Tips for motorists
The electric fuel pump on a VAZ-2114 passenger car is located in the fuel tank, and after the ignition is turned on, voltage is supplied to its terminals through a 15 amp fuse F3 and relay R2, located under the panel on the passenger side in the car interior.
The first thing the driver of the “fourteenth” does after the fuel pump fails is to unscrew the two screws that secure the cover on the right side of the console under the panel, covering three relays and three fuses, and check the integrity of fuse F3, which is located next to two relays located one behind the other and the state of the contacts where the fuse is inserted. If it is intact, you need to check the fuel pump relay (you can replace it), which is located next to the fuse (it is the middle one among the relays available there).
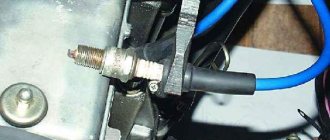
If everything is in order with the fuse and relay, then the driver’s next action will be to get to the fuel pump terminals. To do this, you will have to lift the rear seat cushion and remove the cover at the bottom of the car body by unscrewing the screws that secure it. In the opened hatch you will see three terminals, one of them is negative, and two are positive (gray and black wires), which supply voltage to the fuel pump and fuel level indicator. You have to check whether voltage is supplied to the positive terminal of the fuel pump motor. This can be done using a control lamp. When you turn on the ignition, it should light up for 3-5 seconds (this is the time it takes to pump gasoline from the tank into the fuel rail before turning on the starter).
If the light comes on and the fuel pump does not work, this means that voltage is supplied and you need to check its value using a tester, since if the voltage is below 10 volts, the electric motor of the fuel pump will not start. The voltage drop occurs due to oxidation of the contacts, so you will have to check the condition of the contacts of both the negative and positive wires. You can also check the serviceability of the fuel pump by applying voltage to its terminals directly from the battery using two long wires. If the above actions do not help, then the fuel pump will have to be removed from the fuel tank and either replaced with a new one, or disassembled and looked for a fault inside it (for example, the brushes are stuck or worn out).
In addition to the above reasons, a working fuel pump may stop working as a result of a malfunction associated with the installed security alarm, which blocks the operation of the fuel pump when the engine starts.
One of the most important elements of the fuel injection system of a gasoline engine is the electric fuel pump, which is located in the fuel tank of the car. The fuel pump pumps fuel into the system from the gas tank, creating a certain pressure.
Auto repair experts identify the following common fuel system problems that are related to the fuel pump:
- The fuel pump pumps poorly and does not create the required pressure;
- the fuel pump does not pump when the ignition is turned on;
Considering that the fuel pump is an electromechanical device, the most common fuel pump malfunctions are related to both the mechanical and electrical parts. Next, we will look at what signs indicate a breakdown of the fuel pump and why the fuel pump stops pumping partially or completely.
Read in this article
Fuel pump relay VAZ 2110 2112 2114 2115
The fuel pump relay VAZ 2110 2112 2114 2115 has a significant impact on the operation of the car engine as a whole.
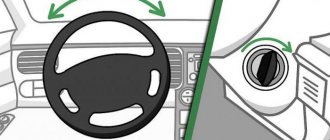
If, for some reason, your car stops starting, and it happens that the power unit doesn’t even “get it”, don’t immediately panic and start looking for an inexpensive tow truck. Try turning the key in the ignition and listen carefully. You should hear a clear hum. This is how the electric fuel pump should hum before the car engine starts. If this does not happen, it means that the gas pump does not supply fuel to the fuel system, which should flow under high pressure into the car’s injector, which is what the gas pump itself is designed to provide. Don’t rush to conclusions and think that the fuel pump is out of working order; often the whole issue is not in the unit itself, but in the fuel pump relay VAZ 2110 2112 2114 2115. This relay is located in the center console on the passenger side. Although, the relay can be quite serviceable and just jump out of its standard socket while the car is moving on rough roads. By the way, the neighboring relay, which, in general, powers almost everything, may also “move away”. According to many VAZ car owners, this nuance is considered a significant oversight by the company’s designers.
It is necessary to carefully get to the console and check the installation of all relays, and indeed the entire structure. In order to remove the entire device, it will take a very large amount of time and the result of disassembly can sometimes be equal to zero, in addition, the entire structure may begin to sag under its own weight, again, during the operation of the vehicle, and the connectors will begin to “pull away” electrical wiring contacts. If the relay is working, when you turn it on, you will hear distinct clicks, and if they are not observed, the VAZ 2114 2110 2112 2115 fuel pump relay will have to be replaced, only after first using the vehicle’s technical instructions, check whether the relay is receiving voltage, and only after that proceed with the replacement.
- Replacing the fuel pump VAZ 2114
- Starter relay VAZ 2110
- Replacing the fuel pump mesh for VAZ 2110
- Turn relay VAZ 2107
- Fuel pump VAZ 2115
No related posts
Signs of fuel pump malfunctions
The main symptoms of fuel pump failure, as well as malfunctions in its operation, are:
- the car starts with difficulty, the engine runs unstable, there are dips, jerking when pressing the gas pedal, etc.;
- the pump does not pump after turning on the ignition, does not turn the starter and does not pump the fuel pump, the engine does not start;
There have also been cases when the fuel pump stops pumping while driving. In such a situation, the engine begins to malfunction and stalls immediately after the remaining gasoline in the fuel line is used up. The problem can occur either regularly or periodically.
Replacing the fuel pump on a VAZ 2114/2115
How to remove the fuel pump?
Before you begin work, you should relieve the fuel pressure in the system. Even when the pump is not working, the pressure can remain very high, which will lead to the pressure of a stream of gasoline during dismantling work.
To reduce the pressure in the fuel system of a car, it is enough to let it stand on level ground for three hours. The fuel pressure in the hoses and pipes will noticeably decrease, and replacing the device will take place without any difficulties.
Not in all cases it is necessary to replace the fuel pump with a new one; sometimes it is enough to simply repair it
Preparing tools
To make all stages of the work easier, you will need to prepare several tools.
As a rule, most car owners have all of them:
- crosshead screwdriver;
- flat screwdriver;
- open-end wrench 17;
- head at 7;
- extension for key.
How to remove a faulty fuel pump in a VAZ 2114/2115
The procedure for dismantling the fuel pump determines the following stages of work:
- Open the hood and disconnect the negative terminal from the battery.
- Raise the rear seat cushion inside the vehicle.
- There is a small hatch under the seat - it is under it that the fuel pump is located.
- Using a 17mm wrench you will need to unscrew all the nuts securing the hatch to the floor.
- Putting the hatch cover aside, you will need to disconnect the two wire blocks. To do this, you will first need to bend the fixing element on the plug.
- Next, using a 17mm wrench, you will need to unscrew the nuts on the fuel line and disconnect the fuel pipes.
- After this, the fuel pump itself will become accessible. Using an extension cord and a wrench, you will need to unscrew all the fasteners that connect the pump to the metal surface of the car.
- The best way to remove the fuel pump is to use a screwdriver to hook it onto the rubber ring.
How to install the fuel pump back
The procedure for installing the fuel pump in the VAZ 2114/2115 is completely reverse: that is, you will first need to insert the device into the cavity under the seat, and then connect all the disconnected wires and tubes. The final stage is closing the hatch and returning the rear seat cushion to its original place.
The ability to independently diagnose a fuel pump failure, as well as quickly replace or repair the device, will be especially useful for those drivers who are accustomed to servicing their car themselves. In addition, the procedure for checking the fuel pump and its repair cannot be considered particularly complex work, so even an inexperienced owner will be able to get the fuel pump into working condition without contacting a service station.
Sources
The fuel pump does not pump: causes and diagnostics
Let's start with the fact that if the gas tank is full, the battery is charged, the spark plugs are dry and there is a spark, the starter turns the engine normally, but the engine does not seize, then you should pay attention to the gas pump. A common problem is that there is no power to the fuel pump after the ignition is turned on. In a similar way, the malfunction manifests itself in motion, when the power to the fuel pump is lost and the engine suddenly stalls.
An equally important point is how much the fuel pump pumps. In other words, the pump may hum and buzz (power is being supplied), but not create the required pressure in the fuel line. The pressure in the fuel system with a working fuel pump must be more than 3 bar (which depends on the specific car model). The indicated pressure is accumulated in the fuel rail and has an indicator of 300 kPa and above.
To check, you need to measure the pressure in the fuel rail with a pressure gauge, taking into account the indicators that are the norm for a specific car model. Using the example of injection VAZs, the pressure when the ignition is turned on is 3 atmospheres, at idle the figure is 2.5 atmospheres, when you press the gas 2.5-3 atmospheres. This method will help you accurately determine:
- malfunction of the fuel pressure regulator in the rail;
- breakdown of the fuel pump or a noticeable decrease in its performance due to wear;
- severe contamination of filters (fuel filter and/or fuel pump mesh);
In the second case, when you press the gas, the pressure does not increase; in the latter case, the pressure gauge needle rises, but very slowly or jerkily.
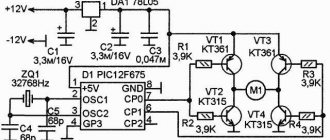
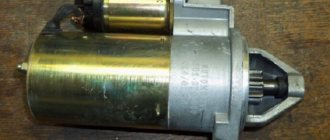
TRIGGER DEVICE
The starter on a VAZ is an electric motor with a mechanical drive for engagement with the flywheel of an internal combustion engine (ICE). The device itself consists of the following parts:
- Main building. It is a metal hollow cylinder, inside of which the electric motor parts are located;
- Stator. The stator is a winding made of thick copper wire, between the turns of which steel cores are placed. The winding is located inside the housing along its walls;
- Rotor. The rotating part of the mechanism, steel plates made of electrical steel are assembled on the shaft, and a winding is located inside the plates. It is also called “anchor”. The armature rotates in the housing bushings - front and intermediate; the rear support of the entire shaft is a bushing in the gearbox housing. There is also a collector on the rotor, which is a set of plates. A magnetic field is created on the collector, which sets the armature in motion;
- Bendix. A gear device that meshes with the flywheel of an internal combustion engine and ensures engine rotation. Placed on the rear of the rotor shaft;
- Brush unit. In model 2114, there are 4 brushes in the assembly. The brushes interact with the rotor commutator, and it is they who create the electromagnetic field;
- Solenoid relay. Unlike a conventional relay, the solenoid relay performs two functions at once - it closes and opens the contacts of the electrical circuit, and with the help of the core it moves the bendix gear to engage with the flywheel of the internal combustion engine.
Other causes of fuel pump malfunctions
Quite often, unprofessional installation of additional electrical equipment or security anti-theft systems leads to the fact that the power to the fuel pump is lost due to mixed up contacts or other connection errors.
Finally, let’s add that the gas pump in the gas tank is immersed in gasoline, in which it is actively cooled. The habit of driving with an empty tank can quickly damage the electric motor of the fuel pump, as it burns out.
What functions does the fuel pump relay perform, signs of breakdown. Where is the fuel pump relay installed, how to properly check the fuel pump relay.
Why does the starter turn normally, but the engine does not catch and does not start? Main causes of malfunction, checking fuel supply and ignition systems. Adviсe.
Diagnose faults that may indicate problems with the fuel pump. Self-check of the device, measuring the pressure in the fuel rail.
The causes of whistling and increased noise during operation of the fuel pump are overheating of the pump. How to diagnose and fix the problem yourself. Tips and tricks.
How to change a fuel pump. Location of the fuel pump, releasing pressure in the system, unscrewing the fuel lines, removing the pump, reassembling.
What to do if the car accelerates worse, does not pick up speed, or has failures during acceleration. Why the engine does not pull, how to find the reason for the decrease in power.
- Signs of breakdown
- Popular breakdowns
- Pump replacement
It's no secret that you can't get far in a car without gasoline. Therefore, for the engine to operate, it is simply necessary that the entire fuel system functions in optimal mode.
Diagnosis procedure
After you are convinced that the fuel pump has failed, you can proceed to the next stage. In particular, it is necessary to understand what exactly the problem is. There can be many options here. The easiest way is to check the integrity of the fuses. Let us remind you that the fuel pump itself in the “fourteenth” is located in the fuel tank. After the ignition is turned on, voltage is supplied to its terminals through fuse F3 and relay R2 - the latter are located in the cabin under the panel on the passenger side.
If the fuel pump fails, the first thing to do is remove the cover located under the panel on the right side of the console. This is not difficult to do - it is secured with two self-tapping screws. Under the cover you will see 3 fuses and 3 relays. The integrity of the above-mentioned F3 should be checked. Also, do not forget to inspect the contacts into which this fuse is inserted. If no problems are found here, move on to checking the fuel pump relay. The easiest way to do this is to borrow something that is known to work from someone you know and try how the car works with it.
If the fuse and relay are good, we move on. The next stage of diagnosis will be to inspect the terminals of the fuel pump itself. To get to them, you must first lift the rear seat cushion. Once you have access to the cover located on the bottom, unscrew the screws holding it. A hatch will open in front of you, in which there are 3 terminals. Please note that black and gray wires lead to the two positive ones. The third terminal is negative. Through them, power is supplied to the fuel pump itself. You will need to check whether there is voltage at the positive terminal, for example, using a test lamp. It should light up for 3-5 seconds after you turn on the ignition.
The light is on, but the fuel pump does not show any signs of life - which means we arm ourselves with a tester and check the voltage level. There should be at least 10 volts here. This is the minimum required value to start the fuel pump. Note that the reason why the voltage has decreased is quite often the oxidized contacts of the positive and negative wires. Accordingly, to fix the problem, you just need to wipe them. By the way, there is another verification option. Take long wires and apply voltage to the fuel pump terminals directly from the battery. In this case, everything will become immediately clear.
Don't forget to also check the ground of the fuel pump - it is attached near the parking brake lever, under the dashboard. This reason is quite common, this point also needs to be checked. With constant use of the handbrake, the mass may well be shifted slightly to the side. Just in case, remove the plastic casing covering the lever, disconnect the mass, clean the contacts and return it to its place.
These are all “external” reasons. If no problems are found here, then you will need to remove the fuel pump and look for the “internal” ones. One of the most common problems is worn or stuck brushes. Another fairly common cause is the motor. You can check it using the same test lamp, having first supplied power to the fuel pump.
Signs of breakdown
There are several situations in which the pump or its components can be at fault. This will definitely have to be checked. Otherwise, you can spend a lot of money buying and installing a new fuel pump, but in the end it turns out that the problem is completely different.
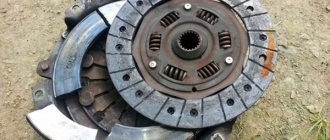
New and old coarse filter
Many people purchase the entire fuel module assembly at once, which includes a filter, sensor, float, intake chamber and the pump itself. Such a purchase will cost approximately 3,000 rubles. It is much more profitable and practical to buy a separate pump, which costs up to 1000 rubles. This is due to the fact that when the pump fails, the remaining elements almost always remain intact and are fully suitable for further use.
Popular breakdowns
Problems with the fuel pump can occur for several reasons. Therefore, your first priority is to determine the source of the problem. These may be:
- Fuel pump fuse;
- Fuel pump relay;
- Pump weight;
- Motor;
- Contacts;
- The pump itself.
If one of these elements fails, it can stop the normal functionality of the entire module.
Let us consider the situations with each of the specified elements of the fuel module in more detail.
Pressure
What exactly is a fuel pump? This is an element of the fuel system that allows fuel to pass through due to pressure. Therefore, if you take pressure measurements, you can get answers to many questions.
Let's give an example of normal pressure readings when checking in certain modes.
Check mode
Normal indicator
At idle
Without pressure regulator tube
When the drain is pinched
When you press the gas pedal
We recommend measuring with a small range of atmospheres on a pressure gauge (up to 7 atm). This will reduce errors to a minimum. Having a pressure gauge at hand will allow you to significantly save on professional diagnostics.
Contacts
The fuel pump includes three wiring:
- Plus (positive);
- Minus (negative);
- Fuel level indicator.
So, failure of the pump may occur due to a simple violation of the integrity of the wires. So if the pressure check shows normal, then we definitely examine the condition of the wiring.
To check, you will need a 12V lamp, which is attached to the external connectors of the pump with positive and negative contacts. Turn the ignition key. If the lamp blinks, contact is present. In this case, you will have to check the condition of the internal contacts.
Motor
If the pressure and wiring are normal, let's try to check the serviceability of the motor. It is this element that is responsible for moving fuel through the system.
- To check it, you will need the same 12V lamp;
- Attach it to any motor terminal;
- Turn the ignition key;
- If the lamp blinks, you will have to get rid of the motor and buy a new one.
Motor
Don't make hasty conclusions. Before checking, look at the condition of the terminals and motor wiring.
Fuel pump weight
The contacts are fine, but the fuel level sensor may provide incorrect information. In this case, you definitely need to check the weight of the pump responsible for dispersing the fuel.
It often turns out that after prolonged use or driving on difficult road sections, the mass simply loses its fastening strength. Accordingly, if the mass falls off, the pump will not be able to work.
The mass is attached to the pump under the dashboard in the area of the hand brake. Therefore, when the driver turns on the handbrake, there is a possibility of hitting the ground contact, which is why it will fall off.
Putting the mass back in place is not that difficult. The problem is caused by the path to it. You'll have to:
Weight
The fuel pump relay is located exactly where the ground is. Therefore, there should be no problems with the search.
With an ideally working fuel supply system, when the ignition is turned on, the relay instantly creates pressure inside the system, and then turns off.
If this process is disrupted, you will have to:
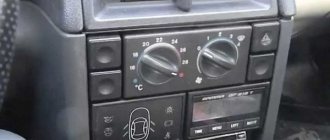
- Lift the front facing panel, which covers the contacts of the audio system and air conditioning;
- Take a look from the front passenger side;
- Find three relays;
- The lowest one is our desired pump relay;
- Turn the ignition key;
- If you hear a characteristic click from the relay, it is working properly;
- If there is no click, check the contacts. The reason is either them or a failed relay.
Fuse
All that remains is to check the condition of the fuse. This stage will make sure who the real culprit of the problems is - the pump itself or its fuse.
Fuse location
- Getting to the fuse is as easy as getting to the relay - through the hood or from the inside. The first option is preferable.
- Raise the hood and look in the area near the windshield.
- There is a dark-colored box located directly on the electronic engine control unit.
- Open the box and look inside for the topmost fuse.
- It has a current strength of 15A, as well as an inscription in English - Fuel Pump, that is, a fuel pump.
- Examine its external condition by removing it from the box.
- If the contacts are intact, then everything with the fuse is normal.
- If burnt contacts are clearly visible, consider purchasing a new device. Its price is affordable, so finding and replacing should not be a problem.
Fuse
Fuse 15 A
One of the final stages of checking a malfunctioning fuel pump is its fuse. Like the relay, the fuse can be seen from the inside. Or you can climb in from the outside, through the hood. Under the hood, closer to the windshield, there will be a dark box, right on the electronic control unit. You need to open it and find the topmost fuse with a current of 15 A and the English inscription fuel pump. We take it out and look at the insides: the contact is not damaged - the fuse is alive. The contact is damaged (blown) - you need to install a new fuse. As with the price of the relay issue, buying and replacing a fuse will not be a big waste of money and time.
Not every master's hands grow from the right place. For this reason. The reason that the fuel pump does not pump can be simple stupid shortcomings of simple tuning.
For example, the alarm was installed in such a way that all the contacts were mixed up, and power simply does not go to the fuel pump. Not because the alarm should not be on the car, or the wiring system is acting up, it’s just that the person who installed it didn’t have enough brains and practice. Check all connections carefully if you decide to add some style to your little one.
Or anti-theft. The button is placed in such a way that it interrupts the integrity of the fuel pump ground contact system, and almost always fails. By the way, if you have such a lotion, I don’t think it will be very effective in the absence of a signal. And if there is a signaling system, then anti-theft is not needed at all.
In any case, remember: in any situation where a VAZ breaks down, the point is not that it is a VAZ, and it was made poorly. It’s just that the Russian auto industry is a little more delicate than the foreign one, it requires a little more attention and your ingenuity.
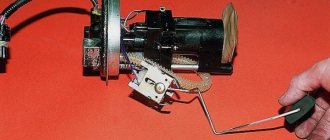
Pump replacement
Most modern cars are equipped with fuel pumps, which are located inside the fuel tank itself. Because of this, getting to it is quite difficult and such placement raises a lot of questions.
In the case of the VAZ 2114, you can raise the rear seat, under which there is a rectangular hatch. By opening it, you will have access to the pump, a sensor with a float and a coarse filter - a mesh. That is, if necessary, you can easily replace a filter or other element.
Checking the electrical circuit
In case of inoperability (lack of fuel supply), the electrical circuit of the VAZ 2114 fuel pump requires checking. The algorithm of actions is as follows:
- When you turn on the ignition, you should hear a click from the relay; if there is none, then either the relay is faulty or the contact is broken;
- During normal operation, check the integrity of the fuse, and if it blows, replace it with a serviceable one with a rating of 15 A;
- The serviceability of the relay can be checked by connecting a piece of wire to the sockets to which gray and pink wires fit.
During normal operation, the sound of the pump motor should be clearly audible in the cabin. If the problem persists, you must provide access to the pump unit, which is located under the rear seat on the right side. Lifting the seat and bending the trim, you can see the hatch, which is secured with two self-tapping screws. After removing the hatch, we gain access to the fuel pump. Next we check this way:
- Disconnect the chip from the block;
- Use an ohmmeter to check the continuity of the black wire with the gray stripe. Its resistance should be close to zero.
- Connect the voltmeter to the gray and black wires with a gray stripe. When the ignition is turned on, the voltmeter should show the battery voltage.
If the voltage is greatly underestimated, then there are two reasons for the ground wire being in good working order:
- Burning of the relay contact group;
- Broken power cable.
The relay is checked by installing a jumper, and the wire is tested with an ohmmeter with the ignition off. To do this, you will need a piece of any conductor about two meters long. The additional wire is connected to the relay socket to the terminal with the gray wire. The second end of the wire is connected to one of the voltmeter probes. The second probe touches the socket with the gray wire on the pump harness chip. As with the ground wire, the resistance should be close to zero. Practice shows that the most common cause of failure is unreliable fastening of the ground wire to the car body. To access the mount, you need to remove the console trim near the parking brake handle. The wire terminal is screwed to the housing using a self-tapping screw. As a result of incomplete tightening, the contact weakens and burns. You should unscrew the screw, thoroughly clean the contact area and securely fasten the terminal.
Mechanical fuel pump for carburetor engine
A mechanical fuel pump was installed on the VAZ 2109 and earlier models, and currently on the VAZ 2110, 2111. It pumps up a pressure of 20-30 kPa, pumping at least 60 liters per hour.
To check the functionality, disconnect the hose between the fuel pump and the carburetor - gasoline under slight pressure should spray out. Then direct the hose into any container and turn the engine with the starter - if it pumps half a liter in 30 seconds, then everything is in order. If not, then you need to restore the system.
To do this you need:
- Bleed the fuel line with compressed air (between the pump and the gas tank)
- Check the cleanliness of the valves and filter mesh in the fuel pump
- Remove the adjusting shim from under the fuel pump
Injector
The two main causes of failure are electrical and mechanical.
There are several basic options for checking the fuel pump at home:
- Using a light bulb (checking power supply)
- Using a pressure gauge (check for mechanical wear)
- Using a measuring container
- Checking wiring with a light bulb (electrical)
If the fuel pump does not produce characteristic sounds when you turn on the ignition, you must first check whether voltage is supplied to it. A regular 12 V light bulb connected between the gray and black wires at the fuel pump terminal should light up when the ignition is turned on.
Video tutorial on checking the fuel pump
If the light bulb does not light up, or does not light up at full intensity, you need to check all contacts:
- Plug blocks
- Relay
- Circuit breakers
Often the reason lies precisely in the little things. To check, the relay and fuse can be swapped with a known good one. The contacts in the plug blocks may have broken off or oxidized. It is advisable to clean them and test them with an ohmmeter.
On VAZ 2112, 2114, 2115, etc., with an injection engine, an alarm can be installed that turns off the power to the fuel pump. In this case, you can turn on the pump directly from the battery or dimensions (turn on the light - it works).
Diagnostics
The fuel pump does not pump on the VAZ 2115.
A malfunction of the VAZ 2114/2115 fuel pump can be caused by:
- malfunctions in the device’s power supply circuit;
- failure of starting and protection elements (relay and fuse);
- wear of electric motor parts.
Checking the electrical circuit
At the beginning of the diagnosis, you should check the electrical circuit of the fuel pump. To do this you will need:
- car tester (multimeter);
- crosshead screwdriver;
- two pieces of wire about 2 m long.
Checking the electrical circuit is carried out in the following order:
- Turn on the ignition without starting the engine. When the key is in the first position, a click should be heard, characteristic of turning on the relay, followed by a slight whirring of the pump electric motor. If there is no click, the relay is faulty or is not receiving power. If there is a click, but no buzzing, the wiring coming from the relay or the pump motor itself is faulty.
- Under the glove compartment, find an additional mounting block consisting of three relays and three fuses. The pump relay is located in the middle, and the fuse is located to the left of it. Remove the fuse from its socket, test it with a multimeter, and if the result is negative, replace it. When replacing the fuse, please note that it is rated for a maximum of 15 A.
- Set your multimeter to voltmeter mode. Connect one probe of the device to the relay terminal to which the pink wire fits, and the second to the car body. Turn on the ignition. The device should show the on-board network voltage in the range of 11.7–12.4 V. If there is no voltage, the problem may be a broken wiring or a malfunction of the ignition contact group. In this case, it is better to contact an auto electrician. If power is supplied, check that the relay is working. With the ignition on, use a screwdriver or a piece of wire to close the contacts to which the pink and gray wires go. This closes the circuit bypassing the relay. If the fuel pump works, replace the relay.
- Be sure to check the connection of the pump's negative wire to ground. Often it is the lack of “ground” that causes interruptions in the operation of the fuel pump. Remove the plastic trim from the center console near the parking brake handle. Under it there is a “negative” wire of the pump, screwed to the body with a self-tapping screw. Unscrew it, clean the contacts, screw it back and repeat the test.
- Then check the fuel module. Remove the rear seat, peel back the carpet and sound insulation. Unscrew the two screws securing the gas tank flap and disconnect the electrical connector on the fuel module cover. Using two wires, supply power to the pump directly from the battery. If the pump works, the wiring is faulty; if it doesn’t work, the pump itself is faulty.
Pressure check
If the pump is working properly, but the engine begins to operate intermittently, you should check the fuel pressure in the system. For this you will need:
- pressure gauge (can be a tire gauge with a measurement limit of 5–7 kPa);
- petrol-resistant hose with a diameter of 10–12 mm and a length of 50–80 cm;
- two clamps for a hose of the appropriate diameter;
- Phillips screwdriver;
- nipple cap;
- dry rag.
The verification procedure is as follows:
- In the engine compartment on the engine fuel rail, locate the pressure measuring fitting (on the right side).
- Remove the plastic cap (plug) from the fitting.
- Using the nipple cap, unscrew the spool valve from the fitting. When unscrewing the spool valve, fuel may spray out of the fitting. To remove it, use a dry cloth.
- Place one end of a gas-resistant hose onto the fitting and secure the connection with a clamp. Connect the other end of the hose to the pressure gauge fitting and also tighten the clamp.
- Ask an assistant to turn on the ignition. Wait a few seconds and watch the meter readings. With a working pump, the pressure gauge should show a pressure of 2.8–3.2 kPa for engines with a volume of 1.5 cm3 and 3.7–3.9 kPa for engines of 1.6 cm3. If the pressure is noticeably higher, the pump is faulty.
Using a pressure gauge
If in the event of a malfunction with the electrical supply of the fuel pump, everything is clear - either it works or not, then mechanical wear is more difficult to determine. There are several techniques for this.
You can estimate the fuel pressure if you unscrew the fuel rail plug and drain gasoline from the spool. There should be a powerful jet. Next, we unscrew the spool itself and connect a pressure gauge, preferably a fuel one, but you can also use one that measures the air pressure in the tires. Turn on the ignition and see how much the pump has pumped. It must be at least 280 kPa, on some models 380 - 400 kPa. To make it clearer, this is 3.8 - 4 kgf/cm2.