The front, rear, right and left doors on a Lada Vesta car consist of a frame with opening mechanisms and window lifters inside, with door stops on the side. This entire structure is covered with door cards. The outside of the door is equipped with protective moldings that protect against scratches.
The owner of a Lada Vesta may need to remove or disassemble the doors of his car, or their components for repair or replacement. In case of replacement, you must be sure that the replacement will be with original components. Manufacturer's doors have their own article number. Front right - 8450039385, left - 8450039379, rear right - 8450039383, left - 8450039380. Read the article to the end and close the questions for yourself: removing, modifying the limiters, the issue of moldings, you can remove the trim, also known as the door card. The battery is dead, no problem, the doors can be closed anyway.
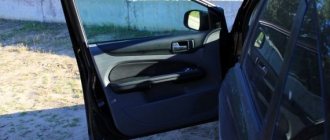
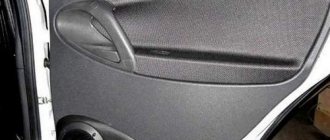
How to remove the trim (door cards) of the front doors on a Lada Vesta
The casing is removed to repair the mechanisms that are installed under it, or in case of some modification. The tools you will need are a flathead screwdriver and a socket wrench with a T20 (star) bit.
The following sequence of actions is performed:
- Remove the side mirror triangle. The part is pryed off with a screwdriver and the latch is snapped off. Then disconnect the block with wires;
- The doors are pryed up from the bottom, then the lampshade is removed and the wires are disconnected from it;
- Using a wrench, unscrew the three screws securing the casing from below;
- They find a plug from the top end and take it out. Unscrew the fastening screw that is screwed in behind it;
- Another screw is found and unscrewed inside the door handle;
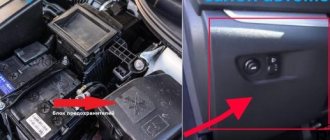
- Carefully pry up, remove the unit that controls the exterior mirrors, power windows and central locking, disconnect the wiring from it, unscrew the fasteners located perpendicular to the door part;
- Starting from the bottom, insert a screwdriver between the door and the trim until all the latches are released.
Tip: To avoid scratching the card, it is recommended to wrap the sharp parts of the screwdriver with electrical tape or a soft rag.
How to remove the rear door door card
You will need the same set as for working with the front ones, plus a 10mm socket wrench. Instead of a flat-head screwdriver, you can use a set of spatulas for working with the interior. The sequence of actions looks like this.
Remove the window handle. To do this, insert a screwdriver or a spatula between its middle mount and the bottom washer, and pull the protrusion on the middle part outward. When the protrusion is pressed out, the middle part is pulled out. Then remove the handle from the slot of the window regulator, the base of the handle, and the round plastic washer. Insert the tool between the door handle and its trim, then remove the trim. There are two bolts screwed under it, which we unscrew with a wrench. At the very bottom of the card, find a self-tapping screw and unscrew it using an asterisk attachment. Now the covering is fixed only on plastic pistons and velvet. The card is pryed up, starting from the bottom, and all the latches along its perimeter are snapped off. Then remove the card from the velvet.
Attention: the pistons are quite fragile, so you need to have some spare ones to install the casing in place.
How to remove the door trim on a VAZ 2114 and 2115
Removing the trim on Lada Samara cars, such as the VAZ 2114 and 2115, is a fairly common task for many car owners, and they have to do this for completely different reasons, the main ones of which are given below:
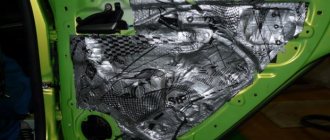
- When soundproofing doors from the inside
- To repair or replace glass, lifts, or door opening and closing mechanisms
- For installing an acoustic system that does not fit in standard places on the casing
So, to remove the casing yourself, you will need a minimum of tools, namely:
- Flat and Phillips Blade Screwdriver
- Sharp and thin knife
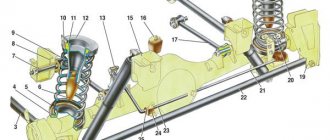
Replacing door stops
Door stops are used to secure doors. If they do not work correctly, they have to be replaced. In their place, you can install both stoppers directly for the Lada Vesta, and stoppers for the rear doors of Ford Focus 3. The part number for the foreign car is 1726441. Their dimensions are almost identical to the standard ones. Except that the stud for the nut is a little wider. The replacement scheme looks like this:
- Remove the door card;
- Remove the mounting screw from the body side using a replaceable Torx T40 socket;
- Unscrew the nuts at the place where the limiter is attached to the door using a 10mm wrench;
- Install the new part in reverse order.
Rear door trim
For the rear door, the instructions are similar (we skip some points).
If you are interested in tuning or modifications, then after removing the door trim, we recommend installing additional sound insulation. This will not only reduce road noise and eliminate squeaks, but will also significantly improve the sound quality of music.
Keywords: Lada Vesta doors
Found an error? Select it and press Ctrl+Enter..
Similar materials
Top materials
News
Tuning
Are you satisfied with the standard low beam of the Lada Vesta?
Lada.Online
Lada (“Lada”) is a brand of cars produced by AvtoVAZ JSC. Previously, it was used only for export cars, and for the domestic market, cars were produced under the Zhiguli brand. In 2004, the management of AvtoVAZ announced the transition to the Latin alphabet for the official spelling of the names of all cars produced by the plant: Lada - instead of "VAZ" and "Lada".
Moldings
The installation of moldings on the Lada Vesta was not provided for. During its development, it was believed that their decorative function would be performed by X-shaped stampings, which are also necessary for the recognition of this model. However, manufacturers of automobile accessories have started producing and selling moldings made for installation on this car. Before purchasing and installing them, you need to understand what they are for.
Initially, this is a decorative function. There is no point in disputing the installation of parts to improve the appearance, since it depends on the preferences and taste of the car owner.
The manufacturer claims the protective function of the moldings. It is believed that door moldings installed along the lower edge serve as additional protection for the car's paintwork. The buffer and shock-absorbing function of the moldings is also indicated. If, when opening, the door hits an obstacle, then they will protect the metal from damage and the appearance of dents. However, remember that such protection will work in the event of a minor collision with a low vertical object. A collision at an angle can still damage the door edge. And if the impact is strong enough, the molding and the metal underneath will still be damaged.
Another issue that must be considered before installing moldings is moisture drainage. Since they are hollow inside, condensation begins to accumulate underneath them over time. And although there are small cuts on the back side for its removal, their number and size are clearly not enough for this, which leads to the formation of areas with metal corrosion under the moldings.
If, however, it was decided to install these elements, then you can do it yourself. To do this, the surface of the part is thoroughly washed and dried. Then degreasing is carried out with anti-silicone and the activator, which is included in the delivery set, is applied to the gluing site. Next, remove the protective film from the mounting tape located on the back side. And carefully glue the moldings. If it is necessary to strengthen the fastening, then glass glue or sealant is used for this.
Important: The bulk of the moldings that are sold on the Russian market are made in black shagreen. Painting any other color will require additional investment.
conclusions
Making minor modifications to the door handles of a Lada Vesta car is not particularly difficult. This does not require any special skills or complex tools, so anyone can cope with the task. The driver just needs to remember that removing external and internal elements requires care and caution, since the plastic on Vesta is quite fragile.
Complete replacement of handles if necessary is also not a problem. In online stores or on shelves, you can purchase sets of a suitable color, or cover parts that have lost their appearance with plastic covers.
Seals
The seals from the manufacturer fit quite tightly in all places except the gap between the front and rear doors. This can be corrected by installing the RKI-19 seal, article number - 000017504293020.
Before installing it, the trailing edge must be cleaned and degreased. Before installation, it is recommended to warm up the seal for a couple of minutes at a temperature of 40 - 50 degrees. This is done to give it elasticity. Then, in an area of 5 - 7 cm, peel off the protective tape and fix the seal to the upper edge of the door flange. Then, removing the protective tape in areas of 5 - 10 cm, glue it along its entire length, avoiding stretching the material.
Sometimes, for better insulation, the rear part of the tailgate is also modified. To do this, use a universal D-shaped seal. Size 14x12 mm.
How to close the doors without an alarm - the battery is dead
There are situations when you cannot lock the car using the key fob. Often, this happens when the battery in it is low or the battery of the car itself is low. Naturally, in this case, the central locking will not work. Therefore, you will have to close the doors using the ignition key. For this purpose, the manufacturer provides some design features in their locks.
All doors, except the driver's door, have a groove with a lock button in the locks. The ignition key must be inserted into this groove and pressed down. The button should go down. Then the door is slammed, and it should already remain closed. Such actions will have to be repeated with each door except the driver's, which is closed last simply with a key. The lock on it is located to the right of the handle and is covered with a cap, which must be pryed off and removed.
Help: The same caps are also on the handles of other doors. But they cannot serve to close them. They are used when you need to open the car from the outside using just a key, without a key fob.
You can use the lock button. To do this, press it for a few seconds with the driver's door open. After clicking, the three doors will close back and forth. The lock indicator should be on. Then the driver's door is locked with the key.
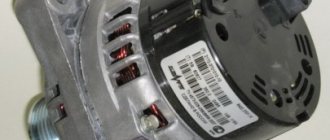
System design
In addition to the control unit, the central locking system also includes input sensors and actuators (actuators).
Input sensors
These include:
- door limit switches (limit switches), transmitting information about the location of car doors to the control unit;
- microswitches that fix the position of the structural elements of the door lock.
Microswitches perform different functions.
- Two of them are designed to fix the cam mechanism of the front doors: one is responsible for the lock signal (closing), the second – unlock (opening).
- Also, two microswitches are responsible for fixing the position of the central locking mechanisms.
- Finally, another switch determines the position of the lever mechanism in the lock drive. This allows you to evaluate the position of the door relative to the body. As soon as the door is opened, the system closes the switch contacts, as a result of which the central locking cannot operate.
The signals sent by each of the sensors enter the control unit, which transmits commands to the actuators that close the doors, trunk lid and fuel tank flap.
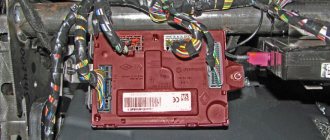
Control block
The control unit is the brain of the entire central locking system. It reads information received from input sensors, analyzes it and transmits it to actuators. The ECU also interacts with the alarm system installed on the car and can be controlled remotely using a remote control.
Actuator
The actuator is the final link in the chain, responsible for directly locking the doors. An actuator is a DC electric motor that is combined with the simplest gearbox. The latter converts the rotation of the electric motor into the reciprocating movement of the lock cylinder.
In addition to the electric motor, the actuators used a pneumatic drive. For example, it was used by manufacturers such as Mercedes and Volkswagen. However, recently the pneumatic drive has ceased to be used.
The door does not open from the inside - what to do?
If the handle does not open from the inside, you must first check the locking system. looking at its indicator.
If everything opens normally from the outside, but it cannot be opened from the inside, then check the position of the “child lock” lever. This mechanism is designed to prevent children sitting in the rear seats from opening the door. Moreover, this does not depend on whether the car is moving or not. The door opens from the outside without any problems.
To disable the child lock, you need to find its lever, located next to the main locking mechanism. To unlock it, it must be moved to another position. Each door handle has its own lock; to fully unlock it, you need to disable the mechanism on each specific door. It cannot be disabled if the lock is enabled and the battery is discharged or disconnected.