Replacing the starter on a VAZ-2104-2107
A car starter is the main element of the engine starting system, and is designed to start it by cranking the crankshaft.
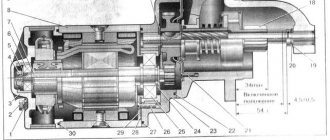
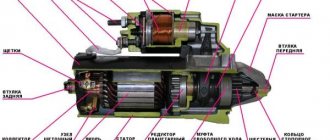
Essentially, it is a direct current electric motor driven by closing an electrical circuit by turning the ignition key. The autostarter consists of a stator, an armature (rotor), a brush holder with brushes, as well as a traction relay and a drive.
In all VAZ classic models, incl. and in the “seven”, it is located at the bottom of the engine, and is attached to the clutch housing.
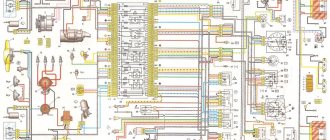
Integrated power supply diagrams for VAZ 2104
All VAZ 2104 systems that consume electricity are switched over a single-wire line. The sources of electricity are the battery and the generator. The positive contact of these sources is connected to electrical devices, and the negative contact goes to the body (ground).
Electrical equipment of the VAZ 2104 is divided into three types:
- working equipment (battery, generator, ignition, starter);
- auxiliary operating equipment;
- light and sound alarm.
When the engine is turned off, all electrical equipment, including the starter, is powered by the battery. After the engine is started by the starter, the generator becomes the source of electricity. At the same time, it restores battery charge. The ignition system creates a spark discharge to ignite the fuel-air mixture entering the engine. The functions of the light and sound alarm include external lighting, interior lighting, turning on the headlights, and sounding a sound signal. Electrical circuits are switched through the ignition switch, which consists of an electrical contact unit and a mechanical anti-theft device.
The VAZ 2104 uses a 6ST-55P battery or similar. Synchronous generator 37.3701 (or G-222) is used as an alternating current source. This is a three-phase generator with electromagnetic excitation and a built-in rectifier unit based on silicon diodes. The voltage taken from these diodes powers the rotor winding and is supplied to the battery charge indicator lamp. On cars with a 2105–3701010 generator, this lamp is not used, and the battery charge level is monitored by a voltmeter. The generator is mounted on brackets in the right (in the direction of travel) front part of the engine compartment. The generator rotor is driven by a crankshaft pulley. The starter 35.3708 is attached to the clutch housing on the right side of the engine, protected by a heat-insulating shield from the exhaust system pipe and activated by an electromagnetic remote control relay.
The VAZ 2104 uses a contact ignition system, and in cars manufactured after 1987, a contactless ignition system. The contact system contains the following elements:
- a distributor-breaker designed to open the ignition coil circuit with a low voltage current and distribute high voltage pulses across the spark plugs;
- ignition coil, the main function of which is to convert low voltage current to high voltage current;
- spark plug;
- high voltage wires;
- ignition switch.
The contactless system consists of:
- a distribution sensor that supplies low voltage control pulses to the switch and distributes high voltage pulses across the spark plugs;
- a switch designed to interrupt the current in the low voltage circuit of the ignition coil in accordance with the signals of the distribution sensor;
- ignition coils;
- spark plugs;
- high voltage wires.
Current is constantly supplied to electrical circuits:
- sound signals;
- brake lights;
- cigarette lighter;
- interior lighting;
- portable lamp sockets;
- emergency light signaling.
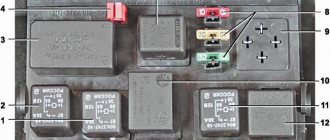
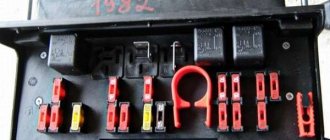
To switch and protect electrical appliances from voltage surges, in a special niche in the engine compartment there is a mounting block with fuses and relays, the purpose of which is schematically indicated on the cover of the block. The standard unit can be removed, the board can be replaced, or its conductive paths can be restored.
On the dashboard of the VAZ 2104 there are power keys:
- external lighting fixtures;
- fog lights;
- heated rear window;
- interior heating.
The light alarm button is located on the protective cover of the steering column shaft, and under the column there are switches for low and high beams, turn signals, wipers and windshield washer.
Electrical diagram of VAZ 21043 and 21041i (injector)
Models VAZ 21043 and 21041i (sometimes incorrectly designated as 21047) have identical power supply circuits. All electrical equipment of these cars is similar to that of the VAZ 2107.
The export version of the VAZ 2104 and VAZ 21043 additionally includes a wiper and heated rear window. Since 1994, this scheme has become the standard for all produced fours. After the appearance of injection models, the scheme was slightly changed. This was also due to the appearance of a five-speed gearbox, electrical equipment and interior from the VAZ 2107, as well as electronic components that control engine operation.
Electrical diagram of VAZ 2104 (carburetor)
The distinctive features of the electrical equipment of the VAZ 2104 in the first years of production include:
- generator G-222;
- ten-pin hazard warning switch;
- five-pin relay for direction indicators and hazard warning lights;
- top (dead) point sensor of the first cylinder;
- diagnostic block;
- rear window heating indicator lamp;
- two-position exterior lighting switch and three-position light switch located under the steering column;
- absence of a carburetor air damper warning lamp.
Malfunctions
Considering that the starter is a complex electrical device, malfunctions in it can occur quite often, but most of them can be eliminated through repair. Malfunctions that cannot be repaired and require replacement of the entire assembly include:
- damage to the commutator due to brush wear or other reasons;
- short circuit or break in the stator winding;
- short circuit or break in the armature winding;
- complete wear of the armature bearing bushings.
If the above faults are detected, it is better to replace the starter with a new one. Otherwise, your car will either not start at all, or serious problems may occur in the on-board electrical circuit of the car.
The catalog number of the original “seven” starter is 2107.3708010-01. Its price is approximately 2500-3000 rubles. You can also purchase improved models - starters with a built-in gearbox, which are very popular today.
Their advantage is that even if the battery is partially discharged, the starter, due to the gearbox, provides a sufficient number of flywheel revolutions to start the engine. The price for such models starts from 3,500 rubles. The cost of replacing a starter at a service station averages 500-600 rubles.
The starter does not turn (does not work). Main reasons
Probably the most unpleasant thing that can happen is when you get into the car with thoughts of a good trip, turn the ignition key, and in response there is deep silence. And at this moment you remember all the swear words and pour them on your car. And it’s even worse when it’s -30 outside and you’re already frozen to the bone. But let’s not talk about sad things, but let’s simply break down the main reasons for a non-working starter.
BUT! Before doing this, be sure to pay attention to other possible causes of malfunction. Because in 90% of cases, the problem of a non-working starter lies in completely different non-working elements.
First of all, you should pay attention to the following elements:
1) Low battery.
The most common problem in this case! It is especially relevant in winter! In this case, you need to charge. replace the battery, or warm it up (if the problem occurs in winter) or light it.
The main sign of a bad battery will be the noise of the relay operating when you turn the ignition key! But if the battery is “healthy” and the noise of the relay being activated is present, then see the next point.
In general, starting the engine in winter is a separate issue. Which will be the subject of a separate article!
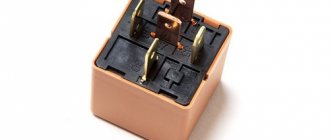
2) Lack of ground to the solenoid relay.
Pay attention to the reliability of fastening the negative wire from the battery ground to the starter solenoid relay. If necessary, clean and re-attach the mass to the starter retractor.
3) Open circuit in the ignition-starter circuit
When you turn the ignition key, and in response there is empty silence, even the relay does not work, then the problem lies in the ignition contact group.
First of all, check for contact from the ignition to the starter. If everything is in order with this, then we move on to the solenoid relay.
Starter malfunctions
Above we described the most common reasons for a non-working starter. As you understand, the malfunctions described above are not directly related to the starter. Therefore, before removing and replacing the starter, carefully check all 3 points stated above again. Below we will look at the problems with the starter itself. Next we will talk about the elements of the starter itself.
4) Defective solenoid relay
There is nothing left to do but replace it (How to replace the solenoid relay?). But first, again, pay attention to the retractor terminals. In 90% of cases, they need to be cleaned. If, when you try to start the car with the key, you hear clicking sounds, then the problem is most likely in a discharged battery, but if it is charged, then there is a problem with the relay contacts. If there are no sounds or clicks, then the relay winding has burned out (in this case it needs to be replaced).
5) The brushes do not fit tightly to the commutator
6) Severe commutator wear
If you still haven’t figured out what the problem is, try starting the car from a pushrod (How to start from a pushrod?) and drive to a service center.
Replacement
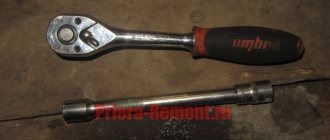
- socket wrench 10;
- socket wrench with extension 13;
- screwdriver.
Work order
- We place the car on a viewing hole or overpass and secure it with the parking brake.
- Open the hood and disconnect the ground wire from the battery.
- Using a 10mm socket, unscrew the bolt of the lower fastening of the starter heat shield.
- We dismantle the air filter housing and the warm air supply hose (for injection units, remove the fastenings of the intake pipeline).
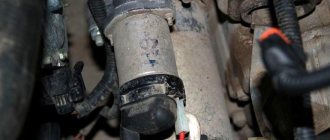
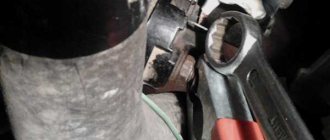
- Using a socket wrench with a 13 mm extension, unscrew the 3 bolts securing the starter housing. It is better to unscrew the bottom bolt from the inspection hole.
- Using a 13mm wrench, unscrew the nut (on the injection engine there are two nuts) securing the starter shield. Let's take it out.
- Using a socket wrench with a 13 mm extension, unscrew the 3 bolts securing the starter housing. It is better to unscrew the bottom bolt from the inspection hole.
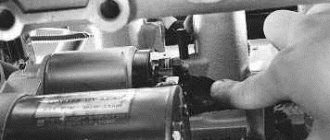
- Using the same tool, unscrew the nut securing the tip of the wire going to the “+” battery.
- Disconnect the start relay wire.
- We remove the starter from the rear wall of the engine compartment.
- We install a new starter in its place.
- We carry out installation work in reverse order.
Connection diagram and possible difficulties
To prevent a starter failure from taking you by surprise, let’s look at how to replace it yourself. But before we talk directly about connecting the VAZ 2107 starter, you should find out how to dismantle the old element. The only problem you will encounter is the inconvenient location of the part; both carburetor and injection models suffer from this.
We install the car above the inspection hole, since the unit can only be reached through the bottom. Be sure to turn off the ignition. Then remove the battery cover and disconnect the ground terminal. To free access, the battery must be removed, and we do this together with the support. It's time to unscrew the wire harness clamp and remove them from the traction relay. And the last operation is to unscrew the bolted connections that secure the part.
Next, we are interested in the connection diagram for the starter on the VAZ 2107. Having installed the new element in its regular place, we screw the longest bolt first, and then we fix the remaining fasteners. We install back the wire terminals, harness supports and battery. We connect the battery and do not forget to replace the protective cover and the dirt shield.
For non-carburetor models, some inconvenience may arise during installation, so when replacing a VAZ 2107 injection-type starter, it would be useful for the owner to remove the inlet pipe extension.
With careful attention and no haste, this entire operation is unlikely to pose any complications, so even an inexperienced car owner will be able to handle the replacement process. The scheme is already known, and for clarity, we tried to duplicate all the steps with photographic materials; now everyone can change the starter on a VAZ 2107. The main thing is to choose the right mechanism for your car, and the principle of operation can be either conventional or geared; when replacing, many do not miss the opportunity to acquire a more complex but effective mechanism.
Today we will tell you how to independently remove and, if necessary, replace the starter on a VAZ-2110 and similar modifications of cars. The procedure is not complicated enough, the tools we need are a 13 key, a 15 key, a little time and straight arms. It is better to perform the procedure on a cooled engine to avoid injuries in the form of burns.