What are pants in a VAZ 2115 engine?
- Registration
- Entrance
- To the beginning of the forum
- Forum Rules
- Old design
- FAQ
- Search
- Users
Maybe put two gaskets.
Maybe put two gaskets.
I don’t care either hehe. I still think it all depends on the landing gear and whether the exhaust system is caught on anything
My pants most likely pulled when I grabbed the steam resonator, although I later tried to straighten them out, but the result was zero, just replacing the pants, but now damn it, the muffler is still burned out
I changed my pants for new ones - it still hurts
Another option is hot sealant. Only after tightening the connection do not start it for at least 8 hours. In general, copper nuts are evil.
And look at the surfaces of the manifold and pants - where the cut begins, a path usually burns out, and the new gasket will also burn out along it. The medicine is a sealant (hot, usually red). Apply over the entire adjacent surface. Only if you give gas under load until the cutoff, it will still burn out (press through).
They also put a damper for these vibrations between the pants and the resonator (I don’t remember what it’s called). It costs us about 1000. It's no fun to pay. The cuts and cuts are not very annoying, and I’m already used to it, and not much) But I suffered for a long time at first. Every week I changed the gaskets and tightened the nuts
Regarding graphite, it’s a good idea, but then the nuts may come loose.
Talk about fantasies - recently it went wrong, it turned out that one of the nuts was half unscrewed, and the second simply flew away. Without any graphite. I just bent the locking plate badly when I changed my pants.
Z.Y. And if you make a bellows (aka corrugation), just cook it, I tried it on self-tapping screws with sealant - namu. I took it off and threw it away, it always breaks.
My pants most likely pulled when I grabbed the steam resonator, although I later tried to straighten them out, but the result was zero, just replacing the pants, but now damn it, the muffler is still burned out
Another option is hot sealant.
My pants most likely pulled when I grabbed the steam resonator, although I later tried to straighten them out, but the result was zero, just replacing the pants, but now damn it, the muffler is still burned out
I changed my pants for new ones - it still hurts
the master said you put in crappy gaskets, they burned through, the gap increased and hello to the silence - it was China or something, cardboard was present - in general, he chose the one he needed in the store and still haven’t known the problem for a year now. Additionally, I installed locking plates - there are factory ones in the Murzilka. T
Well, which ones should be installed, there are three types: 1) asbestos-containing 2) non-asbestos 3) metal?
I installed one like this and it burned out the next day
then I installed 2 of these - it was quiet for about a week, then it started to hook somewhere
I'm looking at this and a change of pants
Source
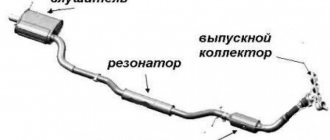
All about the exhaust system of the VAZ 2115. Design, breakdowns and repairs
Design features and modern exhaust system on the VAZ 2115. Perhaps the topic is not very relevant, but many drivers do not really know what it consists of and how it can be repaired in the event of a breakdown. Agree that speeding through the city with a wild exhaust from behind is not to the liking of many. The volume of sound from the muffler depends on how smoothly it works.
The main purpose of the system is to remove exhaust gases from the car engine through pipes and channels. Most often, malfunctions occur due to mechanical damage, due to wear or negative influence of weather. Let's look at what it consists of and what are the main ways to fix breakdowns below.
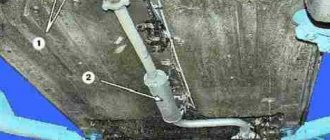
VAZ 2114, VAZ 2115, replacement of the exhaust pipe and its gasket, replacement of pants. Video instruction
While driving along an uneven road, the car was slightly hit by the muffler, as a result of which the exhaust pipe (pants) tore. In the video we will show you how to replace the pants and the gasket under the exhaust pipe with your own hands on VAZ 2114, VAZ 2115 cars.
To work, we need a wrench and a 13mm socket, a long knob. We lift the car or drive onto an inspection hole or overpass. We begin to unscrew the muffler fastenings:
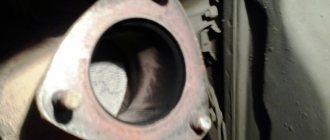
Unscrew the 4 copper nuts of the exhaust pipe (pants):
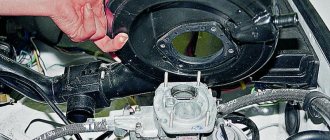
To do this, we use a long wrench, creating maximum leverage; usually they give in very hard and turn sour, but we unscrewed them without any problems. Take off your pants and disconnect the plug with the wires. Use a screwdriver to pry out the old exhaust pipe gasket:
We install a new pant gasket:
We install a new exhaust pipe and assemble the muffler in the reverse order.
Video of replacing the exhaust pipe (pants) and gasket in a VAZ 2114, VAZ 2115:
Backup video on how to replace pants (exhaust pipe) and their gasket in a VAZ 2114, VAZ 2115:
Source
Removing and installing the catalyst
Work on removing a faulty catalyst can only begin after this element of the exhaust system has completely cooled down. Remember that the catalyst heats up much more than pipes and mufflers. Therefore, it takes longer for it to cool completely than in the case of replacing mufflers.
The neutralizer is dismantled in the following order:
— First, unscrew the bolts that secure the catalyst to the additional muffler. We disconnect the pipes.
— Now unscrew the bolts securing the catalyst to the exhaust pipe of the exhaust system.
Remove the bolts and spring washers. We remove the catalyst from under the car.
What is this?
Engine overhaul refers to the work of a master aimed at returning the engine to a state as close as possible to its original state. In this case, most of the nodes are changed or restored. This type of repair is resorted to when there is a lot of wear on the parts of the unit.
The list of work may include grinding the crankshaft journal and camshaft, installing new pistons and springs, and honing the cylinders. If too many engine components are faulty, then it is more advisable to completely replace it.
The following signs indicate that it is time to overhaul the engine on the VAZ-2114:
- The appearance of red, black or dark gray carbon deposits on the spark plugs.
- Increased oil consumption.
- The occurrence of knocking in the engine.
- Increased fuel consumption.
- The appearance of smoky exhaust.
- Bad traction.
- Engine overheating.
- At idle, the engine runs unevenly.
- Reduced power.
Major repairs proceed approximately according to this scheme:
- Preparing the engine for dismantling (disconnecting wires, hoses, gearbox).
- Removing the engine.
- Removal and inspection of the cylinder head.
- Disassembling the unit for diagnostics and cleaning.
- Block boring. Grinding the crankshaft. Application of hone to the cylinder walls.
- Weight distribution of connecting rods, pistons.
- Block assembly.
- Restoring the head (replacing caps and guides, straightening seats).
- Assembling the engine and installing it in the engine compartment.
- Connection.
- Functionality check.
How to notice a node malfunction
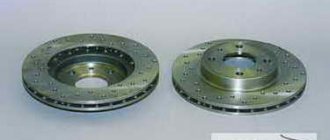
It is not difficult to determine that it is time to change parts of the exhaust system on a VAZ-2115 with an 8-valve engine. Even a novice car enthusiast can cope with this, since the main signs are the appearance of a strong smell of exhaust gases in the cabin and an increased noise level. Most often, faults are hidden in the additional or main muffler, as well as in the gaskets between the connections, which can burn out over time.
The classification of the most frequently occurring faults is as follows:
- mechanical damage to the muffler;
- burnout of gaskets;
- corrugation burnout;
- loosening of connections at joints;
- cracks in the system pipes.
Problems can be spotted by visual inspection. Experienced specialists recommend removing gas exhaust units for these purposes. This way you can examine them from all sides and notice the slightest damage. After you conduct a visual inspection of the system, you need to buy spare parts and begin repairs. It's easy to do it yourself.
If there are no external problems, you can try replacing the internal resonator. This repair method will only help those who know how to handle welding equipment.
Small burns and holes can be covered with sealant. Just pay attention: it must easily withstand temperatures up to 1000 degrees. Before applying the composition, it is necessary to thoroughly clean and degrease the surfaces.
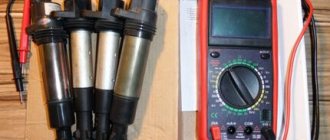
Should high-voltage wires be replaced and when?
No matter how well the armored wires are made, they also have a limited service life. According to current regulations, they must be replaced after every 30,000 km traveled. In practice, many motorists ignore this rule, continuing to travel with wires that have already outlived their useful life.
Such inattention can cause a whole host of problems, including:
- poor ignition;
- overclocking problems;
- engine tripping;
- inability to start the car.
All these troubles are caused by one single factor - an increase in the electrical resistance of the core of high-voltage wires, as a result of which it becomes “more difficult” for the impulse from the coil to reach its destination.
You can check whether you can still drive with the old wires or not - at home.
To do this you need:
- Turn off the ignition.
- Remove one of the armored wires.
- Measure its resistance using a megohmmeter or multimeter in the appropriate mode.
- If the resistance turns out to be equal to or close to the figure indicated on the wire insulation, then it is in good condition, but if it turns out to be greater, then the wire should be replaced.
- Repeat this operation on the remaining three wires.
It should be remembered that if only one of the wires is faulty, then all four should still be replaced.
Also, do not forget about the cleanliness of the contacts of high-voltage wires - they can also cause ignition problems. If oxides are noticeable on the metal tip, they should be cleaned with fine sandpaper or a cloth moistened with kerosene. By following these simple rules for caring for armored wires and replacing them, you can almost completely avoid troubles associated with the ignition system.
Muffler replacement
Using the example of replacing this component, we will show that it is not difficult to repair the exhaust system and dismantle its components. To work, you will need to install the car in the garage above a pit or drive it onto an overpass. Disassembling this node is not so difficult:
- disconnect the main and additional muffler;
- bend the hooks of the hanging straps;
- remove the brackets;
- remove the main muffler, which is mounted on the cushions.
After this, you will need to reassemble in the reverse order, only instead of the old spare part, hang the new one on the cushions. If the fastenings of the clamp connecting the resonator and the muffler pipe are dirty, clean them with a metal brush.
Before assembling the system, clean the gasket ring thoroughly. You can coat it with heat-resistant sealant to reliably seal the exhaust gases inside the system. The above method of replacing a muffler can also be used in cases where you want to tune your car.
Many car enthusiasts install sports mufflers on their VAZ-2115, which have a qualitatively different sound. In this case, you don’t have to wait for a malfunction to appear. Also, the new muffler can improve the environmental characteristics of the car, that is, after replacing this component, it will release less exhaust gases into the atmosphere. Remember that sport or upgraded mufflers will cost more than the stock replacement part.
If you want to tune your car, get ready to spend a lot of money. Buy only new imported spare parts. You should not try to turn an ordinary spare part into a sports modification using welding. This homemade product will not last long. For the same reason, we recommend replacing entire parts of the exhaust system rather than trying to repair them if malfunctions occur.
What does the price depend on?
Motorists who need engine overhaul of a VAZ-2114 are faced with different prices for such a service. The cost depends on the influence of factors:
- Engine capacity.
- The prestige of the service company, its pricing policy.
- Urgency.
- Scope of work.
- Difficulty of repair.
- The need for a specialist to visit.
- Cost of spare parts.
- Equipment used.
- Automotive technician qualification level.
The more work is required to restore the engine of a VAZ-2114 car, the more expensive the service of a specialist will cost. You will have to pay extra for urgency and a specialist visit.
Approximate price
On average, a major overhaul of a VAZ-2114 engine costs from 22,000 rubles. Engine repair cost broken down:
- Dismantling – 500 rubles .
- Installation – 600 rubles .
- Replacing oil scraper caps - 2000-4000 rubles .
- Pulling the engine sump - about 490 rubles .
- Crankshaft grinding - from 900 rubles .
- Replacing the crankshaft bearing - about 330 rubles .
- Honing and boring on a standard block - from 1000 rubles .
- Replacing the valve cover - 420-620 rubles .
- Replacement of the engine mount - from 540 rubles .
Replacing the engine on a VAZ-2114 will cost approximately 5,500 rubles .
This does not include the price of a new unit.
How to repair a “glushak” with your own hands
The muffler on the “fourteenth” and “fifteenth” is considered one of the most vulnerable points of the car. The fact is that due to exposure to high temperatures, the metal quickly burns out, that is, the tightness of the system is broken. Therefore, the part must be changed as soon as there is a suspicion that it is not working.
Reasons for failure
Most often, mufflers “burn out” - that is, due to hot exhaust, the metal inside the housing begins to thin out, which ultimately leads to the appearance of holes. However, this is not the only reason why the silencer may fail:
using a homemade device - handicraft products do not differ in quality and long service life;
mechanical shocks from uneven roads - dents and deformations of the pipe also lead to loss of tightness;
Rust and corrosion sooner or later affects even the highest quality original mufflers.
In general, all of the above factors influence service life to some extent. The car owner can easily identify all of the above faults - just drive the VAZ into the inspection hole and visually examine the muffler. In addition, when deformations, burnouts and corrosion reach their “peak”, the part will begin to make characteristic sounds when moving - gurgling, sharp pops, knocking.
Why is the muffler knocking?
This part on the VAZ 2114/2115 can make knocking noises only in two cases:
it hits the body;
When moving, it touches the gas tank housing.
In any case, it is necessary to immediately take measures to eliminate this malfunction. Most often, the problem lies in severe wear of the rubber suspensions. It is enough to change them and the muffler will again return to its normal position under the bottom of the car.
Pendants are inexpensive, so you can buy new products without spending any money.
Where and from whom can I order the service?
If an engine overhaul of a VAZ-2114 is required, then there are several options:
- Take the car to a car service center.
- Contact a private master.
- Repair the unit yourself.
A major type of repair requires extensive knowledge, skills, experience, certain equipment and tools. Therefore, only a master of a service center can carry out a high-quality engine restoration. Car service centers issue a warranty certificate. You should contact private traders only on the advice of good friends. Among such workers there are often low-skilled people. In addition, they do not provide a warranty card.
On cars of the Samara 2 series, the Volzhsky Automobile Plant installed injection engines with electronic, distributed fuel injection. And for the VAZ 2114, which appeared in 2001, and was launched into series in 2003, such a power plant was developed - model 2111. In subsequent years, various modifications of this car were produced and some of them were equipped with other engine models, such as - 21114, 11183, 21124 and 21126. But the most popular production cars were the VAZ 2114 with engines of models 2111 and 11183.
Malfunctions
- Various mechanical damage;
- Burnout of asbestos gasket;
- Fatigue and wear of the metal and, as a result, burnout;
- Defects at the joints;
- Cracks.
Considering the above, first of all, the driver must determine the source of infection and work out a schematic way to eliminate it. Let's imagine that the muffler on your car has burned out.
, this is the most common phenomenon on many cars and the VAZ 2115 is no exception.
{banner_content}
Design features of the VAZ 2114 engine
The main distinguishing feature of all engine models on the VAZ 2114 is that they have an injector installed. Electronic control of fuel injection, depending on the readings of a large number of different sensors that monitor a variety of parameters, including the composition of the exhaust gases, of course contributes to balanced and economical operation of the engine.
The engine itself on the VAZ 2114 is an in-line, four-stroke, eight-valve unit with a camshaft located on top. It has four cylinders, runs on gasoline and is cooled with a special liquid. In the engine compartment of a car, the engine is located transverse to the direction of travel. The photo of the VAZ 2114 engine shows its actual location relative to other units.
The cylinder block of this power unit is made of cast iron. All holes for antifreeze are formed in the casting mold, the oil passages are machined mechanically. The working cylinders are also machined. At the bottom of the block there are main bearing supports; covers for them are made during the manufacture of the block; they have an individual fit, so they cannot be replaced. When disassembling, you need to pay attention to the markings of these covers so as not to confuse them. Inserts made of an alloy of steel and aluminum are inserted into the covers and supports. Thrust half-rings are inserted into the third support, which prevent axial movement of the crankshaft.
The pistons are made of aluminum with steel rings cast into them. The pins are floating and the connecting rods are forged from steel. The bottom of the cylinder block covers the pan; there must be a gasket between them. Its integrity must be monitored, because the pan is a container for engine oil, which lubricates all rubbing parts during operation of the internal combustion engine. The lubrication oil system operates under pressure and spray. The pressure is created by an oil pump, which, taking lubricant from the sump, drives it through a direct-flow oil filter. It has a check valve that prevents oil from flowing back into the pan.
How to replace a muffler on a VAZ 2114/2115
If you start having any problems with the muffler, it is better not to put it off for a long time. The life and health of the driver and passengers depends on how correctly the “glushak” works. In general, the replacement process itself begins with the selection of a new exhaust system kit. It is best not to save money, but to purchase an original factory one. This will delay the need for repeated replacement indefinitely.
In addition, it is recommended to change the fastening bolts during each replacement. It is necessary to choose products made from heat-resistant materials, since otherwise the bolts will quickly stick to the bottom and will be impossible to unscrew.
To ensure reliable operation, it is advisable to buy new rubber suspensions in advance.
What tools will you need?
To work you will need a simple set of tools:
- two open-end wrenches for 13;
- hammer;
- chisel;
- brake fluid or WD-40 lubricant;
- screwdriver with a flat thin blade.
How to remove a muffler without a hole
The easiest way is to use an overpass or inspection hole - in this case, you can more conveniently crawl under the car body and carry out the necessary operations. However, drivers often do not have the opportunity to use such devices, so they use a regular jack.
To remove the “glushak” from a VAZ 2114/2115, you must:
- Jack up the rear left edge of the vehicle.
- Make sure the machine is stable.
- Reach under the body and moisten all pipe connections and bolts with lubricant.
- Wait 10–15 minutes until the liquid is absorbed.
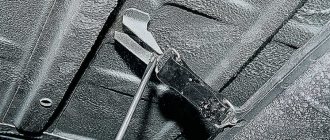
- After which you can begin to unscrew the bolted connections. If the bolts cannot be unscrewed with regular wrenches, it is recommended to cut them off with a chisel and hammer. However, you need to act extremely carefully so as not to catch the bottom.
- After the pipe has been unscrewed, all that remains is to remove the part from several rubber hangers. To do this, the body is raised slightly. If the rubber band is tight, you can pry it off with a screwdriver.
- The dismantled muffler is pulled out from under the car.
The muffler on the VAZ 2114/2115 is attached to the bottom with five hangers
How to install a new one and secure it correctly
Before you begin installing a new muffler, you need to clean all strategically important places under the bottom: hooks for attaching rubber bands, brackets for bolts. Install the product in the reverse order:
- First, pull the muffler under the car body and position it in the position in which it will be fixed.
- After this, hang the exhaust pipe and resonator on rubber hangers. Make sure that each connection is secure and the part will not fall off the hooks at the first road pothole.
- Next, start tightening the nuts on the bolts. Screw it all the way, but without fanaticism, as you can break the thread.
- Lower the car from the jack.
After this, it is recommended to check the performance of the VAZ. It will be enough to start the engine and rev it up a little.
Video: replacing the muffler
Block head and timing device
All front-wheel drive cars of the VAZ family, be it 2109, 2110 or 2114, have one cylinder head, common to all cylinders. They are mounted to the block using ten screws. During installation, a metal gasket is placed under it. This gasket is for single use and cannot be reused. There are five camshaft bearings at the top of the cylinder head.
The camshaft of the engine of the VAZ-2109 car has the index 21083. Some engines are equipped with 2110 or 2111 shafts; their design is slightly different from 21083, which allows for an increase in engine power. The shaft is cast from cast iron, there are five supports and eight cams on it that open the valves.
Seats are pressed into the cylinder head, as well as valve guides. On the inside of the bushings there are grooves for supplying lubricant; the bushings are closed on top with oil deflector caps.
The valves are made of steel, and the intake head is made of heat-resistant steel. They are mounted obliquely in one row. The inlet valve has a larger diameter than the outlet valve. The gaps between the valves and camshaft cams are adjusted using shims that have increased wear resistance.
Pushers are metal cups moving in the cylinder head holes. To improve wear resistance, the surface in contact with the ends of the valve stems is cemented.
Technical characteristics of the VAZ 2114 engine model 2111
- ICE type - in-line;
- four cylinders, two valves per cylinder;
- cylinder diameter - 82 mm;
- compression ratio - 9.8;
- ICE volume - 1.5 liters;
- engine power - 78 hp. With.;
- maximum torque - 116 Nm at 3000 rpm;
- average fuel consumption in mixed mode is 7.3 liters per 100 km;
- ICE weight - 127 kg;
- the service life of the power propulsion system is 150 thousand kilometers, during practical operation the service life reaches 250 thousand kilometers;
- real engine tuning is possible in various ways and without loss of service life the power can be increased to 120 hp. s., there is the potential to increase the power of the internal combustion engine to 180 hp. pp., but with a significant loss of power plant life.
VAZ 2114 engine repair
During the operation of the internal combustion engine on a car, various failures and malfunctions may occur, which can be eliminated by self-repair or with the involvement of specialists. The need for a major overhaul of the power propulsion system, with its proper operation, arises when the mileage reaches 150,000 km. In this case, a VAZ 2114 engine overhaul is needed.
- Before you begin disassembling the engine, you need to drain the oil and coolant, and then wash the entire unit. Be sure to remove all attachments so as not to damage them during reassembly.
- Disconnect all pipes through which gasoline is supplied.
- Remove all systems and components related to the air supply, remove the air supply and exhaust hoses and pipes.
- Remove the cooling system pipes and crankcase breather. Don't forget to disconnect the throttle pipe.
- Remove the receiver, as well as the pipeline mounting bracket and the fuel rail, remove the injectors with regulators.
- Remove the wires with the ignition module and knock sensor. Unscrew the spark plugs. After this, unscrew all sensors.
- Remove the generator by first removing the tension belt. With the generator, remove all brackets and strips necessary for its installation and adjustment.
- Block the flywheel and remove the generator pulley.
- Remove the camshaft drive with the cover, tension mechanism and pulley.
- Unscrew the pump, remove the exhaust manifold and thermostat.
- Disconnect the oil filter and oil sump, then remove the oil pump.
- In order to remove the piston group, you need to unscrew the nuts from the connecting rod bolts and remove the cover.
- Since the flywheel is blocked, you need to unscrew its fastenings with the flange and remove the flywheel disk.
- Remove the caps from the main bearings along with the lower bearings.
- Carefully pull out the crankshaft. It must be handled very carefully to prevent damage and scratches.
- Remove the upper liners and thrust half-rings.
When overhauling an internal combustion engine, it is necessary to carefully inspect each unit, component or part. If mechanical damage is detected, the spare part must be replaced. All gaskets, washers and non-metallic parts also need to be replaced.
The VAZ 2114 injector engine is a series of engines that were installed on the Lada 2114 vehicle. Like many Lada models, the 2114 model received several power unit options over all years of production. So, the technical characteristics of each of them were different. Let's consider the design of the 2114 engine, as well as issues of maintenance, tuning and repair.
Direct exhaust system
Almost all the elements of the exhaust system were purchased by me in the first year after the start of the car modification project. The very first of them was purchased an exhaust manifold ( spider 4-2-1
) in the online store stinger-shop in April 2013. I was originally looking for a stainless steel manifold in the budget price range but couldn't find anything. Although, probably, I didn’t really bother, that’s why I stopped at the stinger store website. Moreover, this particular brand was especially widespread among exhaust systems at that time; I had never even heard of STT at that time, and sites like tuningsport, clubturbo, meta-s acted only as speculators. At least that's how it was in my mind. At the time of ordering, I did not find a section for manifolds made of stainless steel, so I put in the cart “Exhaust manifold / spider 4-2-1 (SPORT) 16 V “Stinger” for cars VAZ 2108, VAZ 2109, VAZ 2199, VAZ 2113, VAZ 2114, VAZ 2115” made according to the description from steel 08 ps. It cost 1800 rubles. Before paying for the order, I asked the store manager about the possibility of making the selected manifold from stainless steel. The answer was yes. After which I paid for the order in the amount of 2800 rubles.
After receiving the order, I was interested to check whether the manifold is actually made of stainless steel. Initially, I was like the amateur method – the magnet method. Having found out that the metal from which the collector is made has magnetic properties, I used a more accurate method - chemical. After cleaning a small section of the pipe with sandpaper, I applied a few drops of copper sulfate to it. After a short time, the color of the metal remained virtually unchanged. For the experiment, I repeated this on ordinary carbon steel, where copper precipitation occurred almost immediately, as evidenced by a rich reddish tint at the site of the reaction. Now I was sure that the spider was indeed made of stainless steel. The only thing I remembered later was that I did not check what steel the flange adjacent to the cylinder head was made of. By “later” we mean the complete preparation of the spider for installation, after which I no longer wanted to know anything, so we will assume that the material of the product satisfied my wishes.
Next, I would like to touch on the issue of the quality of workmanship of the purchased product. Here, as always, I was dissatisfied. Although, if judged objectively, the collector is more likely to correspond to the price-quality ratio.
The first step in modifying the manifold was additional welding of the pipes from the inside at the junction with the flange adjacent to the cylinder head. I believe that this should have a beneficial effect on the strength and durability of the product, as well as on the hydrodynamic performance of the collector channels. After welding, the following picture was obtained in each of the four channels.
After that, I had to process the channels and pin holes according to the same coordinates in which the exhaust channels of the cylinder head were processed during its modification. But before this, it was necessary to bring out the contact plane of the flange, since after welding it was significantly deformed.
I had to build a device to install the collector on the grinding machine, which was later used when milling on a milling machine.
The processing was carried out on a surface grinding machine model 3B70V. The only thing that had to be done for smooth installation and further processing of the part on the machine was to remove the handle from the steering wheel of the longitudinal feed of the table.
As a result, the thickness of the flange at the edges was about 8 mm, in the center about 10 mm. Due to this deformation, some of the mounting holes had to be modified subsequently, as their coordinates were shifted.
Further processing of the channels was carried out on a model 67M20VF2 machine, which, after modernization, received a relatively modern NC-202 CNC system.
The working area of the machine did not allow processing all the holes in one setup, so we had to set it up a second time.
After processing the canals, shells opened up in some places, which were later welded back and processed. Unfortunately, there are no photographs of the final appearance of the collector channels. Most likely, I simply forgot to do them due to the rush to install it and the desire to start the engine as soon as possible.
Here, on the machine, I also modified the two-layer metal gasket, drilling holes in it for the pins.
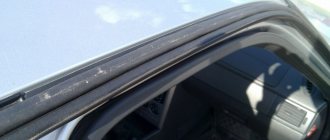
Considering that the manifold was ready for installation, I tried to mount it under the hood. The first thing I noticed was the contact of the secondary manifold pipes with the thermal shield of the brake pipes and the fuel return line.
Looking ahead, I will say that this problem could not be solved, and this thermal screen still had to be abandoned. Secondly, the deviation of the end pipes from the horizontal plane of the body bottom is too large and, in my opinion, their location is low, given that the suspension will use an anti-roll bar from a Lada Granta car, manufactured by TechnoMaster.
Well, the third argument, which initially bothered me, but I turned a blind eye to it, was the imperfection of the channel connections in the internal cavity of the collector. This technology for joining pipes in the manufacture of a collector requires quite precise fitting to achieve the required ( correct)
) channel geometry, but with the serial type of production and taking into account the cost of the product, the quality can change dramatically from one to another. As a result, the manifold was sawed and welded again in place. To connect the primary and secondary pipes, I decided to use stamped tees used by ProCar in the manufacture of exhaust manifolds.
The first two tees had to be slightly modified by cutting off their inlet sockets, which are designed for a pipe with a diameter of 43 mm. But even at the same time, the tees sat with a fairly large gap on the primary collector pipes.
The last tee fit just perfectly, all the pipes fit tightly into its holes. This was very convenient for preliminary installation and tacking of the exhaust system.
As a result of welding the manifold, it turned out to be a little shorter, and it was not possible to place a hole on it for the oxygen sensor. I decided to make it later on the resonator pipe, which had to be lengthened by the missing amount, fortunately I had a small piece of the 51st pipe that I somehow got from a very good friend Densa17.
The underbody thermal shield in the area of the gearbox gate was either missing initially after purchasing the car, or I sent it to scrap when dismantling the standard exhaust system. I can’t say for sure now, but in any case I had to purchase it. In addition, the end pipes of the manifold were too close to the bottom, relative to the serial location of the standard intake pipe.
As always, I turned to the site avtozapchasty.ru for help in purchasing a screen. Order number 21080-1206020-10.
The screen itself had to be modified a little by cutting off its stamped collar on the front side, since it touched the collector. Otherwise there were no problems with its installation.
When choosing a resonator and muffler, I gave my preference to FOX. I purchased everything from the clubturbo online store in the form of welded components ready for installation. The resonator and muffler itself are made of stainless steel, the pipes are made of 08 ps steel. In May 2013, the muffler arrived; its price at that time was 3,450 rubles. I received the resonator only in August of the same year due to its absence at the time of ordering the muffler, I paid 2900 rubles for it.
The connection of the resonator and muffler implied the use of a serial clamp with a ring from the Lada Priora car. With this connection method, the pipes had a certain profile at the ends, which locally reduces the flow area of the pipeline. Without bothering to find out the extent of the influence of this “bottleneck” on the characteristics of the exhaust system, I decided to switch to flange mounting. To do this, I purchased a exhaust pipe gasket from the same Priora, scanned it and made two flanges according to the resulting dimensions. Now the line has a constant flow area along its entire length, not taking into account the insert for the oxygen sensor.
Because the car’s suspension was lowered by -50 mm. I tried to place the muffler as high as possible, thereby trying to avoid its contact with the rear beam when the car was moving. Because of this, the muffler was slightly tilted relative to the horizontal, and its end pipe touched the body. As a temporary solution, I simply shortened the end pipe a little. When installing the exhaust system, I used serial rubber muffler pads, later replacing them with polyurethane ones.
After completing the main welding work with the exhaust system, all that remained was to manufacture and place an insert with a plug for the oxygen sensor on the resonator pipe and paint the bare metal.
I asked a turner colleague to turn out an insert with a stainless steel plug. Then I milled a hole in the pipe for it. The axis of the hole is located at approximately an angle of 15-20 degrees to the horizontal.
Now the exhaust system was completely ready for use. Next in line is the cooling system.
Lubricating parts
Combined engine lubrication device for the VAZ-2109 (2110). Oil is supplied to the main and connecting rod bearings, as well as to the camshaft supports under pressure; the cylinders, pistons, pins and rings, camshaft cams and pushers are lubricated by splashing; all other associated parts are lubricated by gravity.
A gear-type oil pump with a bypass valve is installed at the front of the block. The oil receiver is mounted using bolts on the cover of the second main bearing and the pump housing. The oil filter is non-separable and has bypass and anti-drainage valves. The design of the lubrication system and other engine systems is discussed in detail in separate articles.
Crankcase ventilation is forced, gases are removed through the oil separator.
Specifications
VAZ 2114 car
The technical characteristics of the VAZ 2114 engine are quite typical for the 2113-2115 series of cars. In addition, this power unit is developed on the basis of the “eight” engine, which has declared itself to be reliable and easy to repair. The car was produced from 2001 to 2013. During this period, the vehicle received five valuable power units.
VAZ 2114 engine structure
As was said earlier, the 2114 was equipped with five different power units, which differed in power and valve mechanism. Three of them had 8 valves, and the other two had 16. The gas distribution mechanism had a belt drive. Until 2007, the engine was equipped with a simple on-board computer, which did not regulate the operation of the engine based on sensor readings. Therefore, the motorist had to regulate the processes the old fashioned way, manually. Since 2007, an ECU was installed, which, receiving data from sensors, independently adjusted many processes.
Design features of the engine.
Since the second generation had a so-called two-way electronic engine control unit, it is worth considering what electrical circuit was installed.
Electrical diagram of a VAZ 2114 car.
Main characteristics of the motor
All engines that were installed on the vehicle had approximately the same characteristics and design features. So, the motor is easy to service and repair with your own hands. Let's look at the main technical characteristics of the VAZ 2114 engine:
VAZ 2111
| Name | Index |
| Volume | 1.5 liter (1499 cm3) |
| Number of cylinders | 4 |
| Number of valves | 8 |
| Fuel | Petrol |
| Injection system | Injector |
| Power | 77 hp |
| Fuel consumption | 8.2 l/100 km |
| Cylinder diameter | 82 mm |
VAZ 21114
| Name | Index |
| Volume | 1.6 liter (1596 cc) |
| Number of cylinders | 4 |
| Number of valves | 8 |
| Fuel | Petrol |
| Injection system | Injector |
| Power | 81.6 hp |
| Fuel consumption | 7.6 l/100 km |
| Cylinder diameter | 82 mm |
VAZ 11183
| Name | Index |
| Brand | 11183 |
| Marking | 1.6 8V |
| Type | Injector |
| Fuel | Petrol |
| Valve mechanism | 8 valve |
| Number of cylinders | 4 |
| Fuel consumption | 9.6 liters |
| Piston diameter | 82 mm |
| Resource | 200 – 250 thousand km |
VAZ 21124
| Name | Index |
| Volume | 1.6 liter (1599 cc) |
| Number of cylinders | 4 |
| Number of valves | 16 |
| Fuel | Petrol |
| Injection system | Injector |
| Power | 89.1 hp |
| Fuel consumption | 7.0 l/100 km |
| Cylinder diameter | 82 mm |
VAZ 21126
| Name | Index |
| Volume | 1.6 liter (1597 cc) |
| Number of cylinders | 4 |
| Number of valves | 16 |
| Fuel | Petrol |
| Injection system | Injector |
| Power | 97.9 hp |
| Fuel consumption | 7.2 l/100 km |
| Cylinder diameter | 82 mm |
Engine VAZ 2114.
All engines were equipped with 5-speed manual transmissions. Engine volume ranges from 1.5 to 1.6 liters. This car was not equipped with a large power unit. The average engine power of the VAZ 2114 is 85 horsepower.
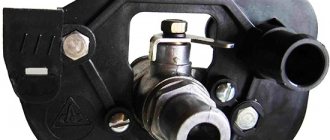
Features of the 2111 (1.5i) engine power system
Location of elements of the 2111 (1.5i) engine power supply system in the engine compartment:
1 - receiver; 2 — vacuum supply hose to the fuel pressure regulator; 3 — throttle assembly; 4 - fuel rail; 5 — fuel pressure regulator; 6 — air supply hose to the throttle valve; 7 - adsorber; 8 — air filter; 9, 10 and 11 — hoses of the crankcase ventilation system; 12 — throttle valve drive cable; 13 — diagnostic fitting
Read more: Resistances for 12V LED
combined with the fuel level indicator sensor into a single unit - fuel module
(often called an electric fuel pump). The pressure pump delivers fuel from the tank through the fuel filter to the fuel rail.
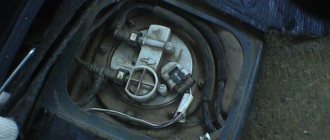
Engine Fuel Module 2111 (1.5i):
1 — fuel level indicator sensor; 2 — connecting block; 3 — inlet pipe; 4 - outlet (discharge) pipe; 5 — module cover; 6 — module cover guide; 7 - electric fuel pump in a plastic casing; 8 - intake chamber
Fuel rail for engine 2111 (1.5i) complete with injectors:
1 — diagnostic fitting; 2 - fuel rail; 3 — fuel supply tube to the fuel rail; 4 — fuel pressure regulator; 5 — tube for draining (draining) fuel into the tank; 6, 7, 8 and 9 - injectors
Fuel pressure control
installed on the fuel rail. Excess fuel is returned to the tank through the fuel return line.
Engine power supply system diagram 2111 (1.5i):
1 - nozzle; 2 - fuel rail; 3 — diagnostic fitting; 4 - adsorber; 5 - check valve; 6 — throttle assembly; 7 - gravity valve; 8 — safety (two-way) valve; 9 - separator; 10 - filler pipe; 11 — fuel filter; 12 — fuel drain line; 13 — fuel line hose connecting the outlet pipe of the fuel module to the fuel filter; 14 — fuel module; 15 — fuel tank; 16 — fuel line connecting the fuel filter to the fuel rail; 17 - fuel pressure regulator
Motor maintenance
When the design and main technical characteristics inherent in the VAZ 2114 engine have been reviewed, it is necessary to consider maintenance and provide answers to questions that motorists are increasingly asking.
Maintenance
If you believe the plant, the manufacturer, the VAZ 2114 engine must be serviced every 12-15 thousand kilometers. It depends on what marking the motor is installed on the vehicle. Maintenance scheme for all engines installed on the “fourteenth” model:
- At the first maintenance, the oil, oil filter and air filter element are replaced, as well as the functionality of all systems is checked.
- The second maintenance is done after 12,000 km. In this case, it is necessary to change the oil and oil filter element.
- Third maintenance – 25,000 km, replacing not only the oil, but also the air filter, and ongoing repair of faults.
- After 45,000 km, it is necessary to replace the timing belt and roller so that the VAZ 2114 engine does not have to be overhauled.
Electronic control unit
This block monitors information coming from sensors and is responsible for controlling the fuel injection system. The control unit contains a diagnostic system, thanks to which a system failure is recognized. It signals all problems occurring in the system through a light located on the dashboard - Check Engine. It also stores all errors that have ever occurred. Subsequently, their codes help to understand when diagnosing problems.
Source