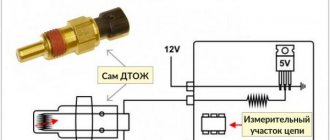
Coolant temperature sensor
This sensor is necessary to determine the temperature of the coolant. Based on its readings, the electronic engine control unit adjusts the fuel mixture depending on the fluid temperature. For example, if the coolant temperature is low, then for normal operation of the internal combustion engine, more fuel is needed to warm up the engine and vice versa. The sensor’s operation as a fuel mixture corrector can be seen by increased speeds when the car warms up.
Its second function is to turn on the fan when critical coolant temperatures are reached. When the antifreeze reaches a critical temperature, the resistance of the sensor changes and it starts the cooling fan, which cools the internal combustion engine.
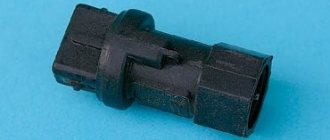
Design
The picture below shows a cross-section of the sensor.
Location
This sensor is located in front of the thermostat and has a special threaded ebb into which it is screwed. You can see the sensor by looking under the throttle valve and the intake corrugation.
Symptoms of a problem
When the coolant temperature sensor fails, the following symptoms of a malfunction appear on the car:
- The cooling fan does not turn on or turns on but very early;
- There are no increased engine warm-up speeds;
- The engine does not start well in cold weather;
- In hot weather, the engine does not start;
If your car shows such signs of breakdown, first of all you need to check the coolant temperature sensor.
How to independently diagnose the unit?
At first glance, it may seem that diagnosing an ECU is a difficult task that not everyone can handle. Indeed, checking your block is not so easy, but having theoretical knowledge, it is quite possible to apply it in practice.
Required tools and equipment
To check the functionality of the module yourself, you will need to perform a number of steps to connect to the ECU.
To perform the test you will need the following devices and elements:
- Oscilloscope. It’s clear that not every car enthusiast has such a device, so if you don’t have one, you can use a computer with the necessary diagnostic software pre-installed on it.
- Cable for connecting to the device. You need to select an adapter that supports the KWP2000 protocol.
- Software. Finding diagnostic software today is not a problem. To do this, just monitor the network and find a program that is suitable for your vehicle. The program is selected taking into account the car, since different control units are installed on different cars.
Algorithm of actions
The diagnostic procedure for the electronic control system is discussed below using the Bosch M 7.9.7 module as an example. This control unit model is one of the most common not only in domestic VAZ cars, but also in foreign-made cars. It should also be noted that the verification process is described using the example of using the KWP-D software.
So, how to check the ECU at home:
First of all, the adapter used must be connected to a computer or laptop, as well as the ECM itself. To do this, connect one end of the cable to the output on the unit, and the other to the USB output on the computer. Next, you need to turn the key in the car's ignition, but you do not need to start the engine. By turning on the ignition, you can launch the diagnostic utility on your computer. After completing these steps, a window with a message should pop up on the computer screen, which confirms the successful start of diagnosing malfunctions in the controller. If for some reason the message does not appear, you need to make sure that the computer successfully connected to the controller
Check the quality of the connection and connection of the cable to the unit and laptop. Then a table should be displayed on the laptop display, which will indicate the main technical characteristics and operating parameters of the vehicle. At the next stage, you need to pay attention to the DTC section (it may be called differently in different programs). This section will present all the faults with which the power unit operates
All errors will be displayed on the screen in the form of encrypted combinations of letters and numbers. To decipher them, you need to go to another section, which is usually called Codes, or use the technical documentation for your car. If there are no errors in this section, then you now don’t have to worry, since the vehicle’s engine is working perfectly (the author of the video at home is the AUTO REZ channel).
But this verification option is most relevant if the computer sees the block. If you have problems connecting to it, then you will need an electrical diagram of the device, as well as a multimeter. The tester or multimeter itself can be purchased at any specialty store, and the electrical circuit diagram of the ECM should be in the service manual. The diagram itself needs to be studied most carefully; this will be required for verification.
In the event that the ECM points to a specific block, and does not show erratic data, then in accordance with the diagram it needs to be found and called. If there is no accurate information, then the only way out is to diagnose the entire system; as we said above, breakdowns are considered one of the main faults.
After the breakdown is found, it is necessary to check the resistance and determine exactly where the cable is fixed. You will need to solder the corresponding new wire parallel to the old one; if the reason lies in the breakdown, then these actions will eliminate the problem. In all other cases, only qualified specialists can solve the problem.
Temperature sensor (for dashboard)
The purpose of this sensor is to take readings about the temperature of the coolant in the engine. It has one contact that transmits resistance readings to the car's dashboard, converting it into degrees on the temperature indicator scale.
The functions of this sensor are only to measure temperature for the dashboard.
Design
The picture below shows a temperature sensor.
Location
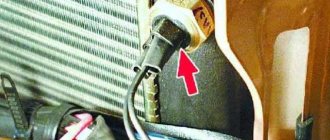
This sensor is located in the cylinder head housing and is installed using a threaded connection between the spark plugs.
Symptoms of a problem
There can only be one failure of this sensor, this is the absence of indications on the dashboard about the engine coolant temperature values.
Causes of breakdowns
There are a number of possible reasons for module failure. The most popular of them are described below.
- Mechanical damage. A similar problem occurs among users who operate the vehicle in off-road conditions. Protruding road surface elements, branches and stones can damage the plastic housing or break wires.
- Moisture ingress. Over time, the insulation of wires and blocks can dry out. The winding cracks and allows water to enter the system, which can cause a short circuit.
- System failure. During power surges, the on-board computer may malfunction. Errors within the module prevent data from being read from the device correctly.
Replacement
Replacing sensors does not require a lot of tools or knowledge of automotive mechanics.
There are two replacement methods: with coolant drain and without drain. Let's consider the second option.
Work must be performed with a cold engine to avoid burning your hands!
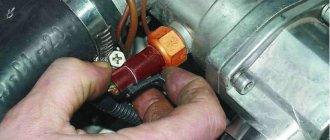
- We find the necessary sensor that needs to be replaced;
- Remove the connector from the sensor.
- Unscrew the sensor using the key.
- We take out the sensor and plug the hole with a finger;
- We prepare a new sensor and install it in place;
- Everything must be done quickly in order to lose as little coolant as possible;
After replacement, you need to check the antifreeze level and top up if necessary.
Performance test
The most effective way to check is diagnostics using diagnostic equipment, in common parlance – a “car scanner”. This is the most accurate way to identify any car malfunctions, and there are 2 options - go to a service center or purchase a scanner for personal needs. At the moment, the second option will be the most preferable, because... will save you a lot of money in a short period of time. There are a very large number of diagnostic devices on the market for every taste and color.
If your budget is limited or you simply do not want to spend large sums on purchasing a device, then we can recommend you an adapter from the Korean manufacturer Scan Tool Pro Black Edition.
The adapter is compatible with 99% of cars manufactured in 1993 and connects via Bluetooth or Wi-Fi to any device on Android, iOS and Windows. It is noteworthy that, despite its low cost in the region of 2 - 2.5 thousand rubles. the device sees not only the engine, like most budget adapters, but also other components and assemblies of the car. It also shows the operation of all available sensors in your car in real time.
If you do not have such devices, and the nearest service is very far away, then there is another way to check, at home.
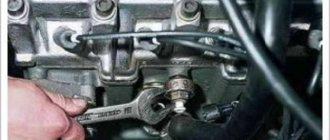
To check the thermal sensor, it will have to be removed from the car. To do this, follow these steps:
- Allow the engine to cool to 40-50 °C to avoid burning your hands during operation. Partially or completely drain the antifreeze from the cooling system.
- Disconnect the battery from the on-board power supply by removing the negative cable.
- Disconnect the block with wires from the thermoelement.
- Unscrew the part using a wrench of the appropriate size.
If the device is installed at the top point of the system, then it is not necessary to empty it entirely; it is enough to drain a third of the liquid into the container. All antifreeze must be drained when the thermocouple is located at the bottom of the radiator.
To carry out the tests you will need:
- a multimeter or other device capable of measuring circuit resistance;
- a small container for water (you can use a regular glass);
- thermometer with a scale up to 100 °C.
A thermometer is essential if you want to make accurate resistance measurements by referring to the reference chart for your vehicle. When there is no table, the serviceability of the part is checked without a thermometer according to its operating principle: the hotter the water in the glass, the lower the resistance at the contacts should be.
If the multimeter shows a certain resistance, then immerse the thermocouple in a glass of cold water and record the readings. Then add hot water and watch the resistance change, it should decrease. If there are no changes, purchase and install a new temperature sensor.
Also interesting: Chevrolet Niva idle speed sensor
If the tests were successful and the device changes resistance when heating the water, then it is worth checking the connecting wires and cleaning the contacts. Little things like this often cause major problems.
Removing the phase sensor
- Disconnect the negative terminal from the battery
- We remove the decorative casing to gain access to the element we need
- We press the block and disconnect it from the sensor
- Unscrew the bolt that secures the part to the cylinder block
- We remove the part from the existing hole in the block head
- We change to a new element, doing all the steps in reverse order.
It is recommended to replace it every five years, even if it is working properly. The replacement job takes about twenty minutes, everything will depend on what technical skills you have.