One of the key components of the electrical circuit of a VAZ 2105 car is the fuse box. Many problems with electrical equipment that arise during the operation of a vehicle are associated with this particular unit. Car enthusiasts, as a rule, carry out maintenance and diagnostics of faults in the fuse box on their own.
- Block under the hood
Table: which fuse is responsible for what - How to remove the mounting block
- Repair of mounting block
- Replacing a burnt track
Video: how to repair a blown fuse box track
- How to identify a blown fuse
VAZ 2105 fuses
The purpose of the fuses used in the VAZ 2105 car is no different from the function of any other fuses - protecting electrical circuits from short circuits, sudden power surges and other abnormal operating conditions. VAZ 2105 fuses, which can be cylindrical or plug-in type, are mounted on the same block with the relay. The mounting block can be located under the hood or inside the car .
The operation of the fuse is based on Ohm's law, known from school: if the resistance in any part of the electrical circuit decreases, this leads to an increase in current. If the current exceeds the permissible value provided for a given section of the circuit, the fuse blows, thereby protecting more important electrical appliances from failure.
New sample block
All functionality, dimensions and connection of the unit were preserved. The fuse block has been converted to midi-format knife-type inserts with flat contacts used throughout the world for a standard 6.3 mm connector. The black box layout has also changed. Euro fuses could last much longer.
The ratings were also brought to the standard series in three values - 7.5, 10 and 20 A. The same seventeen inserts were already arranged in two rows, four spare fuses and plastic tweezers stood separately, making them easy to replace. The circuit switching scheme has not changed, with rare exceptions.
The interchangeability of new and old blocks on different machines is conditional. Minor changes in the electrical circuits of cars may require minor modifications to the units by an auto electrician or independently. This applies to the switching of starter circuits, radiator fan, fog lights and window wipers.
Mounting block in the cabin
In the first VAZ 2105 models, the fuse box was located inside the car. Such a block can still be seen today in some “fives” under the instrument panel next to the left door. Each of the fuses on the block located in the passenger compartment is responsible for the same section of the electrical circuit as the corresponding fuse on the block located under the hood.
How to identify a blown fuse
If problems arise with any group of electrical equipment in the car, the likelihood that the problem is in the fuse is high, but not one hundred percent. To make sure that a fuse has failed, sometimes an external inspection is enough: if there are burnt marks on its body, most likely the fuse has burned out. This method of checking is quite primitive, and in this case it is better to use a multimeter, which allows you to diagnose the malfunction:
- by voltage;
- by resistance.
In the first case it is necessary:
- Set the multimeter to voltage measurement mode.
- Turn on the circuit being tested, such as lighting, stove, etc.
- Check the presence of voltage at the fuse terminals. If there is no voltage at one of the terminals, the fuse must be replaced.
In the second case, the multimeter is switched to resistance measurement mode, after which the tips of the device are connected to the removed fuse. If the resistance value is close to zero, the fuse requires replacement.
If the resistance value is close to zero, the fuse requires replacement
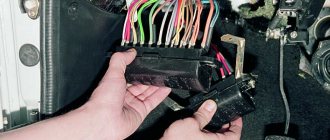
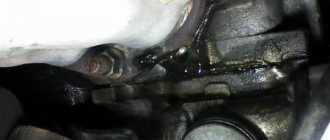
Unit dismantling and repair
The fuse box located in the passenger compartment is removed in the same sequence as that installed under the hood. It is necessary to unscrew the fasteners, remove the connectors and remove the unit. Just as in the case of the block located under the hood, repairing the mounting block installed in the cabin involves replacing fuses and restoring the tracks.
If the fuse blows on the road and you don’t have a spare at hand, you can replace it with a wire. But at the first opportunity, the wire must be removed and a rated fuse installed instead . The fuse location diagram is usually shown on the inside of the mounting block cover.
It should be remembered that there are several types of mounting blocks that do not differ from each other in appearance. The differences lie in the wiring of the tracks. When replacing a block, you need to make sure that the markings of the old and new blocks match. Otherwise, the electrical equipment will not work correctly.
I changed the mounting block in the VAZ 2105 about six months ago. When I changed it, I didn’t know that there were several types. The sellers at the car market claimed that there was only one type, and since my old one was completely falling apart, I had to take what I had. Two problems immediately appeared with the new unit: the wipers stopped working (this problem was solved by throwing a jumper from the first fuse to the second). The second problem (and the most important) is that when the car just sits with the engine turned off, it drains the battery (the charging wire, if it matters, is inserted into the 3rd slot, 1st socket, I don’t know how to say it differently, I have almost no knowledge of auto electrics at all. Completely charged in about 8 hours, it discharges to 0. The third problem (not so important) - the turn signal indicators disappeared. I went to an auto electrician, he just threw up his hands, looked at the panel and could not do anything. I threw out the old panel, as it was almost completely crumbled, not I knew that such a problem would happen, so I have nothing to compare it with.
A pedestrian
https://www.semerkainfo.ru/forum/viewtopic.php?t=2040&start=100
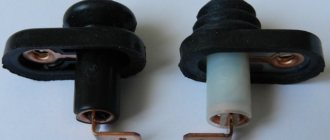
Old style fuse box
Old style mounting blocks use cylindrical (finger) fuses, which are installed in special spring-loaded connectors. Such connectors are not reliable and durable, which is why they cause a lot of complaints from car enthusiasts.
The old-style VAZ 2105 mounting block uses cylindrical fuses
Each of the 17 fuses located on the old-style mounting block is responsible for the same groups of electricity consumers as the corresponding fuses on the new-style block (see table above). The only difference is the rated current for which the cylindrical fuses are designed. Each plug fuse (on a new type block) has a rated current:
- 10 A corresponds to a finger fuse with a rated current of 8 A on an old-style unit;
- 20 A - 16 A;
- 7.5 A - 8 A.
Maintenance and repair of the VAZ 2105 fuse box in most cases does not cause difficulties for car enthusiasts. To independently determine the malfunction of the mounting block and fix it, even a little driving experience is enough. For reliable operation of electrical equipment, it is important to use fuses with the parameters specified in the technical documentation.
The procedure for disassembling the “five” fuse box
Malfunctions of the mounting block can occur at any time, so the car owner should learn how to disassemble or replace it independently. Always have a diagram of the safety block at hand.
If problems arise in the operation of any electrical component, you should not immediately begin to repair the corresponding electric motor. There is a high probability that the cause of the breakdown is the safety block.
The location of the fuse box is different for old and new VAZ 2105 cars:
- The old-style "five" has an internal fuse block located inside the cabin - it can be found directly under the instrument panel next to the driver's door;
- And the fuse box of the new VAZ 2105 is located under the hood next to the windshield.
To remove the mounting block cover, you need to pull it up with a little force. After this, you can begin to inspect the safety elements.
All fuses differ in the main parameter - operation current. VAZ 2105 vehicles use safety elements designed for current from 6 to 20 A. They should be selected in accordance with the power consumption. Under no circumstances should you use a fuse that greatly exceeds the required parameters, as this may cause a short circuit in the electrical equipment.
Installation of additional electrical equipment often makes it necessary to recalculate the maximum fuse current. To do this, the consumer’s power should be divided by the voltage of the “five” on-board network (12) and select an element whose operating current is as close as possible to the resulting number (ideally, exceeding it by 20–25%).
How to replace the VAZ 21053/21051/21055 fuse box:
Due to the fact that the main function of the fuse box is to protect more important parts of the car from electrical damage, it blows out quite often.
To replace it, you should purchase a new working unit and a special 13 mm spanner.
Replacing the mounting block is performed in the following order:
- Remove the screws that secure the block body;
- We move the pads that are connected from the bottom of the block;
- Unscrew the fasteners with a 10 mm wrench;
- We remove the old block and install a new one in its place.
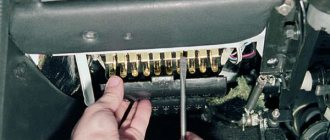
Before installing a new unit, you should inspect the old one. If there are contacts that are bridged with each other, the same must be done on the new block. After bridging, the contacts should be firmly secured. The work should be done carefully, without confusing the locations of the jumpers.
To install fuses, you should check the diagram, since if they are placed incorrectly, there is a high probability of failure of the new unit.
The fuse block blocks are the same, and in order to figure out what color bundle of wires should be connected to a particular connector of the block, special markings are used. Under the pads there is a round color mark: green, blue, white, black, red or yellow.
Letters are used to indicate wire colors. If the wire is double-colored, two letters are used: the first is the color designation of the wire, the second is the stripe applied to it. For example, the IF is a red wire with a black stripe.
The following letter designations for colors are used: G - blue; F - yellow; Ch - black; P - red; O - orange; P - pink; Z - green; K - brown; C - gray; B - white; F - purple.
Replacing the safety block on a VAZ 21053
Before you start replacing, you need to purchase a new block and stock up on a special ring wrench for “13”. The actions are performed in the following order:
- remove the block body, which is secured with screws, using a screwdriver;
- move the pads connected to the bottom of the block (on new cars they are located under the hood, and on old cars - just to the left of the steering wheel);
- using a “10” wrench, unscrew the block clamps;
- install a new fuse block.
It is important to know: before installing a new safety block, you must carefully inspect the old one. You can usually notice contacts bridged with each other. On the new block it is necessary to bridge them in the same way and secure them well.
By contacting a car service, you are dooming yourself to significant financial costs, since the work of changing the safety unit is done manually.
Be careful not to mix up the placement of jumpers. Then carefully insert the first fuse into the block and continue placing the next ones, following the diagram as a guide. Please remember that if placed incorrectly there is a risk of burning the new block.
This guide will allow you to figure out the fuse box yourself, so you'll never be stuck halfway to your destination. Plus, you can save a lot of money. Every self-respecting motorist needs to know how to replace fuses. After all, doing everything yourself is not at all difficult.
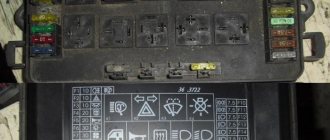
The mounting fuse block for VAZ 2104 and 2105 (carburetor, injector) is located in the engine compartment on the right side and is mounted on the front panel. This block is closed on top with a lid on which symbols are indicated with the purpose of the relay, numbers of fuses and protected circuits. Most car electrical circuits are protected by fuses that are installed in the mounting block.
| Fuse no. | Current strength, A | Protected Circuits |
| F1 | 10 | Tail lights (reversing lights). Heater motor Warning lamp and rear window heating relay (winding) |
| F2 | 10 | Electric motors for the windshield wiper and washer pump. Windshield wiper relay |
| F3 | 10 | Spare |
| F4 | 10 | Spare |
| F5 | 20 | Rear window heating element and heating relay (contacts) |
| F6 | 10 | Cigarette lighter. Portable lamp socket |
| F7 | 20 | Sound signals and relay for turning on sound signals. Engine cooling fan motor and motor switch relay (contacts) |
| F8 | 10 | Direction indicators in hazard warning mode. Switch and relay-interrupter for direction indicators and hazard warning lights in emergency mode |
| F9 | 7.5 | Generator voltage regulator (on vehicles with G-222 generator) |
| F10 | 10 | Turn indicators in turn signal mode and corresponding indicator lamp. Turn signal interrupter relay. Turn signal indicator Tachometer Fuel level indicator. Coolant temperature gauge. Voltmeter. Fan motor activation relay (winding). Battery charge indicator lamp. Indicator lamps for fuel reserve and parking brake activation. Warning lamps for emergency drop in oil pressure and insufficient brake fluid level. Indicator lamp for turning on the parking brake. Indicator lamp for covering the carburetor air damper (for a carburetor engine). Electric fan thermal switch. Carburetor pneumatic valve control system Generator excitation winding (generator 37.3701) |
| F11 | 10 | Rear lights (brake lamps). Body interior light |
| F12 | 10 | Right headlight (high beam). Winding of the relay for turning on the headlight cleaners (with the high beams on) |
| F13 | 10 | Left headlight (high beam). Indicator lamp for high beam headlights |
| F14 | 10 | Left headlight (side light). Right rear light (side light). License plate lights. Engine compartment lamp Indicator lamp for turning on side lights |
| F15 | 10 | Right headlight (side light). Left rear light (side light). Cigarette lighter lamp. Instrument lighting lamp. Glove compartment lamp |
| F16 | 10 | Right headlight (low beam). Winding of the relay for turning on the headlight cleaners (with the low beam on) |
| F17 | 10 | Left headlight (low beam) |
Mounting block connection diagram:
| Relay/fuse no. | Decoding |
| P1 | Heated rear window relay |
| P2 | Relay for turning on headlight cleaners and washers |
| P3 | Horn relay |
| P4 | Engine cooling fan motor relay |
| P5 | High beam relay |
| P6 | Low beam relay |
*A - the order of conditional numbering of plugs in the mounting block blocks.
**The outer number with the letter “Ш” indicating the plug is the block number, and the inner number is the conditional number of the plug. The plugs of the blocks without color marking are conventionally shown in brown.
Location of relays and fuses in the mounting block:
| Relay/fuse no. | Decoding |
| 1 | Heated rear window relay |
| 2 | Place for installing a relay for turning on headlight cleaners and washers (the relay is installed on some manufactured cars); |
| 3 | Mounting jumper in place of the relay for turning on the sound signals (in a variant, a relay is installed) |
| 4 | Mounting jumper in place of the cooling system fan motor relay (in a variant, a relay is installed) |
| 5 | High beam relay |
| 6 | Low beam relay |
| F1-F17 | Fuses (circuits protected by pin type fuses are listed in the table above) |
*Electrical equipment that consumes a large amount of current during operation is connected via a relay, thereby protecting the switch contacts from overload.
**To replace pin fuses and relays in the mounting block, use specially provided plastic tweezers.
***Fuses of different ratings are painted in different colors, and they also indicate the numerical value of the current for which it is designed.
The color of the fuse body and its correspondence to the rating:
20A - Yellow 15A - Blue 10A - Red 7.5A - Brown
SEE ALSO - fuses and relays for...:
Electrical fuses in any car are designed for the same purpose - protecting electrical wiring and consumers from power surges and short circuits. The mounting block of old-style VAZ 2105 fuses has seventeen of them. Each element in the circuit is designed to carry a certain current strength, if it exceeds it it will burn out and thereby protect the equipment and circuit from failure.
Fuse layout
Where is what in the block?
Before you start changing VAZ 21053 fuses, you need to familiarize yourself with the location and purpose of each of them, including the relay. On the block diagram, the fuses are designated by the English letter F and each have its own number:
- F1 - electric current strength of 10 A, ensures the safety of the electrical circuit of the heating system, reversing lights and connection relay;
- F2 - ensures the safety of the electrical circuit of the windshield wipers and headlights;
- F3, F4 - used as spare fuses;
- F5 - current 20 A, necessary for safe operation of the heater for the rear window and the connection relay;
- F6 - 10 A, ensures the safety of the electrical circuit of the clock and cigarette lighter;
- F7 - 20 A, needed for the operation of the signal and other sound elements;
- F8 - 10 A, provides protection for turning headlights and emergency lights;
- F9 - 7.5 A, protects rear PTF;
- F10, F11 - ensure the safety of the lamps inside the cabin and braking, as well as the parking lamp and the indicator of heating the liquid in the radiator;
- F12, F13, F14 - protect the switching on and off of the high beam headlights, their regulator, as well as the license plate lamp;
- F15 - ensures the safe operation of side lamp lamps and certain devices inside the car;
- F16, F17 - designed to protect low beam headlights and washer relay.
WHY DO FUSES FAIL?
There may be several reasons for this. You need to start with trivial cases when a device with a lower current is placed in the circuit. When you turn on, for example, the lighting, the starting current of the cold filaments exceeds the working current, so if the circuits are working properly, a fuse of a lower rating will simply blow out.
A short circuit in the protected circuit is one of the most dangerous electrical equipment faults. If in the circuit where the short circuit occurred there is a fuse of a higher rating, then the track of the printed circuit board of the mounting block may burn out instead. If the culprit for the blown fuse is a short circuit in the circuit, then before installing a new protective element, you need to try to eliminate it.
Reasons for blown fuses
This is what the mounting block looks like
There may be several reasons for the combustion of the VAZ 2105 mounting block. One of the most common is the destruction of a certain electrical part in the car. In addition, if the electrical wiring is shorted, there may be a failure in the electricity supply, as a result of which the VAZ fuse box may also burn out. The violation process can be identified in the shortest path with a low value.
Even from the school curriculum, many remember Ohm's law, which states that the current must necessarily increase if the resistance in a certain part of the electrical circuit decreases. The result of such a violation is the combustion of a special fuse link, which is located in the fuse block of the VAZ 21053. The circuit can only be opened by interrupting the connection.
Another common cause of a blown fuse box is a sudden surge in electricity. It leads to voltage overload, and a certain part working with the distributor begins to short out or jam. Thus, high electrical voltage arises inside the electric motor, which leads to blown fuses. Of course, the fuse box is needed in order to prevent some more important spare part from burning out. Therefore, its replacement is a common occurrence.
It may happen that the fuse is installed incorrectly. In this case, the shell can melt even with the slightest jump in current in the electrical wiring.
Situations cannot be ruled out when the fuse does not sit well in the block, which is why contact is sometimes lost. If the part is not installed tightly, then such a violation can cause not only the fuse to blow, but also the melting of the unit body, which will lead to its replacement.
The last reason for fuses to malfunction is simple wear. In any case, this will happen over time, since even the best detail does not last forever. The part of the fuse made of plastic is most often susceptible to melting due to heat or overload. Over time, this will cause the formation of a smaller cross section. Many people know that when heated, metal threads increase their resistance. Its increase entails a decrease in current. As a result, the device will burn out due to a sudden voltage surge.
Video “Replacing the block”
This video from the Mechanics channel shows how to replace a block with protective elements on VAZ cars, including model 2105.
Where is the VAZ fuse mounting block located: 2104, 2105 (carburetor, injector)
The mounting block is located in the engine compartment on the right side and is attached to the front panel. The mounting block is closed on top with a lid on which symbols for the purpose of the relay, fuse numbers and the circuits they protect are printed. Most vehicle electrical circuits are protected by fuses installed in the mounting block.Show 10202550100 entriesSearch:
| Fuse number | Current strength, A | Protected Circuits |
| F1 | 10 | Tail lights (reversing lights). Heater motor Warning lamp and rear window heating relay (winding) |
| F2 | 10 | Electric motors for the windshield wiper and washer pump. Windshield wiper relay |
| F3 | 10 | Spare |
| F4 | 10 | Spare |
| F5 | 20 | Rear window heating element and heating relay (contacts) |
| F6 | 10 | Cigarette lighter. Portable lamp socket |
| F7 | 20 | Sound signals and relay for turning on sound signals. Engine cooling fan motor and motor switch relay (contacts) |
| F8 | 10 | Direction indicators in hazard warning mode. Switch and relay-interrupter for direction indicators and hazard warning lights in emergency mode |
| F9 | 7.5 | Generator voltage regulator (on vehicles with G-222 generator) |
| F10 | 10 | Turn indicators in turn signal mode and corresponding indicator lamp. Turn signal interrupter relay. Turn signal indicator Tachometer Fuel level indicator. Coolant temperature gauge. Voltmeter. Fan motor activation relay (winding). Battery charge indicator lamp. Indicator lamps for fuel reserve and parking brake activation. Warning lamps for emergency drop in oil pressure and insufficient brake fluid level. Indicator lamp for turning on the parking brake. Indicator lamp for covering the carburetor air damper (for a carburetor engine). Electric fan thermal switch. Carburetor pneumatic valve control system Generator excitation winding (generator 37.3701) |
| F11 | 10 | Rear lights (brake lamps). Body interior light |
| F12 | 10 | Right headlight (high beam). Winding of the relay for turning on the headlight cleaners (with the high beams on) |
| F13 | 10 | Left headlight (high beam). Indicator lamp for high beam headlights |
| F14 | 10 | Left headlight (side light). Right rear light (side light). License plate lights. Engine compartment lamp Indicator lamp for turning on side lights |
| F15 | 10 | Right headlight (side light). Left rear light (side light). Cigarette lighter lamp. Instrument lighting lamp. Glove compartment lamp |
| F16 | 10 | Right headlight (low beam). Winding of the relay for turning on the headlight cleaners (with the low beam on) |
| F17 | 10 | Left headlight (low beam) |
Mounting block connection diagram:
P1 — relay for turning on the heated rear window; P2 - relay for turning on headlight cleaners and washers; PЗ - relay for turning on sound signals; P4 - relay for switching on the electric motor of the engine cooling system fan; P5 - headlight high beam relay; P6 — headlight low beam relay; A - the order of conditional numbering of plugs in the mounting block blocks. The outer number with the letter “Ш” in the plug designation is the block number, and the inner number is the conventional number of the plug. The plugs of the blocks without color marking are conventionally shown in brown
Location of relays and fuses in the mounting block : 1 - relay for turning on the heated rear window; 2 — place for installing a relay for turning on headlight cleaners and washers (the relay is installed on some manufactured cars); 3 — mounting jumper in place of the relay for turning on sound signals (in a variant, a relay is installed); 4 — mounting jumper in place of the relay for turning on the electric motor of the cooling system fan (in a variant version, a relay is installed); 5 — relay for turning on the high beam headlights; 6 — relay for turning on low beam headlights; F1-F17 - fuses (circuits protected by pin-type fuses are indicated in the table above).
Electrical equipment that consumes high current during operation is connected through relays that protect switch contacts from overload. To replace pin fuses and relays, special plastic tweezers are provided in the mounting block. Fuses of different ratings are painted in different colors; In addition, the fuse is marked with a numerical value of the current for which it is designed (rated value). The color of the fuse body and its correspondence to the rating 20A - Yellow 15A - Blue 10A - Red 7.5A - Brown
Free reference material on the electrical equipment of the domestic VAZ-2105 car is presented. Including a relay and fuse block, as well as diagrams of some modifications. The electrics are made according to a single-wire circuit - the negative terminals of the sources and consumers of electricity are connected to the “ground” of the car, which serves as the second wire. Most circuits are turned on by the ignition switch. The car diagram is presented in two parts in the figures. Click to enlarge to full screen.
Removal and replacement instructions
On initial models with an old-style unit, problems with blown fuses occur much more often than with a new one. Therefore, in this article we will touch on replacing fuses in the first VAZ 2105 models with a carburetor.
Block of the old model VAZ 2105
If we take a closer look at the compartment with safety elements shown in the photo, we will see from the diagram that the developers have placed a relay at the top and electrical fuses at the bottom. Relays are designed for a single purpose, namely to reduce the strength of currents in the vehicle interior. In order for the relay to work, there is no need for a large current, as a result the switches operate for a long time.
Electrical circuit of the new block
It is also worth knowing that in old-style blocks on cars with a carburetor, cylindrical safety elements were installed. They were installed in special spring-loaded connectors, which received a lot of complaints from drivers because of their unreliability. Gradually they weakened, which led to sparking.
Fuses blow for a variety of reasons. For example, if an element with a lower conductivity is installed in the electrical circuit. If, for example, you turn on the lighting, the starting current of the cooled filaments will exceed the operating current. As a result, in operating circuits, an electrical fuse with a lower rating can burn out very quickly.
The most dangerous problem in an electrical circuit is a short circuit. If a fuse of the appropriate rating is installed, it will simply blow. If it is more than what is indicated in the diagram, there may be trouble. For example, the compartment track may burn out.
Before installing a new fuse, you first need to determine the cause of the short circuit. Eliminate and then install a new protective element.
Useful video on VAZ 2105 electrical wiring from Vitaly Zhadan. It clearly explains how to understand the electrical circuit.
Preparation
Before you proceed to replacing the fuse, you need to de-energize the vehicle's electrical system. To do this, just turn off the ignition. But you can play it safe by disconnecting the negative terminal of the battery.
First you need to study the circuit to find the fuse or relay that is responsible for the non-working equipment.
The relays are responsible for the operation of the following consumers:
- heated rear window;
- washer drives;
- sound signal;
- if there is no electric fan motor, then a jumper is installed;
- high beam;
- low beam
- Find where the block is located.
- Remove the cover.
- We find in the diagram which electrical fuse or relay is responsible for the non-working equipment.
- We remove the burnt out element.
- We install a new one with the same nominal value.
- We connect the battery terminal and check the operation of the consumer.