Lada Priora Sedan › Logbook › Replacing the radiator grille
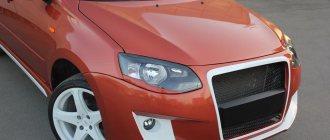
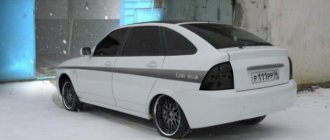
I had some free time over the weekend and decided to start installing a new radiator grille. Since I will be making the car a Black Edition
, the grille is accordingly purchased in black. Installation took a little longer than planned. And so, in order...
Unscrew the top screws, I got 10 pieces. Carefully bend the grille towards you and unscrew the screws from the inside (you need a short screwdriver, otherwise it’s inconvenient to climb)
But I had difficulties installing the new grille... I screwed on the top row of screws without problems, but the bottom row... I still couldn’t reach my hand to properly attach the screws. It was necessary either to bend the grille towards itself more, which was critical, since it was already going to break, or to do something with the maneuverability of the hand in order to get into hard-to-reach places))
In general, I decided to do everything properly and tighten all the screws and remove part of the bumper. We unscrew the bolts and screws around the perimeter of the bumper, pull it off the clips and voila... easy access to the grille is open
Scroll it, put the bumper in place, the grille is finished
Now installing the top bar (saber):
We bend the protective material on the hood, unscrew 2 nuts and carefully pull out the clips from the grooves (I broke one clip on the old strip)
We install a new one, screw it on and enjoy the work done))) As for me, the appearance has become much more pleasing to the eye
PS: While I was working on the car, dinner had already arrived))) Happy start of summer to everyone!
source
Radiator grille, mesh
If you nevertheless decide to make and install one yourself for your Priora SE, then you need to prepare. The main tools needed to implement this idea are scissors for cutting metal and pliers; a glue gun will also come in handy. For the basis of a tuning protective device, a metal mesh is purchased that is approximately the right size with a small margin.
You will have to cut off a lot of excess to accurately fit the product. The cut mesh can be treated with aerosol or any other suitable paint for beauty, keeping in mind that there will always be an increased temperature in the radiator area. After completing the painting work, we apply sizing with a glue gun.
First, the front bumper is removed from the car. How to remove the radiator grille has already been mentioned; it is secured with self-tapping screws and latches. We install the glued mesh on the Priora, insert a couple of screws for guarantee - and now, the work is completed, the tuning is done. We put the bumper in place and admire the result.
Car enthusiasts who have done this know that in the summer such a homemade product holds up well and protects the radiator from clogging with insects and other debris. Even a Chinese aluminum mesh costing about 300 rubles is suitable for the base. According to experienced prior drivers, even such simple protection always preserves the vital parts of the Priora SE car from contamination.
Meanwhile, purchased protective nets have a clearly calculated size of the holes, as well as seals, allowing them not to dangle or ring when the machine moves. Therefore, it makes sense to pay attention to the wide range of beautiful and high-quality grilles and mesh for Priora.
Radiator grilles in the form of a honeycomb or with so-called sabers are popular. There is also a radiator for the Priora, which is specially made for the SE version. Also, as a protective element on the radiator, you can use a special mesh for bumpers, which is installed using sealant.
Lada Priora Hatchback › Logbook › Do-it-yourself upper and lower grilles
When tuned grilles began to appear on Priors, I also wanted to get rid of the standard ones... They went on sale, but I was not eager to pay 1000 rubles or even more for these grilles. I scoured the Internet and found information on how to do everything yourself.
Unfortunately, there are no photos of the manufacture of the upper grille, but there is nothing complicated there. The VAZ badge is cut off from the (old model) grille. Two chrome hood moldings are purchased. These moldings fit well onto the ribs of the grille, like guides, maintaining alignment. The moldings are a little straighter than the grille, so with a little effort the moldings are pressed against the grille and secured either with electrical tape or masking tape (as I did) or something else. Then we glue the contact points between the moldings and the grille with epoxy glue. We carefully cut off the long ends of the moldings, which stick out and will not allow the grille to be installed, without lifting the chrome plating. That's all! The grill is ready!
The lower grille is made from two standard ones. Only the “glasses” for the fog lights are cut out from one of the grilles and soldered into the places cut out for them into the other grill. The joints are soldered with fine metal mesh, puttied, cleaned, primed and painted with anti-gravel to give roughness and black matte paint or any other color to match the car. That's all! I won't say it's easy, but it's still possible! =))
I purchased and installed “Chinese” =)) fog lights, price 600 rubles per pair. Fog lights made by Bosch, and even more so by Kirzhach, are expensive. And I needed 2 pairs of them. And thinking that they are located low, therefore there is a high probability of breaking them, and their glass does not change, I decided that if they were going to break, it would be better to let the cheap ones break! =))) They have one minus, they have f...ing plastic reflectors! Having connected them to the power supply, I just tried it for about 20 minutes, the standard 55W light bulbs stuck to the reflector! =((I then had difficulty pulling them out of the fog...
After that I decided to use 4 fogs as DRLs! And I installed H11 diode bulbs there, ordered from China. At first there were light bulbs with 68 diodes each, but, unfortunately, I hit the dog, breaking the fog lamps =((, the light bulbs remained intact, breaking the lower grille =(( and the bumper burst from the bottom =(( The bumper was soldered, I made a new one of the same grille. When broke the grille, and tore out most of the pins on which the grille is attached. I replaced them with metal pins, soldered them in the same places. I was afraid that it wouldn’t hold, but it holds very well! And I screwed the grille with nuts! =)) And after that I installed diode bulbs with 102 diodes each! =)) I plan to install them with 120 diodes...
source
The main reasons for changing the grill
Another design option
Adjusting and removing the grille is necessary to give the car an original look. Car owners should know how to replace a part if it cracks. It should be noted that this design has:
- Resistance to large temperature changes;
- Personality;
- Low price.
Priora tuning involves installing an “aggressive” radiator grille. This model will give the car a sporty look by increasing radiator cooling. Some Lada owners prefer to install factory models. You can use chrome strips and moldings. They stick easily to the ribs.
Of the necessary tools:
grille from Priora is easy to adjust with your own hands. To do this, you will need to cut the VAZ icon with a hacksaw. Then you need 2 moldings, which are pre-applied to the plane, marked and cut to size. This element is attached to the grille with tape. The forms must be pre-wrapped with adhesive tape. This will prevent damage to the main element.
READ How to Remove the Rear Bumper on a VAZ 2112
The next step is to dilute the epoxy glue in a container. They are covered with moldings and grilles. The strips are then applied, pressed and held in place for a while. After the glue has dried, the edges are trimmed. The file is used for this.
Modernized lower bumper grilles on Lada Priora
Modern lovers of domestically produced cars, at the beginning of the 21st century, were able to appreciate the new developments of the engineers who created the model range of VAZ cars, called Lada Priora, which replaced the Lada 110 and Lada 111, which were discontinued.
This model has improved technical characteristics, and has been constantly modernized over the course of 9 years of production. Every year, various changes occur in this car to improve comfort in use.
Many of the owners of this brand of vehicle, of different years of manufacture, pay attention to the noticeable differences in newer models. The possibility of improvement by updating factory parts with new spare parts allows you to give the car a new image.
The need to replace the lower grille on the front bumper of the Priora
Owners of Priora models are generally very satisfied with their choice, thanks to significant advantages over previous VAZ brands. However, the original, factory appearance of early brands may require some modifications, with the lower grille of the Priora bumper being the first area that is most often paid attention to.
Among the widely used types of such auto parts, the Priora bumper grille is divided into types according to the following characteristics:
- type of material used for the production of these spare parts (high-strength plastic, metal);
- by type of grating surface coating: glossy and matte;
- by diameter, cells on the grid;
- varieties of hole shapes;
- individual design styles.
Most often, the bumper grille on a Priora acts not only to improve the appearance of the car, but also to increase the efficiency of the radiator cooling process, as well as a barrier against the ingress of possible foreign objects.
Unimpeded air circulation allows you to maintain the required temperature with safe and efficient operation of the car engine. The modernized grille on the Priora bumper emphasizes the appearance of the car body of the specified brand in accordance with the requirements of the customer for this spare part.
Improved lower bumper grilles on Lada Priora
Due to the fact that recently the model range has been expanding, many of the motorists who actively use this brand, often in order to follow new developments within the framework of the chosen vehicle.
An improved model, the Priora bumper grille, may include that body part that is made of high-strength materials while maintaining all the requirements for the placement of holes for air circulation, without disturbing the aesthetics of the front of the car.
Very often they are original works as a result of tuning processes to modernize the model. The Lada Priora, whose lower radiator grille is made in an individual style, will make the car stand out among the mass of its own kind.
Tuning "Lada Priora" using moldings
A very interesting radiator grille (Lada Priora) is obtained if you use a couple of moldings. This tuning allows you to radically change the appearance of the front of the car.
The work is quite simple - you do not need any special skills.
- remove the radiator grille;
- cut off the VAZ icon located in the middle;
- We mark 2 chrome moldings along the length and cut them to the required size with a hacksaw;
- Using epoxy resin, we glue the moldings to our base and wait for it to dry;
- use a file to smooth out any unevenness if necessary;
- We install the resulting product on the car - and the tuning is successfully completed.
Replacing the Lower Bumper Grille of a Priora
Preliminary replacement of the front bumper
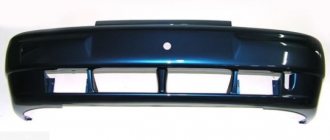
Welcome! Front Bumper - Basically when we drive around the city it is the front bumper that suffers the most, we catch up with the car in front of them and sometimes we put out reinforcements or just a stone lying on the ground that we see and end up getting hit which deforms the bumper, and it no longer becomes as beautiful as it used to be, because many owners immediately choose to replace this bumper, giving 100 cars to many people, they would like to take a lot to replace, because basically most people prefer replacing, you save on your car and, as they say, your money and your time for trips to the service, well, even more so, because the bumper essentially does not change the work, since it is only attached to the bolts, completely unscrewing it, which can be unnoticed, we will tell you about this In this article.
The note! To replace the front bumper on a Prior, you will need to stock up on a set of tools that will come with them: a wrench or socket of about “10”, as well as a screwdriver to unscrew the side screws. this is to attach the bumper!
Where is the front bumper of the previous one? Many people at this point will say: “Why open this question at all, it’s clear where it is before the grill.” The main answer is people who have never encountered replacing a bumper on a Prior, the fact is that on most cars this bumper is actually located strictly under the grille, and it is removed separately from it, while the previous one is, in principle, still the same, this bumper is strictly under the grille, and the grille, it seems, is also considered a bumper, since it comes as a single unit. Block with it, on many cars ethno has not been done, because when people find out about oh, even they are surprised and tell me to change the bar, but on the other one I need to remove and change the entire bumper? Actually, no, the radiator grille can be replaced without removing it or even replacing the bumper itself, you just need to know how (how to remove the radiator grille, see the article entitled: "Replacing the radiator grille. About priority") Take a close look on the subject, for example, under the photograph showing a standard Lada Prior car bumper:
Repair and replacement of the front bumper of Lada Priora
repair and replacement
front
bumpers
frets
in
.
Priority: install grille and eyelashes
In this video we install a new grille
radiator instead of the old drain,
play in
, and put eyelashes.
source
Features of the Priora bumper
Car enthusiasts immediately fell in love with the car, and after some time, in 2013, when the next car showroom opened in Togliatti, the company presented a new car, the Lada Priora. Again, new details appeared:
- headlights with daytime running lights that light up when the key is turned in the ignition;
- rear side lights;
- brake light equipped with LEDs for sedan, hatchback.
But what is especially noticeable is the rear bumper of the Priora. The model has been transformed thanks to a unique bumper with a new design. It has energy-absorbing inserts and is distinguished by the fact that the radiator grille is lined with a mesh structure.
The rest of the details were not changed, and Priora as a whole remained the same. This model comes in 4 standard body styles: station wagon, coupe, sedan, hatchback.
Bumpers are hinged units the same as the hood, fenders, and side doors. Both the front bumper on the Priora and the rear are made of plastic and are attached to the base using self-tapping screws. At the front there is an energy-absorbing beam. The radiator trim cannot be removed, as it belongs to an entire part of the bumper. The color of the bumper is the same as the color of the entire body.
Thanks to such innovations, the aerodynamics of the Lada Priora have improved significantly, since the designers took care to eliminate the shortcomings of previous releases, and the car acquired a completely individual look and became much more attractive.
Life hack: radiator grille of Priora 2 and 1 - how to change it, part numbers
The cooling of the car starts from the grille at the front. A good part can cool the engine only with the flow of air. The radiator grille in Priora 1 and 2 (SE) has such functions. The price of the part is from 700 rubles. On long trips, they allow air to pass through perfectly and cool the radiator. There are several spare parts options for Priora. For example, the radiator grille called the saber looks great. Our Priora is like a Lego. This type of tuning is popular among car owners - change the headlights, or the grille with bumper. As if the Lada Priora will no longer be a Lada. The black radiator grille of the Priora car without a badge also looks great on the car. It is popular with those pelvis workers who constantly rip off badges as if it won’t be a pelvis after that. The part is the “first step” in the air purification system entering under the hood of the car.
The main purpose of the part is to prevent foliage from getting inside. The mesh structure with which the standard spare part is made can only stop relatively large lumps of dirt and leaves. If its structure contained too small a honeycomb, the volume of air entering under the hood in a given unit of time would decrease. This will negatively affect the temperature of the car.
Grid Settings
You can use plastic or metal mesh. The installation process looks something like this:
- Remove the grille;
- Using a hacksaw, cut out all unnecessary vertical and horizontal elements, leaving only the outer contour;
Fold the mesh on the back of the Lada Priora grille
- Seal the resulting holes with putty (some use fiberglass);
- When the putty dries, grind until smooth. This is a rather labor-intensive process. you need to carefully monitor the shape and smoothness of the lines;
- Primer;
- Aerosol paint or regular brush;
- Attach the mesh to the screw (the base must be heated so that it does not burst) or glue it if it is made of plastic;
- Apply paint to the entire product;
- Varnish;
- Install back on the car. this work can be considered completed.
The level of protection for the engine compartment will depend on the size of the cells. You have to remember the right balance: with larger cells the cooling will be better, but the level of protection will be lower. With small cells. vice versa. When choosing a grid, try to stick to the “golden mean”.
Standard radiator grille for Priora - article number and price
The standard part is divided into two parts - upper and inner. The air flow is distributed in two ways: one at a time, it goes up to pass through the air filters. The second flow comes from below to go along the bottom of the engine and cool it.
For the 2170 car, this element was updated compared to its predecessor, the “ten”. The front became unrecognizable. The upper part of the Priora 1 air heat exchanger received catalog number 2170-02803056-00, the cost is about 700 rubles.
Radiator grille on Priora 2 - restyling
The restyled Priora received several changes in appearance, but the usual configuration did not affect the bumper detail.
Only the “Premium Class” version of the car received an update - the SE radiator grille with catalog number 21704-2803056-00, costs about 700 rubles.
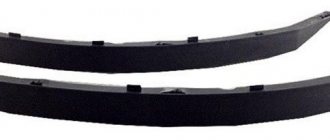
Lower grille: article number, price
The cost of the lower part for the bumper is about 400 rubles, and the article number under which the part is sold is 2170-02803057-00.
Saber – article number, price
Sabers are special facing linings that are installed on the front and rear of the Priora. At the factory they are installed chrome plated, but with the help of simple tuning they can be changed.
- radiator grille molding (saber) hood – 2170-08402104-00, price – about 700 rubles;
- decorative trim (for the trunk of a sedan) – 2170-08212512-00, price – 900 rubles;
- decorative trim (for trunks of hatchbacks and station wagons) – 2171-08212526-00, price – 1500 rubles.
Basic faults
The single most common malfunction of the plastic from which the Priora part is made can be mechanical damage. The part may crack or even break into several pieces. In this case, it will perform its task worse, because a large gap will appear that will allow foliage, dirt and dust to pass through.
The solution to the problem ends with the usual replacement of the part - it should not be connected with anything, because under the influence of vibration this connection will become loose, and then the gap will appear again. The second option is often for tuning and ordinary parts made to look like chrome, this pasting peels off from the frost. Sabers are susceptible to this. Replacing the radiator grille will completely get rid of this disease. The Priora is not so expensive that it is impossible to buy new spare parts for it. Another point is that this is not practical. Some practical pelvis workers paint this spare part after it peels off in the cold.
Replacement: how to remove the radiator grille on a Priora
To remove and change a spare part on a Priora, you need to disassemble the front bumper of the car; it will have to be completely removed. This work must begin by removing the bumper:
- Pull the handbrake and raise the hood.
- Remove the engine splash guard.
- Remove the fender liners, first unscrewing the fastening screws.
- Unscrew the screws securing the bumper to the fender.
- Next, unscrew the screws securing the plastic cover above the headlight. Pull the cover towards you.
- In the middle, unscrew the two fastening screws that hold the bumper relative to the upper frame.
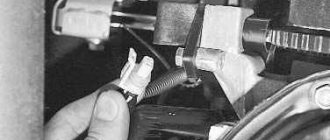
- Disconnect the wires from the fog lamp by pressing the fastening lock.
- Lightly pull the flange on the side of the bumper toward you to disengage it from the fender.
- Do the same on the other side. After this, unscrew four more mounting screws from the top. Place the bumper on a soft cloth.
- Next, to dismantle the air heat exchanger element, unclip the 11 plastic fasteners (for SE these are screws), pull the plastic part towards you. It is not recommended to dismantle without removing the bumper, because there is a fairly serious risk of damaging the element and its fasteners.
Replacing the lower grille
In order to remove the lower part of the part, you also need to remove the bumper. After this, the fastening washers are unscrewed, and the grille comes out of engagement; it can be easily removed.
Removing the front bumper
We carry out the work when repairing and replacing the front bumper, the energy-absorbing beam of the front bumper, removing the headlight unit and for access to the hood lock and sound signal. Unscrew the nuts securing the power unit mudguard 5–6 turns (see “Removing the power unit mudguard”). We unscrew the screws securing the fender liners to the front bumper (see “Removing the mudguards and front wheel fender liners”). In the wheel arch...
… use a Phillips screwdriver to unscrew the self-tapping screw securing the bumper to the front fender bracket. Similarly, unscrew the screw on the other side of the car.
Using a Phillips screwdriver, unscrew three screws 1 and one self-tapping screw 2 securing the decorative trim of the headlight...
...and remove the cover. Similarly, remove the decorative trim on the other side of the car.
Using a Phillips screwdriver, unscrew the two screws securing the bumper to the upper cross member of the radiator frame.
Using a little force, remove the bumper side flange from the body bracket. We perform a similar operation on the other side of the car.
Remove the front bumper. If it is necessary to remove the energy-absorbing beam of the front bumper...
...using the “8” head we unscrew the three bolts securing the energy-absorbing beam to the body...
...and remove the energy-absorbing beam. We install the energy-absorbing beam and the front bumper in the reverse order, ensuring uniform gaps between the bumper and body parts. After the bumper is secured to the body, we press the sidewalls of the bumper to the body brackets until the sidewall flanges are fixed on the body brackets.
Winter grille cover
The winter cover is installed to ensure that only more or less hot air enters the radiator. This happens in such a way that the air entering under the hood circulates for some time, taking heat from the engine and heating up, and then gets inside the “stove”. This way the air is heated in advance before entering the cabin.
The plug is solid, and therefore the volume of air entering under the hood is noticeably reduced. It is recommended to remove it at the end of the winter season, because in summer such tuning can result in the car overheating. Plugs can be placed on both parts - upper and lower.
For the lower part, the solid version ZRLP-050602 is suitable, the price is 480 rubles, on top you can put a “Razor” for 1,000 rubles, or a completely blank version for 800 rubles. However, it is not recommended to close both parts - you should leave a “window” for a large air flow.
source