Hello dear readers of the blog RtiIvaz.ru. Let's look at rubber door seals and trunk lids today under the heading of auto repair kits, find out their design numbers from the catalogue, which VAZ cars are suitable for and what they are used for. Well, let’s not waste time and start studying this photographic material.
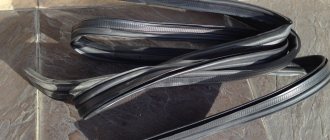
And so here is a photograph of a rubber door seal for a VAZ car, Kalina-1118. In the red circle you can see a complex cross-section of the seal, by which you can determine which car it is intended for. We will not go into the details of this cut, which is already clear in the photograph, but let’s look at its design number according to the catalog and the length itself to determine when choosing. The same door opening seal is suitable in cross section and length for VAZ 2170 Priora and VAZ 2110 cars.
Repair kit design number:
- 1118-6107018-10 length for front doors 3 meters 11 cm. measurement error (+ -) 5 cm
- 2170-6107018-10 length for front doors 3 meters 11 cm. measurement error (+ -) 5 cm
I measured the length myself, so excuse me, I could have made a mistake, plus minus (+ -) from 2 to 5 centimeters. The length of the rear door seals for Kalina and Priora is still in question; by the way, you can install them on the rear door openings of the car from the front ones by shortening them in length with a hacksaw. Door seals for VAZ 1118 and VAZ 2170 need to be measured on site when you buy them. Sometimes on sale door seals are the same in shape and cut as Kalinovsky and Priorovsky, but longer.
Look further at the second photo of the rubber door seal for cars of the “ten” Lada 2110 family, as you can see here there is a completely different cut shape of a less complex design compared to the Kalina car door seal.
- 2110-6107018 for the front door length is 3 meters 17 cm, and for the rear door 3 meters 4 cm. measurement error (+ -) 2 cm.
Types of seals for VAZ-2114
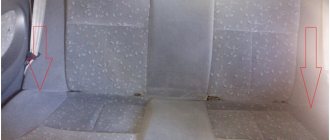
Over time, the rubber seals on car doors become unusable. The seals on the lower sills in the VAZ-2114 are especially susceptible to wear. Therefore, they need to be changed most often. It is recommended to replace all door seals as a whole.
What kind of door seals can be installed on a VAZ 2114:
- Ready-made factory kits for VAZ 2109 - VAZ 2115 - they are specially selected for the size of the doorways of these particular car models, the set includes rubber seals for the front and rear doors.
- Measuring universal seals - they are sold in the form of a measuring tape, from which a section of the required size is cut off.
- Sealing rubber from other car models - for the VAZ-2114, seals from Lada Priora or GAZelle are often used.
Important! You may come across advice to install a universal seal for windows or refrigerators on your car. You should not try to save money in this way, since such seals, which are not designed for loads in car openings, quickly wear out. In addition, they initially do not provide the proper degree of protection and sound insulation.
Additional Priora seal between the front and rear doors
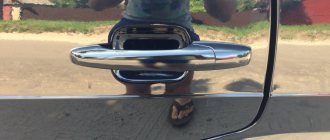
The noise and whistle of the wind at speed is familiar to many; to reduce it, the gap between the front and rear doors should be eliminated. RKI-19 was a good fit for the Lada Kalina as such a seal and there were no difficulties with its installation. However, the distance from the edges of the doors to the Priora pillar is greater than that of the Kalina. Therefore, instead of RKI-19, you will need to find a larger seal.
Advantages:- Reduction of aerodynamic noise (sound insulation).
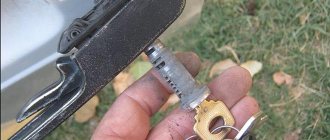
- Protection against contamination of the front door lock area and rear door hinges.
- Additional sealing (thermal insulation) of the car interior.
Disadvantages: None found.
Application of a three-chamber seal
All seals can be divided into:
- Single-chamber universal - require installation of additional protection, suitable for windows, doors and hood. They are not produced as factory equipment for cars due to the low degree of security.
- Two-chamber - factory seals for VAZ-2114. The double-circuit structure allows, if necessary, to install an additional layer of sealant.
- Three-chamber - for example, sealing rubber for Lada Priora. They are additionally equipped with a steel strip for fixation, which allows them to retain their shape for a long time.
Three-chamber seals provide the greatest degree of protection of the car interior from cold and noise. Currently, they are used in the production of domestic cars.
Attention! After installing the three-chamber sealing rubber, car owners note that they need to apply more force when closing the door. This is a temporary phenomenon. It is due to the fact that the VAZ-2114 was initially equipped with double-circuit tires, and the door was designed specifically for its thickness. Also, the new sealing layer always has greater rigidity. Gradually the new seal will “take hold” and the door will close easier.
Additional seals
Sometimes, when the sealing circuit is worn out, car owners install additional protection. The following are used as it:
- thermal insulating tubes (Flex, K-Flex);
- windshield seal - not recommended due to low seal to the doorway;
- universal single-circuit seal.
An additional layer is usually installed on the top and back of the door. It is not worth installing additional VAZ 2114 door seals on the thresholds, since this area is subject to the greatest loads.
This is also where dirt accumulates the most, and a seal in the form of a Flex tube can become an additional storage for it (essentially it is foam rubber with increased density). And this leads to metal damage.
An additional seal is glued to the side of the body, but in no case to the doors themselves. It is necessary to ensure its tight fit to the main insulating layer. Also, you cannot follow the advice of “traditional craftsmen” and use IV tubes as insulation - this will not provide the desired effect.
Additional seals for the Priora body
After the door seal is installed, we move on to the body. There are two “sides of the coin”: horizontal and vertical compaction. We install horizontal rubber bands at the top and bottom of the body:
And vertical ones for the rear door:
Thus, additional Priora seals will significantly reduce wind noise, eliminate dust and make the car interior warmer. Here is a general picture of the work done:
The issue price is 50 rubles/meter, no more than 10 meters will be required.
By the way, in order to maximize the effect of the door seals, it is recommended to soundproof the Priora doors.
How to change the seal
In order to change the sealing rubber, you first need to dismantle the old seals.
To do this, you need to remove sequentially:
- plastic facing panels from thresholds;
- old layer of sealant;
- its remains - small traces are cleaned with a solvent;
- dirt and dust - using a vacuum cleaner and a damp cloth.
Before starting installation work, you need to wait until the openings are dry.
- For a measured seal - measure the doorway and cut off the required length of rubber + a few centimeters of reserve.
- Insert a silicone or polymer tube inside the seal chamber - it is needed to create additional density and sound insulation.
- Place the seal around the entire perimeter, trim off the excess.
- Using a mallet with a rubber striker, tap the sealing rubber so that it sinks “all the way.”
- Replace the plastic panels.
- Carefully glue the second contour of the seal.
Important! Glue and solvent should be selected very carefully so as not to damage the paintwork and metal.
Next, you need to wait for the glue to dry completely and close the door. If excess “comes out”, you can cut it off.
After installing a new sealing layer on the VAZ-2114, the level of noise insulation and wind protection in the cabin increases significantly.
A properly installed seal can also protect against moisture that gets inside when the insulating layer is worn out.
It also becomes warmer in the car - drafts no longer circulate around the cabin. But this result can only be achieved with the correct selection and high-quality installation of door seals.
Source
Door and trunk seals
Door and trunk lid seals...
Hello dear readers of the blog RtiIvaz.ru. Let's look at rubber door seals and trunk lids today under the heading of auto repair kits, find out their design numbers from the catalogue, which VAZ cars are suitable for and what they are used for. Well, let’s not waste time and start studying this photographic material.
And so here is a photograph of a rubber door seal for a VAZ car, Kalina-1118. In the red circle you can see a complex cross-section of the seal, by which you can determine which car it is intended for. We will not go into the details of this cut, which is already clear in the photograph, but let’s look at its design number according to the catalog and the length itself to determine when choosing. The same door opening seal is suitable in cross section and length for VAZ 2170 Priora and VAZ 2110 cars.
Repair kit design number:
- 1118-6107018-10 length for front doors 3 meters 11 cm. measurement error (+ -) 5 cm
- 2170-6107018-10 length for front doors 3 meters 11 cm. measurement error (+ -) 5 cm
I measured the length myself, so excuse me, I could have made a mistake, plus minus (+ -) from 2 to 5 centimeters. The length of the rear door seals for Kalina and Priora is still in question; by the way, you can install them on the rear door openings of the car from the front ones by shortening them in length with a hacksaw. Door seals for VAZ 1118 and VAZ 2170 need to be measured on site when you buy them. Sometimes on sale door seals are the same in shape and cut as Kalinovsky and Priorovsky, but longer.
It is better to buy a longer seal and cut off the excess length, rather than have it short and have to install a gasket.
Look further at the second photo of the rubber door seal for cars of the “ten” Lada 2110 family, as you can see here there is a completely different cut shape of a less complex design compared to the Kalina car door seal.
- 2110-6107018 for the front door length is 3 meters 17 cm, and for the rear door 3 meters 4 cm. measurement error (+ -) 2 cm.
In the third photo we see the seal of the door opening of the “nine” of the best car, Lada 2109. On the “eight” with two doors, such seals are installed in the shape of the cut, only longer, if I’m not mistaken, by about 15 centimeters. They are suitable for cars from VAZ 2109 “nines” to 2115 “fourteens”.
- 2109-6107018 for the “nine” the length on all four doors is 3 meters 42 cm. measurement error (+ -) 2 cm
- 2108-6107018 for the "eight" length on two doors 3 meters 71 cm. measurement error (+ -) 2 cm
And now we come to the rubber door seal of cars of the “classic” family VAZ 2101-2107. The cross section, as seen in the photo of the first cars, has a more or less simple shape compared to other seals shown on this page of the rubber technology auto blog.
- 2107-6107018 for all “classic” models, length 3 meters 46 cm. measurement error (+ -) 2 cm.
In general terms, everything is clear about the side doors, let's next look at the seals of the trunk lids and the tailgate opening of VAZ cars. A cross-section of the trunk lid seal as we see a complex design for the Lada 2170 Priora.
Repair kit design number:
- 2170-6307024 length 3 meters 36 cm. measurement error (+ -) 2 cm
The rubber seal for the trunk lid of the VAZ 2112 car is also suitable for the Lada 2111 station wagon.
Repair kit design number:
- 2112-6307024 length 3 meters 87 cm. measurement error (+ -) 2 cm
The rubber seal of the trunk lid of the VAZ 2110 car, in comparison with the Priorov one, seems to have fewer complications in section (see photo).
- 2110-6307024 length 4 meters 9 cm. measurement error (+ -) 2 cm
Here we come to the final part. Before our eyes is a rubber seal for the rear trunk of a VAZ 2105 of the “classics” family. Since the “five” is long, it can be installed on all Lada cars only by adjusting the length on site. Exactly the same seal, about 35 centimeters longer, is found on the Chevrolet Niva SUV.
- 2105-5604040 length 3 meters 46 centimeters measurement error (+ -) 2 cm
- 21213-6307024 length 4 meters 36 centimeters measurement error (+ -) 2 cm
What are all these listed rubber seals for? I'll try to answer this question. Rubber protects and protects us! For example, in order to prevent it from being cold in the car in winter or to make the noise of the wheel treads less audible, there is no whistling from the oncoming wind and dust and polluted air from the street do not get in. YouTube video:
Source
What to choose?
Sometimes you are amazed at the imagination and thoughts of those who are trying to save money on car repairs. If we talk about rubber seals, some advise using drip tubes instead, others go the other way, inserting window seals.
Do not follow such advice under any circumstances. They won't lead to anything good.
There are several truly correct and effective options, which we will introduce you to using the table.
| Option | Peculiarities |
| Ready-made kits from the manufacturer | They are designed specifically for the VAZ 2110 model. These are mass-produced rubber bands that fit perfectly on the dozen doors. Their design is double-circuit, which allows you to install additional seals if necessary. |
| Measuring rubber bands for VAZ | In stores you can purchase ready-made or soldered seals for each door. Or a solid tape, from which they will cut you a piece of the required length |
| Seals from Priora | Experts believe that these are the most effective and reliable seals. This is due to the three-chamber design with a steel fixing strip and high quality. These elastic bands do not wrinkle and keep their shape perfectly. |
| Rubber bands from GAZelle | A frequently encountered option that has similar characteristics to the standard elements for the dozen. The price is about the same |
When choosing the length of the required piece of seal, measure the internal length of the installed rubber bands on both doors separately. Take it with a reserve, because you can always cut off the excess.
The fixing elements should be caps and high-quality, effective glue. When purchasing the rubber itself, they will tell you which glue is best to use.
Installation of additional door seals on Priora
| The sound insulation of foreign-made cars has always been different from domestic ones, and one of the reasons for this is the competent design of the body and the successful location of door seals. Let's figure out where and how you can install additional seals on the Priora. |
The maximum effect will be noticeable if the additional Priora seal is installed in the correct place and in combination on the car body and doors:
Additional seal for the car body
Owners of Lada Granta/Kalina can use the RGI-135 seal:
Universal method: We begin installing the rubber seals from the bottom corner of the windshield. We glue the seal onto the gutter seal, and glue part of the seal onto the plastic intakes of the windshield. Make sure there are no gaps between the doors and the body.
We go to the end of the back door and go down. We glue the lower seal onto the plastic threshold, and not above it. Otherwise, it will be of no use.
Instead of a construction D-shaped seal, you can use a seal from UAZ Patriot:
After installing all the additional seals, the doors will be noticeably more difficult to close in the first days of operation. After a week, the seal will take the desired shape and the doors will close as before.
There are several positive effects after such modification. The seal plays the role of sound insulation, whistling while driving will disappear, and road noise will decrease. In addition, less dust will enter the car interior, and the doors will close noticeably quieter with a pleasant sound.
In the survey we determine which method of installing an additional seal is the best. Along with the installation of additional sealing, it is recommended to install additional sound insulation of the doors.
Photo: Lexa16 in-flight magazine
Keywords: Lada Priora doors | seals for Lada Priora | sound insulation of Lada Priora | Lada Granta doors | seals for Lada Granta | soundproofing of Lada Granta | Lada Kalina doors | seals for Lada Kalina | soundproofing Lada Kalina
Found an error? Select it and press Ctrl+Enter..
- LADA car sales collapsed in April 2021
- A simple way to automatically turn on the low beam on a Lada Priora
- Installation of the Luxe central console from Lada Kalina on Lada Granta
- Is it worth buying LADA Connect, owner reviews
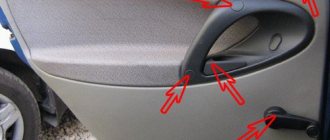
Additional seals on Priora doors
Seals for Priora doors can be purchased at a hardware store. This D-shaped seal is self-adhesive, so you don’t need to buy additional glue. You can install an additional seal on the Priora door in different ways. The photo shows one of the options, which, according to the majority, is the most advantageous.
We also install a seal at the bottom of the door (photo by author). They are installed on special clips that come complete with the lower seals:
Advantages:
- Reduction of aerodynamic noise (sound insulation).
- Protection of the interior and sills from dirt.
- Additional sealing (thermal insulation) of the car interior.
- More silent/pleasant door closing.
Removal
When you have purchased the required number of seals, you can begin to work.
The first step is to remove the old rubber elements, after which the installation of new parts begins.
Let's tell you more about the dismantling procedure.
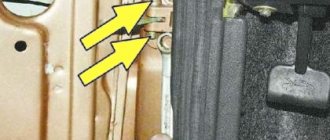
- Remove the plastic trim panels installed on your vehicle's door sills. To do this you will need a thick screwdriver. Remove carefully, being careful not to damage the plastic caps. But it’s better to buy new ones in advance if you can’t carefully dismantle the threshold.
- Now remove the old pieces of rubber from the seats. Simply tear off the sections that are torn off by hand.
- Remaining rubber can be cleaned off with any available tool. Only be careful with sharp objects so as not to damage the metal and paint layer.
- Very small residues and traces of glue are removed using solvents. Make sure that the solvent you choose will not damage your paintwork.
- Go over the doorway with a vacuum cleaner, remove all dust and dirt. Take special care to clean the bottom part. If wet cleaning was used, wait until everything is thoroughly dry.
Upcoming work
Installation
This process cannot be called complicated. You are not required to have any special training or extensive experience. Although you should at least be able to handle glue.
Working with the back door
Each stage is performed consistently and carefully to achieve the desired result and create comfort inside the cabin.
- Even if you have already measured the required length of the seals for your doors, we advise you to do it again. Anything can happen.
- Cut the required length, plus leave a couple of centimeters of reserve. Although if we are talking about a ready-made set of rubber bands, you won’t have to cut or leave anything. Skip the first two points.
- Insert a tube made of silicone or polymer inside the sealing tape. They are sold everywhere, so there should be no problems finding them.
- The length of the tube must match the length of the rubber. This tube will serve to create the necessary elasticity and allow the elastic to press more tightly to the door. This way, ventilation gaps will not appear, and the cabin will become much quieter.
- A shaped side rubber seal is glued to the bottom.
- If the tape is solid, you can start putting it on from either side, as is more convenient for you.
- If it is a measuring rubber band, then start from a point between the door overhangs, or 30 centimeters from the bottom of the threshold. Moving up or down is a personal choice for each master. There is no difference here.
- Push the figured profile all the way down. To do this you will need a rubber or wooden hammer. He's a mallet.
- When the seal is installed around the entire perimeter, an extra piece will be revealed. Cut the tube straight and end-to-end, and make the elastic itself seem slightly deformed. It's like you tore it off by hand. This will avoid the unpleasant phenomenon of siphoning through the joint.
- Replace the pistons; if some were damaged during removal, replace them with new, intact ones.
- Replace the plastic cladding removed from the threshold.
- The second contour of the seal is glued along the edges carefully, but as tightly as possible, after which time is given for the glue to dry completely.
Almost immediately you will feel the difference between the old and new seal. This is a useful exercise that allows you to get rid of unpleasant sounds, knocking, whistling and cold air flowing directly onto your feet.