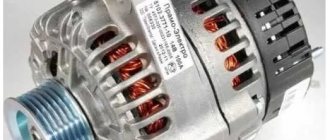
Signs of generator failure
Signs of abnormal operation of a car generator may include:
- no “battery” indication on the dashboard when the ignition is turned on;
- the “battery” light glows after starting the engine;
- periodic blinking of the “battery” signal indicator while driving;
- the smell of burnt electrical wiring in the generator area;
- failure to start the engine after parking.
Lack of battery charge with a faulty generator leads to problems with starting the engine. More dangerous is a malfunction associated with exceeding the current and voltage of the car battery charge. Many car enthusiasts use a donor battery to start the engine, after which they disconnect the battery terminals to switch to charging their own battery. At this moment, the vehicle's electrical equipment is powered by a generator.
If the generator is faulty, the voltage in the on-board network may be more than 17 volts, which leads to breakdown of the protective zener diodes in the engine control unit. In this case, expensive repairs to the engine control unit are required.
Causes and possible consequences of the malfunction
The generator may not work for the following reasons:
- malfunction of the voltage regulator (“pills”, “chocolates” in the slang of car enthusiasts);
- wear (destruction) of brushes;
- short circuit of the exciting winding (rotor);
- breakdown of diodes (located in the horseshoe);
- wear of bearings and bushings.
A faulty voltage regulator usually results in a lack of battery charge. In this case, the “battery” indicator light appears on the dashboard. The engine continues to run until the battery is discharged to approximately 8 - 9 volts.
During daylight hours, the battery charge may be enough for 30-50 kilometers, provided that the battery was well charged at the time the malfunction occurred.
If the output stages of the voltage regulator breakdown, a malfunction may occur due to an increase in the generator output voltage to 17 - 20 Volts. This recharges the battery. The consequence of overcharging is the process of boiling of the electrolyte. If signs of corrosion appear under the hood in the battery area, it is necessary to check the generator.
A breakdown of the diode bridge can occur when the battery is accidentally reversed (installing the terminals in the wrong polarity). Typically, diodes are punched in pairs in one arm. A faulty diode has a resistance close to zero. In this case, the stator winding of the generator operates in short circuit mode and becomes very hot.
After a few minutes of engine operation, the windings overheat, and a smell of burnt electrical wiring appears under the hood of the car. To avoid fire, the engine must be turned off and the generator checked.
Wear of the brushes leads to gradual failure of the generator. First, while driving, the charge indicator light on the dashboard begins to blink, then it begins to glow constantly. In many generator models, the brushes are changed together with the voltage regulator.
A short circuit in the generator windings can lead to a significant change in output parameters and overheating of the device.
Initial check sequence
An initial performance check can be performed without dismantling the generator. To do this, set the multimeter switch to the “constant voltage 20V” mode. Next, connect the black probe to the negative terminal of the battery, the red one to the positive terminal. After this, you need to start the engine and let it reach a stable idle speed. Multimeter readings ranging from 13.5 to 14.5 Volts are considered normal.
If the multimeter shows a value less than 12.8 Volts, the charging process either does not occur at all, or the charging current is extremely small. The generator is operating in abnormal mode. When the voltage is more than 14.8 Volts, the battery is overcharged. This can lead to boiling of the electrolyte, an increase in acid concentration, and destruction of the battery plates.
To check the voltage at the generator output, you need to turn on the car lamp in the open circuit from terminal 30 on the generator (the point of contact with the thick wire leading to the positive terminal of the battery or starter).
Next, connect the multimeter in the “=20V” mode with the red probe to contact 30 of the generator, and the black probe to the stripped contact on the engine or body. Start the engine. The reading on the multimeter should not be more than 15.5 volts whenever the accelerator pedal is pressed. Otherwise, further operation of the generator is dangerous for the electrical equipment of the car.
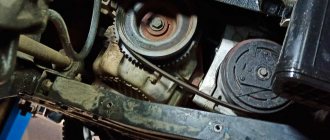
When checking, you should evaluate the degree of tension of the generator belt. Using a simplified method, this can be done by pressing on the belt with your finger.
The amount of deflection should be within 0.5 - 1 centimeter. At the same time, check the degree of belt wear. To determine the reasons for abnormal operation of the generator and perform repair work, dismantling the generator is required.
Check Features
When checking the generator of a VAZ 2110, 2107 and others for serviceability, the following conditions must be met:
- An accurate multimeter should be used for diagnosis.
- The normal voltage is 12 V.
- If it is necessary to replace the wiring, you must use wires with the same cross-section as the original.
- Before checking, you should check that all fasteners are connected correctly and the belt tension is correct. If necessary, the connections should be adjusted to normal, the belt should be loosened or tightened.
During the verification process it is prohibited:
- short circuit the wires;
- connect terminals that differ in purpose and parameters, connect terminal 30 or B to ground;
- diagnose a generator without connected consumers.
Checking generator components
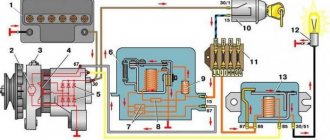
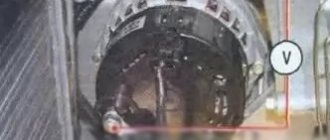
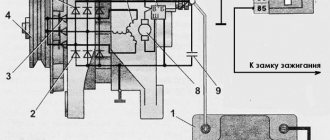
The test begins with monitoring the functionality of the voltage regulator. To do this, the regulator is removed from the generator and a simple electrical circuit is created.
Any car interior light bulb can be used as an incandescent lamp. If voltage regulator 3 is working properly, lamp 6 should not glow at full power. When connected in parallel with the lamp (brushes) of a multimeter, its readings should be from 5.0 to 10.0 Volts. If the multimeter readings fall outside these limits, the regulator must be changed. The design of some generator models allows for the possibility of replacing the regulator without dismantling the device.
Next, check the exciting winding of the generator for breakdown. To do this, set the multimeter to resistance measurement mode at a limit of 200 kiloOhms. The probes are connected: black - to the commutator lamella, red - to the metal part of the armature. The resistance should be more than 100 kiloohms or higher than the upper limit of measurement, as shown in the photo.
The resistance between the lamellas (rotor windings) is usually 0.5 - 2 Ohms.
Checking the stator begins with checking the windings for breakdown. To do this, the red probe of the multimeter is connected to the metal part of the stator, the black probe is connected in series to the windings.
The resistance must be above the upper measurement limit. Then the resistance between the winding contacts is measured. They should differ by no more than 5%. The measurement limit of the multimeter is set to 200 ohms.
If the winding has an electrical breakdown, a short circuit of the turns or a break, it must be replaced. There are workshops that rewind stators and rotors.
To check the health of the diode bridge, the multimeter measurement mode is switched to the “diode” test. Then the diodes (their number on a horseshoe is usually 9) are sequentially “ringed” in forward and reverse connection. In the forward direction (black probe to the cathode) the resistance is 550 - 700 Ohms, when switched in reverse it is greater than the maximum measurement limit.
When the diodes breakdown, the resistance in all directions will be practically zero. This diode should be changed. The difficulty of replacing a diode lies in the fact that the diodes in generators are not soldered, but spot welded to ensure reliable contact at different temperature conditions.
A car generator is an important part of a car's electrical equipment. At the first sign of inoperability, it is necessary to check it using a multimeter.
Source
How to measure the voltage of a Prior generator
- Registration
- Entrance
- To the beginning of the forum
- Forum Rules
- Old design
- FAQ
- Search
- Users
no oscilloscope
I would just replace it with a new one. Or installed it from a known-good generator to make sure it was the problem
It should be understood that this is a test of the generator itself. And the serviceability of the power supply system - the voltage must be measured on the battery. Unfortunately, sometimes it differs.
I extended all the contacts and everything is OK! It's back to normal! And the generator was producing the correct voltage, so I checked the voltage regulator!
What follows from this? Those. What if the voltage on the battery is less than on the generator?
Then the battery is charging
The tablet can be easily checked separately from the generator, tablet + light bulb + adjustable power supply.
when driving (headlights, fog lights, heater at first speed), 12.8 -12.6 is bad.
Well, as if there is no buzz, the battery gets nothing. headlights - low beam? At what rpm is this voltage?
Diagnostics of a removed generator
To check the generator removed from the VAZ 21, you should use a multimeter in ohmmeter mode. The probes are pressed against terminal 30 and the body of the unit. If there are contaminants and strong oxides on the case, they should be removed first, as they can affect the readings of the device.
You need to measure the resistance of each generator unit in turn. Parts that do not have the required resistance have become unusable. Most of them can be replaced at home using a minimal set of tools. To replace, you need to buy the same parts as those originally installed in the generator.
If you find an error, please select a piece of text and press Ctrl+Enter.
Generator check
We start the engine, let it run for a few minutes, then press the gas pedal and bring the engine crankshaft speed to 3,000 rpm. We turn on all consumers: external lighting, high beam headlights, heated rear window, heater fan, windshield wiper, hazard warning lights, etc. We use a voltmeter to measure the voltage at the terminals of the battery, which should be above 13.0 V. If this is not the case, it is faulty voltage regulator with brush assembly, generator windings (break or short circuit) or the contact rings of the generator rotor are oxidized. In order to make sure that the voltage regulator is working properly, turn off all consumers, except for the high beam headlights, and measure the voltage again. It should be within 13.8–14.4 V. To check the voltage regulator removed from the generator...
...we connect a lamp (1–3 W, 12 V) to the brushes, and a DC power source to the terminals of the brush holder, first with a voltage of 12 V, and then 15–16 V. In the first case, the lamp should be on, in the second - not. If the lamp lights up in both cases, there is a breakdown in the regulator; if it doesn’t light up, there is a break or broken contact between the brushes and terminals of the voltage regulator. In both cases, the brush holder with voltage regulator must be replaced. To check the valves of the rectifier unit, you can use a probe with a 1–3 W lamp or connect the battery through a 1–3 W, 12 V lamp. Dismantle the generator and remove its casing. Disconnect the “positive” terminal of the voltage regulator from the rectifier unit.
We connect the “plus” of the probe to the “B+” terminal of the generator, and the “minus” to its body (for clarity, the voltage regulator has been removed). If the probe lamp is on, then there is a short circuit in both the “positive” and “negative” valve blocks.
To check the short circuit in the “positive” valves, we connect the “plus” of the probe to the “B+” terminal of the generator, the “minus” - to the terminal of one of the phase windings of the stator. If the probe lamp is on, one or more “positive” valves are broken. To check the short circuit in the “negative” valves, we connect the “plus” of the probe to the terminal of one of the phase windings of the stator, and the “minus” to the generator housing. If the probe lamp is on, one or more “negative” valves are broken or the stator windings are shorted to the generator housing. A break in the valves is determined by a sharp decrease in the output current. However, this may also be a consequence of a break or short circuit in the generator windings.
To check the short circuit in additional valves, we connect the “plus” of the probe to the terminal of the rectifier unit, and the “minus” to the terminal of one of the phase windings of the stator. If the probe lamp is on, then there is a short circuit in one of the additional valves. A break in the additional valves is determined by low voltage (below 13.8 V) at the “D+” terminal of the generator at an average rotor speed. If the rectifier unit fails, we replace it as an assembly. We inspect the stator windings. There should be no signs of overheating on the winding insulation, which is a consequence of a short circuit in the valves of the rectifier unit. If there are signs of overheating on the windings, the stator must be replaced. To check the rotor windings, you need to remove the voltage regulator. To check the short circuit of the rotor winding to ground, connect the tester probes (in ohmmeter mode) to the slip ring and to the rotor shaft (or to the pulley). The tester should show infinity, otherwise the winding is shorted to ground.
To check for a break in the rotor winding, connect the tester probes (in ohmmeter mode) to the slip rings. If the tester shows infinity, it means there is a break in the winding.
Source
Checking the windings
First you need to visually inspect the windings. If there are no visible defects, you should use a multimeter. First you need to do the following:
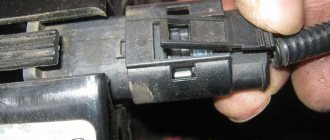
- Remove the brush holder.
- Disconnect the voltage regulator.
- Clean the slip rings.
- Diagnose the winding for defects.
The resistance measurement function on the multimeter should be activated. The measurement is taken between the slip rings and the stator. In normal mode, the value will be from 5 to 10 ohms.
How many volts should the generator produce on the Priora?
Constant undercharging of the battery or its absolute discharge at the most inopportune moment is a headache for many car owners. One source of these problems may be the generator. But how to check it? Perhaps it's not his fault at all? Let's figure out together how much the generator must produce for the normal functioning of all car systems and maintaining the battery in a charged state.
How to check the operation of the generator
The battery in a car is an important element of the system, which is responsible for providing the car’s on-board network with electricity. The generator is used to charge the battery while it is active. Unstable operation of a device generating electricity causes a voltage drop in the network and failure to restore the capacity of the power source.
Normal generator performance means timely and complete replenishment of the battery charge level, which decreases under load. Checking the battery charge level from the generator is simple and can be done by the car owner himself.
Diagnostics of an automotive energy-generating device includes a visual inspection of the unit, its elements and related parts, as well as voltage and current measurements. At least twice a year, you should check the tension of the drive belt, excessive weakening of which leads to a decrease in the performance of the generator, and sometimes can lead to breakdown of the device. Once a year, you can check equipment elements - fasteners, diode bridge, voltage regulator and others. Timely maintenance of the battery will also guarantee the absence of problems - cleaning the terminals, adding distilled water.
Diagnostics of indicators such as voltage, current, resistance are also necessary twice a year. To carry it out, you will need special devices - a voltmeter, multimeter or load fork.
What kind of charging should go to the battery from the generator?
It is traditionally believed that 13.5-14.5V should be supplied by the generator to the battery and this is absolutely enough to replenish the battery costs.
It is worth considering that using a battery with a higher power in a car than the manufacturer recommends also requires the installation of a more productive generating device.
It is necessary to take into account the load that the generator must withstand - it is calculated based on the maximum indicators of all electrical appliances and car systems.
Do not forget that the charging current from the energy-generating device will allow you to start the car in the cold season. In order to avoid problems with starting the car, we recommend purchasing generating equipment, the charge current of which will be approximately 10% of the capacity of the power source. That is, a battery of 100 A/h requires a generator that can produce 10A. Please note that for many cars, 100 amp equipment will operate at its maximum capacity, because the power consumption of the automotive system is in the region of 80 amps. Therefore, the choice of a source generating energy must take into account both the battery capacity and network consumption.
How to check the alternator voltage on the battery
The potential difference can be diagnosed in two ways - directly at the generating equipment and through the battery. The generator is directly connected to the power source with a thick wire, therefore, to check the level of potential difference, you can measure the voltage at the power source. To do this, you will need special devices - a voltmeter, multimeter or load plug.
The wires of the first measuring instruments are connected to the battery in any sequence. The plug must be connected to the battery terminals with strict observance of polarity. It is generally accepted that the normal voltage in the network should not be lower than 12 volts. At idle speed without turning on all the electrical appliances of the car, this indicator should be at the level of 13.5-14V. A drop in voltage values to 13.3-13.8 volts is considered acceptable.
At the same time, using conventional testing equipment, you can check the resistance of the generator elements - rotor, stator and diode bridge. Diagnostics of rotary equipment is carried out by its winding. It is necessary to connect the probes of the device with slip rings. If the multimeter gives readings from 2, 3 to 5.1 ohms, then this element is working. The current consumption of the winding should be within 3-4.5 amperes.
Checking the return current
Diagnostics is carried out with the engine running at high speeds. It is necessary to measure the current consumed by the vehicle components. The probe is pressed against the wire from terminal 30 or V.
It is necessary to turn on the electrical appliances of the car one by one and record the indicators. The resulting values should be summed. Then you need to turn on all the devices and measure the current indicator. The resulting indicator should be compared with the summed value of previous measurements. The final value should be approximately 5 A below the summed value. A higher value confirms that the node is faulty.
How many amperes does a car alternator produce per battery?
The current strength required by the electrical system of each car is individual and depends on the number of electricity consumers and their values. And also the charge current must be sufficient to charge the power source.
It is worth noting that ampere readings appear only when there is a load in the vehicle’s electrical system and, accordingly, the battery is discharged. After starting the car engine, the charging current is about 6-10 amperes and drops over time, because the battery is charging, taking on the main energy consumption. If you turn on additional equipment - headlights, radio or heated mirrors, you can see an increase in the charging current values.
When purchasing a generator, pay attention to its technical characteristics, which the manufacturer indicates on the case - that’s where you will find information about the maximum current that will flow to the battery.
In the table below you can see the approximate current values that the generator shows at different loads.
Table 1. How many amperes the generator produces under load.
Lada Priora hatchback › Logbook › Combating voltage sags
So, to one degree or another, many Prior owners (and not only them) face the problems of voltage drops when hot and with voracious consumers turned on. This misfortune did not bypass me either. When cold, the voltage is 14.3 on the generator, 14.2 on the battery, 13.9-14 on the onboard, which is very good. All this at idle. But when driving through traffic jams, and with the air conditioning and heated mirrors on (during rain), the voltage on the side panel drops right down to 12.8-12.6. On the highway everything returns to normal, that is, the problem is exclusively when driving in traffic jams. The first thought that arose in my brain was to duplicate all possible wires, both positive and mass. But after thinking a little, I decided to first carry out some measurements, namely, to measure the voltage drop in various sections of the electrical wiring in various operating modes of the car. All measurements were carried out at idle, which is not entirely fair to the generator and wiring, but still. Only side lights are on. I measured the voltage drop between the generator pin and the battery positive terminal. The voltage drop is around zero, which is good. I turned on the high beams, heated mirrors, and the heater at 4 speed. The voltage drop in the indicated area is already 0.4V. It's a lot. Then, with the same load, I measured the voltage drop between the positive terminal of the battery and the red wire coming from it in the mounting block. The drop is zero. Then I measured the voltage drop along the “mass” wires. The voltage drop between the negative terminal of the battery and the metal bracket above the mounting block is zero. The voltage drop between the battery negative and engine ground in load mode does not exceed 0.1V. This is a little good. Where then does the voltage drop come from as the engine warms up and with consumers turned on? I measured the voltage at the generator - 12.8V. This is the main culprit for drawdowns. Either the voltage regulator is drizzling from overheating, or the generator. The generator is new at 100A. The “new model” voltage regulator is the vaunted Orbit. Thus, the only section of the electrical wiring with a relatively large voltage drop of 0.4V is the section from the generator pin to the positive terminal of the battery. Here it was decided to lay an additional wire. In fact, from the generator stud in one corrugation there are 2 wires with a cross-section of either 4 or 6mm^2 (I don’t remember now). The wires are pink and they each go to their own 60A fuse (both blue) in the main fuse box - a black box under the hood near the battery.
It was to this box that I laid a stranded wire with a cross section of 10mm^2. There are two standard wires, and I laid one, but much thicker than the standard ones. I decided to connect the laid wire to one of the standard pink wires. Here the question arises: how to connect? You can, of course, run the wire to the + terminal of the battery through an additional fuse, but I already have so much stuff on the battery terminals that it’s crazy. So I had to drag it to the black box.
I could not directly remove the connector with the pink wire from the plastic case. These connectors are very powerful. So I decided to just cut one of these wires.
Source: www.drive2.com
Signs of a generator malfunction
In modern cars, breakdowns of the electrical system are one of the most common. A large number of electronics requires particularly careful monitoring of the operation and condition of the generator and battery, because their failure can immobilize the car. The most common signs of a generator malfunction are:
- battery indicator light on the instrument panel;
- unstable operation of the battery (its boiling over or undercharging);
- different intensity of headlights;
- extraneous sounds from the generator.
If you notice incorrect operation of the car, then perhaps the battery charging current from the generator is insufficient.
All malfunctions of electrical equipment, which includes the vehicle’s energy-generating device, are mechanical (deformation or breakage of fasteners, housing, malfunction of bearings, pressure springs, drive belt, etc.) or electrical (winding breaks, diode bridge malfunctions, burnout or wear of brushes , short circuits between turns, breakdowns, etc.).
Don’t write off a non-working generator: find out if there are repair kits and spare parts. Replace them if possible. If you cannot carry out repair work yourself, then take the generator to a workshop. Many craftsmen will be able to restore the unit at no extra cost and in the shortest possible time.
However, some breakdowns require the purchase of a new device that generates electricity. For example, a failing bearing that is soldered into the generator housing cannot be restored or replaced in most cases.
Remember that failure of this unit can be caused not only by wear and corrosion, but also by poor quality of elements and components; excessive load; external influence of salts, liquids, temperatures.
Car tips
Actually, I already told you about them from above; if the generator refuses to work, then it is easy to notice even inside the cabin.
- All modern cars will be signaled by a warning lamp - “red battery” on the instrument panel. If it lights up or even blinks, then there is nothing good about it, you need to react immediately, otherwise a discharge is just around the corner.
- Weak glow from all instruments. The “warning lamp” may burn out, but if you notice that the instruments begin to glow dimly, this means that the car is running on the battery, and not on the generator. Again you need to check.
- Belt break. If you crawl under the hood and there you see a break in the belt that spins the generator, then you MUST CHECK THE OPERATION! Otherwise, again, you can kill your battery.
These are all obvious malfunctions, but it happens that the battery is dead and everything seems to be fine, but something inside is “gnawing” - maybe it’s the generator? How to check easily and quickly on a car without removing it? Question? And everything is quite easy here
Other causes of low voltage
A small potential difference in the system is not always associated with a breakdown of the generator or a bad battery. If the diagnosis of these elements does not reveal any problems, then you should pay attention to the following:
- condition of the battery terminals - connection density and oxidation;
- electrical wiring problems - oxidation, violation of its integrity;
- output contacts to electrical appliances;
- correctly selected energy consumers.
Each contact must be tightly adjacent and intact, that is, there must be no formations (for example, sulfation) that will disrupt the flow of current. Incorrect connection of contacts leads to accelerated battery discharge even when the car is not running.
To improve the connection of the elements of the car's electrical system, it is necessary to clean all contacts and restore the integrity of the wires by replacing them or connecting them and wrapping them with insulating tape.
In conclusion, I would like to repeat that stable operation of the car requires constant monitoring of all elements, and the generator should attract special attention. The battery is charged from it and provides electricity to the entire car system. Pay attention to all elements: generator brushes, slip rings, voltage regulator, equipment winding.
The most correct measurements should be carried out when the battery is fully charged and in various modes. Remember that the manufacturer links the characteristics of the generator to the number of engine revolutions - they help produce a certain current.
Detailed video on how to check the generator:
Do you have experience diagnosing an alternator and solving problems in a vehicle's electrical system? Please share your experience and opinion with our readers in the comments. If you have questions about the topics covered, we will be happy to answer them.
Good afternoon Priora 2010 lux. The car is under warranty.
Problem: the voltage in the network when driving with consumers turned off is 13.4 V (measured according to the “State”). At idle, when parked with off. consumers, the voltage according to the “State” is 13.4V according to the multimeter, at the battery terminals, the same 13.4V, i.e. The “State” can be trusted.
Question. What should be the voltage at the battery terminals pr XX according to the standards (and what can you refer to, in which documents these standards are prescribed)?
Is the voltage measured only at idle with the consumers turned off, or are there still control measurements?
Can the guarantee providers send me away because they have installed an add-on that is not theirs? equipment if I change the voltage with the music turned off, etc. and so on.?
I watched it in motion - I was driving with the 13.5 consumers turned off, I turned on the headlights. light drops to 13.1. With ventilation, music and dimensions on - 13.4.
Question, is it normal that the headlights are bl. lights drop voltage by 0.4V?
Sorry for the possible off-topic, but in the “Electrical equipment” section I was asked a question: What should be the voltage at the terminals of a XX battery according to the standards (and what can you refer to, in which documents these standards are prescribed)? They don’t give you a manual for the battery when you sell a car, and there isn’t one on Akkom’s official website either. Therefore, a link to documents is needed, so as not to yell, but to convince the IPG that he is wrong.
On September 19, I will go to replace the generator, the symptoms were as follows: 1) after the trip, when I parked I heard a short hum. 2) under the hood in the area of the generator there was smoke and the smell of burnt radio elements. 3) the light on the dashboard did not light up. 4) when measuring with the engine running, a decrease in voltage is observed as the speed increases.
After digging around on the forum, I measured the voltage, it was around 12 and a kopeck. I measured it directly on the generator, the same thing. Next was a trip to the IPG.
On my battery it says something like this: charge with voltage from 13.8 to 14.5
| 12.09.2011, 20:45 | #2 |
| Seregich66 user menu |
| View profile |
| Find more posts by Seregich66 |
I learned about the low voltage problem in Priora last year from my own experience. I was driving in the summer with air conditioning and stopped at the post office, when I returned five minutes later I couldn’t start, it turned out the battery was dead. I contacted the service center and they replaced the generator under warranty and apparently also recharged the battery. Summer is over and I forgot about the problem. However, this year I encountered this problem again and during the 3rd maintenance (at another service) I asked to check everything. And I was shocked
. Without loads, the voltage was about 13.4 - 13.7 Volts. And when the air conditioner was turned on, when the fans on the radiators started working, the voltage dropped to 12.3 Volts and this without turning on the lights, music or anything else. A local electrician actually killed me, he suggested turning off the lights in traffic jams. The IPGeshnik went to the OTKashniks, took out a tolmut and stated that their instructions say that the voltage in the Priora can be from 13.3 to 14-something volts and they say everything is fine with me, but when the air conditioner is turned on, it’s normal as much as 12 volts. In response to my objections that the battery can only be charged at a voltage of more than 12.6 volts, they told me that even at 12 volts the current strength should be greater (I almost fell over from this). Without hesitation, I wrote a complaint to the director just like that. They invited us to check it again, measured everything and again sent it only in writing and also offered to replace the battery (at our own expense, because by that time the density there had dropped very much). Well, everything really boiled over for me and I started looking in stores for the same battery as I had from the factory and I found it in the first battery store. There was a normal guy who sold it and gave me instructions for my battery (many thanks to him). And what do you think is written there, but it clearly says “operation of the battery is allowed with a working voltage regulator relay and an output voltage of 13.8-14.2 Volts”, while the voltage should remain in this range when the high beams and the heater fan are turned on. As a result, I wrote a total of 4 complaints and bought a new battery directly from the service (in order to receive instructions with their stamp), as well as several complaints to the AVTOVAZ hotline with a request to clarify this discrepancy with their technical specifications for the car. There is no result yet, AVTOVAZ is silent (although they promise to respond to any claim within 10 days), and I am waiting for an answer from the service to the 4th claim. He offered the service to reduce the cost of the car by 50 thousand rubles in a pre-trial manner. But I think they will refuse, so I’m preparing for trial.
I think our cause is just, victory will be ours!
For correct operation of the car, it is necessary to regularly check the functionality of the car generator. If this unit fails, the battery will no longer receive main power. This state of affairs (when the car is “powered” only by the battery) leads to a rapid loss of power to the entire car.
Timely monitoring of the technical condition of the electrical source will allow you to avoid accidental failure of the element, saving your money and mental strength.
The breakdown of the power unit generating current is determined by one of the following signs:
The light on the dashboard is constantly on (signal of insufficient current);
The battery constantly runs out;
electrical equipment malfunctions or does not work at all when the engine is turned on;
burning smell from the engine compartment;
The NODE makes uncharacteristic sounds (for example, rustling).
Priora generator brushes: how to replace them correctly and do it yourself
If the owner of the Priora notices that the charge from the battery is disappearing, first of all, he needs to check the condition of the generator brushes. Of course, at first the charge decreases insignificantly, but if the problem is not corrected in time, the charge will very soon disappear altogether. Replacing the brushes of the Priora generator, which are clearly worn out, will help correct this problem.
Important! The brush mechanism of the generator on the Priora cannot be repaired. If any breakdown occurs, only a replacement along with the brushes will be required.
Since this process is not so complicated, you can do everything yourself. You just need to take into account the recommendations of professionals.
- What tools are needed for work?
- Changing the generator brushes, process sequence
- What are the signs that indicate that the generator brushes have become unusable?
- Reassembly
- We recommend watching:
What tools are needed for work?
Before changing the brushes on the generator, prepare the tools you will need for the job:
- flat screwdriver;
- wrench – it’s better if it’s an open-end wrench (size 13);
- car head with wrench (size 10).
Changing the generator brushes, process sequence
It is quite possible to replace the alternator brushes on a Priora that have worn out without removing it. But, according to experts in their field, the process is simplified if replacing the generator is preceded by removing it from its usual location.
Important! When carrying out any work on the generator (replacement, repair, etc.), be sure to disconnect the battery.
After removing the generator on the Priora, replacement is carried out as follows:
- Use a screwdriver to remove the plastic cover, which is designed to protect the device. Having done this, you gain access to the brushes;
- disconnect the connecting plug from them;
- slowly unscrew both fasteners (they are located along the edges of the elements that are inspected);
- Take the above key and unscrew the locking bolt. Do this in the center of the element;
- Having unscrewed all the fasteners, remove the brushes, inspect them, assess their condition and replace them with new ones, connect the wires.
What are the signs that indicate that the generator brushes have become unusable?
The following external “signs” will help with this:
- if, upon examining this element, you find that its length is less than 5 mm, it certainly requires replacement;
- if the brushes are worn unevenly, this will also negatively affect the functioning of the generator, so they need to be replaced.
There is no need to skimp on buying new brushes. If you find a cheap option, it is highly doubtful that they will last long. It is more likely that such savings will lead to the need to re-replace the above-mentioned components.
Reassembly
After purchasing high-quality brushes (it is advisable that your choice falls on a well-established manufacturer), you can begin the general assembly of the element, and then install the generator itself in its place. However, as mentioned above, the last procedure can be performed without removing the generator. Which, however, is decided independently by each car owner. All operations performed should be performed in reverse order. After completing the work, the operating efficiency of the entire generator must be checked.
You should use a voltmeter to check whether the charging process is moving, as well as what the panel displays. Make sure its work is objective. Indicators that correspond to each other are evidence that the remaining elements can be installed in their places and the generator repair has been completed successfully.
If the replacement of failed brushes was carried out correctly, and the battery was discharged precisely because the main elements of the car’s electrical system were worn out, the car owner will solve this problem without the help of service station workers. And in this case, you will save a lot on such a service. The replacement process is really quite simple. However, if you encounter any difficulties during the repair work, you can watch the help video. It is provided by specialists. On the Internet resource you can, among other things, find out:
- about design features - generator 2170;
- how to check the generator for operability, what you should pay special attention to;
- how to change wipers on a Priora and so on;
- What other possible problems can occur with the power generator?
Generator device
The pulley transmits energy from the motor to the shaft using a belt.
Covers on the housing are needed to accommodate the rotor supports, install the unit on the motor and secure the stator. The back cover is needed for the brush assembly and outputs for powering electrical equipment. The stator produces power through a three-phase winding. The rotor is a steel shaft with two bushings. The terminals of this winding are connected to copper rings. The regulator stabilizes the voltage under various factors:
rotor speed delta;
temperature changes in nature.
The brush assembly is a plastic element with brushes attached to it that interact with the rotor rings. The electric generator also includes six diodes (three in “-” and three in “+” heat sinks).
Reasons for failure
If the symptoms described below appear, carry out diagnostics. You can do it yourself or take the car to a car service. To determine the cause of the failure, special equipment is needed. If you decide to figure it out yourself, master a multimeter tester.
Five possible sources of difficulty are described below:
bearing wedge (lubricant is used up, sometimes the belt breaks - you will need to replace or rebuild the unit);
the winding has burned out (a common cause is the reagents used to treat winter roads);
brush wedge (reason – wear of graphite cores);
the regulator relay is faulty (this element prevents the battery from overcharging and stabilizes the voltage);
The diode bridge is broken.
Generator check
The main sign of a malfunctioning energy source is interruptions in U (voltage). In this case, check the functionality of the system and figure out how much the car’s generator transmits to charge the battery.
When testing, follow the advice of experienced car owners:
check whether the fasteners are connected correctly;
check the quality of the belt tension;
valves should indicate a current of 12 Volts (V) and below;
When changing wiring, observe the cross-section diameter (the original and new ones ideally match).
If the element in question has received significant mechanical damage, we recommend entrusting its analysis to experienced auto repair shop employees.
How long should the generator charge? The algorithm for working with a multimeter looks like this: measure U at the battery terminals with the engine not running (the norm is 12.5-12.7 V). Start only the engine and repeat the measurement without load “at idle”. How many volts are supplied to excite the generator? “Healthy” indicators are from 13.8 V to 14.5 V (with a current strength of 80 to 140 Amperes).
The next step is to give maximum load by connecting additional equipment (headlights, radio, heated windows, etc.). With a working unit, the values under load will be from 13.7 V to 14 V. A value below 13 V is considered critical.
If you don’t have a multimeter, there is another way to diagnose at idle speed: turn on the engine, load it a little (for example, with the headlights on), remove the “-” terminal from the battery (you need a 10 key). The car, like the headlights, works stably - EVERYTHING is in order. If the car stalls or the headlights are dim, you need to further understand the issue.
How much does the generator deliver to the battery? If the battery is overcharged, you will notice characteristic signs: white streaks are visible on top of the battery (the electrolyte has boiled away, a possible reason is a malfunction of the regulator relay). The test is performed using a multimeter. See the charge when the internal combustion engine is running:
14.5 V – 14.8 V – normal, relay is ok;
15 V - 15.2 V - overcharge, the relay needs to be replaced urgently.
This breakdown should not be neglected, because the system can fail at the most unfortunate moment.
How much should the generator supply to the battery for normal charging? The answer to this question is values in the range from 13.5 V to 14 V (at idle).
To prevent the electric generator, check:
whether the wire is disconnected before welding;
indicator on the dashboard (when it lights up, you should react quickly);
Rectifier (if you suspect a problem with it, disconnect the battery);
operability of the electricity source (by shorting the “ground” to the output);
protection of electricity from any liquids.
The battery and generator work in parallel, withstanding high loads of different types: short-term, long-term and permanent. If it is important to know the power of all consumers, add the sum of the peak power indicators of all systems to the value required to recharge the battery. For ease of calculation, below is a table with approximate loads of all types.
It is convenient to find a suitable auto repair shop for preventive or repair work on the aggregator website Uremont.com. An easy search for a suitable service (in Russia, Belarus and Kazakhstan), reviews from portal visitors and chat with representatives of partner service stations help you make the best choice.
Battery overcharge
However, often it is not “undercharging” and “overcharging”. The electrolyte from the battery boils away and the battery also fails; there is nothing good about this either.
The first sign will be white streaks on the top of the battery, which means the electrolyte simply boils and evaporates. That is, the battery is charged, but the generator still “craps” charging it. The relay regulator has most likely failed here.
The check here is also elementary - you need to connect a multimeter or tester (whatever they call it) with the car running, and look at the charge. If it greatly exceeds 14.5 - 14.8 V, but is within the range of 15 - 15.2 V, it means that it is overcharging. We urgently change the relay-regulator, otherwise you will constantly boil your battery, ALSO NOTHING GOOD. It’s trivial that the plates may crumble.
Now let's watch the video version.
That’s all, he told me, exactly the methods without removing it from the car, and of course give it to a good auto electrician for repairs.
This is where I end, sincerely yours, AUTOBLOGGER.
out of 5)
Similar news
Engine chip tuning. Advantages and disadvantages. Is it worth doing at all? .
Generator overrunning clutch. What is it and what is it for? Important.
Why does the alternator belt whistle? When cold or under load. .