How to Remove the Rear Door Trim of a Kalina Universal
After removing the door trim of the Lada Kalina, do it yourself
Door
Any car, including Lada Kalina, is lined with special decorative panels from the inside.
Remove the door screen from the door to install speakers or repair windows, it can be removed from the front or back door. Due to various circumstances, there is a need for this skin to take off , and here uninitiated motorists are faced with the problem of installing the door card from the outside there. In fact, disassembly is simple, although there are a few aspects to consider.
Why do the doors fly off the casing?
Most often, the front or front door trims are removed to reach the interior cavities where the power windows are installed. Although there are other situations during the life of the vehicle when it is necessary to take off
frame:
- install speakers built into door cards;
- in case of failure of electric window buttons;
- for disassembling glass for tinting or replacement;
- For repairing or lubricating windows;
- Replace worn or scratched panels over many years of machine use.
Lada Kalina entrance door maps
It is also impossible to do without removing the cladding during body work, when you need to weld rotten elements, update a paint machine, or carry out anti-corrosion treatment.
The note. Many motorists remove the gasket to add additional vibration and sound insulation to the body.
Rear door trim Lada Kalina
Preparing for disassembly
Unscrew the fastenings and take off
Door trim, you need to prepare a simple set of tools:
- a screwdriver with slots in the shape of a cross;
- long flat screwdriver;
- sharpened tool, for example, sewing.
Door disassembly tool
Since the Lada Kalina door card is supported by plastic clips (otherwise known as clips, plugs), there are warnings about operating conditions. It is strongly not recommended to disassemble door freezers when the plastic becomes brittle and breaks easily. Therefore, there is a risk of breaking all the clips when removing the decorative panel. Therefore, in winter, perform this operation in a heated or boxed garage.
Removing the rear panel door Lada Kalina Cross (Lady Kalini Cross)
It was easy to replace, except for one thing. It was difficult to get the handle back in place!
Replacement door handle Lada Kalina
disassembling and gluing vinyl boots Kalina
2 hatchbacks.
There are no summer residency requirements; remove skin even outdoors. There is only one recommendation: in windy weather it is better to drive the car into the garage, otherwise it will cause a lot of dust when opening the doors.
This is what a door card
Advice. In cars over 5 years old, the plastic from which the locks are made dries out and becomes brittle. Separating the Trim from the Door With a machine like this, you're bound to ruin some of the clips. Removing the Trunk Trim provided a video link on how to remove the trunk lining. Where can I find out more about how to remove the trunk lid with my own hands? So it's worth buying new ones in advance, 8 at the front door and 10 at the back.
Instructions for removing cladding in Kalina
The first three operations are the same for all Lada Kalina doors. The exception is the hatchback hatch in hatchback and station wagon bodies; the disassembly procedure is much simpler. How to remove the front and rear door trim on a Kalina Lada. Here's what to do:
- Unscrew and remove the lock cover designed to lock the door lock inside.
- Using a Phillips screwdriver, remove the 4 screws that secure the music speaker.
- Remove the speaker and disconnect it from the speaker.
Unlocking the blocker and acoustics
Advice. The acoustics can be attached either to the door card itself or to the metal frame of the door . If, after removing the speaker, you stick to the first option, it is better to repeat it when installing the mounts, drilling holes for the screws. The acoustics should be installed on the door, not on the trim.
Incorrectly attaching the speaker to the case
The further procedure depends on the location of the door you are disassembling.
Front passenger door
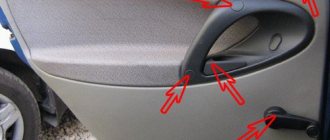
Here the decorative panel is supported by 8 clips, 2 screws for attaching the internal handle and two screws located under the plastic pocket. The disassembly algorithm looks like this:
- Carefully support the awl with the edge of the plastic plug that covers the screw in the door , gave it away. Remove the screw with the second cover in the same way.
- Remove both handle screws.
- Pull the handle to open the door, turn the locking screw and remove the lever. Then succeed in taking off the whole pen.
- Remove the 2 screws at the bottom of the door card
, under the plastic pocket. - Take a flathead screwdriver and support the top right corner of the trim panel to close the first latch. Grasp the skin with your fingers and remove the rest of the cap by hand.
- After removing the panel from the door, disconnect the wires coming from the power button. how to remove the door trim from the viburnum on the carriage door (rear). To do this, turn the screwdriver on the protrusion of the connector and pull the block out of the button assembly. Dismantling of the cladding is completed.
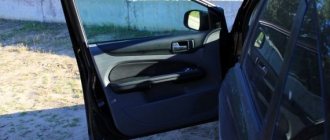
Passenger side panel removed
Advice. When you pin the edge of the door card
Use a flathead screwdriver to place a cloth underneath to avoid scratching the paintwork inside.
How to remove the rear door trim of a Lada Kalina
Lada K alina 2 . REMOVAL AND INSTALLATION OF REAR DOOR TRIM
You will need: flat-blade and Phillips-blade screwdrivers.
Removal and installation of left rear door trim shown. The right rear door trim is removed and installed in the same way.
1. Disconnect the wire from the negative terminal of the battery. On vehicles equipped with manual rear door windows.
. Using a thin screwdriver, press the window handle lock away from the socket.
6. Pry up the upholstery with a mounting spatula and, overcoming the resistance of the fastening clamps, disconnect it from the door panel.
7. Disconnect the wiring harness connector from the rear door power window button. NOTE__
The rear door trim is attached to the inner door panel with ten plastic clips (Fig. 11.10). Replace damaged fasteners with new ones by removing them from the upholstery. 8. Install the rear door trim in the reverse order of removal.
To remove the rear door trim we will need the following tools: a Phillips screwdriver and a sharp tool (I use a knife). We need to remove the following elements: door lock button, glass lift handle, door opening and closing handle.
To remove the glass lift handle, you need to slightly move the fixing ring with a sharp tool to release it from the hook.
Pull out the retaining ring as shown in the picture. After removing it, remove the handle.
Unscrew and remove the rear door opening handle.
Using a sharp tool, remove the plugs securing the door closing handle.
Unscrew the 2 bolts securing the handle.
Unscrew the door lock handle counterclockwise.
This is what the completely removed elements on the door look like.
Now the door trim is held in place only by clips; without fanaticism, we begin to tear off the trim from below. And we remove it completely.
- Assembly is carried out in the reverse order; it is advisable to replace the door fixing clips.
- After winter, cracks appeared on the trunk lid trim.
Electronic ignition circuit for IZH Jupiter 5
To remove them, you need to remove the cover.
Before removing the cover, go to the store and buy new caps. In general, during any work when removing casings, it is recommended to replace them with new ones.
Pistons are needed of 2 types:
- For door trim 1118 Kalina - 4 pieces
- Pistons for the trunk lid. (herringbone) - 2 pieces
- Door piston for fastening the lining
- Piston trunk trim Kalina 2
When removed, old pistons will become unusable and the casing will rattle. For comparison, the new (left) and old (right) piston.
New and old trunk lid piston Kalina 2
To remove the casing, you will need to unscrew 2 bolts on the inner handle, then pull out 2 pistons (herringbones) on the sides. Carefully unclip the inner pistons on the sides and remove the casing.
There are no pistons in the part of the casing closest to you; there are plastic brackets; they are very easy to break; be careful when removing and installing them.
We check dangling wires that can knock on the casing. We secure them in any way convenient for you.
Preparatory work
To dismantle the rear door trim on Kalina, you must have the following tools with you:
- Phillips slotted screwdriver.
- Long flat screwdriver.
- Any pointed tool, such as an awl.
It is worth noting that there are certain restrictions when carrying out work to remove the Kalina rear door trim. Due to the fact that the door card of this car is fixed using plastic clips, work on dismantling the lining cannot be carried out at sub-zero temperatures, since under such conditions the plastic is most susceptible to destruction. By ignoring this fact, the car owner risks damaging all the fasteners. To avoid such consequences, experts recommend carrying out work on removing the rear door trim in a heated specialized room.
In the warm season, there are no special requirements, except for windy weather, when dust can enter the cabin.
It is worth paying attention to the fact that in Kalina, with a service life of more than five years, the clips begin to dry out and break. In this case, it is recommended to purchase new latches in advance, of which there are 10 in the rear door.
How to disassemble the trunk lid on a hatchback and station wagon
The interior lining of the Kalina rear hatch in hatchback and station wagon bodies is held on by 4 regular clips, 2 special black plastic fasteners (installed after installing the panel) and 2 screws securing the handle. In addition, the panel is hooked onto a metal protrusion by two brackets located in the lock area.
Handle screws
The procedure for removing the upholstery is as follows:
- Unscrew the 2 screws with a Phillips screwdriver and disconnect the handle.
- Place a flathead screwdriver under the glass side of the panel and unlock the lock. Release the remaining latches with your hands, pulling the panel along the contour.
- Remove the trim, lastly releasing the staples near the trunk lock.
The panel is detached from the glass side
Note. You need to start snapping the pistons away from the glass, because you won’t be able to remove the lining from the lock side without damaging the clips. This is prevented by 2 brackets hooked to the metal frame of the hatch.
The mounting brackets for the trunk hatch are located near the lock.
As practice shows, it takes no more than 10 minutes to remove the trim of one door of a Lada Kalina car. The operation is really simple, but if you lack experience, it is better not to rush, so as not to break all the fasteners and scratch the plastic facing panels. The door cards are installed in the reverse order: first, the clips are snapped on, then the handles are installed, and finally the plastic elements are attached. Don't forget to connect the connectors to the power window buttons.
Dismantling the rear and other door trim on the Lada Kalina
When removing the trim, the division into front and rear doors is not accidental. Although at first the process is identical for them, then some differences begin to appear.
What tools will you need?
To unscrew the fasteners and remove the door trim, simple tools are required in the form of:
- Phillips screwdriver;
- flat and long screwdriver;
- sharp awl.
Step-by-step description of the process
The first three stages are similar for both front and rear doors:
- Use your fingers to unscrew and remove the latch that locks the door lock from the inside.
- Using a Phillips screwdriver, you need to unscrew the 4 screws that secure the audio speaker.
- Then it should be removed and the wires disconnected from it.
Removing the door lock, speaker and disconnecting them is mandatory for all doors
To dismantle the trim on the front right door, it is necessary to free the decorative panel from 8 clips, 2 mounting screws holding the inner handle, and 2 screws located under the plastic pocket. Then follows:
- Using an awl, pry off the plastic plug under which there is a screw in the door handle. In a similar way, remove the second plug and unscrew both screws (3).
- Pull the handle that opens the doors towards you, then unscrew the fastening screw, remove the lever and then the entire handle.
- Under the plastic pocket at the bottom of the door, unscrew the 2 screws (2).
- Using a flat-head screwdriver, pry the lower right part of the decorative panel (5) to disengage the first latch. Holding the panel in your hand, use your other hand to release the remaining latches.
- Separating the panel from the door, disconnect the wiring connecting the electric lift button and its mechanism. To do this, use a screwdriver to pry up the detachable tongue and remove the block from the button block.
To remove the front passenger door trim, several fasteners must be removed.
The decorative panel from the driver's door is removed in the same way as from the passenger door. However, there are some minor differences:
- To facilitate removal of the trim, it is necessary to remove the plastic panel that covers the rear view mirror adjustment lever.
On the driver's door, among other things, it is necessary to remove the rear view mirror panel - One of the armrest mounting screws should be found under the plug (2), while the second (4) is recessed into the recess of the handle.
- The door opening handle is located above the armrest and is detached by unscrewing the fastening screw.
- The plastic panel can be easily removed with your fingers.
- The rear view mirror adjustment panel is removed using a flat screwdriver, prying it up from below. If the car is equipped with electric mirror control, the adjustment lever is replaced with a plug.
Here you need to release these fastenings
Removing the trim from the rear doors, which is secured with 10 plastic clips and 2 mounting screws, proceeds as follows:
- First of all, the handle of the mechanical window lifter (7) is dismantled, for which the plastic half-ring (5) is pryed off with an awl, which fixes the lever on the axis. After removing the half ring, the handle can be easily removed.
- 2 plastic plugs are removed from the door handle (3) and the fastening screws (1) are unscrewed.
- Using a flat-head screwdriver, the lower far part of the decorative panel is pulled out, after which the first latch is snapped out.
- Then the remaining clips are released from the panel supported by one hand with the other.
To remove the trim on the rear doors, you need to release these fasteners
And in order to remove the door card from the trunk lid of the Lada Kalina on a station wagon and hatchback, which is held on by 4 clips, 2 special clamps, 2 fastening screws on the handle and 2 brackets hooked onto a metal protrusion, you need to:
- Using a Phillips screwdriver, remove the 2 screws and disconnect the handle.
- From the glass side, insert a flat-head screwdriver under the panel and unlock the lock.
- Use your fingers to disengage the clips, pulling the panel around the perimeter.
- Remove the trim, releasing the staples near the luggage lock last.
- It should be taken into account that the panel is detached from the glass side, since if this is done from the lock side, the clips can be damaged.
We remove the trim on the doors of the Lada Kalina - what is the complexity of the process?
The car door trim, officially called the door panel, is most often removed to access the window lift mechanism for repair or lubrication. Much less often, this operation is carried out to install speakers, install noise and vibration insulation, replace facing panels or perform body work. But in any case, sooner or later, almost every car owner has to dismantle the door trim. At the same time, many of them, without resorting to the services of a service station, do it themselves, since this operation is quite simple and can be done by most car enthusiasts.
Replacing the larva in Kalina
First of all, replacing the lock elements means that the door trim will be completely missing. Therefore, first we will figure out how to dismantle the trim on Lada Kalina cars. The second chapter is devoted to how to remove the larva and install a new one in its place. The last step will actually be the simplest.
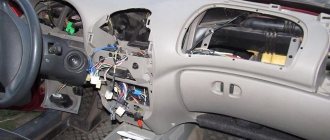
Removing the door trim yourself
The casing is attached not only to screws, but also to plastic pistons. The number of screws holding the part in question is four:
Numbers here indicate all fastening elements. But to get to them, you need to remove the screw cap “3”, as well as the inner door handle. The pawl handle also needs to be unscrewed.
If these actions are completed successfully, the casing begins to be dismantled, moving it away from the metal. Dismantling is carried out starting from any of the corners, but care must be taken: the pistons holding the plastic are fragile.
If the package includes power windows, you will need to disconnect the connector connected to the button block. Also, another similar connector is present in most trim levels - where there is a central lock. Both connectors must be disconnected.
All the steps described here involve electronics in any case.
Therefore, at the stage before dismantling the trim, you need to open the hood, take the “10” key and unscrew the negative terminal. We are talking about the battery terminal, which can be connected last (when the last screw is screwed in). Anyone who breaks this rule will look for blown fuses. Draw a conclusion.
How to get to the door mechanism
According to the recommendation of the magazine "Behind the Wheel", in the absence of casing, access to the lock is always available. Simply put, there will be no need to remove the inner lining made of metal. The steel sheet is simply bent to the side.
The rotating part with the protrusion is called the “drive”, and this is what you will need next.
Removing the front seat slide
We move the seat slide so that the bolts securing the slide to the seat frame are visible through the technological holes in the slide.
Using a 8mm socket, unscrew the bolts securing the slide to the seat frame.
Each of the slides is attached to the frame with three bolts.
Remove the slide assembly with the longitudinal movement mechanism lever
We remove the end of the lever shaft of the longitudinal movement mechanism from the hole in the inner slide and from the hole in the outer slide
A spring is installed between the lever and the outer herrings. Similarly, we remove and disassemble the front passenger seat.
We assemble and install the front seat in the reverse order.
Before installing the lever shaft into the hole of the outer slide, first put a spring on the shaft and place the short mustache of 1 spring on the latch, then, squeezing the long mustache of 2 springs (can be tied with wire), insert the shaft into the hole of the slide so that this mustache goes under the slide .
Removing the rear door trim
Regardless of the body configuration or year of manufacture, reinstallation and repair of locks and handles remains the same for hatchbacks and station wagons. The order of work differs when repairing the front and rear elements. The arrangement of the parts is considered simple, so it takes about 30 minutes to reinstall one element. For independent work you will need the following tool:
- crosshead screwdriver;
- flat screwdriver;
- knob;
- head at 8;
- extension;
- sharp knife or awl.
Front door
The procedure for performing the work necessary to remove and install the outer front door lever on the Lada Kalina:
- Disconnect the negative terminal from the battery.
- Remove the inner trim of the outside rear view mirror by first prying it off with a screwdriver.
- Unscrew the locking lock.
- Using an awl or sharp knife, remove the plug.
- Use a Phillips screwdriver to remove the armrest mounting screw.
- Pull the inner handle of the lock and unscrew the screw using a Phillips screwdriver.
- Remove the inner lever.
- Unscrew the armrest mounting bolt located in the niche.
- Unscrew the two pocket screws.
- Wrap a flat-head screwdriver in a rag and insert it between the trim and the door frame. Carefully pulling the screwdriver towards you, unclip the first clip that holds the trim. Also unclip all the other clips, there are 8 of them in total.
- Carefully remove the trim from the iron door frame.
- Disconnect the two wire connectors from the power window assembly.
- Move the trim to the side.
- Disassemble the lower link of the outer door handle drive.
- Unscrew the handle fastening bolt located at the end; for this, use a 8-mm socket and a knob.
- Disconnect the outer arm drive upper link.
- Remove the faulty part and replace it with a new one.
Lubricate all moving parts of the lock drive and assemble everything in reverse order. Most often the tongue or pawl breaks. Experts do not recommend replacing the element separately; it is better to reinstall the entire assembly, since the lock rod loses its performance characteristics over time.
Backdoor
Step-by-step repair of the rear door handle:
- Unscrew the locking lock.
- Using a flat-head screwdriver, press out and move the window regulator lever lock to the side.
- Remove the retainer and window lift lever from the shaft.
- Unscrew the fastening screw by pulling the lock handle.
- Remove the lock handle.
- Remove the two plugs using a sharp knife.
- Unscrew the two fastening screws that were under the plugs and remove the inner handle of the lock.
- Wrap a flathead screwdriver with a rag or electrical tape. Slide it between the door trim and frame.
- While pulling back the screwdriver, unclip the clips located along the perimeter of the casing one by one.
- Remove the casing and set it aside.
- Using a socket 8, a wrench, unscrew the nut that holds the handle on the inside of the door.
- Using the same head with a knob, remove the bolt, which is located at the end.
- Remove the old faulty part and replace it with a new one.
Lubricate all moving parts of the lock and reassemble in reverse order.
All of the above types of work can be done with your own hands, without resorting to expensive car service services. For repairs, you only need to buy a new handle and a set of clips for the door trim.
Unscrew the lock button by hand
Having turned the inner handle so that the screw securing it to the lever is accessible, use a Phillips screwdriver to unscrew the screw and remove the handle.
Using a screwdriver with a thin blade, pry up two decorative plugs and remove them from the holes in the armrest handle.
Using a Phillips screwdriver, unscrew the two screws securing the armrest handle
Use a screwdriver to press out the window handle socket.
Pull out the latch and remove it.
Remove the handle and socket from the shaft.
Using a screwdriver, placing soft material under it, we press the lower edge of the upholstery away from the inner door panel, overcoming the resistance of the pistons.
It’s better to start from the bottom, gradually moving the screwdriver around the entire perimeter of the upholstery.
Removing the rear door trim
The location of ten pistons on the inside of the upholstery
Install the rear door trim in the reverse order.
Remove the rear door trim.
We lower the glass so that we can unscrew the screw securing the decorative glass trim.
Use a flat-head screwdriver to pry up the edge of the inner glass seal.
We lift the seal up, applying the necessary force, and remove the inner glass seal from the inner door panel.
Having bent the edge of the seal, use a Phillips screwdriver to unscrew the self-tapping screw securing the decorative glass trim.
Using a slotted screwdriver, press out the upper corner of the decorative trim and remove it.
Remove the lower part of the seal from the door.
We raise the glass.
Using a 8mm socket, unscrew the bolt securing the glass guide at the end of the door.
We take out the guide. Roll down the window
From the outside of the door, use a slotted screwdriver to pry up the decorative retainer of the glass seal.
To avoid damaging the paint, place a soft material under the screwdriver, for example, a piece of fabric folded several times.
Adjusting the front left (right) door lock on the Lada Granta
Front door
Remove the rear door trim.
We lower the glass so that we can unscrew the screw securing the decorative glass trim.
Use a flat-head screwdriver to pry up the edge of the inner glass seal.
We lift the seal up, applying the necessary force, and remove the inner glass seal from the inner door panel.
Having bent the edge of the seal, use a Phillips screwdriver to unscrew the self-tapping screw securing the decorative glass trim.
Using a slotted screwdriver, press out the upper corner of the decorative trim and remove it.
Remove the lower part of the seal from the door.
Using a 8mm socket, unscrew the bolt securing the glass guide at the end of the door.
We take out the guide. Roll down the window
From the outside of the door, use a slotted screwdriver to pry up the decorative retainer of the glass seal.
To avoid damaging the paint, place a soft material under the screwdriver, for example, a piece of fabric folded several times.
In the process of systematic use of the door, its frequent opening and closing, the lock and adjacent elements wear out. As a result, the door closes with a distinct knocking sound.
Often knocking occurs after an accident due to changes in body geometry. The functionality of the lock can be restored by partially repairing it, and in case of deformation, by completely replacing it with a new one.
- screwdrivers, set of auto tools;
- lubricant;
- liquid WD-40.
- We inspect the gaps around the entire perimeter of the door. We mark areas with deviations. The factory standard is 2–3 mm, anything higher or lower is a defect.
- Using a screwdriver, unscrew the screws securing the hinge to the body. If necessary, use an impact screwdriver.
- Move the hinge a few millimeters up and down and check the tight fit of the door to the body. If you hear a rumble when closing, lower the hinge; if you hear a dull knock, raise it.
- We carry out a control measurement and tighten the bolts.
Preparation for dismantling
To unscrew the fasteners and remove the door trim, you need to prepare a simple set of tools:
- screwdriver with cross slots;
- long flat screwdriver;
- a pointed tool, such as an awl.
Door disassembly tool
Since the door card of the Lada Kalina car is held on by plastic fasteners (otherwise known as clips, pistons), there is a warning regarding the working conditions. It is strictly not recommended to dismantle door trim in the cold, when the plastic becomes brittle and easily destroyed. Hence, there is a risk of breaking all the clips during the process of removing the decorative panel. Therefore, in winter, perform this operation in a heated garage or box.
In the summer, there are no requirements for premises; remove the casing even in the open air. There is only one recommendation: in windy weather it is better to drive the car into the garage, otherwise a lot of dust will be brought into the interior when the doors are open.
This is what the door card lock looks like
Advice. In cars that are 5 years old or more, the plastic from which the retainers are made dries out and becomes brittle. When separating the trim from the door of such a car, you will probably ruin some of the clips. So it’s worth buying new ones in advance, there are 8 pieces in the front door, and 10 pieces in the back door.
Replacing the rear door lock and outside handle
The outer handle can be changed without removing the lock.
Removing the door trim
A very simple way to quickly repair a door handle
, no need to open the
door
, everything is done from the outside.
disconnect the door lock
Using a Phillips screwdriver, unscrew the screw securing the intermediate lever of the locking rod, and remove the lever together with the rods from the rectangular protrusion, removing the locking rod from the plastic holder (shown by the arrow).
We remove the electric lock through the technological hole in the inner door panel.
Rear door lock with electric drive and rod assembly
Install the rear door lock in the reverse order.
Repair of door handle on Kalina VAZ-1119
A very simple way to quickly repair a door handle
, no need to open the
door
, everything is done from the outside.
3. To remove the door lock, disconnect the wire terminal from the “negative” terminal of the battery
Using a Phillips screwdriver, unscrew the screw securing the intermediate lever of the locking rod, and remove the lever together with the rods from the rectangular protrusion, removing the locking rod from the plastic holder (shown by the arrow).
4. Use a Phillips screwdriver to unscrew the screw securing the base of the inner door handle and remove it. together with traction from a hollow pin. Remove the decorative glass trim and take out the glass guide.
5. Removal, installation, replacement and repair of the outer front door handle of the Lada Kalina | Section 10. Using a Phillips screwdriver, unscrew the three screws securing the door .
Instructions for removing the cladding on Kalina
The first three operations are performed the same way for all Lada Kalina doors. The exception is the trunk hatches of hatchback and station wagon cars, where the disassembly procedure is much simpler. Here's what to do:
- By hand, unscrew and pull out the cap of the latch designed to lock the door lock from the inside.
- Using a Phillips screwdriver, remove the 4 screws holding the music system speaker.
- Remove the speaker and disconnect the wires from it.
Unscrewing the blocker and acoustics
Advice. The acoustics can be attached either to the door card itself or to the metal door frame. If, after removing the speaker, you observe the first option, then during assembly it is better to redo the fasteners by drilling holes for self-tapping screws. The acoustics should be mounted to the door, not to the upholstery.
Attaching the speaker to the casing is wrong
Removing the front door trim
First, and most importantly, you need to turn off the power to the car. To do this, you need to remove the battery terminal. Then we head to the door panel and use a flat-head screwdriver to remove the plug on the door handle. You must remove the plug carefully without breaking the fastenings. Having gained access to the screw, unscrew it with a Phillips screwdriver.
There are several locking screws located at the bottom of the car door. They also need to be unscrewed. At the top, in a small recess, there are several screws. You need to get rid of them with a Phillips screwdriver.
The next step is the lock button. It has a left-hand thread, which means it needs to be unscrewed clockwise.
Next, we look at whether the car is equipped with an electric tilt adjuster for the rear-view mirrors. To remove it, you need to use a screwdriver to remove the hinge seal.
At the bottom we pick up the firmware with a plastic shovel and move it back 10 cm. We gain access to the electrical wires of the window regulators. Disconnect the wires from the power supply.
After all the machinations have been completed, the casing is completely ready for removal. Assembly of the casing is carried out in the reverse order. Broken clips should be replaced before assembly.