Sound insulation on the Lada Priora is of interest to many car enthusiasts, for whom not only safety is important, but also comfort during travel. Being in a car that is treated with high-quality noise-insulating materials, the driver and passengers can enjoy every trip.
Street noise, the knock of worn suspension parts, the sound of a running engine and other factors affecting acoustic comfort become much less noticeable. But in order for the result to meet expectations, and the money not to be wasted, it is necessary to entrust the soundproofing of the Lada Priora to experienced craftsmen.
The desired effect can be achieved only with the proper experience, professional skills and abilities, as well as with the proper selection of materials. If you need a decent result, contact those.
Floor
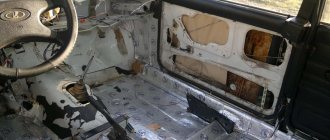
The floor of a Lada Priora car requires effective sound insulation, since noise from the wheels, transmission, engine, etc. penetrates into the cabin through it. And when driving on country dirt roads and light off-road conditions, dry grass can touch the bottom, which is why a characteristic rustling sound can be heard in the cabin.
To prevent all this from causing discomfort during trips, we use multi-layer sound insulation of the floor. The elastic and elastic material STP Profi Plus is used for the first layer. STP BlackTon is used as the second (intermediate) layer, and STP NoiseBlock is the third.
This three-component structure guarantees excellent sound absorption quality. An STP Aero+ sheet, cut along a pre-marked contour, is secured under the rear seat cushion.
Task: installing sound insulation for a Lada Priora car in the “Gold” configuration
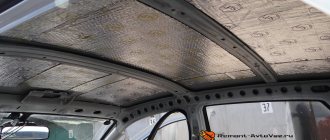
The first thing we decided to do for complete sound insulation was to cover the roof of the VAZ car. We carefully remove all unnecessary elements from the roof, including the sheathing on the roof of the vase. Now you can make the first layer of sound insulation on the car ceiling. We install a high-quality damper from SGM Alumast Alfa to neutralize vibration on the vase roof. How much work does this cost us? You yourself can guess by the appearance of the roof in the photo and the effect achieved. The roof of the Lada Priora is not only protected from vibrations, but has also become stiffer. The use of vibration on the roof significantly reduces the overall sound background in a hatchback car. Then you need to make another layer on the roof. For this purpose we use a thick layer of Violon WELL sound insulator. It eliminates unwanted sounds. After installing it, it is almost impossible to push through the roof of the car, and raindrops will definitely not cause any discomfort to anyone. After assembling the upper part of the interior and hatchback of the car, all we have to do is take on the lower part to achieve a similar effect.
Why choose us
Many car enthusiasts have already used it and are satisfied with the results. There are several reasons for this.
- We specialize exclusively in sound insulation, so we know about this better than employees of wide-profile auto repair shops.
- For our work, we use only certified materials from the premium STP line.
- The interior of each Lada Priora car remains the same, because our craftsmen carefully handle the factory upholstery, seats, plastic elements, etc.
- We complete assigned tasks without delay, informing clients in advance of specific deadlines.
Call us at our contact number or request a call back to ask all your questions.
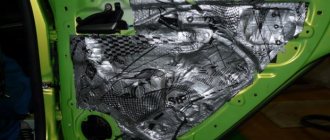
Sound insulation of LADA Priora doors
Soundproofing or soundproofing of the VAZ 2170 is often done for one simple reason: since the car is Russian-assembled, it is not famous for its quiet interior and silent ride.
In addition, one of the main sources of noise is the noise from the wheels when driving, so the issue of sound insulation of Priora doors is currently the most pressing. The technological process of sound insulation is almost the same regardless of the make and type of car. But each individual case has its own subtleties and nuances. ATTENTION! Now you can buy a completely new Pioneer MVH X580BT processor radio for only 2990 rubles! Don't believe me? Then follow the link and see for yourself! Read more"
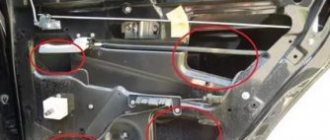
Soundproofing Priora doors begins, first of all, with removing the upholstery material from the doors. Under the upholstery there is standard sound insulation, which must be carefully removed. After this, you should thoroughly wipe the metal door frame, for example, with White Spirit, degreasing and cleaning the surface. It is worth noting that the anticorrosive agent located at the bottom of the doors must under no circumstances be removed!
The most optimal and simplest option for installing sound insulation is considered to be the option in which sound insulation is made using layers. Soundproofing Priora doors with your own hands of this type will take you no more than 10 hours of work. You will also need about 7 sheets of vibration-absorbing material, 4 sheets of Splen, 3 sheets of bitoplast and the same amount of modelin.
The first layer of sound insulation of Priora front doors is the installation of vibration-proofing material inside them:
- First, you need to cut out several sheets of suitable shape and size from the vibrating material (the larger the sheets, the better).
- Next, using a technical hair dryer, you need to heat the bitumen side of the resulting sheets.
- Then heated pieces of vibration insulation should be glued to the inside of each door and rolled out with a hard iron or plastic roller over its entire area.
- Then the next sheet is taken and overlapped over the first one according to the algorithm described above.
The coverage of vibration-proofing material on the inside of the doors depends on the material itself, so its percentage (percentage of coverage) can vary from 55 to 100%.
The next layer of sound insulation for Priora doors means sticking sound-absorbing and heat-insulating materials onto the vibration-proofing layer. Experts recommend using materials such as Splen or Accent at this stage. They have a self-adhesive base, so their installation does not require any specific skills or a lot of time. In this case, the entire surface (100%) of the inside of the doors is covered.
A third layer of sound insulation can be installed upon request. The essence of this layer is to cover all technological holes in the doors with vibration-isolating material or the like. If you make a third soundproofing layer, then in case of repair of the window regulators it will need to be dismantled. As practice shows, sound insulation of doors made in three layers is considered the most effective.
Discomfort inside the car when driving also occurs due to squeaks. Therefore, an equally important step in soundproofing doors is soundproofing the door skins. To do this, the upholstery material is first made heavier with vibration material, so it will vibrate less and make fewer squeaks. And then bitoplast (sound-absorbing material) or modelin is glued on top of the vibration material in the places of their contact.
The rear doors of the Priora are soundproofed in the same way . Then the door is assembled in the opposite sequence. It is recommended to use new clips for door trim.
It is worth paying attention to the fact that high-quality sound insulation implies a set of measures that are aimed not only at eliminating external noise from the wind, wheels and road, but also at minimizing crickets and squeaks inside the car dealership. Only in this case will the driver be able to achieve absolute silence and comfort when moving in the car.
One of the best radios in its segment. It is a diskless receiver that rationally uses the manufacturer’s developments in the field of digital audio processing. This is a full-fledged processor device, designed taking into account the needs of modern car enthusiasts. More details at the link.
- Matrix LCD display with wide viewing angle;
- Working with a USB drive;
- Built-in microphone, Bluetooth and wireless voice communication system (can connect up to 2 phones);
- Compatible with Android, iPod/iPhone;
- Maximum output power: MOSFET 50W x 4.
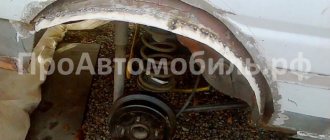
DomINIK95 › Blog › Do-it-yourself noise insulation of wheel arches
Extra sounds when operating a car are a constant irritation on a long journey. If traveling within the city does not greatly affect your comfort, then highway raids of several hundred kilometers are tiring due to the presence of a constant hum. So every motorist strives to learn how to soundproof the wheel arches of a car without spending a lot of money and time on this procedure.
Types of insulation materials
Some types of materials for such a procedure will require you to have a special tool. For example, if you are attracted to liquid sound insulation, you need to get a special sprayer and compressor. These materials can be borrowed for temporary use. This is the only way to “blow out” the arches properly, which will not only improve the level of ride comfort, but will also actively resist car corrosion.
So, we can distinguish the following types of materials for performing the process of insulating the car interior from unfavorable sounds:
— special adhesive-based material; - foil sheet, which is attached to the arches using so-called lockers; — liquid mixtures for filling fender liners; — special plastic fender liners with ready-made insulation on the inside.
The surest way to get rid of annoying sounds is liquid materials applied to the arches using a compressor and sprayer. But many car enthusiasts are able to achieve excellent results with foil materials that are glued on the outside of the arch.
Installation of foil materials
There should not be any particular difficulties in using materials with an adhesive backing. The material you purchase may be universal or specially prepared for your type of transport.
— the foil should fit as tightly as possible to all elements; — cutouts for the strut and shock absorber should not be too large; — the material should not interfere with the normal operation of the suspension elements — it is advisable to place plastic fender liners on top of the foil.
Liquid insulation materials
This material is considered a professional way to blow out wheel arches, which will prevent metal corrosion and also prevent unnecessary sounds from entering the cabin. Therefore, this method of sound insulation is the most difficult.
To perform the procedure efficiently, you will need to dismantle the bumper and wheels of the car. At this time, the machine must stand on special stands. It is worth taking care of safety while performing work. The algorithm for applying the insulating liquid is as follows:
— first you need to degrease the surface of the arches with a solvent; — then, using a spray gun, a layer of sound insulation is applied; — then you need to wait several tens of minutes until the material dries; — then it is advisable to put plastic fender liners on the arches.
If you have the opportunity to purchase plastic fender liners specifically for your car model that are attached to latches or lockers, be sure to do so. The traditional method of attaching fender liners with self-tapping screws can cause rapid corrosion at the screw entry points.
Sharing materials
Many car owners decide to use several types of insulation. For example, they first pour in liquid insulation and then glue the foil materials. This allows you to achieve a better effect, but takes up quite a lot of space.
The disadvantages of this insulation option are the following:
- when performing work independently, a large amount of time is spent; — insulation takes up about a centimeter of space under the arches; — the procedure requires maximum precision and care in the use of materials; — the monetary costs will be significant.
Combined methods should be taken if the noise in the cabin from the wheel arches is too annoying. Then you can achieve more significant results and get maximum effect. In other cases, it is better to use one of the methods suggested above.
Noise insulation of wheel arches with sheet vibration damper
Recommendations for choosing materials for sound insulation of wheel arches from the outside:
You can also choose the appropriate vibration-proofing material yourself, for example, using this table:
General action plan:
The process is also shown in the video:
If the car does not have a plastic locker, there is an option to cover the glued layer of the vibration damper with aerosol bitumen mastic.
It is worth noting that this method of soundproofing wheel arches is less popular than mastics or liquid rubber (see survey at the end of the article).
Liquid sound insulation of wheel arches
Most often, mastic or liquid rubber is used as a material for external sound insulation of wheel arches. The mastic is applied to a cleaned metal surface using a brush, and liquid rubber is sprayed using a pneumatic spray gun (purchase separately, or use the services of a service station).
The treatment of the arches with mastic, as well as noise measurements in the car interior after this, is shown in this video:
Treatment of wheel arches with liquid fender liners on Lada Vesta:
It is worth noting that by performing sound insulation only on the wheel arches, you will not be able to achieve a good result. The effect after such modification will be little noticeable, or will not be felt at all:
To evaluate sound insulation not only with a sound level meter, but also by ear, you will have to perform a set of measures. Please note that in the first case, not only the metal parts of the body were processed, but the plastic fender liners were also covered with vibrometal. And in the second case, the material was applied to the entire bottom of the car.
What reviews can you leave about the sound insulation of wheel arches? Is it worth modifying your car in this way or is it a waste of money and the inside of the car will still not become quieter? Let us remind you that noise in the cabin can be reduced by installing additional seals and soundproofing the doors.
Source
Hood and engine
Sound insulation of the engine compartment of the Lada Priora
— the front instrument panel is removed;
— we also remove the factory insulation;
— use a photograph to record the position of all wires and bearings;
— wash the surface, clean it with sandpaper, treat it with a solvent;
— heat the first layer of the vibration isolator to a sticky state and fix it;
- second layer - splen, bitoplast;
— insulate the wires with anti-squeak;
- Reassemble the panel in reverse order.
Sound insulation of the hood
In addition to the standard set of materials and tools, you will need factory insulation with clamps. Clean the surface, treat with solvent, and dry. The first vibration-isolating layer, preheated. Roll it out with a roller, then lay the splen. The next layer is standard insulation.
Source
Rules for applying sound insulation
The instructions for applying sound insulation are the same, no matter what kind of car you treat:
- Preparing the surface for processing begins with removing the casing, factory sound insulation and anything that will interfere with your work.
- Then, the surface must be washed, if there is rust, clean it and prime it
- After this, you need to degrease the surface
- Now you can cut out the vibration material, it is always placed first, remove the protective film, heat it with a hairdryer, apply it and roll it with a roller to expel air bubbles
- Vibromaterial is placed overlapping, so the protection will be more effective
- A noise absorber or a noise reflector is glued on top of the vibration insulation, it all depends on the place of treatment
- It is self-adhesive, sticks in sheets on all 100 percent of the surface, it does not require heating (vibrating material is enough to stick on 80-90 percent of the entire area)
- Anti-squeak materials are glued in places where the skin comes into contact with the metal, and in places where the skin elements come into contact, around the handles