How to change the license plate light bulb on Kalina
What tools will you need:
- flat screwdriver,
- a piece of rag
- new lamps.
The left side of the lampshade is made in such a way that you can place a thin object (in our case, a screwdriver) under it and pry it, releasing the first latch. This requires a little effort. If you are afraid of scratching the plastic, place a prepared rag under the tip of the screwdriver.
Once the left side of the latch has come out, move the lamp itself a little to the left and remove the right side. Pull the lantern out. Now you can either disconnect the wire, or simply turn the lamp a little and remove it from the housing.
The light bulbs in the license plate illumination are the most common ones - W5W. The same ones are in the front side lights. We take out the old incandescent lamps and insert new ones - LED ones. It’s better to immediately check whether you placed them on the wrong side; LED lamps have polarity ! Well, now, with a clear conscience, everything can be put back together. The license plate light bulbs on Kalina have been replaced.
What advantages will we get after replacing the standard license plate light bulbs with LED ones?
- Firstly, they shine much brighter . This is noticeable even to the naked eye. And at the same time they consume much less energy, which leads to at least insignificant savings.
- Second, they don't get so hot . Having removed the old lamps, you may have noticed some melted plastic near their seats. It is not good. This definitely shouldn’t happen with diode lamps.
- Well, the last thing is a beautiful appearance . Agree, the bright, white backlight of the license plate looks much better than the standard one.
How to do everything yourself
The backlight bulbs need to be changed in this order.
- To begin with, the lamp shade itself is disassembled, this is done starting from the middle, using a thin screwdriver.
- The standard lamps must be unscrewed very carefully, as it is quite easy to damage the place where the lamp is attached to the car body.
- The next step is to install a new LED or incandescent bulb.
- After the new lamp is screwed in, you can reinstall the lampshade. Before installation, it must be thoroughly degreased.
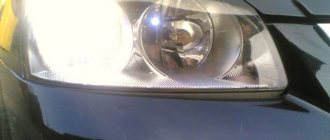
- When the installation process is completed, you need to check whether the license plate light is working. If everything is done correctly, then the license plate will have bright lighting.
Replacing the license plate lamp for Lada Kalina
Any Lada Kalina (be it a sedan, hatchback or station wagon) must be equipped with illuminated rear license plates. Manufacturers install two lamps on the lower side of the car trunk saber. Sooner or later these lamps burn out. Some car enthusiasts decide to leave everything as is and do not change the light bulbs. This is fundamentally wrong behavior, because it has not the most pleasant consequences.
The fact is that any traffic police officer has every right to fine a person who is driving a Lada Kalina with unlit license plates. In addition, the basis for a fine is not only the lack of license plate lighting, but also the incorrect installation of the lights.
If the inspector cannot clearly identify the license plate of the Lada Kalina from a distance of twenty meters from the car, then he will impose a fine for illuminating the license plate. Of course, you can convince the traffic cop that the license plate illumination malfunctioned during the trip and you simply did not notice the problem, but in most cases this does not help. It is much better to try to avoid such situations and simply monitor the serviceability of the Lada Kalina license plate illumination.
How to change license plate lights
Replacing the license plate light bulbs on the Lada Kalina is a simple task, so you can easily handle it yourself. By changing the lights yourself, you will not only save money on the services of workshop specialists, but you will also be confident in the excellent quality of the work.
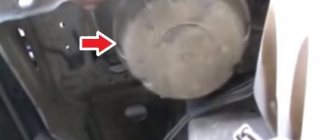
- Open the trunk of the car and pry the lamp on the left side with a flat-blade screwdriver. This will free him from the latch;
Step #1
- Push the light on the right side and move it to the left. After some pressing, it should come out easily;
Step #2
- Pull out the lamp along with the power wires. This will make it easier to replace the license plate lamps of the Lada Kalina;
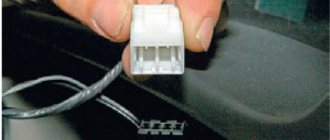
- Slightly lift the plastic clip up and remove the power plug;
Step #3
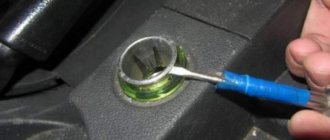
- Carefully turn the white housing of the Lada Kalina license plate light bulb counterclockwise and completely pull out the base;
Step #4
- Pull out the lamp itself. To do this, simply pull it to the side. After this, remove the lampshade from the base.
Step #5
- Install a new lampshade in place of the burnt out bulb. The job is done in the same way as removing a light bulb, but in reverse order. Make sure the new light is lit.
Removing the rear light, replacing lamps VAZ (Lada) Kalina 2004-2013
Tool:
- Driver for socket attachment
- High nozzle on the wrench 10 mm
Parts and consumables:
Note:
The work is shown on the left lantern.
1. Disconnect the wire terminal from the negative terminal of the battery.
2. To replace the lamps in the rear light, simply unscrew the mounting nuts and remove the light from the body without disconnecting the wiring block. Inside the trunk we bend the cut out part of the upholstery. Using a wrench or a high 10mm socket, unscrew the three nuts securing the light (the third nut is located under the upholstery and is not visible in the photo).
3. We move the lamp away from the body. By turning the side and fog light lamp socket counterclockwise, remove the socket with the lamp from the lamp housing.
4. Pressing the lamp, turn it all the way counterclockwise and remove the lamp from the socket.
5. Install the new lamp in reverse order. The combined parking and fog light lamp has two protrusions located at different levels.
6. When installing it, the protrusions must fit into the corresponding grooves of the cartridge. The grooves on the flashlight body have different widths. This should be kept in mind when installing the lamp socket.
7. We carry out the operations for replacing the remaining lamps in the same way.
Position of the lamps in the rear light: 1 — reverse lights; 2 — brake signal; 3 — direction indicator; 4 - side and fog lights.
8. To remove the light, squeeze the clamps of the wiring harness block and disconnect it from the rear light wiring block. Using your hand, push the rubber sealing cover of the wires out from the hole in the body.
9. Having unscrewed the nuts securing the lamp (see above), remove the lamp by pulling the wires with the block through the hole in the body.
10. Install the lamp in the reverse order.
The article is missing:
- High-quality photos of repairs
Recommendations for replacing license plate lights
By spending a few minutes of your free time, you will protect yourself from fines from traffic police officers. Remember that only those lights that emit a pale yellow or white color can act as backlight lamps for the Lada “Kalina” license plate. Drivers who decide to replace factory lamps with colored bulbs receive a fine of five hundred rubles.
According to the law, such machines should not be allowed to operate. If the replacement of lamps was successful and the backlight is on, do not forget to monitor the cleanliness of the rooms.
Tail lights and lamps
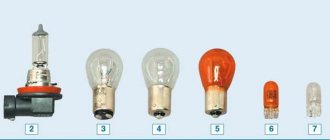
The following elements are used as brake light lamps in Kalina-2: lamps with a P21W socket and a transparent bulb. Replacing such an element will not be difficult.
Brake light bulb, VAZ-2192/2194
The rear turn signals are equipped with the same bulbs as discussed above. Their bulb is colored yellow (type PY21W).
The reversing light in the hatchback is provided by a lamp of the following standard size - R10W. If we talk about the station wagon, they use lamps of a different type - W16W. They do not have a metal base.
Website about joints
After using the car for a long time, the license plate lamps burn out and Lada Kalina owners quite often encounter a similar problem. The room is illuminated by two lampshades, which are located on the lower side of the trunk saber. To dismantle them we need a flat blade screwdriver.
- We open the trunk to make everything more convenient and pry the lamp cover on the left side with a screwdriver so that it is released from one latch:
- Then we press on it on the right side and try to move it to the left, after which it should come out without difficulty, as shown in the photo below:
- After which you need to pull it out a little along with the power wires for more convenient work when replacing lighting lamps.
- Next, you need to lift the plastic clamp up a little and remove the power plug:
- Now you can remove the base along with the light bulb by turning the white housing counterclockwise:
- The light bulb itself is very easy to remove; we grab it and pull it to the side, after which it is removed from the base:
After replacing the license plate lamp with a new one, we install everything in the reverse order on our Kalina. As you can see, everything is done quite simply.
If you need to replace the license plate light bulb on Kalina, then this article will help resolve this issue. In modern life, a car has long ceased to be a luxury, but has become an urgent necessity.
Each owner of his own vehicle tries to improve his car as much as possible, choosing new accessories and changing the upholstery. Particularly popular is the procedure of replacing the backlight with a better one or a different color scheme. The modern automotive services market offers easy and quick replacement of lighting not only for the car interior, but also for license plates.
Replacing the license plate light bulb on Kalina is done in several ways
. Replacing a standard device, or changing a simple incandescent lamp to LEDs.
In this case, it is necessary to dismantle the lampshade that protects the lamp from mechanical stress, and then replace it with an LED of a pre-selected color. Original license plate lighting will add zest to the appearance of any car.
Changing the lampshade is also not difficult.
, since to do this it is enough to remove the chrome strip from the car bumper and replace the lamps. It is necessary to carry out all processes carefully, since the holder located on the body is quite fragile and breaks easily.
To successfully dismantle the lampshade, you must use a special screwdriver or knife
. In the modern construction market you can easily find diodes of different colors, including red, blue, green, white, etc. For brighter illumination of license plates, it is better to choose bulbs with lenses.
LED strips
. Such devices can be purchased both on the construction market and in specialized stores. Such tapes can be sold in various colors and different formats.
To install it, you need to cut off the excess section of the tape, and then use a soldering iron to solder the tape to the wires connected to the numbers. The tapes are connected directly to the on-board network, after which a special battery is installed that regulates the voltage supply.
Replacing interior lighting
In modern cars, problems quite often arise with interior lighting, since the standard lamps included in the basic package do not provide sufficient illumination. In this case, many vehicle owners decide to replace the interior lighting. LEDs are installed in the ceiling covering, on the instrument panel, as well as in any other parts of the car chosen at the discretion of the owner.
For such purposes, you can choose both LED and neon. A modern popular novelty is LED strips of different colors, suitable for interior lighting.
To create brighter lighting
special stabilizers are used that can extend the service life of the lamps, as well as create a flickering effect for the light and music. Replacing interior lighting is more difficult, so you should not carry out this activity yourself.
Changing LEDs to new lamps with your own hands can lead to incorrect operation, as well as to disruption of the lighting. This process should be taken extremely seriously and responsibly, so replacing interior lighting should be entrusted exclusively to professionals. But in general, replacing the license plate light bulb on Kalina is not a complicated operation
. Lighting and illumination of a car significantly affects the perception of the appearance and design of the car.
Replacing the license plate lamp on Kalina
Today we’ll look at how to replace the license plate light bulb on a Lada Kalina.
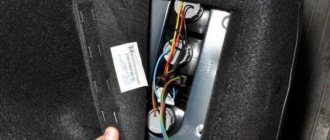
The rear license plate illumination on the Lada Kalina car is made in the form of two lampshades located in a plastic cover above the license plate. Most often, the rear license plate light does not work due to a burnt out bulb. To replace it, you need to remove the lampshade. The mounting of the lampshades is quite fragile, so it is not recommended to remove them in the cold.
The backlight is held in a plastic cover with two latches - on the left and on the right. There is a small latch on the left, a large one on the right.
To remove the lampshade, you need to use a thin screwdriver to pry out the small latch that is located on the left (the one on the right can be easily broken).
Having disconnected the small latch, we move the lampshade itself to the left, thereby releasing the right latch.
We take out the backlight.
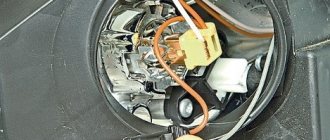
Disconnect the connector and remove the plastic base along with the light bulb.
We take out the burnt out backlight bulb and put a new one in its place. Checking the functionality of the backlight.
Diagram and marking of fuses and their replacement
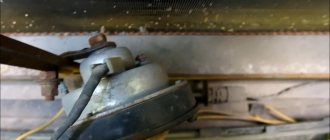
If you turn over the cover of the Lada Kalina fuse box, you can see the markings and which fuse and relay are responsible for what. Also, it can be seen in the vehicle’s service and technical book.
Fuse box diagram
Let us indicate and decipher the fuse number, amperage and what it is responsible for:
F1 - (10) - Instruments: immobilizer control unit, hazard warning switch, instrument cluster. If, when starting the engine, the starter does not turn and the immobilizer icon flashes, then you need to pay attention to this fuse. F2 — (30) — Electric windows. Read more about why window lifts may not work here. F3 - (10) - Hazard warning switch F4 - (20) - Windshield wiper F5 - (25) - Heater, electric power steering control unit F6 - (20) - Horn F7 - (10) - Instrument cluster, interior lighting F8 - (20 ) — Heated rear window F9 — (5) — Side light (right side) F10 — (5) — Side light (left side) F11 — (7.5) — Immobilizer control unit F12 — (7.5) — Low beam (starboard side) F13 — (7.5) — Low beam (left side) F14 — (10) — High beam (starboard side) F15 — (10) — High beam (left side) F16.17 — (10) — Fog lights F18 — (15) — Heated seats F19 — (10) — ABS F20 — (15) — Cigarette lighter F21 — (10) — Reverse lock F22 — (15) — Electrical package control unit F31 — (50) — Control unit electric booster
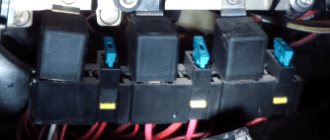
Relay layout in the mounting block
Also, relays are installed on the fuse block. Let's give them a breakdown according to numbering:
K1 - headlight washer relay; K2 - power window circuit activation relay; KZ - starter activation relay; K4 - additional relay (ignition relay); K5 - relay for turning on direction indicators and hazard warning lights; KB - relay for turning on the windshield washer and wiper; K7 - headlight high beam relay; K8 - relay for turning on the sound signal; K9 - relay for turning on the front fog lights; K10 — relay for turning on the heated rear window; K11 — relay for turning on the front seat heating circuit; K12 - backup relay.
Replacing fuses and relays
Replacement of fuses and relays is carried out using special tweezers. They are in the photo below, marked with an arrow.
Arrows indicate tweezers
Replacing license plate lamps Kalina station wagon
Did you unexpectedly need an operation such as replacing the license plate light bulb on Kalina?
First, you need to read this article as carefully as possible. She will definitely help. The modern world is designed in such a way that a car is no longer a luxury item, but is used primarily as a means of transportation. Drivers want their iron horse to look unique inside and out. For this purpose, various types of work are being carried out. For example, installing new accessories on the body or replacing the upholstery with a better one. The automotive market today is incredibly rich. You can find anything on it, right down to license plate lighting elements. Replacing the license plate light bulb on Kalina can be done in various ways. It is possible to replace the device itself. If this option does not suit you, then you can replace a simple lamp with well-known LEDs.
Is the second option still chosen? Then you need to dismantle the lampshade, which is installed directly to protect the lamp from mechanical influences. All that remains is to install the desired LED. Bright and attractive license plate lighting can make each car visible on the road. You don't have to put in a lot of effort to replace the lampshade. You just need to carefully remove the chrome strip that is on the bumper, after which all that remains is to install new lamps. It is not recommended to use too much force, because the holder located on the body can easily be broken!
To remove the lampshade, you will have to use a regular flat-head screwdriver. If you don’t have one at hand, then you should just take a knife. As for the diodes themselves, it will not be possible to find them on the modern labor market. There are a variety of colors available, giving you a good choice. If you want your room to be illuminated as brightly as possible, you should spend money on lamps with lenses.
You can buy them both at the previously mentioned automobile store and at the building materials market. They, like the diodes separately, are sold in different colors. Plus, the tape can have different shapes.
To complete the installation, you immediately need to cut off the excess part of the tape with scissors. Next you will need a soldering iron. With its help, the tape is soldered to the necessary wires. The tape must be connected directly to the on-board network. Then it is necessary to install a small battery, the task of which is to keep the incoming voltage under control.
Alas, the interior lighting on modern cars is not of high quality. This fact is due to the fact that initially there are lamps that are unable to provide a high level of luminescence. This is not only inconvenient, but can also provoke an emergency situation in the dark. To avoid this, the owners of the iron horses decide to replace the interior lighting elements. The diodes are mounted in the ceiling, or rather in its covering. You can also put them in doors and other parts of the interior. Here everything depends on the wishes of the car owner.
For the interior, you can choose not only LED strips. Neon ones are also great. Today, tapes that can boast diodes of various colors can be considered a novelty. It looks really nice. It becomes possible to create a pleasant atmosphere in the machine.
To achieve maximum bright lighting, it is customary to use specialized stabilizing devices. Their task is to ensure that the lamps can be used for as long as possible. Plus, it creates a flickering light effect, like at a disco. Replacing interior lighting elements is not the easiest procedure, I must admit. You shouldn’t do it yourself, because you can “get yourself into trouble.” It’s better to go to a service station, where specialists will do everything quickly and efficiently, even for a certain amount of money.
Installing new light bulbs on your own often leads to not entirely correct operation, as well as to a general malfunction of the lighting system. Such procedures must be treated as responsibly as possible, and therefore, in the absence of knowledge and skills, it is better not to go to court at all. The masters themselves will perfectly complete the task. But if we are specifically talking about the operation - replacing the license plate light bulb on Kalina, there is nothing supernatural here. As has already become clear, the quality of lighting and illumination play not only an important role in terms of appearance, but also influence the perception of the car on the road.
The license plate lamp has burnt out. Without waiting for maintenance, I decided to replace it myself.
Changing the lamp is not very convenient, since you have to manage to hold the back door, which is constantly being pulled up, and at the same time try to pick up the lamp with something flat.
The lamp will be replaced in the right lamp.
Right license plate light Kalina 2
They write on the Internet that the flashlight needs to be hooked on the right side, as I tried to do at the beginning, and you need to place something under the screwdriver, which you can use to try to pry the flashlight off so as not to damage the decorative plastic trim. I couldn't do any damage