Many car enthusiasts were faced with the fact that they had to change the headlight glass on a VAZ-2114. There are many reasons for replacement, from an accident to tarnishing that can no longer be polished. Not all motorists are able to carry out the procedure on their own, since the process is scary, but as practice shows, it is quite simple.
Video on how to remove headlight glass from a VAZ-2114:
The video will tell you how to independently replace the headlight glass on a VAZ-2114 car, and will also tell you about some of the nuances and subtleties of the process.
Replacing headlight glass on a VAZ-2114
Removed headlight during disassembly.
Replacing a headlight glass on a car means a complete process of disassembling the housing. So, let’s consider the sequence of actions aimed at carrying out repair work to replace glass:
- The first thing you need to do is remove the upper radiator grille. The mounting location of the radiator grille, which needs to be unscrewed. Removed radiator grill to get to the headlight mount.
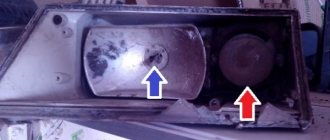
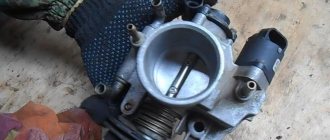
- Remove the hydraulic corrector and disconnect the power supply terminals. Rear part of the headlight housing Disconnect the hydraulic corrector
- Unscrew the headlight mounts. Two at the top, one at the side and one at the bottom. Place for mounting the headlight on the inside Place for mounting the headlight
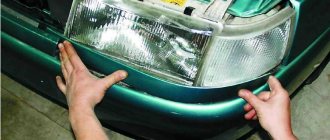
- We remove the headlight from its seat.
We remove our damaged headlight. - We dismantle the light bulbs and other elements that are located at the back of the case.
- Using a knife or screwdriver with a thin blade, we pry it between the glass and the body, and then cut the rubber seal and glue around the entire perimeter. Using a screwdriver, remove the headlight glass. The photo shows a VAZ-2109 headlight, but the work is similar. Applying sealant to the headlight glass. This is a VAZ-2114 headlight.
- We take out the glass.
- We degrease the new glass and glue a sealant onto it.
Lubricate the headlight glass with glue or sealant. The photo shows a VAZ-2109 headlight, but the work is similar. - Apply glue to the body and press the glass tightly.
Gently press the new glass onto the headlight and wait for it to dry. - The rest of the assembly process is carried out in reverse order.
You can remove the glue without a knife. There are special products that dissolve frozen liquid. The variety of manufacturers today is quite large, so the motorist will have plenty to choose from.
Glass selection
Essential glass replacement kit.
Glass for VAZ headlights can be sold original or analogues. So, the analogue costs 20-30% less, but it is not a fact that the kit will come with a rubber seal. This element is mandatory, since it is it that prevents moisture from getting inside the headlamp.
Reasons for replacement
The most common reason for replacing headlight glass is a pebble on the highway.
The glass on a car headlight can change for several reasons. So, sooner or later the car enthusiast will have to deal with this process. Of course, one of the options is a trip to a car service center, where they will definitely tell you to completely change the product, but many people don’t want to do this. So, let's look at the main reasons for replacing headlight glass:
- Over time, glass tends to fade . At the same time, I can’t help polishing the top layer, so I have to replace the glass.
- Broken headlight . It is often cheaper to change the glass than to replace the entire headlight unit, so many car owners are inclined towards this option.
One of the cheapest replacement options is to buy a disassembled headlight , since in most cases the housing becomes unusable, but the glass surface remains intact.
Principle of step-by-step action
Let's start removing the lamp from the headlight unit. To do this, we need a thin screwdriver and an awl, as well as a magnet on a long handle (if possible). We unscrew the lamp protection box on the headlight unit on both sides by hand. Remove the cover. Below it you can see the three-pin headlight power connection block, as well as the spring mechanism of the lamp holder.
Replacing the low beam bulb on a VAZ 2114
Before disconnecting this unit, you need to disconnect the terminal block. Then you need to compress the lamp fastening spring and release the lighting element itself. With a slight movement of the hand, we remove the lamp from its standard mounting location and replace it in the reverse order.
Before changing the low beam bulb on a VAZ 2114, it is advisable to make sure that there is no condensation in the reflector unit. If moisture is present, this may be the main reason for the failure of this device. To eliminate it, it is important to clean the drainage channel, which is located in the area where the turning lamp is mounted (left or right).
When performing this work, you must adhere to basic safety rules. When the lights for the VAZ 2114 stop shining on the road, you don’t need to stand on the side of the road, creating an emergency situation, but try to get to the nearest gas station or service station.
conclusions
Replacing the headlight glass on a VAZ-2114 is quite simple, and you do not need to change the entire product, while paying significant money for the whole part and the work of a car service center. Glass products can be found at salvage yards or at the car market for fairly low money.
—> VAZ Masters / External car lighting / Headlights
Replacing headlight glass on a VAZ 2114
LET'S SUM IT UP
So, we figured out the pricing policy, design and modernization of headlights for VAZ 2113 cars and their series. Let's summarize so that everyone can consciously make a choice which headlights are better for the VAZ 2114:
- The components from Kirzhach are a little simpler in their technical design and are easier to modify with your own hands using any of the specified methods and actions. However, not everyone wants to do manual modifications, even if they help change the car for the better. Therefore, for some, a more expensive option will be a godsend, which you just need to install and do nothing else.
- Bosch headlights are brighter, and the light is a more saturated beam.
- In terms of prices, Kirzhach turned out to be a little cheaper with relatively good performance and can easily compete with its opponent.
Why do you need to replace the canopy glass?
Let's figure it out first, why is it necessary to replace the headlight glass of a VAZ 2110 or 2114:
- It's simple - glass separately is cheap and there is no need to buy expensive headlights entirely. The reason why headlight repair is needed is some pebble that has fallen on the glass or other foreign object. When the glass of the lamp cracks, the light from the headlights becomes dim.
- In addition, the headlight glass of a VAZ 2114 or VAZ 2110 may fade over time and then again, by the way, there will only be a replacement. Polishing rarely helps in this case, and this process is not so easy. It’s easier to buy headlight glass and quickly replace it.
Step-by-step instruction
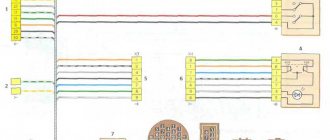
Fuses and relays VAZ 2114 2115 2113
Adjusting the headlights of a VAZ 2114 or 2115 with your own hands is a simple procedure. With proper preparation of the car, you can achieve optimal results that will not differ from adjustments on an optical machine.
- Install the VAZ 2114 at a distance of 5 meters from the wall. The measurement is made strictly from the headlight glass.
- The height of the lamp relative to the asphalt is measured with a tape measure.
- The value is marked on the wall with a horizontal line.
- A vertical stripe marks the center of the car.
- From the horizontal mark, an indentation is made downwards by 65 mm and a mark is made where the cut-off strip should be located.
- To identify the center of the beam, the transition points into daws are used.
- The centers of the jackdaws are marked on the wall with vertical lines, the distance between which should be 964 mm.
A schematic sketch is recommended by the manufacturer as the most accurate method for adjusting the optics.
- Turn off the car engine.
- Turn on low beam.
- Set the headlight hydraulic adjustment lever to position 0.
- Open the hood.
- Cover one headlight with cardboard or a thick rag. This improves the visibility of the beam boundary.
- Using the built-in screws, adjust the direction of light first on one headlight, then on the other.
- Rock the car and check that the settings are correct again.
When performing work, the vehicle must be without passengers. You can put a load weighing 50-70 kilograms on the driver's seat, but this is not necessary. Installation on the handbrake often changes the position of the body relative to the road surface, so you should use a wheel support or a regular stick.
By adjusting each headlight separately, you can achieve the most accurate result of the beam position. Correctly configured VAZ optics will not blind oncoming traffic participants and provide high-quality illumination of the road surface.
How to replace headlight glass
Now we’ll find out how to replace the glass itself. First, let’s find out the design of the lantern, what it consists of.
What does the headlight consist of?
As you know, the main link of any lantern is its reflector or reflector. It is a concave mirror component, which serves to form a light beam of the desired shape.
Types of lamps for flashlights
As for the light source, they are car lamps. They can also be different. Today we know:
- ordinary incandescent lamps;
- halogen lamps;
- xenon lamps.
Incandescent lamp
Halogen lamp
Xenon lamp
Lantern glass
The headlight also consists of corrugated glass, which will be discussed in this article. The most popular types of glass are transparent.
Although tinting headlights is becoming more and more fashionable now.
Transparent glass headlights VAZ 2114
Although reflective options are also known, crystal, modular, lensed, etc.
How to replace glass on a headlight
2114 VAZ glass headlights
Method one
Begin:
- remove the radiator grille;
Removing the radiator grille
- lift it and insert your fingers into the gap formed between the bumper and the grille;
- we find two latches on each side and unhook them;
- take out the grate;
- now we find the two bumper mounting bolts and unscrew them;
- pull the bumper towards you (nothing is holding it anymore and it should come out easily);
- we find three bolts securing the headlight and unscrew them;
- we recess the headlight inside;
- holding the eyelash of the headlight, we pull it towards the center of the car;
VAZ 2110 glass headlights
- take a screwdriver and, using it to pick up the eyelashes from the outside, pry the headlight out of engagement with the bumper;
- remove it;
- Now you will need to unscrew the lower nut securing the headlight;
- then unhook the connectors from the headlight, turn signal and hydraulic corrector cylinder;
- remove the headlight completely.
Note. If the headlight does not come out, it may be held by brackets on the sides, which should be picked up with a screwdriver and the headlight will easily come out.
Note. It will be much easier to install the brackets in place if you first hook them onto the headlight housing, and then push from above and snap them onto the glass.
VAZ 2114 glass headlights
- We install the eyelash in place, pushing its edge into place with a screwdriver.
Method two
It's time to find out how to change the glass on a VAZ 2110 headlight using the second method. And in one thing you can carry out a complete repair of headlights on a VAZ. Let’s get started:
- disconnect the blocks with wires;
- remove the upper radiator grille (you will need to unscrew several bolts with a 10mm wrench);
- Having disconnected the blocks with wires, remove the hydraulic corrector (to do this, press the latch and turn the hydraulic corrector 90 degrees clockwise);
How to change glass on a VAZ 2114 headlight
- we find the bolts securing the headlight with a 10 key;
- move the headlight back a little;
- move the eyelash to the center by 4 centimeters;
- disengage its edge using a screwdriver;
How to remove glass from a VAZ 2110 headlight
- loosen the bolts securing the upper buffer;
- remove the eyelash by pressing on the lower part of the pad so that its flange disengages from the front buffer;
- take a 10mm wrench and unscrew the last nut securing the part;
- remove the lantern.
Let's move on. Let's try to find out how to disassemble the headlight itself in order to replace not only the glass, but also its other parts:
- take a flat screwdriver or knife;
- insert the tool into the corner of the glass and lift it slightly;
- take a utility knife and cut off the old sealant.
Advice. When cutting off the old sealant with a knife, you need to lift the corner of the glass with your other hand. If the sealant does not cut off, then you need to take an industrial hair dryer and heat the joints to the required temperature. The sealant will melt a little and it will be easier to cut off.
How to remove glass from a VAZ 2114 headlight
It will be useful to watch this video
Let's continue:
- Once the glass is removed, it can be replaced with a new one.
If you need to change any other part of the headlight, then continue the analysis:
- dismantle the headlight reflector by unscrewing three bolts;
- Now you will need to remove the board with the reflector and the module from the headlight.
Note. In order to remove the board without problems, you will need to remove the pressure spring through the hole in the hydraulic corrector. Then tighten the adjustment as much as possible, and then unscrew first one adjustment screw and then the other.
- remove the board from the headlight.
Now we’ll find out how to disassemble Bosch headlights, which is much easier to do:
- remove the glass from the lantern (it will come out only after the latches are unfastened);
- Unscrew the adjusting bolts of the headlight reflector completely;
- we take out the cap inside the reflector, which covers the low beam lamp (to do this, we again use a screwdriver, with which we pry the reflector off from the other side);
- We change what is needed and assemble the part in the reverse order.
Note. When assembling the headlight, after replacing the glass or other part, you can use a soft rubber seal instead of sealant (it is shown in the photo below).
Rubber seal for headlights
Add a commentAdd a comment We advise you to readXenon in the foglights of the VAZ 2109 with your own handsXenon on the VAZ 2109: installation on your ownWe do the lens headlights on the VAZ 2109 ourselvesHydraulic corrector for the VAZ 2110 and its installationContents
Front light fixtures are statistically the most fragile part of a car. If there is slight contact with third-party objects, a bumper or hood can be straightened, but the fragile glass of lighting fixtures cannot be repaired.
Also, unlike the mechanical parts responsible for the appearance of the car, light repairs cannot be postponed, so every car enthusiast faces the question of how to remove the headlight on a VAZ 2114. Firstly, the life of the driver at night depends on their serviceability, and secondly, the malfunction of lighting devices is a significant reason for a fine.
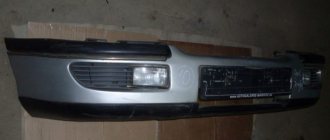
Replacing headlights for VAZ 2114
In addition to collisions, there are many everyday reasons that result in the replacement of a VAZ 2114 headlight, the most common being a poorly maintained road. Even the smallest pebbles that pass the “millstones” of the wheels of the car in front turn into “bullets”.
Moreover, the starting speed of some of them is quite comparable with real small arms. Therefore, let's figure out how to replace the entire optics, change the glass and what lighting devices to buy.
Dismantling
Replacement
To resolve the replacement issue, you will first need to dismantle the headlight unit. By following fairly simple instructions, you will quickly understand the device and be able to remove it.
- Disconnect the negative terminal from your battery. This way you will de-energize the car, thereby protecting yourself from electricity.
- Remove the radiator trim.
- Disconnect the connectors with wires from the flashlight. Don't forget to disable the second one too.
- Now press the latch on the hydraulic corrector cylinder, turn it clockwise 90 degrees, which will allow you to remove the element from its seat. You will also see hoses there. There is no need to turn them off. They won't bother you.
- The headlight unit is held on by three bolts, which can be unscrewed with a regular wrench.
- Slide the light back and then to the side, moving towards the center of the car. Move until the hook disengages from the wing.
- The top bolts on the bumper will have to be loosened. There is no need to completely dismantle them.
- Press the trim from below until the flange disengages from the buffer. This will allow you to remove the cover.
- There is a nut at the bottom that holds it in place. It needs to be unscrewed.
- Now pull the headlight unit towards you, disconnect the block from the turn signals. That's it, the device is dismantled.
Article on the topic: Cigarette lighter fuse on VAZ 2109
Replacement timing and choice of optics
In addition to the difficulties described above, which are familiar to motorists who drive long distances, there are more banal reasons related to the depreciation of the headlight itself. This mechanism does not have a specific shelf life, but the lamps “burn out” over time, and the reflector material and diffuser become unusable.
The last two elements have a shelf life directly related to the material from which they are made and the methods of car care. At the same time, even the best of them are still susceptible to the ingress of dirt associated with depressurization of the headlight structure.
IMPORTANT! If you have working headlights, but you still can’t see anything, visit a good car service center that has a light debugging stand. It may just be necessary to clean the structure and adjust it.
The choice of headlights is extremely important for the convenience of the motorist. To be more precise, it is not the manufacturer itself that is important (although it affects the characteristics of the light), but the identity of the lighting fixtures. If your car has standard headlights, but you decide to replace only one, then find the original ones. You should not take AUTO SVET or BOSCH, which are similar in appearance.
Choice of optics
From a technical point of view, the headlights will be the same, but the manufacturing technology of the optics differs from one company to another, and as a result, you will get two distinctly different headlights. Even if you don't care about the appearance of the car, don't forget about the properties of your eyes.
Human vision and the brain have a number of characteristics, and in this case they will manifest themselves in the fact that a more powerful headlight will create a “twilight zone” instead of a dimmer light. Consequently, there will be no improvement in visibility, and the brain will perceive the “blind spot” almost the same way if it did not exist at all.
Disassembly
1. Remove the battery to gain access to the headlight
2. Disconnect the wiring and hydraulic corrector
3. Remove the radiator trim and the headlight itself
There is nothing complicated about this. The main thing is not to take unnecessary force. The fact is that the cladding is attached not only with latches, but also with self-tapping screws, the most tricky of which is located at the bottom; from above this place looks like this:
Algorithm for replacing the front headlight of a VAZ 2114
When we have decided on the timing and reasons for the replacement, and also know what to follow when choosing new optics, it’s time to move on to the question of how to change the headlight on a VAZ 2114.
REMEMBER! The vehicle's lighting system is part of its electrical network, therefore, we must not forget about the standard safety measures required to work with this part of the car. You need to at least remove the terminal from the battery, and if you have to work with the right handicap (in the direction of travel), you will have to completely remove the battery, otherwise it will be impossible to dismantle it.
So, let's remove the headlight:
- We remove the radiator trim - to do this you need to unscrew 4 screws.
Removing the radiator trimRemoving the turn signal
IMPORTANT! If for one reason or another you cannot remove the turn signal separately, do not break the latches. Later, you can dismantle the entire lighting system in one block and separate them separately. This will be less convenient, but much better than a turn signal dangling from the housing.
- Remove the bumper mounting nuts in the headlight area. This is necessary in order to then move the bumper itself a little and get closer to the fastenings of the illuminator trim.
- Now we dismantle the headlight itself.
This is done as follows:
- disconnect the wire from the headlight itself and fix it in the engine compartment;
- We find the corrector latch and clamp it, after which we turn it counterclockwise. If everything is done correctly, it will be removed easily and without the need for physical force;
- Unscrew the fastening nuts using a spanner. There are three nuts in total and finding them is not difficult;
- Use a screwdriver to unscrew the screw connecting the headlight to the bracket;
- carefully remove the headlight through the “face” of the car.
Removing the headlight
There is another method for removing headlights, which involves removing the entire headlight unit along with the middle frame.
To do this, you must immediately disconnect the wires from the headlight and turn signal, then remove the hydraulic corrector, and then:
- Unscrew the four bolts located behind the headlight group.
- We remove the headlight together with the middle frame and unscrew its fasteners outside the car.
- After removing the fasteners, carefully remove the headlight itself.
After replacement (repair), you must assemble the car in the reverse order of the method you used. Also note that the headlight may need to be repaired and you just need to replace the glass of the VAZ 2114 headlight, which is often found in the practice of operating this car.
Also check out
- Disconnect the connectors for the turn, then the headlight and hydraulic corrector. To perform the last step, you need to clamp the curved clip, turn the corrector plug down, and remove it from the socket.
- Using a 10mm socket, unscrew the 4 bolts located at the rear of the headlight.
Remove the headlight from the mounting socket, remove the middle frame fasteners from the common mount
It is important to do everything carefully to avoid damage to the paintwork.
- Remove the middle frame, dismantle the headlights with the lower eyelashes.
Before replacing the VAZ 2114 headlights, you should make sure that they are faulty, since they can probably be repaired. After this, you need to adjust the headlights of the VAZ 2114.
Source
Replacing the taillight of a VAZ 2114
This procedure is much simpler than that of its front brother.
Removing the rear light:
- Unscrew the fabric cover.
- Unscrew the 4 nuts with a “10” wrench.
- We remove the rear light, and if necessary, unfasten the latch and remove the lamp holder.
Everything is assembled in the reverse order, and completely replacing both taillights will take no more than 10 minutes. Everything is done easily and without physical effort, the main thing is not to drop the flashlight on the rear bumper when it is removed.
Replacing the headlight glass
If you see that the headlight itself is working, and its cloudiness is due to glass defects, you need to know how to remove the glass from a VAZ 2114 headlight and then replace it.
Headlight glass
The algorithm for performing the procedure is as follows:
- We dismantle the headlight using one of the methods described above.
- Take a thin flat screwdriver (spatula, knife) and pry up the corner of the glass.
- Insert the tip of a utility knife into the resulting gap and cut through the old sealant (if there is a lot of sealant left, take a hairdryer and heat the edges of the glass).
The glass is now removed, but remember that reassembly will involve applying sealant (can be replaced with a rubber seal), so be sure to get some in advance. Also, some manufacturers' headlights have headlights with clips, so don't use brute force, just look where they are and tighten them.
In conclusion
Now you know how to replace the headlight itself or its glass. If you need to further disassemble the headlight, know that the reflector in the VAZ 2114 headlight is secured with three bolts, and the board itself is fixed with a spring, which will have to be released.
Published January 11, 2018
09/07/2018 Off Posted by dakus
Content
Replace headlights on a VAZ-2114 yourself
Many car enthusiasts were faced with the fact that they had to change the headlight glass on a VAZ-2114. There are many reasons for replacement. from accidents to sunburns that can't be buffed out. Not all motorists can perform this procedure on their own, since it is a scary process, but, as practice shows, it is quite simple.
Video on how to remove headlight glass from a VAZ-2114:
Video explains how to replace your glass headlights
The VAZ-2114 car, as well as some of the nuances and subtleties of the process.
Replacing headlight glass on a VAZ-2114
The headlight is removed during disassembly.
Replacing headlight glass on a car. this means a complete dismantling process. So, let's consider the sequence of actions aimed at glass repair:
- The first thing to do is remove the top grill.
Repair of VAZ 2114 headlights Replacement of VAZ 2114 glass headlights
Broke one glass headlight
and the second one is getting dark from old age, so I decided to replace it and make a good video on this topic well!!!
READ How to Decode an Audi A6 C5 Radio
How about replacement glass in the headlights?
Using the example of Lada Samara-2.
Remove the damaged headlight.
grease glass
lamps with glue or sealant. Photo. Headlight VAZ-2109, but the work is similar.
Gently press the new glass into the headlight and wait until it dries.
You can remove the glue without a knife. There are special products that dissolve frozen liquid. The variety of manufacturers today is quite large, so the car enthusiast will have to choose.
Glass selection
A glass replacement kit is required.
Glasses for VAZ headlights can be sold in originals or analogues. Thus, the analogue is 20-30% cheaper, but it is not a fact that the kit includes sealing rubber. This element is necessary because it prevents moisture from entering the headlights of the device.
Reasons for replacement
The most common reason for replacing headlight lenses is gravel on the highway.
The glass on a car's headlights can change for several reasons. Therefore, sooner or later the motorist will have to face this process. Of course, one of the options. This is to go to a car service center, where they will definitely tell you to completely change the product, but many do not want to do this. So, let's look at the main reasons for replacing glass headlights:
- Over time, glass acquires the property of coloring. . The top layer does not help with the same shine, so you have to replace the glass.
- Broken light . Cheap glass replacement is cheaper than completely replacing the entire headlight assembly, which is why many car owners tend to do it.
READ Removing the Steering Column VAZ 2110
One of the cheapest replacement options is purchasing floodlights during disassembly , since in most cases the housing becomes unsuitable, the glass surface remains intact.
conclusions
Replacing headlight glass on a VAZ-2114 is quite simple, and you do not need to change the entire product, which gives you a lot of money for all the little things and the work of a car service center. Glassware can be found at demonstrations or in the automobile market for relatively little money.
CategoryCar garageTags2114 change headlight
Where is the Central Locking Unit of the VAZ 2110 Where is the Opel Cadet Oil Pressure Sensor Sources used:
- https://carfrance.ru/zamena-stekla-fary-vaz-2114/
- https://masteravaza.ru/vneshnee-osveshhenie-avtomobilya/fary-elektroprovodka-i-elektrooborudovanie/zamena-stekla-fary-327
- https://remontvazov.com/kak-snyat-faru-na-vaz-2114
- https://autotexnika.ru/kak-pomenjat-steklo-na-fare-vaz-2114/