How to tighten the timing pulley on a Priora
The Lada Priora car is equipped with high-strength timing belts from Gate, as the manufacturer states that the belts can be used for 100,000 km, however, the timing belt requires constant supervision. The belt may wear out ahead of time due to deviations in the operation of other components with which it works together (guide or tensioner, due to play or jamming of the pump). In this article we will talk about replacing the Lada Priora timing belt, if such a need has arisen. As a rule, replacing the timing belt is necessary if the rubber on it is cracking, breaks, excessive wear or pullouts of the teeth.
Timing belt design on a car on a VAZ 2170 2171 2172 Lada Priora
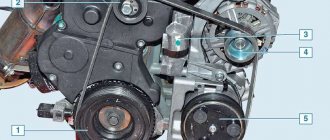
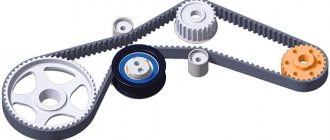
Rice. 1 Diagram of the gas distribution mechanism drive of the Lada Priora car: 1 - crankshaft toothed pulley; 2 — toothed belt; 3 — water pump pulley; 4 - tension roller; 5 — exhaust camshaft pulley; 6 — rear protective cover of the toothed belt; 7 — intake camshaft pulley; 8 — ring (synchronization disk) for the phase sensor; 9 — support roller; A - TDC mark on the crankshaft toothed pulley; B — installation mark on the oil pump cover; C, F - installation marks on the rear protective cover of the toothed belt; D — installation mark on the exhaust camshaft pulley; E - installation mark on the intake camshaft pulley
Monitoring the condition of the timing belt on a VAZ 2170 2171 2172 Lada Priora
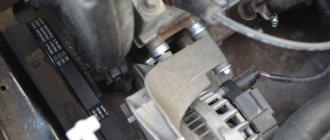
The camshafts are driven into rotation from pulley 1 (Fig. 1) of the crankshaft through a belt drive with a toothed belt. Under the camshaft pulleys there are two rollers: on the left is a tension roller 4, on the right is a support roller 9. On the support roller, the mounting hole is made in the center of the inner race, on the tension roller it is located eccentrically (offset from the center by 6 mm). Therefore, by turning the tension roller relative to the fastening bolt, you can adjust the belt tension. The camshaft pulleys differ in that a synchronization disk 8 is welded to the pulley 7 of the intake camshaft, which ensures the operation of the phase sensor. The drive is covered with plastic covers at the front and rear. To set the valve timing, there are timing marks A, D, E on the pulleys, B on the oil pump cover, as well as C and F on the rear drive belt cover. When the phases are correctly set, mark A should coincide with mark B, and marks D and E should coincide with marks C and F. Replace the camshaft drive belt if, upon inspection, you find: - traces of oil on any surface of the belt; - signs of wear on the toothed surface, cracks, undercuts, folds and separation of fabric from rubber; - cracks, folds, depressions or bulges on the outer surface of the belt; - fraying or delamination on the end surfaces of the belt.
Tools necessary for replacing the timing belt on a VAZ 2170 2171 2172 Lada Priora
You will need: the tools necessary to remove the alternator drive belt and the front timing belt cover, a 15-size wrench, a 17-size socket wrench, a special wrench for turning the tension roller or a circlip remover, a mounting spudger or a large screwdriver.
Operations when replacing the timing belt on a VAZ 2170 2171 2172 Lada Priora
1. Disconnect the wire from the negative terminal of the battery.2. Remove the generator drive belt (see “Replacing the generator drive belt on a VAZ 2170 2171 2172 Lada Priora”).3. Set the piston of the 1st cylinder to the TDC position (see “Installing the piston of the 1st cylinder to the TDC position of the compression stroke on a VAZ 2170 2171 2172 Lada Priora”). 4. Using a 15mm wrench, loosen the tension roller mounting bolt and turn the tension roller to release the belt tension.
5. Remove the belt from the camshaft pulleys, tension pulley and water pump timing belt.
6. In order to unscrew the bolt securing the generator drive pulley, it is necessary to secure the crankshaft from turning. To do this, after removing the plug in the clutch housing, an assistant must use a mounting spatula or a large screwdriver to hold the crankshaft by the teeth of the flywheel ring. It is also possible to fix the flywheel to unscrew the bolt when replacing the timing belt in the following way: - engage 5th gear; - if necessary Place chocks under the wheels or have an assistant press the brake pedal.
7. Using a 17mm spanner, unscrew the crankshaft pulley mounting bolt...8. ...take it out with the washer and remove the generator drive pulley from the crankshaft.
9. Remove the washer from the timing belt pulley.
10. Remove the timing belt from the crankshaft timing belt.
11. Before installing a new belt, clean the pulleys and tension roller from dirt and grease, and degrease them with white spirit.
12. Install the camshaft drive belt in the reverse order of removal. The generator drive pulley is installed in only one position. The groove of the pulley should fit into the boss of the timing gear drive pulley.
13. When installing the belt, ensure the tension of its leading branch.
14. After installing the belt, adjust its tension. To do this, using a special wrench or a lock ring remover inserted into the grooves of the outer disk of the tension roller, turn the roller counterclockwise... 15. ...until the cutout on the outer disk aligns with the rectangular protrusion on the inner sleeve of the tension roller. Use a 15mm wrench to tighten the tension roller bolt to the torque recommended in the appendix.
If you hear noise from the camshaft drive belt, there is a possibility that the tension roller bearing has failed. Remove the roller and check the functionality of its bearing. If, when turning the bearing, you feel jamming, axial play, or signs of grease leaking out of the bearing, replace the tension roller.
16. To replace the roller, before installing the belt, completely unscrew the bolt securing it and remove the roller. 17. Install the new tension roller in the reverse order of removal. In this case, the roller disc with the markings should be directed outward.
18. Adjust the tension of the timing belt (see paragraphs 13-15).19. Install all removed parts and assemblies in the reverse order of removal.
In order to check the roller, it is necessary to remove the upper timing belt guard.
To check we need:
1. Unscrew the protective cover. It is screwed on with 5 5mm hex screws. If someone has already climbed into this car before you, then instead of screws there may be ordinary “10” key bolts.
2. Remove the casing. Inspect the condition of the belt. Part of the belt will be hidden, and it is better to inspect it all by cranking the engine with the starter (after disconnecting the harness from the ignition coils or injectors) or pushing the car in 4th gear.
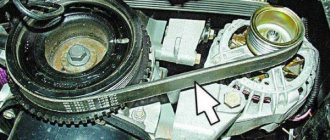
3. Inspect the condition of the video. There should be no damage to it. We look at the position of the marks relative to the groove. If it has moved more than 4 mm, then the timing belt and rollers need to be changed.
For clarity, the photo shows a new video. The risk is indicated by the upper arrow, and the groove by the lower. In a tense state, the risk is located opposite the groove.
4. To check the condition of the roller, press your fingers on the belt between the two camshaft gears. With a force of 10 kg, the needle should deflect by 4 mm.
5. An easier way is to start the engine and turn on additional devices (air conditioning, heater, high beam). At idle, the pointer on the roller should wobble slightly. When re-gasping, the needle should deviate from the normal position by about 2 mm and return to the working position. If the pointer does not move when re-gasping, then the roller needs to be changed.
6. With the engine running, you need to listen to both videos for any extraneous noise. If the rollers “whistle”, then they need to be replaced. It is better to change both together with the belt at once, because Repairs in the event of a belt break for any reason will cost a significant amount.
7. Replacing the rollers and belt is described in detail in the article replacing the timing drive on Lada Priora, Kalina and Granta cars (16 valves).
8. If all parameters are normal, then we assemble them in reverse order.
Please rate the article
The timing belt is a timing belt that is designed to synchronize the engine camshaft and crankshaft. Taking into account the maintenance regulations, the condition of the gas-type timing belt must be checked every 105 thousand km. The timing belt replacement on the Lada Priora should be carried out after 200 thousand km.
What you need to replace the timing belt
Before starting work, you need to prepare all the necessary tools. You need to prepare the following equipment:
- Wheel key
- Open-end, socket and ring wrenches
- Hexagon 5
- Tension roller wrench
- Jack
- Flashlight
You also need to prepare the car itself. Place the car on a level surface, raise the handbrake and place additional clamps under the wheels. According to the car dealer's recommendations, it is better to change the rollers and, preferably, the water pump along with the belt.
Repair work
When carrying out such work, it should be remembered that a failed timing belt from a Priora 2172 can lead to costly repairs to the vehicle’s power unit. At the same time, you need to know that the surface of the toothed part of the belt should not have cracks, folds, undercuts of teeth and separation of fabric from rubber. The reverse side of this part should not be worn out or have signs of burning. As for the end surfaces, there should be no delamination or fraying. If there are traces of oil on the timing belt of the Lada Priora, it will need to be replaced urgently. In this case, it is imperative to find out the reason for the appearance of this liquid.
How to determine when it's time to change
Here you will have to rely more on your eyes. Replacement is just around the corner if, during a visual inspection, you notice:
- traces of oil;
- excessively worn teeth on the inner surface and cracks in them;
- various deformations, such as bulges, delaminations, various folds and cuts;
- ragged surface and clearly protruding threads.
The table below provides a more expanded list of consumable defects, probable causes of their occurrence and recommended corrective measures.
List of possible timing belt defects, causes and corrective measures
Step-by-step instruction
You can check the position of the crankshaft as follows:
Such work must be carried out carefully so as not to disrupt the valve timing while unscrewing the bolt.
Therefore, replacing the belt on a Lada Priora must be carried out with at least one assistant. Its task is to fix the flywheel. To do this, a large slotted screwdriver is inserted between the teeth of this unit (due to the presence of a hole in the clutch housing).
If the timing belt is changed on a Priora, then new support and tension rollers are installed. To do this, remove the tension roller by unscrewing the fastening bolt. To remove the support roller, unscrew the bolt using a spanner set to “15”. The roller is dismantled along with the bolt and thrust washer. The last part has cores that prevent the washer from being removed from the bolt.
Before installing a new belt, you need to make sure that the marks on the camshaft and crankshaft match. You can control the position of the second element taking into account the alignment of mark No. 1 on the crankshaft toothed pulley with mark No. 2 on the oil pump cover.
If after completing this work you hear noise from the drive belt, then it is possible that the tension roller bearing has failed. To do this, you will need to remove it and check for functionality.
One of the latest developments by VAZ engineers of the last decade is the 21126 engine, which became the main power unit on the VAZ-2170. Here, cylinder honing and new pistons were used, which contributed to an increase in power. However, a banal break in the gas distribution mechanism drive will damage the components of even such a technologically advanced unit. Therefore, it is better to check and change this component of the system in advance.
How to display?
After this, they proceed directly to setting labels. To do this, remove the valve cover. Unscrew the spark plugs. This is done to make cranking the engine easier. Next you need to plug the hole in the first cylinder. The easiest way to do this is to use a plastic bag.
Using a special wrench to unscrew the crankshaft pulley, turn the engine counterclockwise. When the plug is knocked out of the first cylinder, this will mean that the TDC (top dead center) of the compression stroke is approaching. Next we turn the engine a little. The position of the cylinder can be controlled using a long screwdriver.
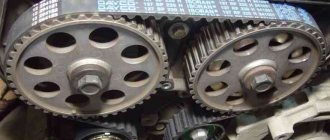
When the piston is at TDC, you need to pay attention to the marks. Usually there are two. One is located on the camshaft, the other on the crankshaft. Sometimes there may be 2 camshafts, then the marks will be on each shaft. They all must match.
If the labels do not match, then you need to fix it. To do this, loosen the chain tensioner. It is best to remove it while working. Next, unscrew the camshaft mounting bolt and remove the sprocket. Trying not to throw the chain off the bottom sprocket, throw it 1-2 links in the right direction. Next, put the asterisk in place. To do this, turn the camshaft slightly, because the mounting points have shifted. They put everything back together.
When installing the tensioner, it should be charged by tightening it to the maximum. Otherwise, installing it will be problematic. After assembly, crank the motor again and look at the position of the marks. If they do not match, you need to repeat all the steps again.
Carefully inspect the chain; it should be as tight as possible. If the tension is insufficient and cannot be corrected, the chain and all sprockets should be replaced. Regular slipping of links can damage the valves.
Belt motor
. Owners of belt motors have to deal with timing marks much more often. This is due to the lower reliability of such a drive compared to a chain. Replacement has to be done much more often, and belt breaks also occur. On older models this happened painlessly; special recesses were made on the pistons, but later this was found to be ineffective (loss of power) and was abandoned.
Thus, modern motorists need to carefully monitor the condition of the timing drive. To avoid having to repair the cylinder head.
When is it necessary to replace the timing belt on a Priora car?
In any case, the condition of the element must be monitored every 45 thousand km . The first signs that a timing belt replacement is already necessary on a Lada Priora are the following factors:
Low mileage does not always guarantee trouble-free operation of the car. Quite often in reviews from car enthusiasts you can come across a situation where the belt drive wears out ahead of schedule due to oil and dirt getting on it. These components enter through seals and cracks in the casing, so it is important to eliminate the causes of leaks and inspect the part.
It is important to understand that replacing the Priora timing belt must be done in a timely manner; in no case should the matter be delayed until it breaks. Otherwise, the cost of repairs may unpleasantly surprise the owner. This is largely due to the absence of recesses for the valves on the pistons, so a break in the part leads to their direct contact, after which the latter usually bend.
Problems with the strength of the belt drive at high speeds generally lead to catastrophic consequences, including breakage of the pistons and even deformation of the connecting rods. In order not to expose themselves to risk, experienced motorists are advised to periodically monitor the condition of the rubber transmission, as well as the degree of its tension.
When is it necessary to install timing marks?
Based on the foregoing, it is simply impossible not to state the importance of properly aligned timing marks. Carrying out this procedure - we repeat, the procedure is simple, but requires some knowledge. It is especially important to understand in what situations the installation of timing marks will actually be required by the engine, and under what circumstances it will be pointless.
Generally speaking, there are two main reasons that provoke the need for labeling:
- The first is a complete replacement of the timing belt. Having installed a new mechanism in the motor design, naturally, you will have to set the shafts to the desired position, because otherwise the engine will not be able to work;
- The second is repair of the gas distribution mechanism, associated with its complete or partial disassembly. As a rule, marks are installed when replacing the timing belt, but repairing a mechanism of a different nature will also create a similar need.
How is a belt drive checked on a VAZ 2170?
The part is a rubber product with teeth located on its inner part. The outer rim shows:
This data will be useful to the owner who does not yet know which belt to buy for the VAZ 2170. All that remains is to prepare the necessary tool for checking:
The drive status check is performed on a cold motor and consists of the following steps:
Where to buy a timing belt
A kit with a belt for the gas distribution system can be purchased at any auto service store. It is very important to choose based on price and quality. It’s better not to skimp on a belt, but to buy a quality one. By the way, you can make a profitable purchase from our good friends from the company S-Agroservice LLC. This is not an advertisement, just based on our experience, we always shop there. We recommend buying drive belts and much more from C-Agroservice. There are good prices, high-quality products, and competent specialists will consider each case individually and help in choosing. If you have a problem and need to buy a belt in a short time, you can call the number (the call is free). Your order will be delivered to you anywhere in Russia and beyond.
How to replace the timing belt on a Lada Priora on your own?
The process includes not only the rotation of the rubber transmission, but also the rollers - tension and support - change along with it. Repair kits are usually sold at auto dealerships. To work you will need the following tools:
Next, the process of changing the drive occurs in the following order:
Important! During the repair process, you need to check the condition of the coolant pump. Its shaft should rotate freely, without play or extraneous noise. Traces of coolant leakage are unacceptable. If one of the factors is present, be sure to change the pump.
How to adjust the drive tension on a VAZ 2170?
The final stage of replacing the timing belt on a Lada Priora car is performed according to the following scheme:
The tension roller bolt is tightened to a torque of 35-41 Nm , and the auxiliary pulley is tightened to 105-110 Nm . Assembly is performed in the reverse order; we do not install only the upper plastic casing for visual control of the work performed.
Next, we start the engine and observe - indicators 1 and 2 on the roller should not deviate from the norm by more than 2 mm , after which they should take the working position. After checking the functionality of the units, the upper drive casing is installed in place.
The described process is similar and can be applied when repairing Lada Kalina and Lada Granta cars. The technique for replacing the gas distribution mechanism drive is available to any car enthusiast, but requires special care. The slightest displacement of the marks can result in expensive repairs.
The timing belt is an important component of your car's engine, connecting the crankshaft to the camshafts. Its main function is the precise and timely movement of valves in accordance with the positions of the pistons in the cylinders. In the event of a break, this correspondence is violated, and the valves may begin to move towards the pistons, which inevitably leads to large and expensive repairs. That is why it is recommended to check the condition of the timing belt at every opportunity. In Lada Priora, replacing the timing belt, or checking it, is required with the same frequency and for the same reasons as on other cars. Now we will look at this process in detail.
The test is carried out on a cold engine at room temperature. If your car has air conditioning, you will need to remove the accessory drive belt. To inspect the timing belt in detail , you need to hang one wheel by lifting the car with a jack or lift. Next, carefully studying every millimeter of the belt, we rotate the suspended wheel forward as the car moves. The belt must be perfectly smooth, without longitudinal or transverse cuts. There should be no peeling on the belt and no threads included in its composition should stick out. Each tooth should be in place and there should be no cracks or broken pieces of belt at the base of each tooth. Equally important is the absence of traces of oil leakage onto the belt. Belts of this type, like any other belts, do not tolerate contact with motor or any other oil - it very quickly destroys their composition and, sooner or later, leads to the breakage of the timing belt itself. Before replacing the timing belt due to oil getting on it, it is necessary to find out and eliminate the cause of the leak.
On VAZ-21126 power units, the camshafts are driven into rotation by the crankshaft pulley (1). Under the right camshaft (looking at the engine compartment from the front) there is a support roller (9) for the timing belt (2). Under the left camshaft there is a roller used to tension the belt (4). Even lower, under the tension roller, there is a coolant pump, the pulley (3) of which is driven by a toothed belt. The tension roller mount is designed so that the axis of rotation can move relative to the engine. This creates tension in the timing belt when the roller rotates relative to the axis of its fastening. A synchronizing disk (8) is attached to the right camshaft pulley (7), which ensures the operation of the timing sensor. The drive is covered with plastic covers to prevent the entry of foreign objects, dust and dirt. To correctly set the phases, special marks are used:
— mark A located on the crankshaft pulley must coincide with mark B located on the engine body above the crankshaft
— mark D located on the left camshaft pulley (5) must coincide with mark C located on the rear cover (6)
— mark E of the camshaft pulley (7) must coincide with mark F on the rear cover (6)
Why are tags needed?
The internal combustion engine operates in four strokes. We are interested in two of them - fuel injection into the cylinders and exhaust gas release. These two processes should not occur simultaneously. Tags are necessary for the smooth operation of the system and the separation of these two processes.
They also ensure the correct position of the motor shafts. If the marks are set incorrectly, an unpleasant situation may occur when the air-fuel mixture does not enter the combustion chamber in time. Ignition will not occur at the right time, the spark will work empty, and the engine will never start.
About the timing and frequency of replacement according to the regulations
The exact frequency of replacing the timing belt drive is indicated in the operating instructions supplied with each vehicle. It also indicates whether the tension roller needs to be changed at the same time as the belt. As a rule, it is also replaced with a new one.
As already mentioned, the service life of products depends on the brand of car and lies in the range of 50-150 thousand km. But the condition of the timing drive should be periodically monitored and early replacement made in the following cases:
- longitudinal cracks appeared on the back side of the belt;
- the edges of the rubber product are “frayed”, threads from the cord stick out from it;
- if there are transverse cracks on the inside between the teeth;
- the teeth began to peel off or were noticeably worn out, and the parts of the mechanism and the walls of the casing were covered with black rubber dust.
Transverse cracks - the first sign
To conduct a visual inspection of the belt drive and assess its condition, simply unscrew and remove the upper protective casing (usually made of plastic). Along the way, it’s worth inspecting all the gears and the walls of the cylinder block, looking for leaks of engine oil or antifreeze from the pump.
Advice. If the engine suddenly begins to operate unstably at idle and while driving, and shots appear in the injector receiver and exhaust pipe, then do an emergency inspection of the timing drive. These problems arise due to shifted valve timing, which is caused by a loose belt that has jumped 1-2 teeth.
What's the result?
In relation to internal combustion engines with a timing belt drive, it should be taken into account that slippage of the belt even by one “tooth” can lead to malfunctions of the power unit or its breakdown. As mentioned above, if the belt breaks, there is a risk of bending the valves. As for diesel engines, a broken timing belt can render the camshaft unusable.
As a result, I would like to add that when replacing a timing belt, aligning it to the marks is the main task. In this case, if you are not convinced of your own abilities or have problems identifying the marks, then it is better to give up trying to set the belt on your own and turn to experienced specialists.
The car does not start after replacing the timing belt, timing chain, or performing other work on the gas distribution mechanism drive. Main prerequisites, advice.
Why does the valve bend when the drive belt or chain breaks: reasons for the break. How to find out whether the valves are bent on a certain gasoline or diesel engine.
Features and aspects of correct selection of timing belt. When a belt needs to be replaced, the best belt manufacturers know how to avoid purchasing a fake. Adviсe.
The purpose of the timing belt is in the timing belt drive device. Features of operation, how often the drive belt needs to be changed.
Why is it necessary to change the timing chain? Available methods for replacing the timing chain yourself, features and nuances. Useful tips.
Purpose of timing drive. Advantages and disadvantages of a belt or chain in the design of the engine timing gear drive.
Replacing the drive belt: does the direction of rotation matter?
Replacing a timing belt is not an easy task: in most cases, you have to remove the accessory drive belt, as well as some accessories. Once you do, you'll probably have to figure out how to put everything back together. In this case, the question often arises: is it possible to install the timing belt and serpentine belt backwards? In other words, do these belts have a direction of rotation ? Let's try to find the answer to this question for both the timing belt and the auxiliary drive belt. Let's get started!
Timing belt: does it follow the direction of the arrows?
From a purely technical point of view, the new timing belt is absolutely symmetrical, i.e. it has no direction of rotation. “Then what is the use of timing belts with directional arrows?” - you will be surprised. If there are timing marks , then there are also timing marks on the pulleys/engine. The directional arrows only help you set the timing marks correctly and are not necessary at all because, as we said earlier, the new timing belt can run in any direction. Directional arrows help align timing marks.
Do I need to reinstall the timing belt?
If the timing belt is installed properly and the belt tension is correct, then you should not touch it - even if you suddenly notice that the arrows are pointing in the “wrong” direction. Once the car starts running, removing and reusing the timing belt becomes impossible: unfortunately, it only goes to waste, since installing and tensioning the timing belt is only allowed once.
What about the accessory drive belt?
The same applies to new accessory drive belts ). The new poly V-belt is also completely symmetrical and has no direction of rotation.
However, it is essential that the used accessory belt be reinstalled in its original direction. So it is very useful to draw an arrow on the belt before removing it. If you reinstall the belt in the opposite direction , the ribs will end up in different grooves on the pulley than the ones they have worn into over time. This means the belt will have to re-adapt to the new wear pattern, resulting in a dangerous loss of belt tension.
In conclusion, we can safely answer the question in the title: “No, the direction does not matter.” However, automotive technology does not stand still, so it is possible that in the future there will be belts for specific tasks with a specific direction of rotation.
Remove the old one and install a new timing belt
We've finished making room and can change the timing belt. Loosen the bolt securing the tension mechanism. We need a key “13”. We dismantle the belt with rollers. We install the new belt by carefully inserting it into the camshaft and crankshaft pulleys. Take L-shaped pliers and insert the ends into the inside of the roller, clockwise. Don't forget to insert the labels parallel to each other.
After aligning the marks, you must tighten the nut tightly. Before returning the remaining parts to their place, you need to check the work done. Turn the pulley a couple of turns and look at the marks. The marks must clearly coincide with each other, only after that the work can be completed.