Hello everyone!;) A few days ago a slight noise began to be heard from the engine compartment. I went to look - I was not happy, under the timing mechanism, on the crankcase protection, I found wet spots, and the noise was coming from the timing belt. The conclusion was clear - the pump was leaking. There was no time to think at all, so I went online to see what was needed for replacement, how to change it, and of course, which brands of components to choose. And then the most interesting thing began! ;D There are a lot of disputes about who says GAtes, who says Ina, and who even takes Balakovo. But since the problem had to be solved, I had to read and study a lot. Next, I will write my personal opinion on this whole matter, because... I don’t like to save on important things, especially on a car, so I usually choose more reliable parts. The miser pays twice;) Or even three times in this case)
Of course, it’s profitable to buy it online, but since I didn’t have time to wait for delivery, I looked in my city and found it only in one store. That's it guys, the issue is closed! If you want quality, take Marel! If you want cheaper, you can use Gates, but the main thing is not a fake! We'll talk about it later) It has plastic rollers, and sometimes one of them jams, I didn't look into it too much, that's why I took Marel.
Let's move on... The pump, there are also a million opinions, they don't write anything specific, they take different ones, some break, some don't. Based on the voting results, we buy TZA Motor Sport in this box
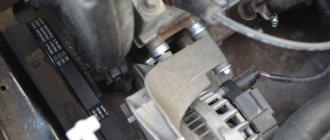
The front crankshaft oil seal of the Priora engine is covered by a drive gear and pulley, as in principle on all engines of a series of Russian-made cars with front-wheel drive. But it must be taken into account that on engines equipped with an ECM (Electronic Engine Control System), the pulley not only drives the generator, sometimes power steering (Power Steering) or air conditioning, but also performs another of the leading control functions.
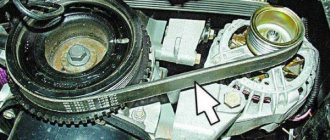
WE OPEN ACCESS TO THE TIMING BELT
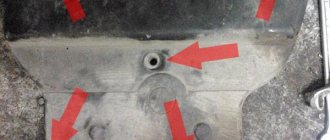
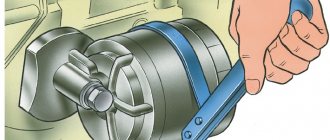
- To get to the gas distribution mechanism drive, we need to unscrew the five bolts of the upper timing cover using a hexagon.
The location of these bolts is shown in the photo below:
FIG 6. Upper timing cover bolts
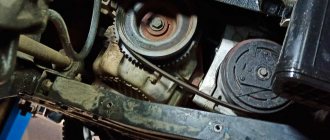
- Then use the same key to unscrew the two bolts of the lower timing cover and remove the cover.
FIG 7. Bolts of the lower timing cover
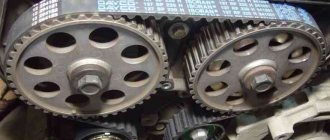
- Using a 17-point head, we turn the crankshaft toothed pulley until the marks are firmly in place according to Figure 4. You also need to check the alignment of the marks on the flywheel so that they are located as shown in Figure 3. The crankshaft must be turned clockwise.
And one more important point! It is the crankshaft that needs to rotate the entire timing mechanism. This cannot be done using the camshaft pulleys. To ensure that the camshaft marks do not get lost during operation, they must be secured to each other. This is done in different ways. I once saw a mechanic insert a socket head between the teeth of a pulley. You can also take a pin and two thick plates with holes. We put plates on the stud, nuts on both sides and insert this structure between the pulleys so that the plates rest against the teeth of the pulleys and tighten the nuts.
It looks something like this! Here, however, is an engine from another car:
FIG 8. Device for fixing camshafts
We have completed the preparatory work and it is time to proceed directly to replacing the Priora timing belt.
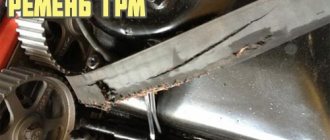
- To remove the Priora timing belt, you first need to loosen its tension. To do this, use a 15mm wrench to unscrew the tension roller nut; the support roller must also be removed. Because when the timing belt is replaced, both rollers are also changed.
Then remove the timing belt and inspect it carefully. First of all, we pay attention to the presence of cracks, fraying of the edges of the belt, and, of course, we look at the condition of the teeth. There should be 137 of them, they should be round in shape. If you find at least one of these defects or the time has come for mileage in kilometers, then the Priora timing belt must be replaced with a new one. Next, you need to pay attention to the condition of the pump. Holding the toothed pulley of the pump, you need to tug it; if there is play in the pulley, then the pump must be replaced.
REPLACING THE PRIORA PUMP
- In order to replace the pump, we will have to drain the coolant. Using a 15 wrench, unscrew the nuts, remove the camshaft toothed pulleys and the rear timing drive cover.
It should be borne in mind that the camshaft pulleys should not be mixed up; the exhaust and intake pulleys are placed exactly in their places. To remove the back cover, you need to use a 10mm socket and unscrew the six bolts securing this cover.
The location of these bolts is shown in the following figure:
FIGURE 9. Bolts of the rear timing cover of the Priora
- This figure also shows the bolts for securing the Priora pump. These bolts are unscrewed with a 5mm hexagon. After unscrewing the bolts, you need to pry the edge of the pump with a flat screwdriver and remove it from its seat.
- Before installing a new Priora pump, you need to clean the surface to which it is adjacent. It is advisable to degrease it and cover it with a thin layer of sealant. The new pump should also be coated with sealant, the place where the gasket is installed. When installing the pump, pay attention to the inspection hole; it should be located at the bottom.
- We tighten the three bolts securing this unit and now you can install and secure the rear cover of the gas distribution mechanism.
INSTALLING THE PRIORA TIMING BELT
- Before installing the Priora timing belt, we put the camshaft toothed pulleys in place, making sure that the marks are strictly in place. We must install the exhaust and intake camshaft pulleys in their proper places. This was mentioned above! Do not forget that you need to install a phase sensor ring under the intake camshaft pulley.
- After checking the position of the marks on the camshafts and crankshaft, we put the rollers in their places. Tension on the left, just bait. The support located on the right is “parasitic”; it can be immediately secured until it stops.
- We start with the crankshaft, put the timing belt on its toothed pulley, from bottom to top. Then, holding it with your hands on both sides, first place the belt on the pump pulley, then simultaneously place the belt on the rollers with the reverse side. Next, while holding the belt tension, pull it up and to the sides and put it on the camshaft pulleys. In this case, you must carefully monitor the position of the marks; they must remain strictly in their places.
- It's time to tighten the timing belt. To do this, use a special key to turn the tension roller counterclockwise until the protrusion and the cutout coincide, as shown in the photo below. After this, you can completely tighten the tension roller bolt.
FIG 10. Priora timing belt tensioner roller
After installing the Priora timing belt, you need to check the operation of the entire mechanism. To do this, you need to manually turn the crankshaft, making at least two revolutions. The marks after each revolution must be strictly in their places, according to Figure 4. If the marks do not coincide by at least 1 tooth, then the belt installation procedure must be repeated again. Otherwise, deformation of the valves cannot be avoided, and then you will have to remove the cylinder head and replace the valves.
- Then you can replace the lower and upper timing covers, tighten the bolts and begin installing the alternator serpentine belt.
INSTALLING THE ACCESSORY DRIVE BELT
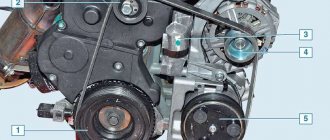
- First, we put the accessory drive pulley in place. Then we unscrew the nut securing the right engine mount, which we removed earlier, to remove the Lada generator belt. After this, we need to jack up the engine until there is a gap through which we will insert the belt, then lower the engine and tighten the support mounting nut.
- We put the tension roller of the generator belt in place, but only tighten its bolt. Next, we place the belt on the drive pulleys of the units, generator, air conditioning compressor, and on the tension roller. We do it as shown in Figure 2.
- Using a special wrench, which we used to tension the timing belt, we turn the generator belt tension roller counterclockwise to the required force.
Holding the belt with your fingers, between the tension roller and the generator pulley, we try to turn it across. A correctly tensioned belt should rotate no more than 90°.
If there is no extraneous noise and the generator provides the required level of battery charge, this means that the job was done correctly.
Finally, I want to say that I did the work myself. The other day a friend called me about replacing the timing belt on a Priora. He asked me to help him in this matter. In fact, he himself is ignorant in this matter. I had to dig around on the Internet myself and ask knowledgeable people. Find out what's what. In general, I did the work, and he helped. After this, I share my experience with you by writing the article “Replacing the timing belt on a Priora 16 valves.”
So, let's say you need to figure out how to remove the crankshaft pulley. This is not an easy task, especially when it happens for the first time. Let's figure out how to unscrew the crankshaft pulley without falling out of love with your car?
Let's move on to the cylinder block
We remove the pallet. Rotating the crankshaft as it is convenient for us, unscrew two bolts on each connecting rod cap. We use a TORX E10 head for this.
We take out the pistons along with the connecting rods. To do this, use the wooden handle of a hammer to press the connecting rod from below and lightly tap it to knock it up. We remove the old liners and buy new ones of the same size according to the markings on them. Here is another stone in AvtoVAZ’s garden, the owner has never climbed into the car from the interior or into the engine, but three pistons were of group “B” and one was “C”. It turns out that at the factory they re-sharpened one cylinder a little and simply put an enlarged piston there, no words. There are no options, we take group “C”, don’t sharpen the engine because of this. We will not touch the main liners either.
We buy a new piston group that does not bend the valves, connecting rods and connecting rod bearings.
Eliminating longitudinal play of the crankshaft
It was noticed on this motor. To eliminate it, replace the thrust half-rings. Standard and repair sizes are available. We take the first repair size, if they are too tight we sand them down a little. We unscrew the middle main bearing and gently push it with a screwdriver and move the half rings. The mark on it is in the form of three serifs, shown below.
When the half ring comes out a little, turn the crankshaft, it will push it out. There are two types of half rings: white at the front and yellow at the rear; the grooves on them should point towards the crankshaft cheeks.
We install them as we removed the new half rings; if they go in with great effort, you can grind them a little on a small abrasive stone, but not from the side of the grooves. Checking the play. We tighten the main bearing with a torque of 8 kgf*m.
Assembling the piston
There is an arrow stamped on the top of the piston; it should be directed towards the front of the engine. And there are marks on the connecting rod that should look the same way. Don't get confused!
We insert one retaining ring into the groove on the piston. We insert the connecting rod into the piston and, having lubricated the connecting rod and the piston pin with oil, insert it into place. Insert the second retaining ring. Although this operation seems simple, it will take some pains. We inspect the assembled structure; all retaining rings must be clearly in their grooves, otherwise a ring that has jumped out while the engine is running can cause a lot of trouble.
After assembly, you need to break off the connecting rod bearing cap, since the connecting rod is made in one piece. It's like that on our cars. First, unscrew the bolts. We insert the connecting rod into the cleats at the level of the mark shown in the figure with the black arrow and lightly clamp it, then break it off with a slight movement of the hand. The first time is very scary. We put the cover in place and tighten the bolts so as not to mix it up in the future.
Checking the thermal gap in the piston rings
We lay out each set of rings for each cylinder. In the future we will not change their places. In turn, we insert each ring into its own cylinder and push it a little with the piston approximately to the middle.
How to remove the crankshaft pulley
Today, many car owners prefer to carry out preventive and repair work themselves, thereby saving their money, which would have to be spent on paying third-party specialists. There are jobs that are quite easy to do the first time, but more often than not, to successfully carry out repairs, you must have some practical experience, supported by a minimum theoretical base about the structure of the car. It is difficult to remove the crankshaft pulley yourself for the first time, because... Even a careful study of the relevant section of the car’s maintenance instructions will not provide answers to all the questions that a car enthusiast will certainly have during the dismantling process. In this article we will talk about how to remove the crankshaft pulley in a garage without resorting to the services of specialized service stations.
What happens if you don't change the drive?
Replacing the timing belt on a Priora must be carried out in a timely manner; the matter must not be delayed until a break occurs. Otherwise, the total cost of repairs may very unpleasantly surprise you. This is due to the fact that there are no recesses for the valves on the pistons. For this reason, a broken belt leads to direct contact between the valves and pistons. After this, the valves usually bend and only need to be replaced.
If everything happens at high speeds, then the consequences are catastrophic - the pistons break off, the connecting rods become deformed. In order not to expose yourself to such risks, it is recommended to promptly monitor the condition of the timing belt and rollers. And most importantly, check the alignment of the timing marks on the Priora and the tension of the drive belt! If it is too tight, it will wear out faster.
Replacing the crankshaft pulley for VAZ Lada Priora 2170 in auto repair shops in Moscow
18 car repair companies
- TTS Motors
- Pyatnitskoe highway, 2
- +7 (495) 24… show all
- The site of the company
- Lorant
- Garimotors
- Psrservice
- Lexus on the market
- Auto-rad
- Technical center gm east
- Auto complex
- Ddcar
- Nivus
- Bers-auto
- Master motors
Popular companies
Why might difficulties arise?
Removing a pulley is a difficulty in itself, even for a specialist, let alone a beginner. Difficulty may arise when removing the bolt or nut connecting the pulley and crankshaft. The fact is that the direction of the thread when unscrewing it coincides with the direction of the torque during engine operation. Thus, while the engine is running, the bolt is constantly tightened, which results in a serious problem when removing the bolt. Difficulty can also arise if you do not have the right tool.
When to change
The manufacturer provides a 100,000 km warranty on a new belt. But the quality of the tension and deflection rollers leaves much to be desired. Therefore, based on life experience, the timing belt along with the support rollers should be changed every 50,000 km. This will help avoid tragic consequences resulting from a timing belt break or failure of one of the rollers.
Also, after 50,000 km, it is necessary to check the coolant pump (pump) for leaks, play and squeaks. If necessary, the pump must be replaced. When a vehicle travels more than 100,000 km, the coolant pump must be replaced.
Unscrew the pulley nut
The nut that holds the pulley at the end of the crankshaft indicates that we are working with a classic version of the engine, namely a VAZ-type car. So, before starting work, you need to prepare the necessary tool, namely a socket or socket wrench for “36” or “38”, you also need to prepare a piece of pipe about 30 cm (later you will find out why). It is better to do the work above the inspection hole. If this is not possible, then it is better to use a jack and definitely a tree stump (better to be safe).
We set the gearbox lever to the fourth gear position and turn on the parking brake mode (handbrake). We try to unscrew the nut using a wrench with a long lever while being under the car. If the attempt fails, you need to use another option.
Set the gearbox lever to the neutral position and remove the spark plugs. We install the key so that it rests (in the case when the length of the key is not enough, a pipe is used) against the floor or the rear spar in the direction of movement of the crankshaft. When the requirements are met, it is necessary to turn the ignition key to give short-term pulses. Sometimes the nut fits so tightly that you can’t get it off the first time. Mostly it is released on the third or fourth try. Once the nut is stripped, it can be tightened with a wrench.
Diagnostic procedure
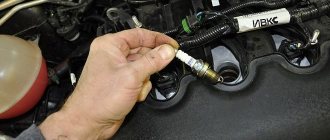
Checking the drive should only be performed on a cooled engine and consists of the following manipulations:
- Using a hex wrench, unscrew the cover fasteners (there are 5 in total) and remove the protection.
- Inspect the motor and determine whether the belt needs to be replaced. To do this, you need to turn on the 5th speed, lift the right front wheel and make several revolutions clockwise. There should be no cuts, cracks or peeling on the belt. If there are any defects, the drive must be replaced.
- Inspect the condition of the tension roller - it should also not be damaged.
- Check if the belt tension is as required. To do this, you need to press it between the camshaft gears. The deflection should be approximately 5-7 mm, if more or less, adjust the tension.
- Check the timing marks on the Priora.
Crankshaft pulley selection
Cast iron pulley
The standard crankshaft pulley is steel. There are complaints about him. Therefore, when replacing it, many owners install a cast iron pulley. Moreover, cast iron is a little cheaper.
The cast iron pulley is on the left, and the steel pulley is on the right.
Priora 16 crankshaft pulley
Hello everyone!;) A few days ago a slight noise began to be heard from the engine compartment. I went to look - I was not happy, under the timing mechanism, on the crankcase protection, I found wet spots, and the noise was coming from the timing belt. The conclusion was clear - the pump was leaking. There was no time to think at all, so I went online to see what was needed for replacement, how to change it, and of course, which brands of components to choose. And then the most interesting thing began! ;D There are a lot of disputes about who says GAtes, who says Ina, and who even takes Balakovo. But since the problem had to be solved, I had to read and study a lot. Next, I will write my personal opinion on this whole matter, because... I don’t like to save on important things, especially on a car, so I usually choose more reliable parts. The miser pays twice;) Or even three times in this case)
Of course, it’s profitable to buy it online, but since I didn’t have time to wait for delivery, I looked in my city and found it only in one store. That's it guys, the issue is closed! If you want quality, take Marel! If you want cheaper, you can use Gates, but the main thing is not a fake! We'll talk about it later) It has plastic rollers, and sometimes one of them jams, I didn't look into it too much, that's why I took Marel.
Let's move on... The pump, there are also a million opinions, they don't write anything specific, they take different ones, some break, some don't. Based on the voting results, we buy TZA Motor Sport in this box
The VAZ 2112 engine is a four-cylinder, four-stroke, with four valves per cylinder, two camshafts and distributed (phased) fuel injection. The VAZ 2112 engine is developed on the basis of the VAZ 2110 car engine, but has many modified or original parts, which is primarily due to the installation of a 16-valve head and a drive of two camshafts on the VAZ 2112 car engine, as well as a different air supply system to the cylinders .
Replacing the timing belt
According to the maintenance regulations, the condition of the timing belt should be checked after 105 thousand km, and the belt replaced after 200 thousand km. It is necessary to take into account that failure of the timing belt (breakage or shearing of teeth) can lead to valves sticking into the pistons due to mismatch of the rotation angles of the crankshaft and camshafts and, as a result, to expensive engine repairs. Therefore, we recommend checking the condition of the belt more often - every 45 thousand km. The surface of the toothed part of the belt should not have folds, cracks, undercuts of teeth and separation of fabric from rubber. The reverse side of the belt should not have wear, exposing the cord threads, or signs of burning. There should be no delamination or fraying on the end surfaces of the belt. The belt also needs to be replaced if traces of oil are found on it (before replacing the belt, the cause of its oiling should be eliminated) or when replacing a failed tensioner/support roller of the timing drive and coolant pump.
Use a 5mm hex to unscrew the five screws securing the front upper timing cover...
...and remove it. Remove the right mudguard of the engine compartment (see “Removing the mudguards of the engine compartment”).
Folk tricks
Let's look at a few folk car tricks that have helped more than one driver.
- Each threaded connection, by the way, not only on the part of the car, can be unscrewed by first lubricating it with a special oil, for example: HP, sunflower oil, vinegar, brake fluid.
- In rare cases, lightly tapping the edges of the bolt and nut with a hammer or wrench helps.
- Removing a bolt or nut does not mean removing the pulley. How to unscrew the crankshaft pulley without a special key? The pulley sits very firmly on the shaft; it can be removed using a pry bar or a screwdriver and carefully pry it off in several places.
We remove the pulley from the generator with our own hands
A car generator is a very important component in the system of any car. Considering the fact that the generator consists of a large number of parts, it may break down from time to time. A generator breakdown can have a very negative impact on the operation of the entire car, because without this element the car simply won’t start. The list of reasons why a generator can break down is quite extensive. One of them may be a pulley failure. How to correct the current situation? Let's figure it out.
What is a generator pulley?
The generator pulley is a special part that is installed directly on the generator.
A pulley is needed in order to ensure the required degree of belt tension and protect the mechanism from those negative vibrations that occur when the machine engine is running. The performance of the entire car will depend on how well this part works. If the pulley is deformed even to the slightest degree, the belt drive will not be tensioned correctly, which may disrupt the electrical supply to the vehicle.
Renault Megane › Logbook › Replacing generator bearings and installing generator pulley 2110
This means that the rustling noise from under the hood completely bothered me, I even began to suspect the release valve... However, the smell of burnt rubber in traffic jams convinced me to turn my attention to the generator, its bearings and pulley. I took off the belt of the additional equipment and pronounced the verdict - generator bearings. It was lunch time, I removed the generator, brought it to the workshop and began to disassemble it. I’ll say right away, the generator is BOSCH.
Now you can inspect the bearings. The rear (small) one was not changed; no signs of wear were found. But the front one was simply worn out into rubbish. The bearing was purchased from a “tenth” generator, Vologda (VBF) for 110 rubles. Its catalog number is 6303, also known as 180303. The rear bearing is like 6003, unlike the “tenth” one, which is 6202. The difference is in the internal mounting diameter, ours is 17 mm, the external one is 35. The 6202 has an internal 15 mm, the external one is also 35.
At the same time, a 2110 17mm generator pulley was purchased. There are 2 varieties, 17 and 15, here 17 is our size. I also bought a “generator cover repair kit 2110”, but it was not useful.
The main problem was removing the front bearing. On top of it there is a spacer washer, quite rusted. It was impossible to get under it with a puller; it wouldn’t fit together with the bearing, so I had to carefully knock it off. Unfortunately, there are no photographs of this process, because by that moment the phone was put on charge, but I’ll try to describe it in words .
I poured WD40 liquid on it and turned it on the shaft a couple of turns using a chisel. The anchor is GENTLY clamped in a vice through the old belt. Next, I drove a chisel between the washer and the bearing, evenly and from different sides, until the washer began to move towards removal. Then I picked it up with a puller and removed it. The bearing did not yield to the puller and was barbarously sawed off with a cutting machine, without however damaging the shaft. The sawn-off bearing came off easily.
Adjusting the belt tension
And now we have come to the end, all that remains is to adjust the belt tension on the car. To do this you will need to perform the following manipulations:
- Using a special wrench or pliers, you need to turn the tension roller counterclockwise.
- Align the cutout with the mark located on the inside of the roller. Tighten the fastening bolt to a torque of 15-20 N/m.
- Reinstall the pulley that powers the accessories.
- Turn the crankshaft 2-3 turns clockwise, placing the wrench on the pulley bolt. Check the alignment of the installation marks on the camshaft and crankshaft, and at the same time check the belt tension. If necessary, repeat the procedure.
The tension roller mounting bolt must be tightened with a torque of 35-41 N/m, the auxiliary drive pulley - 105-110 N/m. Reassembly must be done in reverse order. There is no need to install only the top casing, as you will need to visually check the work done.