Adjusting the front door lock (Chevrolet Niva Exterior (external elements)) - AutoCall
Raise the hood and secure it in the open position with the stop. Disconnect the rods of the inner and outer handles, see.
Re: About adjusting the tailgate > Please explain if anyone has either experience or knowledge...
Reassemble the tailgate in the reverse order of disassembly.
Removing the tailgate mechanisms: Unscrew the two 5 cm screws.
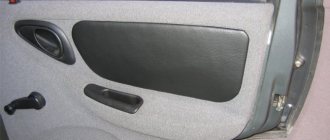
Removing the front door trim: Front door locking mechanism: Removing the front door handles: Disconnect the connectors for the outside mirror gear motor wiring harness and the front door wiring.
Unscrew the three screws and remove the outside mirror. Remove the outer lower and upper sliding window seals.
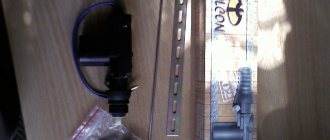
Unscrew the screw and remove the sliding glass guide assembly with the seal. Through the openings in the inner door panel, unscrew the two screws securing the sliding window frame to the window lifter and remove the glass from the door cavity.
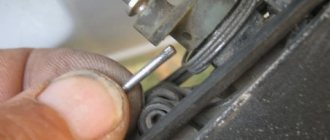
Disconnect block 10 fig. Unscrew the four nuts 5 securing the window regulator and remove it complete with the gear motor through the opening in the inner door panel. Unscrew the two 6 cm screws. Disconnect the rods 5 and 7 of the outer handle from the lock 9. Unscrew the nut and bolt and remove the 4 cm handle.
Unscrew the three screws and remove the 9 cm lock. Unscrew the three bolts securing the door opener and remove it. Remove the wiring harness from the door cavity.
Removing the rear door trim: Before adjusting the lock, it is recommended to outline the contours of the lock on the body pillar. If the door closes too tightly, loosen the bolts that secure the lock, move it outward, and tighten the bolts. If the door does not close tightly, move the latch inward. In this case, there should be no retraction or protrusion of the door relative to the body.
If the door lifts when closing, sagging in the open position, lower the latch.
If the door is not properly unlocked using the inside handle, adjust the position of the internal drive rod. To do this, disconnect the 7 cm bracket. After completing the adjustment, tighten the fastening screws. Open the rear door and lower the sliding window to the bottom position.
Niva Chevrolet rear door lock
Squeeze the tabs of the latch and remove button 3 fig. Unscrew the screw, take out niche 2 fig. Unscrew the two 5 cm screws.
Using a flat-head screwdriver, remove the trim and remove the window handle. Use a screwdriver to press out buttons 1 and remove trim 6 of the rear door. Removing the rear door window regulator is carried out in the same way as removing the front door window regulator.
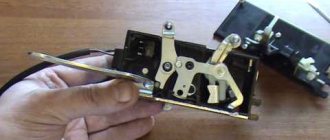
Unscrew two screws 8 fig. Disconnect the rod 8 of the outer handle from the lock 11.
REPLACING THE DOOR ACTIVator FOR A Chevrolet NIVA
Removing the rear door handles: Rear door locking mechanism: Unscrew the screw securing the drive 1 cm. Unscrew the three screws and remove the lock 11 assembled with the lock release drive and rods 4, 6 and 7. Unscrew the three bolts securing the limiter and remove it. Unscrew the bolt securing the limiter to the body and Clean and inspect the parts, lubricate with CV joint-4 grease or similar. Install the limiter in the reverse order of removal. Remove the bolts of the sliding glass mounting plate.
Unscrew the bolt securing the guide and remove the internal glass seal. Remove the glass by moving it in the opening as shown in the photo.
10.11.8 Adjusting the front door lock
The clip is pressed onto the glass and additionally secured to the glass using a strip of raw rubber. However, if it is not possible to purchase assembled glass, dip a strip of new raw rubber in gasoline for a few seconds, insert it into the holder and install the holder on the new glass. After installing the glass in place, lift it up as far as it will go and do not lower it for at least three hours.
During this time, the glass will be firmly fixed in the holder. Install the glass and the removed parts in the reverse order of removal. Replacing the front door window lifter mechanism You will need: Remove the front door glass, see.
Disconnect the wiring harness connector from the window regulator motor. Remove the window regulator assembly through the technological opening in the door amplifier.
Clean and inspect the parts, lubricate with Litol or similar lubricant. Install the window regulator and all removed parts in the reverse order of removal.
Removing and installing the front door You will need: Unscrew the bolt securing the limiter to the body, see. Turn along the axis and disconnect the wiring harness block from the door. Remove the locking brackets of the door hinge axes. Remove the door upwards.
Source: https://autovizov.ru/chevrolet/%D0%BD%D0%B8%D0%B2%D0%B0-%D0%BA%D0%BB%D1%83%D0%B1-niva-club- 22.html
How to repair the lock on the rear and front doors of a Niva Chevrolet
The Niva Chevrolet door lock is a silent device. The internal parts are located in the same way as in standard locking mechanisms, but the strength and durability of the product is given by the plastic case that covers the internal elements.
Principle of operation
The door lock device on the Chevrolet Niva is equipped with pins around the perimeter. The back and front teeth close the door when they come together and open when they diverge. If the right or left pin jams or breaks, the mechanism will lock. Without falling into the grooves, the internal fragments cannot complete their path, so a disconnective displacement occurs. The malfunction is caused by prolonged use and wear. The situation is aggravated by moisture ingress, burglary, and metal corrosion.
The first signs of a breakdown are a squeaking sound when turning the key. Only disassembly and inspection of the mechanism will reveal the cause of the malfunction. After diagnostics, it will be determined what exactly is required: repair or replacement. Sometimes it is enough to carry out lubrication work or replace the core of the part. In other situations, it is necessary to install the entire device. The average price of a Euro-lock is from 1,500 rubles, depending on the place of purchase.
Adjustment
To carry out preventive maintenance on a Chevrolet, the passenger door lock is adjusted and lubricated with silicone. To work, you will need a hexagon and lubricant. The adjustment is carried out in the open position. The stand is disassembled by unscrewing the bolts. It is important to fix them at a right angle. The screws must not be removed. When the fastener is loosened, the position of the lock is easily adjusted.
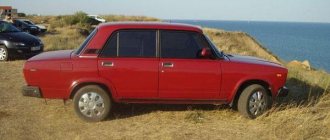
Tailgate Niva Chevrolet
• Niva • Chevrolet • Body
Removing the spare wheel bracket for Niva Chevrolet
To remove the bracket, you will need a 17mm wrench. Remove the spare wheel from the bracket and Unscrew the four nuts securing the bracket to the tailgate and remove the washers installed under the nuts
Remove the bracket and rubber washers from the tailgate studs. Installation of the Chevy Niva spare wheel bracket is performed in the reverse order of removal.
Removing and installing the tailgate trim of the Niva Chevrolet
To replace the trunk lid trim of a Chevy Niva, you will need flat-blade and Phillips-blade screwdrivers. Open the rear trunk lid
Remove the top screws securing the glass frame
Remove the decorative caps on both sides of the frame and remove the screws located under the caps.
Remove the trunk lid glass frame
Unscrew the filler plug and remove the neck trim of the tailgate glass washer reservoir
Carefully pry up the upholstery with a screwdriver at the locations of the fastening rivets and remove it. Installation of the trim and glass frame of the Niva Chevrolet trunk lid is performed in the reverse order of removal. Replace broken upholstery fastening pistons with new ones.
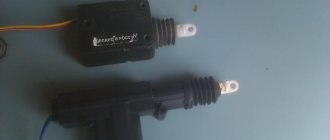
Removing and installing the trunk lid door lock drive Niva Chevrolet
To replace the Chevy Niva trunk lid lock, you will need flat-blade and Phillips-blade screwdrivers. Remove the upholstery
tailgate
and disconnect the wire from the negative terminal of the battery.
Remove the screws and remove the lock drive activator. Disconnect the wiring harness block from the activator. Installation of the rear door lock drive activator on a Chevrolet Niva is performed in the reverse order of removal.
Removing and installing the lock and handle of the trunk door lock of the Niva Chevrolet
To replace the lock or handle of the trunk lid door of a Chevy Niva, you will need keys 8 and 10, flat-blade and Phillips-blade screwdrivers. Remove the tailgate trim and disconnect the wire from the negative terminal of the battery
Remove the screws securing the trunk lid lock
Using a screwdriver, disconnect the rods from the door lock switch lever and from the door handle
Disconnect the black and white blocks of the wiring harnesses from the Chevrolet Niva trunk door lock activator and remove the lock assembly with the drive activator
Unscrew the door handle fastening nuts and remove the handle bracket bolt
In the "open" position, slide the handle to the left and remove the handle from the door opening. Installation of the Chevy Niva rear cover door lock and its handle is performed in the reverse order of removal.
How to remove the trunk lid of a Niva Chevrolet
To remove or install the Chevy Niva trunk lid, you will need keys 10, 13, 17 and a screwdriver. Disconnect the wire from the negative terminal of the battery
Unscrew the screws and remove the rivets securing the left trunk trim
Move the upholstery to the side and remove the screws securing the side panel trim
Remove the decorative trim for the seat belt eye and remove the bolt securing the eye to the body.
Remove the Niva Chevrolet seat belt from under the side panel trim and remove the trim
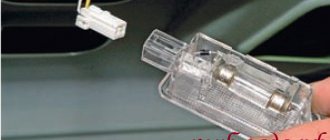
Disconnect the wiring harness connector from the trunk light and disconnect the tailgate wiring harness connector.
Chevrolet Niva tailgate
- Repair manuals
- Repair manual for Chevrolet Niva 2002+.
- Tailgate
Removing the spare wheel bracket
You will need a “17” key.
| 1. Remove the spare wheel from the bracket. |
| 2. Unscrew the four nuts securing the bracket to the tailgate and... |
| 3. ...remove the washers installed under the nuts. | 4. Remove the bracket and rubber washers from the tailgate . |
| 5. Install the spare wheel bracket in the reverse order of removal. |
Removing and installing the
tailgate trim
You will need flat-blade and Phillips-blade screwdrivers.
| 1. Open the tailgate . |
| 2. Remove the top screws securing the glass frame. | 3. Remove the decorative caps from both sides of the frame and... |
| 4. ...unscrew the screws located under the plugs. | 5. Remove the glass frame. |
| 6. Unscrew the filler plug and... | 7. ...remove the neck trim of the tailgate . |
| 8. Carefully pry up the upholstery with a screwdriver at the locations of the mounting rivets and remove it. |
| HELPFUL TIP To avoid scratching painted parts with a screwdriver, wrap the screwdriver blade with insulating tape. |
| 9. Install the trim and glass frame in the reverse order of removal. Replace broken upholstery fastening pistons with new ones. |
Removing and installing the
tailgate
lock You will need flat-blade and Phillips-blade screwdrivers.
| 1. Remove the tailgate (see “Removing and installing the tailgate trim ” ). |
| 2. Disconnect the wire from the negative terminal of the battery. |
| 3. Remove the screws and... | 4. ...remove the lock drive motor. |
| 5. Disconnect the wiring harness block from the gearmotor |
| 6. Install the lock drive motor and the removed parts in the reverse order of removal. |
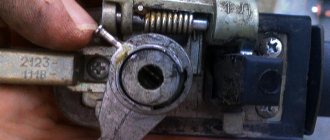
Removing and installing the lock and handle of the tailgate lock
You
will need: keys “8”, “10”, screwdrivers with a flat and Phillips blade.
| 1. Remove the tailgate (see “Removing and installing the tailgate trim ” ). |
| 2. Disconnect the wire from the negative terminal of the battery. |
| 3. Remove the screws securing the lock. | 4. Using a screwdriver, disconnect the rods from the door and... |
| 5. ...from the door . |
| 6. Separate the black and... | 7. ...white wiring harness blocks. |
| 8. Remove the lock assembly with the drive gear motor. |
| 9. Unscrew the nuts securing the door and... |
| 10. ...unscrew the handle bracket bolt. | 11. In the “open” position, move the handle to the left and... |
| 12. ...remove the handle from the door . |
| 13. Install the tailgate and its handle in the reverse order of removal. |
| HELPFUL ADVICE Before assembly, lubricate the rubbing metal parts of the lock mechanism with grease. |
Removing and installing
the tailgate
You will need: keys “10”, “13”, “17”, a screwdriver.
| 1. Disconnect the wire from the negative terminal of the battery. |
| 2. Remove the screws and... | 3. ...remove the pins securing the left trunk trim. |
| 4. Move the upholstery to the side. | 5. Remove the screws securing the side panel trim. |
| 6. Remove the decorative trim of the seat belt eyelet and... | 7. ...unscrew the bolt securing the eye to the body. |
| 8. Pull the belt out from under the sidewall pad and... | 9. ...remove the trim. |
| 10. Disconnect the wiring harness connector from the trunk light bulb and... | tailgate wiring harness block . |
| 12. Remove the exhaust ventilation deflector. | 13. Unscrew the nut securing the ground wire terminal. |
| 14. Remove the rubber bushing from the body hole and... | 15. ...remove the tailgate wiring harness from the body opening . |
| 16. Remove the bolts securing the door . |
| 17. Remove the bolts securing the lower and... | 18. ...the top hinges of the tailgate, having previously marked the position of the hinges on the body (if you are installing the old door), and... |
| 19. ...remove the tailgate . |
| 20. Install the tailgate and all removed parts in the reverse order of removal. |
| NOTE: Install the old door according to the marks made before removal. If you are installing a new door, adjust its position in the body opening (see “Adjusting the position of the tailgate ”). |
Adjusting the position
the
tailgate Adjust the position of door tenon socket .
You will need an impact screwdriver.
| 1. Using an impact screwdriver, loosen the door and... |
| 2. ... tailgate sockets. |
| 3. Move the retainer and socket in the desired direction and tighten the screws. |
Removing and installing the tailgate opening limiter
You
will need: a 13mm wrench, a Phillips-head screwdriver, and a hammer.
| 1. Remove the tailgate (see “Removing and installing the tailgate trim ” ). |
| 2. Remove the bolts securing the limiter to the body. | 3. Unscrew the screws securing the tailgate and remove it. |
| 4. Remove the bolts securing the limiter to the door and... |
| 5. ...remove the limiter. | 6. Install the limiter in the reverse order of removal. Use a hammer if necessary. |
↓ Comments ↓
1. Car structure
1.0 Car structure 1.1 General information about cars 1.2 Passport data 1.3 Car keys 1.4 Controls 1.5 Heating and ventilation 1.6 Doors 1.7 Seat belts 1.8 Adjusting the position of the front seats 1.9 Adjusting the steering wheel
2. Recommendations for use
2.0 Recommendations for operation 2.1 Safety rules and recommendations 2.2 Tools and accessories 2.3 Running in the car 2.4 Operating the car during the warranty period 2.5 Checking the car before leaving 2.6 Replacing the air filter entering the cabin 2.7 Using a jack 2.8 Towing the car
3. Problems along the way
3.0 Malfunctions along the way 3.1 The engine does not start 3.2 Malfunctions of the fuel injection system 3.3 No idle speed 3.4 Interruptions in engine operation 3.5 The car moves jerkily 3.6 The car accelerates poorly 3.7 The engine stalls while driving 3.8 The oil pressure has dropped
4. Engine
engine piston of the fourth cylinder to the TDC position of the compression stroke
5. Transmission
5.0 Transmission 5.1 Clutch 5.2 Possible malfunctions of the clutch, their causes and solutions 5.3 Gearbox 5.4 Possible malfunctions of the gearbox, their causes and solutions 5.5 Transfer case 5.6 Possible malfunctions of the transfer case, their causes and solutions 5.7 Driveshaft 5.8 Possible malfunctions of the driveshaft , their causes and solutions 5.9 Front wheel drives
6. Chassis
6.0 Chassis 6.1 Front suspension 6.2 Possible malfunctions of the front suspension, their causes and solutions 6.3 Rear suspension 6.4 Possible malfunctions of the rear suspension, their causes and solutions 6.5 Shock absorbers
7. Steering
7.0 Steering 7.1 Design features 7.2 Inspecting and checking the steering on the vehicle 7.3 Checking the tension and adjusting the power steering pump drive belt 7.4 Replacing the fluid in the power steering hydraulic system 7.5 Replacing the power steering hydraulic system reservoir 7.6 Bleeding the power steering system 7.7 Adjusting the gap in the roller engagement with worm 7.8 Removing and installing the steering wheel 7.9 Replacing steering shafts
8. Brake system
8.0 Brake system 8.1 Device features 8.2 Useful tips 8.3 Checking and adjusting the brake system 8.4 Replacing brake fluid 8.5 Bleeding the hydraulic brake system 8.6 Master brake cylinder 8.7 Vacuum brake booster 8.8 Pressure regulator 8.9 Replacing hoses and pipelines of the hydraulic brake system
9. Electrical equipment
9.0 Electrical equipment 9.1 Design features 9.2 Fuses and relays 9.3 Generator 9.4 Possible generator malfunctions, their causes and solutions 9.5 Starter 9.6 Possible starter malfunctions, their causes and solutions 9.7 Ignition switch (lock) 9.8 Replacement and maintenance of spark plugs 9.9 Engine control system
10. Body
10.0 Body 10.1 Design features 10.2 Removing and installing front fender liners 10.3 Removing and installing front fenders 10.4 Removing and installing decorative trims on the front fenders and doors 10.5 Replacing buffers 10.6 Removing and installing radiator trim 10.7 Removing and installing the hood 10.8 Removing, installing and adjusting the lock and hood lock drive 10.9 Tailgate
11. Vehicle options
11.0 Vehicle options 11.1 Clutch release master cylinder 11.2 Electromechanical power steering 11.3 Brake system
12. Car care
12.0 Car care 12.1 Checking the car before leaving 12.2 Washing the car
13. Purchase of spare parts
13.0 Purchasing spare parts 13.1 Engine oil 13.2 Greases 13.3 Coolants 13.4 Brake fluid
14. A trip to the service station
14.0 A trip to the service station 14.1 Useful tips
15. Winter operation of the car
15.0 Winter operation of a car 15.1 How to prepare a car for winter 15.2 Recommendations for starting the engine in severe frost 15.3 What is useful to buy for winter 15.4 Useful winter tips
16. Preparation for technical inspection
16.0 Preparation for technical inspection 16.1 Recommendations 16.2 List of malfunctions and conditions under which the operation of vehicles is prohibited 16.3 Changes to state standards regulating the maximum permissible content of harmful substances in the exhaust gases of vehicles 16.4 Standard form of diagnostic card for instrumental control points
17. Applications
17.0 Appendix 17.1 Appendix 1. Tightening torques for threaded connections 17.2 Appendix 2. Basic data for adjustments and control 17.3 Appendix 3. Fuels and lubricants and operating fluids 17.4 Appendix 4. Filling volumes 17.5 Appendix 5. Lamps used on vehicles 17.6 Appendix 6. 17.7 Appendix 7.
Adjusting Chevrolet Niva door locks
for railway transport, certified by VNIIZhT - “Favorit K” and “Favorit Shch”
, internal and external washing of cars.
How to adjust a door on a field
13.16 Removing, installing and adjusting doors
Service and operation
Manuals → VAZ → 21213 (Niva)
Removing, installing and adjusting doors
Door fit gaps
Removal and installation
- Open the door completely and support it from below with racks, laying a rag.
- Disconnect the wiring connector from the front edge of the door - remove the clamp, turn the locking ring and pull the plug out of the socket.
- Remove the torx bolt securing the door stop to the A-pillar.
- If equipped accordingly, remove the petal caps from the hinge axles, then knock out the axles using a drift - ask an assistant to support the door. Remove the door from the car. When replacing a door, transfer all removable components from the old one.
On models without side airbags, a blank must be installed inside the door.
- Installation is in the reverse order.
Door hinges are welded to the door and body pillar, eliminating the possibility of adjustment.
- If necessary, the holes in the hinges can be drilled out and the axial fingers replaced with thicker ones.
- The tightness of the door closure can be adjusted by moving the lock striker on the body pillar B - to release the fasteners you will need a hexagonal bar wrench (allen) (see illustration Door fit gaps).
Removal and installation
- Open the door completely and support it from below with racks, laying a rag.
- Disconnect the wiring connector from the front edge of the door, turn the locking ring and pull the plug out of the socket.
- Remove the torx bolt securing the door stop to the B pillar.
- If equipped accordingly, remove the petal caps from the hinge axes, then knock out the axial pins using a drift - ask an assistant to support the door. Remove the door from the car. When replacing a door, transfer all removable components from the old one.
- Installation is in the reverse order.
Door hinges are welded to the door and body pillar, eliminating the possibility of adjustment.
- If necessary, the holes in the hinges can be drilled out and the axial fingers replaced with thicker ones.
- The tightness of the door closing can be adjusted by moving the lock striker on the C pillar - to release the fasteners you will need a hexagonal bar wrench (allen) (see illustration Door fit gaps).
16.17.4 Adjusting the rear door
Attention: When making adjustments, the vehicle must be on its wheels.
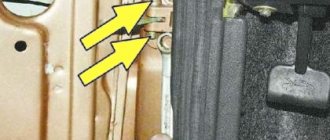
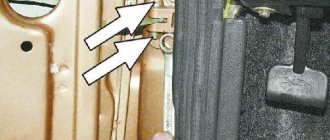
• Open the rear door, use a 24 mm ring spanner to turn the adjusting buffer 90° counterclockwise -arrow- and remove it from the profiled hole.
• Using a 3 mm hex key, loosen the locking bolt enough to remove the locking slide. 1 — rubber cap.
• Remove the locking slide from the housing and adjust to size a = 12.5 mm. Note: the new buffer has a preset distance of 12.5 mm.
• Insert the adjusting buffer, turn it 90° clockwise and thereby fix it in the profiled hole.
• On the left and right sides, above the rear light, unscrew the cap -1 - from the blind rivet nut -2-.
• Close the back door, but do not lock it.
• Set the gap at the joint between the rear door and the side of the body to 4.5 mm.
• At service stations, a clearance gauge vw-3371 is used for this.
• Open the rear door again.
Note: The tailgate is now adjusted to a preload of approximately 3mm.
• On the left and right sides, above the rear light, screw the cap into the blind rivet nut.
• Using an external hexagon wrench, screw in the locking bolt -1- to a distance of no more than a = 25 mm.
• Close the rear door and check that the gaps in the joints are correct.
How not to slam a door loudly on a Niva
Sanek 18 Feb 2009, 00:27
Vitya wrote: Please note that I do not think that remodeling and finishing UAZs is not good! Vice versa! I respect those who took the UAZ as a basis and designed it for specific purposes - “dear to his heart”! ))))
The doors of VAZ 2104, 2105, 2106, 2107, NIVA do not close well. Part 1
Cleaning and lubrication, maintenance and adjustment of door
on cars VAZ 2104, 2105, 2106, 2107,
NIVA
...
Adjusting door locks
a little about adjusting door locks, how I adjust door locks. Vkontakte community …
. however, he also expressed his position.
+1. If for fishing, use a long trunk tow bar. For hunting, the silencer is quieter, the body colors are appropriate, and the locks are quiet. By the way! How to make the doors on Niva so that they don’t slam across the entire field? We're exhausted! We're scaring away all the ducks! Sanek Nivanuty Age: 23 Messages: 12976 Registered: January 31, 2009, 01:59 From: Tomsk Car: Lynx, Honda Steed 600, TTR 125 Gender: Male Advertising Register and read the forum without advertising. By the way, free advertising space on the right is sold for only 1000 rubles per month.
Tractor driver 18 Feb 2009, 00:39
Sanek wrote: How can you make it so that the doors don’t slam across the entire field on Niva?
How not to slam a door loudly on a Niva
Sanek 18 Feb 2009, 00:27
Vitya wrote: Please note that I do not think that remodeling and finishing UAZs is not good! Vice versa! I respect those who took the UAZ as a basis and designed it for specific purposes - “dear to his heart”! ))))
The doors of VAZ 2104, 2105, 2106, 2107, NIVA do not close well. Part 1
Cleaning and lubrication, maintenance and adjustment of door
on cars VAZ 2104, 2105, 2106, 2107,
NIVA
...
Adjusting door locks.
a little about adjusting door locks, how I adjust door locks. Vkontakte community …
. however, he also expressed his position.
+1. If for fishing, use a long trunk tow bar. For hunting, the silencer is quieter, the body colors are appropriate, and the locks are quiet. By the way! How to make the doors on Niva so that they don’t slam across the entire field? We're exhausted! We're scaring away all the ducks! Sanek Nivanuty Age: 23 Messages: 12976 Registered: January 31, 2009, 01:59 From: Tomsk Car: Lynx, Honda Steed 600, TTR 125 Gender: Male Advertising Register and read the forum without advertising. By the way, free advertising space on the right is sold for only 1000 rubles per month.
Tractor driver 18 Feb 2009, 00:39
Sanek wrote: How can you make it so that the doors don’t slam across the entire field on Niva?
don’t slam the door just a tractor driver Roadless sick Age: 24 Messages: 5985 Registered: Jan 13, 2008, 20:13 From: From the same gate as the rest of the people. (KGB) Car: Caterpillar Gender: Male
snake 18 Feb 2009, 01:00
Sanek wrote: +1. If for fishing, use a long trunk tow bar. For hunting, the silencer is quieter, the body colors are appropriate, and the locks are quiet. By the way! How to make the doors on Niva so that they don’t slam across the entire field? We're exhausted! We're scaring away all the ducks!
He lifted the handle, closed the door and pressed it tightly, released the handle, the door closed without a bang. snake Beginner flooder Posts: 152 Registered: Jan 22, 2008, 10:34 am Car: Japanese Niva Gender: Male
Sanek 19 Feb 2009, 21:36
So! The Ottoms have moved away! here we need to talk about the silent closing of doors on the Niva. And we're talking about the region. They say the locks on the doors can be put in a plastic box, and the doors will close like on a foreign car.
Sanya Nivanuty Age: 23 Messages: 12976 Registered: Jan 31, 2009, 01:59 From: Tomsk Car: Lynx, Honda Steed 600, TTR 125 Gender: Male
TDV 19 Feb 2009, 21:45
Sanek wrote: yes! The Ottoms have moved away! here we need to talk about the silent closing of doors on the Niva. And we're talking about the region. They say the locks on the doors can be put in a plastic box, and the doors will close like on a foreign car.
They're lying! TDV Beginner flooder Age: 32 Messages: 187 Registered: Jan 14, 2008, 21:45 From: Tomsk Car: UAZ 315201 Nissan Teana 4wd Gender: Male
Sanek 19 Feb 2009, 22:33
We just bought German locks on the eleventh day. Regular Toko locks in plastic. and the doors quietly closed.
Sanya Nivanuty Age: 23 Messages: 12976 Registered: Jan 31, 2009, 01:59 From: Tomsk Car: Lynx, Honda Steed 600, TTR 125 Gender: Male
Skay 20 Feb 2009, 20:56
Sanek wrote: yes! The Ottoms have moved away! here we need to talk about the silent closing of doors on the Niva. And we're talking about the region. They say the locks on the doors can be put in a plastic box, and the doors will close like on a foreign car.
Eight locks in Niva, outside.
Skay Evil Genius Age: 35 Messages: 8762 Registered: Jan 14, 2008, 6:57 pm From: Tomsk, st. Oil Car: Suzuka Escudo 91, Opel Corsa 1.2, 2007 Gender: Male
spoon 21 Feb 2009, 11:15
It's a pain to install chisel locks on Niva!
spoon Incorrigible flooder Age: 38 Messages: 857 Registered: March 23, 2008, 15:18 From: St. Petersburg - Seversk Car: VAZ-2121S, VAZ-2114 Gender: Male
kovlagen 24 Feb 2009, 16:59
Sanek wrote: we'll see. There is nothing to do in the village in the summer anyway. well, since there is nothing to do. forum11/topic2038.html kovlagen Unbridled flooder Age: 41 Messages: 1473 Registered: Apr 05, 2008, 10:44 pm From: Tomsk Car: RAV-4(I) Gender: Male
Uri Feb 24, 2009 5:38 pm
It’s easier to weld 2 ears and hang a padlock. Uri Reader Posts: 27 Registered: Oct 31, 2008, 10:53 pm From: Tomsk Car: Niva 21213
Sanek March 10, 2009, 20:03
Yesterday evening we were digging around and found standard locks from the Vagonchik (Lada 2111). Will these locks do anything? They don't look like chocolates.
Sanya Nivanuty Age: 23 Messages: 12976 Registered: Jan 31, 2009, 01:59 From: Tomsk Car: Lynx, Honda Steed 600, TTR 125 Gender: Male
mkot 10 Mar 2009, 20:05
Put electromagnetic ones like they are at the entrances, it’s a real thing!
mkot BIG&Mkot Age: 40Messages: 6672Registered: Jan 28, 2009, 21:59 Car: RSHN Gender: Male
Solodik 05 Oct 2010, 22:59
Maybe in some way I can get it from a foreign car? Solodik Reader Age: 22 Messages: 26 Registered: 04 Oct 2010, 14:22 From: From oblivion Car: KHACHU UAZ) Gender: Male
andrtob55433 06 Oct 2010, 21:05
It seems to me that you just need to get used to closing it. At first I also slammed so that the plaster in the adjacent houses flew off and didn’t close it yet. And now I just close the door first, then I press sharply in the area of the lock and the door closes perfectly with a small click. andrtob55433 Beginner flooder Posts: 168 Registered: Dec 17, 2009, 07:16 pm Car: vaz 21213 Gender: Male
spoon Oct 06, 2010, 10:57 pm
I also wanted to say that there’s just no need to clap. The door should close relatively sharply and with a short swing. And then there’s one more thing. Have you tried adjusting the locks first?
Last edited by spoon on Oct 06, 2010 11:45 pm, edited 1 time in total. spoon Incorrigible flooder Age: 38 Messages: 857 Registered: March 23, 2008, 15:18 From: St. Petersburg - Seversk Car: VAZ-2121S, VAZ-2114 Gender: Male
Sanek 06 Oct 2010, 23:34
Are you for me? I can close them without any noise at all. Only the passenger door stopper doesn’t work for some reason. The door doesn’t lock. Sanya Nivanuty Age: 23 Messages: 12976 Registered: Jan 31, 2009, 01:59 From: Tomsk Car: Lynx, Honda Steed 600, TTR 125 Gender: Male
IT68 06 Oct 2010, 23:44
Sanek wrote: By the way! How to make the doors on Niva so that they don’t slam across the entire field? We're exhausted! We're scaring away all the ducks!
I need to train at home on the refrigerator IT68 Haven’t chosen a title yet Age: 48 Messages: 2222 Registered: 08 Feb 2010, 00:12 From: Bely Yar Car: UAZ 469 B Gender: Male
spoon Oct 06, 2010, 11:44 pm
No, I am for those who are looking for a way not to slam the door.
spoon Incorrigible flooder Age: 38 Messages: 857 Registered: March 23, 2008, 15:18 From: St. Petersburg - Seversk Car: VAZ-2121S, VAZ-2114 Gender: Male
AxeT 06 Oct 2010, 23:49
spoon I fully support And that is, amateur maniacs on a grand scale.
On Niva the doors close normally.
AxeT Zubilist Age: 30 Messages: 3025 Registered: Jan 19, 2008, 5:13 pm From: Tomsk Car: Chevrolet Niva GLS Gender: Male
Return to Interior and Body