How much do other models cost and what are their features?
There are other options for choosing such spare parts for the Lada Priora.
In stores and retail outlets, resonators from a variety of manufacturers are sold, which differ in their cost. For example, prices for a given spare part from individual companies may be as follows:
- From the company EKRIS (with an aluminized body - 2250 rubles or more, the regular version - from 1800 rubles). The advantage of a product without a special coating is the fact that this ferrous metal resonator is the best in terms of price/quality ratio.
- From (from 2000 rubles). It is the most suitable original component of the Lada-Priora exhaust system at an affordable cost.
- From (aluminized model - from 1950 rubles). A fairly well-known company offering inexpensive, high-quality resonators with a special durable housing coating.
- Resonators of the SVD brand. Made from aluminized steel. It has a long service life (at least three times longer than the service life of conventional, painted products made of ferrous metal), low noise level, saves fuel, and has low back pressure. Is the most expensive option.
There are also many other firms and companies offering this component of the exhaust system, differing in both cost and workmanship.
Repair, or rather a complete replacement of the resonator of a Lada-Priora car, if it fails, is an important and necessary action for the proper functioning of other technical complexes of the car, as well as for ensuring truly comfortable conditions for passengers and the driver.
Step-by-step instructions for replacing the resonator on a Lada-Priora with your own hands
The best models and procedure for replacing low beam lamps on a Lada Priora.
Actions to replace a faulty resonator of this model are carried out quite quickly, without any difficulties arising in their sequence. Car repairs are best done using an inspection hole or a lift. As a last resort, you can lift the car body with a jack.
To carry out repairs, you will need a set of the following tools:
- special penetrating lubricant;
- keys, heads at “13”;
- knob or ratchet;
- chisel;
- hammer.
A hammer and chisel are needed if the fastening nuts cannot be unscrewed from the manifold studs due to burning of the metal. To dismantle the resonator, you must carefully cut the nuts with a chisel, being careful not to damage the studs.
For self-repair, the step-by-step brief instructions for the work are as follows:
- All existing threaded connections are treated with a special penetrating lubricant to facilitate their unscrewing.
- The clamp, which is the fastening element of the resonator and muffler pipes, is equipped with two nuts that can be unscrewed.
- The loose clamp is dismantled.
- The above pipes (resonator and from the muffler) are disconnected.
- The special metal sealing ring is removed.
- The nuts that secure the pipe from the resonator to the catalyst are loosened. It should be noted that some car models are not equipped with this component. In this case, this stage of action is replaced by measures to disconnect the resonator tube from the collector.
- The resonator rises slightly.
- The hanging pillows are removed from the metal bracket. The rear cushion is released first. Next, the front one is dismantled.
- Further and final unscrewing of two nuts is carried out for fastening to the catalyst structure.
- The special spring washers are dismantled.
- The bolts are removed. In case of repair of a car model without a catalyst, both fasteners are removed together with the springs.
- The resonator is dismantled.
How to replace the resonator on a Priora
Lada Priora Hatchback inconspicuous TURBO Logbook Replacing the generator on a Priora with a Conder and a subframe
I think that many car owners know very well that the very first element of the exhaust system that falls into disrepair is the muffler. After that, usually in a year or two it comes to the resonator. The main reasons why you have to change the resonator on a Priora are the following:
- Burnout of its central part
- Burnout and damage at the joints with the muffler or exhaust manifold
To make the replacement, you will need a certain tool, the list of which is given below:
- Hammer
- Lubrication
- Keys 13 and heads
- Ratchet or crank
- Chisel
How to change the resonator on a Priora
It is most convenient to carry out this car repair in an inspection hole, a lift, or raise it high enough on a jack. After which we immediately apply penetrating lubricant to all threaded connections that will need to be unscrewed.
Particular attention should be paid to the connection to the collector, since this is where you have to suffer. First, carefully try to remove the fastening nuts with a wrench:
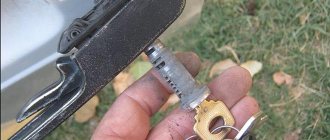
If the nuts do not budge, which is what most often happens, you need to move them out of place using a chisel. It will look like this.
Try again using the key. If the nut still does not give in, you need to cut it off with a chisel, acting extremely carefully so as not to damage the stud. The resulting result will be approximately the same as shown in the photo below.
Attention! If you start turning them right away with a wrench or socket, then in 90% of cases you will immediately break the fastening studs. This leads to additional difficulties during replacement, such as drilling out the remaining studs and cutting new threads
When you have dealt with all the nuts, you can move one edge of the resonator to the side.
Now we move to the opposite side, where it is attached to the muffler. Unscrew the nuts of the tie clamp.
We take it to the side so that it doesn’t get in the way:
If two parts of the exhaust system are stuck to each other, you can separate them by lightly hitting the joint with a hammer, but without force.
As a result, both parts can be separated quite easily.
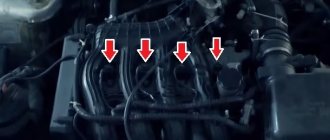
Now all that remains is to remove the Priora resonator from the rubber suspensions, which are marked with arrows in the photo below:
And finally we remove the resonator to replace it.
Replacement is carried out without any problems and everything is installed in the reverse order. It is advisable to treat all threaded connections, especially the fastening of the resonator in the exhaust manifold, with copper grease. The gasket in the same place must be replaced with a new one.
Important advice: when installing, you must maintain the central position of the resonator relative to the opening in the body. If it is tilted to either side, vibration or even knocking noises may occur from the exhaust system while driving.
How much does a new resonator cost on a Priora?
Nowadays, there is a fairly wide selection of similar spare parts for Priora. But choosing a quality one is actually quite problematic. And the prices differ quite a lot. For example, below is a list of manufacturers and prices that you can find in stores or at the car market:
- EKRIS (Aliminized) - from RUB 2,250
- AvtoVAZ - 2000 rubles
- EKRIS (regular) — 1800 rub.
- Autostart (Aliminized) — 1950 rub.
Do not delude yourself by buying a “factory type” resonator. Quite often, when installing such parts, a problem occurs that it does not sit exactly in its place, vibration and extraneous sounds appear when the engine is running. This is primarily due to a defect in its bends - that is, they may differ from the original factory ones! This is exactly what you should be wary of when choosing new parts. To 100% protect yourself from such problems, it is better to remove your old resonator and compare them when purchasing, placing them next to each other so that there are no differences in shape, bends and places of attachment to the hangers on the body.
Resonator installation
Design and malfunctions of the exhaust system of the Lada Priora
Installation of the part is carried out in the reverse order. Compliance with the required sequence, as well as the use of the original resonator for the Lada Priora, ensures simple, easy installation of the part
Particular attention must be paid to connecting the new resonator to the muffler pipe. It is recommended to replace the special metal sealing ring between these components, as well as the clamp itself, with new ones in order to ensure the required level of sealing of the connection, reliability and rigidity of the structure
The fastening elements are clamped sequentially, without distortions in the level of the resonator and muffler pipes.
The Lada Priora resonator in the exhaust system is located, as a rule, after the collector pipe (pants) or after the catalyst
On the Lada-Priora car, it is recommended to install a resonator, which is made from stainless steel options. This circumstance allows you to significantly increase the service life of this part. Installation of such a resonator is carried out on its standard mount and no additional modifications or improvements are required in the exhaust system of the car.
Experts do not advise trying to install resonators that are intended for use on other car models. For example, you should not try to install a resonator from the domestic brand Lada-Kalina on a Lada-Priora. This is due to a number of reasons that will subsequently have a negative impact on the technical and operational characteristics of the car, and such a replacement will only turn into a waste of money, time and effort.
When installing resonators from other cars on the Lada-Priora, extraneous noise and unwanted vibration may be observed when the engine is running, which is caused by defects in the bends of the shape and size, as well as differences in the fastening of the part to the suspensions of the car body. All these points are determined by the relevant norms and standards at the manufacturer.
The main advantages of the part include:
- reduced exhaust noise compared to factory;
- the thickness of the partitions is 2.0 mm;
- integrity and high-quality assembly of the housing (pulse argon arc welding is used);
- high-quality processing of welds on the body, which includes several stages and consists of their mechanical processing, subsequent polishing and special acid passivation.
Additional characteristics of the resonator on the VAZ 2170
It is worth noting that the new resonators have an exhaust that is 2 dB quieter. This effect is achieved due to the integrity of the case and the thickness of the partitions of 2 mm. All of the above advantages are achieved due to the type of assembly and damper, namely pulsed argon-arc welding.
The final and preparatory stage is the processing of seams. The operational period depends on their quality. Seam processing consists of three stages, namely:
• mechanical restoration;
• polishing;
• passivation in acid.
The main malfunctions of the Priora exhaust tract
Resonator in the exhaust system: device, principle of operation and methods of replacement or repair
Due to the fact that the operation of these components is associated with high temperatures, the most common breakdown is the burning out of some part. This could be the gasket under the manifold, or the wall of the muffler, catalyst or resonator. A separate part is the malfunction of the particulate filter or afterburner. But they are included in the section for repairing the injection part of the car, just like the Priora oxygen sensors. In other cases, it is either mechanical damage or simple rust.
The appearance of extra holes in the system is determined immediately and for sure. The engine exhaust just becomes loud and unpleasant. There is a crackling sound and sounds vaguely reminiscent of shooting. In this case, you need to go to the inspection hole, find the hole and replace the damaged unit. Relevant video on this topic:
Basic resonator malfunctions
The performance of an exhaust system part can be determined by the following criteria:
All these malfunctions are associated with the design of the muffler resonator - it has a cylindrical shape with holes evenly spaced on the body. The housing may burn out - a hole will form, which only increases the noise level emanating from the muffler. The connection to the muffler or exhaust manifold may also be mechanically damaged.
If some of the air passes by, extraneous noise will appear, and the exhaust gas system will work “crookedly”. There is a risk of corrosion - in a climate with temperature changes, this outcome is not surprising, and after driving through puddles or parking in the snow, the rate of rust will increase at a rapid rate. The ingress of reagents harms not only the paintwork - due to aggressive chemical compounds, the metal rusts.
Manufacturers of mufflers and prices of analogues for Priora
The choice of Priora mufflers available to consumers is huge. Many of them differ in the name of the manufacturer's plant. Let's look at the main ones that differ in production method and materials:
- Muffler made of steel with a large admixture of aluminum (Lada-Image, EDEX, PHOENIX, etc.), resistant to corrosion, suitable for all body types. Its disadvantage: the presence of welding seams in the design of the part. Price – from 2500 rub;
- The sunset type of production (Phobos, NAAZ, Avtokomplekt, etc.) has the main advantage that the part is produced without welding technologies or the use of stainless steel, so it has an increased service life. The price of such a “stray” is from 3000 rubles;
- Budget muffler (“VVV Tolyatti”) uses iron-zinc steel in production, is short-lived, suffers greatly from corrosion, and wears out quickly. The only plus is the price of the spare part is approximately 1400 rubles;
- A separate type is stinger (spider) forward flow exhaust systems (“MUTE”? “StinGer-auto”, etc.). Advantages - a slight increase in vehicle traction, choice of high-quality materials in manufacturing, long service life.
General information about the principle of operation and design of the resonator
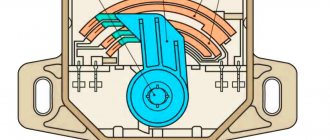
The operating principle of this component is based on the use of completely closed cavities located near the pipeline, which are connected to the latter using a number of special holes.
As a rule, its body contains two cavities of different volumes, which are mechanically separated by a special solid partition. The existing holes, as well as closed individual cavities, are resonators that excite oscillations with their own frequency.
The directions of propagation of noise waves with a resonant frequency can change, due to which its effective noise damping occurs. The effect occurs due to friction in the holes present in the exhaust of gas particles.
The structure consists of two parts: the outer shell, as well as the internal structure. The product can be made entirely of stainless steel AISI 316, which is an analogue of the common version 10Х 17Н 13М2. Standard dimensions correspond to 250 mm x 100 mm. The pipe is also made of high-quality stainless steel and has dimensions of 51 mm x 1.5 mm.
The internal filling of the body of a standard resonator is simple, and the design uses features that take into account the propagation of noise waves
Features and Benefits
The main task of the exhaust system resonator of the Lada Priora car is to qualitatively dampen the sounds of engine operation, as well as vibrations arising during operation.
With the loss of the original qualities of this component, there is a sharp increase in vibration, as well as the noise characteristics of the car’s power unit, reaching their peak values at maximum engine speed. In fact, this is a regular muffler that performs the same functions, which is why it is called a middle muffler based on its location in the exhaust system.
Such a muffler has the following advantages:
- effective damping of low noise frequencies;
- absence of significant barriers to the passage of gases;
- use does not reduce the overall cross-section of the exhaust system.
Causes of possible breakdowns, conditions for replacing parts
The main reasons for replacing the resonator on a car are as follows:
- burning of the body in the center of the structure;
- burnout or mechanical damage to the joints with the exhaust manifold (catalyst) or muffler;
- corrosion processes.
The resonator can burn out anywhere or undergo unwanted corrosion
As a rule, the following reasons are to blame:
- sudden changes in external temperature;
- contact of exhaust system components with reagents, salt, and moisture;
- accumulation of moisture condensate in the resonator;
- the presence of various chemical aggressive compounds in the resonator.
A faulty resonator when driving is a source of discomfort for the driver and passengers of the car. Other road users will also have a negative reaction to the operation of a car with a similar malfunction, since the movement of such equipment will be accompanied by loud noise.
Thus, signaling factors about a malfunction of the exhaust gas exhaust system of vehicles, in particular the Lada-Priora resonator, are:
- increased noise when the engine is running;
- a noticeable decrease in the power of the power unit (decreased traction, acceleration);
- intermittent engine operation (jumpy idle speed);
- entry of exhaust gases into the passenger compartment of the car;
- presence of black deposits on parts (smoke soot).
Due to its design features, full-fledged repair measures for this part are impractical, so experts recommend replacing the failed component.
System breakdowns
There can be many problems with the exhaust system. As a rule, repair is not possible; replacement of elements will be required. Let's take a closer look at them.
- Rust and system destruction due to corrosion. Accumulating condensate especially contributes to this problem.
- Inability to muffle noise. Typically, the malfunction is caused by the destruction of the internal partitions of the main muffler.
- Breakage of fasteners. A characteristic symptom of the problem is a knocking sound from the muffler and the appearance of vibration.
- Oxygen sensor malfunction.
The standard method for solving certain problems is to replace the element. In some cases, temporary solutions are possible, but if the muffler is “burnt out” or rusted, unfortunately, you simply cannot do without installing a new part.
The system for removing waste exhaust gases in a car is an important technical complex that performs many necessary functions: reduces toxicity in exhaust gases, reduces noise from vehicle operation, prevents the penetration of toxic products of fuel combustion into the passenger compartment of the car, participates in regulating the operational characteristics of the car, Thanks to the creation of the necessary resistance of exhaust gases, it creates a certain image of the car brand (timbre of sound, detail of appearance). On the Lada Priora, in this regard, replacing the resonator is not such a rare operation.
Replacing the resonator on a Priora, installation
As usual, to change the resonator you need a pit, or even an overpass. To carry out the replacement yourself, you need to prepare several tools and materials:
- a set of keys;
- penetrating lubricant;
- chisel;
- knob;
- hammer.
Dampening vibrations and sound of the exhaust system is the main task of the resonator installed on the Lada Priora. Failure of the resonator is accompanied by increased levels of noise and vibration, which, in turn, reach their peak at high engine speeds.
This kind of problem brings discomfort not only to car passengers, but also to other road users. Repairing the Riorov resonator is not an appropriate measure, as a result of which a full replacement is necessary.
Choosing a new resonator for the Lada Priora: detailed replacement instructions
The exhaust system of a car is a kind of extension of the engine. After all, no engine can operate without exhaust gases. One of the elements of the system is a resonator. Moreover, modern devices are made from a variety of materials, due to which they cannot meet the requirements of quality and durability. For example, owners of Lada Priora cars often suffer from the problem of burnout. And they don’t always know that you can buy an inexpensive but high-quality product and replace it yourself.
How to install new
After the old product has been dismantled, there is no need to rush to immediately put a new one in its place. First, you need to clean as much as possible of carbon deposits and dirt from all joints with the muffler and exhaust pipe. This will ensure better sealing of the entire system.
Further work is carried out in reverse order:
- The new resonator is suspended on rubber hangers. If the rubber bands are stretched out, it is better to replace them with new ones, this will improve the fixation of the resonator.
- Then you need to connect the resonator to the muffler.
- Additionally, it is recommended to install a new reinforced gasket between them and secure it with bronze bolts, since only such connections will withstand high temperatures.
- Then you can begin installing the resonator with the receiving pipe.
- At the joints it is also better to install new nuts made of heat-resistant metal alloys.
Video: step-by-step replacement algorithm for VAZs of various modifications
Choosing a resonator is a problem for many car owners. Moreover, for the Lada Priora you can choose both original products and models from the Lada Kalina - there is no difference in design. You can save significantly on installation costs if you replace the resonator yourself. The procedure is quite simple and does not require special preparation. This is the only way the owner can guarantee the reliability of the fastenings and functions of the new resonator.
Home →
Maintenance and Repair →
How to remove the old resonator
Before starting any work on the exhaust system, it is necessary to drive the car onto an overpass or inspection hole. You can use a lift or even a regular jack - you need to make sure that the car is securely fixed in this position.
New Lada: Standard head unit MyDean 7320 for Lada Kalina (2013-), Priora (2014-) - in Moscow at a super price - 24,500 rub.
And also, before starting work, it is recommended to lubricate all threaded connections that will need to be unscrewed. This is necessary so that the old fasteners can be dismantled as quickly as possible. After 10 minutes you can begin the main work:
- First, the connection between the pipe and the exhaust manifold is unscrewed. This is the most difficult place to reach in the exhaust system. You can try to remove the nuts with a wrench. But in most cases, even WD-40 is not able to soften the reliability of the connections. Therefore, you have to resort to using a chisel to move the nuts out of place.
- If even after the chisel the nut cannot be unscrewed, you will have to cut it off with a hammer and chisel, while being careful not to touch the stud itself on which it stands.
- After unscrewing or removing the nuts, you can move one edge of the resonator to the side. You can start dismantling from the other edge.
- Next, the nuts of the coupling clamp are easily unscrewed.
- If the nuts suddenly become very stuck, you can cut them off with a chisel.
- The resonator is disconnected from the exhaust system pipes; all that remains is to remove its body from the rubber suspensions.
- After which the product is pulled out from under the car.
Twin Pipe Types
The following options are currently most popular among domestic car enthusiasts:
- bifurcated outlet installed after the muffler;
- parallel installation of two pipes with mufflers behind the resonator;
- system with 2 resonators and the same number of mufflers.
Moreover, in the latter case, a twin pipe can also extend from each of them. As you can see, each option has its own advantages and disadvantages, so the choice remains with the car owner.
In this article we will tell you how to make the simplest double exhaust for a Priora. In this scheme, the pipe will be routed after the muffler, that is, the option is purely decorative.
This solution can be implemented in several ways. It will be easiest to weld a branch from the main pipe. However, this option has many disadvantages, which, however, do not affect the quality of the motor. But the fact is that at high speeds less gases will come out of the added pipe. That is, any knowledgeable person will understand that the dual exhaust is pure decoration.
It is better to assemble a structure in the shape of a slingshot, in which pipes of equal length and cross-section, directed in different directions, are installed after the muffler.
Muffler corrugation Lada Priora
5 out of 5 (5 ratings)
* Calculated based on Yandex Directory reviews
Which muffler corrugation should I buy for Lada Priora? First, you need to know the size of the muffler corrugation. You can buy a muffler corrugation according to factory sizes, but when replacing the muffler corrugation, it turns out that you need to cut off a larger piece of the muffler pipe and the standard size will be insufficient. They buy a muffler corrugation when it has already burned out. The muffler corrugation is not repaired or welded.
The price of a Lada Priora muffler corrugation depends on the type of corrugation. There are two types of muffler corrugations: Interlock and Innerbraid. The most expensive and high-quality corrugation is Interlock: the corrugation consists of four layers, three outer layers and one inner layer. The second option is Innerbraid: three layers, both external. Frankly speaking, there is a difference between the corrugations, but it is not colossal.
In most cases, they buy a three-layer corrugation version. You may also need muffler rings and additional gaskets.
Price:
| Options | Price | Buy |
| Muffler corrugation for Lada Priora, 3-layer | from 1800 rub. | |
| Muffler corrugation for Lada Priora, 4-layer | from 1100 rub. |
Do you want to pick up and buy with a profit of up to 50%? Call or write to us right now!
from 20.00 to 10.00
send us a request to:
Whatsapp/Viber
The cost depends on the size and whether it is new or used, the manufacturer, as well as availability in our warehouse or delivery time to our store.
Rating of companies:
1. ASSO (Italy) 2. Bosal (European Union) 3. Polmostrow (Poland) 4. ASAM-SA (Romania) 5. Atiho (European Union)
The service life is on average from 3 to 6 years. But in our climate, it can be significantly reduced.
When to buy:
— the engine is louder than usual; — there is a leak of exhaust gases; — from below, from under the bottom, rattling, dull sounds are heard; — there is a burning smell and the smell of exhaust in the cabin; — the car’s power and traction have become less than before.
Dimensions of the Lada Priora muffler corrugation (in mm):
38x158 42x158 42x269 45x153 45x200 45x230 45x250 45x260 45x158 45x208 45x269 45.5x10² 46x190 48x158 48x206 49x166 50x95 50x 230 50x158 50x282 50x208 50x269 50.5x200 50.5x250 51x150 51x252 51.5x156 52x126 52x208 54x200 54x158 54x200 55x150 55x220 55x 250 55x280 56.5x101 60x158 63x203 63x252 38x158 42x158 42x269 45x250 45x95 45x158 48x158 50x158 50x208 50x269 50.5x200 50.5x250 51x100 51x190 52x126 52x208 54x158 5 5.5x190 55.7x10⁵ 60x158 60x120
Lada Priora Hatchback "Priorka" › Logbook › Replacing the resonator (middle part)
Notes from the past.
Today I replaced the resonator (middle part). Finally, the peeling corrugation began to fray. Exactly three years ago, a complete set (resonator + main muffler) from Ekris made of aluminized steel was installed. The exhaust then turned out to be quite loud. What I immediately didn’t like about the Ekris resonator was that the receiving pipe was 43mm (instead of 51mm in stock). Well, the outer braid of the corrugation completely peeled off after 1.5 years.
This is a photo from a year ago. So I went.
Flange and nuts a year ago (September 2017). Now when replacing it is almost the same.
The nuts unscrewed quite normally. 3 years ago standard copper-plated nuts were installed without any lubricants. Naturally, there was no copper left there. First, I cleaned it well with a basket brush, sprayed it with a high-pressure brush, and tapped it with a chisel. One of the nuts had to be socketed to size 12 - it was rusty. He touched it a little and immediately spilled it again with VD - it immediately went easier. But a nut hammer, drill, drills, pins and taps were prepared in advance. Fortunately, this was not necessary.
Kata stud thread. Quite decent for a 7 year old.
Here is the corrugation for now. It cracked and farted. Then he broke it completely. Surprisingly, the inner braid survived.
Old nuts and flange gasket.
I bought an AvtoVAZ resonator as a replacement. It was the most decent available. Reception pipe 51mm.
Here is a comparison of the old Ekris and the new AvtoVAZ.
AvtoVAZ's can is 10 cm longer.
There was a drop from welding on the mating surface of the flange of the AvtoVAZ resonator. I had to file it down. The new resonator geometry fits 100%.
I installed a new gasket on the flange, coated the threads of the studs with copper grease and screwed on new standard copper-plated nuts. I bought brass exhaust pipe nuts 2101, but did not install them. I read somewhere that now it is a kind of “powdered brass”, not what it was before, and it sours even worse than copper-plated ones.
While I was connecting the resonator and the main muffler with a clamp, the latter got upset, and it also began to fart quite loudly at the junction of the inlet pipe and the can. We'll have to replace it soon.
UPD: 08/08/2018
When using a nut hammer, you can get to all the nuts on the flange.
Source
Replacing the resonator yourself
For what reasons do parts of the exhaust system fail? Each Lada Priora car owner can list at least three factors that affect the service life of the resonator:
- mechanical damage to the body due to road unevenness;
- corrosion;
- metal fatigue.
High humidity, temperature changes in winter (the inside of the resonator can be very hot, while it is cold outside), accumulation of condensation - all this affects the service life of the product. First, the resonator begins to roar loudly and scare people passing by. Then the owner of the Priora receives complaints from his neighbors, whom he disturbs in the morning when he starts his car.
One way or another, a powerful roar is only the first step towards resonator malfunctions. Then it becomes deformed, cracks and holes form on its body, which makes the car unsafe to operate.
Tool preparation
Due to the fact that all parts of the exhaust system are constantly exposed to temperature changes, you will need tools that can be used to knock out or break off a bolt or nut stuck to the body. So, you need to prepare in advance:
- two open-end wrenches for 13;
- ratchet;
- hammer;
- chisel;
- WD-40 or brake fluid for lubrication.
Tools for replacing the resonator can be found in every car enthusiast's garage.
How to determine whether a muffler is faulty
Self-replacement of the Lada Kalina thermostat step-by-step instructions
In fact, this is the element that is most often exposed to high temperatures. Over time, this element fails due to corrosion, burnouts, impacts on uneven roads, or constant accumulation of condensate in the pipe.
Corrosion causes the muffler body to lose its seal.
If the muffler is faulty, the driver will immediately notice this:
- the “glushak” will start knocking on the body;
- the car will lose its dynamism;
- you can hear pops and a strong roar in the exhaust pipe;
- Antifreeze is leaking from it.
Why does the silencer fire?
Most often, car owners complain about loud popping noises in the exhaust system while driving. The muffler can only fire for one reason: the air-fuel mixture does not have time to completely burn out in the engine, so ignition occurs in the exhaust pipes.
This can seriously damage the integrity of the pipes. Therefore, at the first claps, you need to check the following car systems:
- spark plug wires (if, after replacing the spark plugs, the wires were connected incorrectly, problems with engine operation may occur);
- gas distribution control;
- timing belt performance.
That is, the occurrence of pops is not related to the performance of the muffler itself, but directly affects the service life of the pipes.
Knocks from under the body
The muffler may knock:
- about the bottom of the car;
- about the fuel tank body.
In any case, the impact of the pipe on the surface quickly deforms the coating, as a result of which the part loses its tightness. There are two reasons why it lost its original position under the body and began to hit other surfaces while driving:
- The rubber suspensions are worn out. You just need to buy new rubber bands and replace them. The muffler will return to its normal position and the knocking will stop.
- After replacing any elements of the exhaust system. It is quite possible that certain parts were connected incorrectly, the nuts were not tightened correctly, the reinforced gasket was inserted on the wrong side, etc. To understand this problem, you will need to carefully check all connections and elements. Often knocking noises occur due to improper installation of the short stroke.
Antifreeze in the muffler
Antifreeze that drips from the exhaust pipe may indicate one serious problem with the engine - wear of the cylinder head gasket. Therefore, coolant gets inside rather than being used in the cooling system.
It is recommended to immediately take measures to diagnose the engine unit.
Condensation accumulates in pipes
Drivers often notice a phenomenon such as water in the exhaust pipe. Sometimes condensation appears even in winter. Of course, for steel pipes of the exhaust system, moisture is considered the main enemy - here it’s not far from corrosion.
However, the formation of condensate in pipes is an irreversible process. This cannot be called a malfunction or defect of the exhaust system, since due to high temperatures inside the pipes and lower temperatures outside, the exhaust gas turns into a liquid state. This is why condensation forms. Some drivers drill small holes in the muffler to make water leave the muffler faster. This really helps to avoid the rapid development of corrosion.
This phenomenon can often be observed on all cars.
Manufacturers and prices of analogues - how much the part costs
The question of which resonator is best to install on the Priora should be approached based on requests. For example, parts for sports cars are completely tailored to maximize engine power. Such components process a larger volume of gas over a period of time than standard parts. They remove hot gases from the space around the engine faster and it cools faster, and the fuel-air mixture is cleaner, while the proportion of “dirty” air is noticeably reduced. The following analogues are suitable for Lada Priora:
- Mute (for spider) – 3,200;
- Mute (with spider corrugation) – 4,400 rubles;
- Stinger Sport (for spider) – 1,500 – 2,000 rubles;
- Stinger Sport (without flanges) – 2,100 rubles;
- Stinger Sport (FSA class with corrugation) – 3,300 rubles;
- Stinger Sport (with corrugation on a triangular flange) – 2,400 rubles;
- Turbotema with spider corrugation – 2,600 rubles;
- Turbotema for spider – 1,100 rubles;
- STT with corrugation – 5,500 rub.
How to repair a muffler
If your car's muffler requires repair or complete replacement, it is not recommended to do this work yourself, since there is a high risk that you will only worsen the condition of the exhaust system, and possibly the entire vehicle as a whole. In order to prevent such a situation, contact only specialized car services. In our car service center, qualified specialists with the necessary competence in the field of working with exhaust systems will competently diagnose the exhaust system of your car, and, if necessary, repair or install a new muffler in the shortest possible time.
If you encounter any malfunction in the exhaust system and you need to diagnose it, repair it or replace the muffler, then our salon specialists will be happy to help you with this, since we carry out all types of this work!
Which model is better to choose
Choosing a new device is almost always a challenge. Firstly, I want to save money on its purchase. Secondly, in order to avoid paying attention to the operation of the exhaust pipe for a long time, it is advisable to buy a more or less high-quality product.
Today, several models for the Priora are presented in car markets and auto stores at a variety of prices. The cost of any product depends on its quality. So, on free classifieds websites you can buy a used resonator for about 450–550 rubles. However, at a low price, the car enthusiast acquires an additional problem: the resource of such an element has already been exhausted and it does not have long to serve.
The middle price category includes resonators produced by AvtoVAZ - Lada Image. They are made of durable metal alloys and can last for quite a long time - up to 5 years. Their average price ranges from 1500 to 2500 rubles. The cost increases according to the thickening of the metal wall and the number of perforated tubes inside the housing.
The Lada Image resonator is capable of providing factory quality at an affordable price
And also in the category of “middle peasants” are Ecris resonators. They come in two types - regular and aluminized. Their performance indicators and service life are almost the same as those of Lada Image.
The Phobos models are recognized as the highest quality. They are made using rolling technology, that is, they have excellent tightness and durability characteristics. Depending on the financial condition of the buyer, you can choose a regular housing or a device with a corrugated compensator, which will reduce exhaust noise to a minimum and will serve for more than 10 years. True, such models cost 3500–4000 rubles.
The Phobos resonator is chosen by drivers who are accustomed to trusting only proven brands
When choosing a new resonator, one must proceed from practical convictions: the product must meet all safety requirements. Some car enthusiasts try to make a resonator for the Lada Priora with their own hands: this is a fairly simple procedure, however, a homemade element is not always completely sealed and removes gases from the manifold well.
A reliable and high-quality resonator will ensure stable removal of gases from the manifold and prevent the penetration of poisons into the cabin
Direct-flow muffler for Priora
Which muffler should I put on the Priora?
The need to repair the exhaust system arises for any car. The action of high temperatures, high humidity, reagents and salt on the roads in winter, all this leads to the destruction of the metal from which the exhaust parts are made. Let's take a closer look at the questions: which muffler to buy for a Priora (VAZ 2170 - VAZ 2172), which resonator to install on a Priora, how many parts does a muffler on a Priora consist of, and how much does the exhaust system on a Priora cost in current realities?
There are options for cheap Ukrainian-made mufflers, there are spare parts that are more expensive than foreign ones, and you can install a direct-flow (sports) exhaust. If you are faced with the problem of repairing the exhaust, we will look at how to replace the muffler on a Priora below in various possible variations.
What parts does the Priora exhaust system consist of?
The exhaust system of a Priora car (VAZ 2170 - VAZ 2172) consists of the following components:
collector pipe: as standard, it has a catalyst or particulate filter, which allows it to meet the environmental safety requirements of the car Euro - 3, and later, in the latest models, Euro - 4; the collector is connected through flanges to the resonator
The resonator is equipped with an integrated corrugation, which allows you to reduce the level of vibration in the exhaust, this is important for Priora; the resonator is connected to the muffler through a clamp, this allows you to quickly remove the Priora muffler if it needs to be replaced; from the rear of the car, from the outside, you can see the muffler exhaust pipe, which many motorists decorate with an aesthetic nozzle; all the main components of the Priora exhaust system are connected using pipes into a single, closed and sealed system.. It has become quite common to replace the manifold with catalyst with a regular spider (exhaust pipe) familiar to classic VAZs.
In this case, environmental standards are not complied with absolutely, but the catalyst does not “strangle” the engine. By reflashing the electronics, you get an increase in power and better vehicle dynamics at certain engine operating modes
It has become quite common to replace the manifold with a catalyst with a regular spider (exhaust pipe) familiar to the classic VAZ. In this case, environmental standards are not complied with absolutely, but the catalyst does not “strangle” the engine. By reflashing the electronics, you get an increase in power and better vehicle dynamics at certain engine operating modes.
Most often in Priora there is a need to change the muffler. If an unpleasant loud sound appears when the engine is running, then the most likely cause is a burnout in the muffler. A situation often arises when the exhaust system cracks when the Priora accelerates. The most common reason for this situation is the destruction of the internal partitions in the muffler bank. At certain engine speeds this has a noticeable effect on the sound. In any such situations, the best solution would be to install a completely new muffler on the Priora.
Exhaust system of Lada Priora
Sealant for muffler types, DIY repair instructions
The exhaust system of any vehicle is designed for the quick and safe removal of exhaust gases. In addition, the main element of the system - the muffler - works to reduce noise and the volume of toxic substances in the exhaust.
Depending on the body design of the Lada Priora, the mufflers may vary:
- For a hatchback body, a muffler with an exhaust pipe diameter of 51 mm is considered typical; in addition, its length will be slightly less than standard due to the reduction in body dimensions;
- for the Priora sedan, stainless steel devices with an exhaust pipe diameter of 63 mm are produced; however, this hole size is appropriate if the car has a turbocharger;
- station wagon cars can use the same designs; the only difference is the length of the exhaust pipe.
Such “Spider” modification systems cope well with increased loads and are durable
What does the exhaust system consist of?
The system for reducing noise and exhaust gases on the Lada Priora consists of only three elements:
- main muffler;
- additional;
- exhaust manifold with gas neutralizer.
All these parts are connected to each other so as to become a single whole device with 100% tightness.
1-cylinder head gasket, 2-catalyst downpipe, 3-reinforced gasket, 4-corrugation, 5-resonator, 6-rubber suspension, 7-bracket, 8-downpipe, 9-o-ring, 10-gasket, 11-main muffler, 12-mount
The main “glushak” is a structure made of light metal or steel, which has the shape of an ellipse. Drivers often call him a “barrel” among themselves. The main muffler inside has several chambers that are located parallel to each other. This structure allows you to quickly interrupt the sound wave and reduce the noise of gases. In addition, a perforated pipe runs inside the barrel, through the holes of which the exhaust exits.
The main muffler is connected to pipes on both sides: one releases exhaust gases, and the other removes them from the housing. The barrel is attached to the bottom of the car with just two rubber hangers. However, this installation method is considered the most reliable and protects against unnecessary vibrations.
The additional one is connected directly to the exhaust manifold pipe with bolted connections. It is a pipe, which at the other end enters the main one. The entire exhaust system on the Lada Priora is designed in such a way that the main and auxiliary exhaust systems are connected to each other by a hinge mechanism.
An exhaust manifold with a neutralizer is necessary to reduce the specific gravity of toxic substances in the volume of gases. A distinctive feature of the Priora exhaust system is the presence of a neutralizer, which takes in exhaust gases and fights their toxicity. The exhaust pipe is attached to the manifold via flange connections, between which there must be a thermal protective gasket.
Standard muffler - article number and price
The VAZ 2170 Priora is equipped by the factory with spare part item number 2170-120010. Made of light sheet steel with a thickness of 0.8-1.1 mm. Connecting inlet pipe with a diameter of 48mm. Inside the muffler chamber (an oval tank - popularly known as a barrel) there is a series of parallel chambers for the last stage of dampening the force of the sound wave of the exhaust gases. The exhaust pipe allows you to install different types of muffler attachments to add uniqueness and change the sound characteristics of your car's exhaust. The price of such a standard muffler is in the range of 1200-1600 rubles. Of course, you can go much further.
The feasibility of installing a new stainless resonator
This is how Priora sounds without a resonator
For the purpose of high-quality replacement and long-term use, it is necessary to install a stainless resonator on the VAZ 2170 Priora. Installation of such a resonator occurs in a standard place. Lada Priora replacement of the resonator eliminates the need for modifications and improvements to the exhaust system.
This type of resonator has two parts, namely internal and external. Both parts are stainless steel (AISI 316 steel). AISI 316 steel is a common analogue of 10Х17Н13М2.
The standard resonator, which requires replacement, has dimensions of 250x100. Pipe size – 51x1.5. The pipe is also made using AISI 316 steel.
Step-by-step instructions for replacing the resonator on a VAZ 2170
Priora with a leaky resonator
Replacing the Priora resonator by specialists is carried out quite quickly and without any particular difficulties. If we are talking about independent replacement, then you should familiarize yourself with certain step-by-step instructions, namely:
• it is necessary to unscrew the two nuts securing the muffler pipe clamp to the resonator pipe;
• remove the released clamp;
• disconnect the muffler pipe and the resonator pipe;
• remove the metal sealing ring;
• loosen the nuts securing the resonator pipe to the neutralizer;
It is worth noting that some Priora models do not have a neutralizer. In this case, the previous paragraph is replaced by the action of disconnecting the resonator pipe from the pipe that receives the liquid.
• lift the resonator;
• remove the suspension cushions from the bracket;
After the resonator is freed from all fasteners and connecting pipes, it is necessary to remove the car suspension cushions. Particular attention should be paid to the order in which the suspension cushions are removed. First of all, replacing the resonator on a Priora involves removing the rear airbag. The second is to remove the front airbag.
• finally unscrew the two nuts securing the resonator pipe to the neutralizer;
• remove the spring washers;
• remove the bolts;
If we are talking about the above-mentioned models without a neutralizer, then it is necessary to remove the bolts with springs.
• remove the resonator on the Priora.