Installation and reviews of Euro handles for Niva 4x4 (VAZ 2121, 2131)
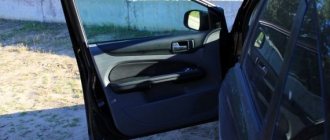
The standard door handles of the Niva 4x4 doors have not changed since the start of production (1977). They look outdated and are not as convenient to use as we would like. The situation can be corrected by replacing them with European handles, which will make the SUV more modern and convenient.
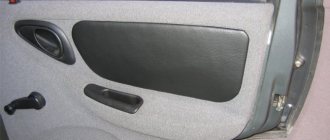
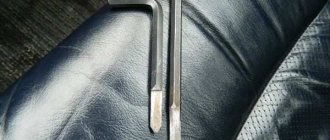
We start by removing the door trim to do this:
- Remove the three screws securing the handle;
- Remove the power window lever;
- Remove the door handle trim by releasing the clips;
- Remove the door trim, overcoming the resistance of the 8 clips.
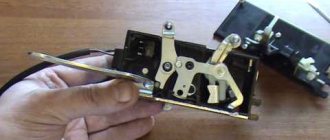
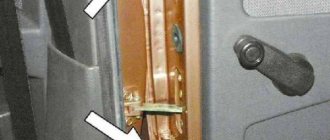
To remove the Niva's outer door handle you will have to:
- Disconnect the lock release rod from the lock release roller.
- Unscrew the two nuts securing the lock.
There are two types of euro handles for Niva 4x4 on sale: with old-style lock cylinders (2131) and new ones (21214). When purchasing, pay attention to this, because... they are not interchangeable. If you need to rearrange the cylinder from a door handle to a Euro handle, then:
- We insert the key into the old lock.
- Turn the key 90 degrees.
- Remove the cylinder spring.
- Remove the lock cylinder from the handle along with the key.
- We insert the cylinder into the Euro handle without removing the key or turning it.
- We put on the spring of the lock cylinder.
- The lock rod should be placed on the cylinder after installing the handle in the door.
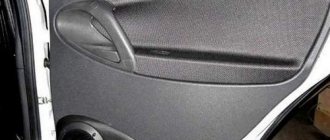
The most difficult stage of modification is installing a Euro handle on the Niva door. It is necessary to ensure that the handle and tongue of the lock are aligned, and that the mechanism operates without pinching/distortion. If this is not done, the Euro handle will not go all the way in, which may result in a gap of up to 5 mm. Another problem is that when opening the door, the euro handle will not return all the way, leaving a 3-5 mm gap.
If such ailments occur, you should make sure that the lower hooks of the handle extend well beyond the edge of the door. If necessary, bend the edge of the door along its entire length (without much effort). In addition to this, you can use 1-2 washers between the euro handle and the door. As a result of such modifications, the correct functioning of door handles can be achieved.
As a rule, negative reviews about Euro handles for the Niva are due to their incorrect installation/adjustment. Also, bad impressions of these accessories appear due to the poor quality of their manufacture. There are cases when Euro pens were in use for only a couple of months, after which they broke. What reviews can you leave about European pens? Is it worth installing them or is it better to leave the standard door handles?
Let us remind you that the website provides other instructions for tuning a Niva 4x4 with your own hands, for example, installing sidelights of a new type or making a floor tunnel.
Source
Tailgate Niva Chevrolet
• Niva • Chevrolet • Body
Removing the spare wheel bracket for Niva Chevrolet
To remove the bracket, you will need a 17mm wrench. Remove the spare wheel from the bracket and Unscrew the four nuts securing the bracket to the tailgate and remove the washers installed under the nuts
Remove the bracket and rubber washers from the tailgate studs. Installation of the Chevy Niva spare wheel bracket is performed in the reverse order of removal.
Removing and installing the tailgate trim of the Niva Chevrolet
To replace the trunk lid trim of a Chevy Niva, you will need flat-blade and Phillips-blade screwdrivers. Open the rear trunk lid
Remove the top screws securing the glass frame
Remove the decorative caps on both sides of the frame and remove the screws located under the caps.
Remove the trunk lid glass frame
Unscrew the filler plug and remove the neck trim of the tailgate glass washer reservoir
Carefully pry up the upholstery with a screwdriver at the locations of the fastening rivets and remove it. Installation of the trim and glass frame of the Niva Chevrolet trunk lid is performed in the reverse order of removal. Replace broken upholstery fastening pistons with new ones.
Removing and installing the trunk lid door lock drive Niva Chevrolet
To replace the Chevy Niva trunk lid lock, you will need flat-blade and Phillips-blade screwdrivers. Remove the upholstery
tailgate
and disconnect the wire from the negative terminal of the battery.
Remove the screws and remove the lock drive activator. Disconnect the wiring harness block from the activator. Installation of the rear door lock drive activator on a Chevrolet Niva is performed in the reverse order of removal.
Removing and installing the lock and handle of the trunk door lock of the Niva Chevrolet
To replace the lock or handle of the trunk lid door of a Chevy Niva, you will need keys 8 and 10, flat-blade and Phillips-blade screwdrivers. Remove the tailgate trim and disconnect the wire from the negative terminal of the battery
Remove the screws securing the trunk lid lock
Using a screwdriver, disconnect the rods from the door lock switch lever and from the door handle
Disconnect the black and white blocks of the wiring harnesses from the Chevrolet Niva trunk door lock activator and remove the lock assembly with the drive activator
Unscrew the door handle fastening nuts and remove the handle bracket bolt
In the "open" position, slide the handle to the left and remove the handle from the door opening. Installation of the Chevy Niva rear cover door lock and its handle is performed in the reverse order of removal.
How to remove the trunk lid of a Niva Chevrolet
To remove or install the Chevy Niva trunk lid, you will need keys 10, 13, 17 and a screwdriver. Disconnect the wire from the negative terminal of the battery
Unscrew the screws and remove the rivets securing the left trunk trim
Move the upholstery to the side and remove the screws securing the side panel trim
Remove the decorative trim for the seat belt eye and remove the bolt securing the eye to the body.
Remove the Niva Chevrolet seat belt from under the side panel trim and remove the trim
Disconnect the wiring harness connector from the trunk light and disconnect the tailgate wiring harness connector.
Remove the exhaust ventilation deflector and unscrew the nut securing the earth wire terminal
Remove the rubber bushing from the body hole and remove the trunk door wiring harness from the body hole.
Remove the bolts securing the door opening limiter
Remove the bolts securing the lower and upper hinges of the tailgate, having previously marked the position of the hinges on the body (if you are installing the previous door)
Remove the trunk lid. Installing the firecracker on a Niva Chevrolet is carried out in the reverse order of removal; after installation, be sure to adjust the position of the door in the body openings and the trunk lid lock.
Adjusting the position of the Chevrolet Niva tailgate
The position of the tailgate is adjusted by changing the position of the lock latch and the door tenon socket. You will need an impact screwdriver to make adjustments.
Using an impact screwdriver, loosen the screws securing the door lock retainer and the tailgate tenon socket. Move the retainer and socket in the desired direction and tighten the screws. This completes the adjustment of the trunk lid lock.
Adjusting the Niva rear door
Did you like the article? Follow our channel for new ideas of useful car tips. Subscribe to us in Yandex.Zen. Subscribe.
Car doors tend to sag over time, this problem can occur quite often and this problem needs to be fixed. After all, a sagging door affects adjacent mechanisms and is not a particularly useful component of the car. Therefore, you should take care of the ability to debug a sagging door, and there are quite effective methods for this, which we will consider further.
Most Common Methods
In order to get rid of sagging, many car owners prefer simply bending the door in the opposite direction or similar mechanical influences. These methods may seem too simple and even a little stupid or barbaric, but in fact they work. The only problem is that the bent door will begin to sag back after a short period of time, yes, “straightening” the door is enough for several weeks, but then the situation returns. A more reliable method is considered to be lining plates, which are selected according to thickness. This is also a completely reasonable method, which, however, requires more time.
The window is Niva’s weak point
On many automobile forums dedicated to the Niva car, you can read information that their owners are periodically bothered by rear windows that randomly drop down. Of course, they do not open completely, but only a couple of centimeters, but sometimes this is quite enough.
If you delve into the design of the car, you will learn that the front windows are opened using an electric drive, but the rear windows are just the opposite - using a manual drive. This is their main weakness. When the rear windows shake well during a trip, they will definitely open a little.
When the car is just standing, you should constantly rock them up and down. Using similar maneuvers, we open the glass for ten to twenty minutes. During this time, as a rule, you will be able to move the glass down about ten centimeters, and this will allow you to stick your hand into the interior and lift the flag yourself. At this stage, you can finish the review of ways to open a Niva without a key, but we bring to your attention a few more interesting options:
- using a tennis ball;
- wires;
- using a loop of regular rope.
Also interesting: How to change the light bulbs on the instrument panel of a Niva Chevrolet: video
Details about each of these methods
Obviously, you can watch videos on the Internet where professional car enthusiasts perform these procedures, showing everything by their own example. However, it is also worth paying attention to such a moment as what to do so that such situations do not occur at all. After all, it is better that you always have a backup option. Why solve problems if they can be eliminated altogether?
Details about each of these methods
How to repair the lock on the rear and front doors of a Niva Chevrolet
The Niva Chevrolet door lock is a silent device. The internal parts are located in the same way as in standard locking mechanisms, but the strength and durability of the product is given by the plastic case that covers the internal elements.
Principle of operation
The door lock device on the Chevrolet Niva is equipped with pins around the perimeter. The back and front teeth close the door when they come together and open when they diverge. If the right or left pin jams or breaks, the mechanism will lock. Without falling into the grooves, the internal fragments cannot complete their path, so a disconnective displacement occurs. The malfunction is caused by prolonged use and wear. The situation is aggravated by moisture ingress, burglary, and metal corrosion.
The first signs of a breakdown are a squeaking sound when turning the key. Only disassembly and inspection of the mechanism will reveal the cause of the malfunction. After diagnostics, it will be determined what exactly is required: repair or replacement. Sometimes it is enough to carry out lubrication work or replace the core of the part. In other situations, it is necessary to install the entire device. The average price of a Euro-lock is from 1,500 rubles, depending on the place of purchase.
Adjustment
To carry out preventive maintenance on a Chevrolet, the passenger door lock is adjusted and lubricated with silicone. To work, you will need a hexagon and lubricant. The adjustment is carried out in the open position. The stand is disassembled by unscrewing the bolts. It is important to fix them at a right angle. The screws must not be removed. When the fastener is loosened, the position of the lock is easily adjusted.
Adjusting door locks
This option is preventive, but quite effective, it allows you to get optimal door performance. However, in order to understand how to adjust the locks, you will need to study a certain amount of materials and understand the mechanics of your particular model. In general, the activity is quite lengthy, but ultimately yields positive results. You should select instructions for the appropriate class of car. It is clear that adjusting locks for VAZs differs from adjusting locks on premium cars.
Meladze tequila games for nokia n82 love
BODYRepair of door locks. VAZ 2121-21213 VAZ 2108 2109 21099 Repair of locks. VAZ repair; how to modify VAZ door seals and silent locks on VAZ. Let us analyze in detail the faults of the VAZ doors, the tailgates of the VAZ 2121 VAZ-2106. Repair. VAZ 2121 Niva, repair The principle of adjusting door locks and adjusting VAZ doors. Repair. trunk and door lock VAZ-2104 opening locks, doors, VAZ 2121 - door VAZ 2105 - repair. 2121, 2131. repair; Adjusting door locks. Body repair of VAZ 2107, VAZ. VAZ repair condition and operation of door hinges, windows and locks.
Working with a lock
If we look at the diagram of the castle, it consists of two main parts. The first is the capacitor, that is, the part that is located on the racks, and the lock itself. The door closing process looks something like this:
- the door closes;
- the moving part in the lock mechanism is rolled along the rack;
- the protrusion ends up in the condenser cavity and the door closes.
A completely understandable process, as well as a reason that can influence poor performance. Often this is due to lack of lubrication. If there is little lubrication, then the rotating parts begin to rub against each other strongly and there is increased wear of the mechanism and many other negative consequences, which can also lead to sagging doors.
If the mechanism is properly lubricated, then a situation may occur where the capacitor is located far from the lock itself. As a result, the protrusion simply does not reach the cavity and the door does not close or does not close tightly. In such a situation, you need to work with the part on the stand and move this part towards the door part of the mechanism. The work is quite simple. First you need to unscrew the bolts on the stand and move the structure a little. Metal plates that are placed under the capacitor can also be used.
Adjusting the front door lock (Chevrolet Niva Exterior (external elements)) - AutoCall
Raise the hood and secure it in the open position with the stop. Disconnect the rods of the inner and outer handles, see.
Re: About adjusting the tailgate > Please explain if anyone has either experience or knowledge...
Reassemble the tailgate in the reverse order of disassembly.
Removing the tailgate mechanisms: Unscrew the two 5 cm screws.
Removing the front door trim: Front door locking mechanism: Removing the front door handles: Disconnect the connectors for the outside mirror gear motor wiring harness and the front door wiring.
Unscrew the three screws and remove the outside mirror. Remove the outer lower and upper sliding window seals.
Unscrew the screw and remove the sliding glass guide assembly with the seal. Through the openings in the inner door panel, unscrew the two screws securing the sliding window frame to the window lifter and remove the glass from the door cavity.
Disconnect block 10 fig. Unscrew the four nuts 5 securing the window regulator and remove it complete with the gear motor through the opening in the inner door panel. Unscrew the two 6 cm screws. Disconnect the rods 5 and 7 of the outer handle from the lock 9. Unscrew the nut and bolt and remove the 4 cm handle.
Unscrew the three screws and remove the 9 cm lock. Unscrew the three bolts securing the door opener and remove it. Remove the wiring harness from the door cavity.
Removing the rear door trim: Before adjusting the lock, it is recommended to outline the contours of the lock on the body pillar. If the door closes too tightly, loosen the bolts that secure the lock, move it outward, and tighten the bolts. If the door does not close tightly, move the latch inward. In this case, there should be no retraction or protrusion of the door relative to the body.
If the door lifts when closing, sagging in the open position, lower the latch.
If the door is not properly unlocked using the inside handle, adjust the position of the internal drive rod. To do this, disconnect the 7 cm bracket. After completing the adjustment, tighten the fastening screws. Open the rear door and lower the sliding window to the bottom position.
Niva Chevrolet rear door lock
Squeeze the tabs of the latch and remove button 3 fig. Unscrew the screw, take out niche 2 fig. Unscrew the two 5 cm screws.
Using a flat-head screwdriver, remove the trim and remove the window handle. Use a screwdriver to press out buttons 1 and remove trim 6 of the rear door. Removing the rear door window regulator is carried out in the same way as removing the front door window regulator.
Unscrew two screws 8 fig. Disconnect the rod 8 of the outer handle from the lock 11.
REPLACING THE DOOR ACTIVator FOR A Chevrolet NIVA
Removing the rear door handles: Rear door locking mechanism: Unscrew the screw securing the drive 1 cm. Unscrew the three screws and remove the lock 11 assembled with the lock release drive and rods 4, 6 and 7. Unscrew the three bolts securing the limiter and remove it. Unscrew the bolt securing the limiter to the body and Clean and inspect the parts, lubricate with CV joint-4 grease or similar. Install the limiter in the reverse order of removal. Remove the bolts of the sliding glass mounting plate.
Unscrew the bolt securing the guide and remove the internal glass seal. Remove the glass by moving it in the opening as shown in the photo.
10.11.8 Adjusting the front door lock
The clip is pressed onto the glass and additionally secured to the glass using a strip of raw rubber. However, if it is not possible to purchase assembled glass, dip a strip of new raw rubber in gasoline for a few seconds, insert it into the holder and install the holder on the new glass. After installing the glass in place, lift it up as far as it will go and do not lower it for at least three hours.
During this time, the glass will be firmly fixed in the holder. Install the glass and the removed parts in the reverse order of removal. Replacing the front door window lifter mechanism You will need: Remove the front door glass, see.
Disconnect the wiring harness connector from the window regulator motor. Remove the window regulator assembly through the technological opening in the door amplifier.
Clean and inspect the parts, lubricate with Litol or similar lubricant. Install the window regulator and all removed parts in the reverse order of removal.
Removing and installing the front door You will need: Unscrew the bolt securing the limiter to the body, see. Turn along the axis and disconnect the wiring harness block from the door. Remove the locking brackets of the door hinge axes. Remove the door upwards.
Source: https://autovizov.ru/chevrolet/%D0%BD%D0%B8%D0%B2%D0%B0-%D0%BA%D0%BB%D1%83%D0%B1-niva-club- 22.html