For some, cars are a means of transportation, while for others, they are a means of self-expression. The reasons why you decide to reupholster the ceiling can be different: the desire to change the interior to your liking, a coating that has become unusable, persistent dirt, an accident and expelled airbags, loss of shape, peeling of fabric. Before deciding to reupholster the interior, it is advisable to understand in detail the issues of technology and choice of materials. At first glance, there is nothing complicated about reupholstery, but there are a number of features that need to be taken into account. If you decide to entrust this operation to a professional, then knowledge of the nuances will help you control the work of the master.
Procedure for reupholstering the interior
In order to change the car ceiling upholstery, you need to carry out a number of operations:
- dismantling the ceiling from the car;
- cleaning the ceiling from the old layer of upholstery;
- Troubleshooting the ceiling frame, do-it-yourself repairs;
- selection of material and color, purchase of the required quantity;
- preparation of the ceiling frame, repair and degreasing;
- pasting the ceiling with material;
- installation of the ceiling in place;
- assessment of the master's work.
Removing the ceiling and installing it in place must be carried out in full accordance with the above algorithm, otherwise a high-quality result will not be achieved
How to glue the ceiling in a car without making a video
How to glue the ceiling in a car without removing it with wallpaper glue Plus, I did everything alone and at times I really needed a pair of hands to just hold the area for a couple of seconds, but what can I do? I got out of the situation) here is the problematic part In the end Everything is perfect , only on these rear windows, causing difficulties only in one place, where it’s simply physically impossible to stick it like that... I’ll show you everything in the photo. difference I did everything, all that remains is to drag the two horizontal strips (Above the doors along the ceiling, the passenger handles are attached to them. The problem is that both of them (the strips) are cracked. They broke over time. I will make them from. I don’t know what yet. And then retighten accordingly))) I don’t expect anything supernatural from this reupholstery, the purpose is rather “for interest”, because it looks like “carbon 3D” film and is very practical to use.
How and how to glue the ceiling in a car
Many car owners are accustomed to the fact that over time, the headliner begins to deteriorate as a result of natural wear and tear. This is especially true for interiors made in light shades. In addition, cigarettes (burnt spots will appear) or children (draw, pierce or cut the material) can help, so to speak, speed up the process, as can be seen in the photo. Therefore, many find a way out - to re-upholster the ceiling in a new way. Of course, some car owners first try to make do with “little loss”, using various means to restore the coating. However, time still wins sooner or later, and therefore re-upholstery threatens all non-new cars. Therefore, covering the ceiling with new material is the right decision. Therefore, let's consider how to perform this procedure with your own hands. And first, let’s determine why the constriction is needed in general:
- Pollution.
How to glue the ceiling in a car without removing glue
- Catalog /
- Video / What and…
BORODA CHANNEL fell off, the ceiling in the car sagged, no problem, look how I repaired it, BORODA CHANNEL Social comments Cackle Similar video
- Repairing a sagging car ceiling (without removing it)
- What glue to use to glue the ceiling in a car
- Car ceiling restoration
- Car ceiling repair without reupholstery (BMW E36)
- Sagging ceiling, DIY gluing
- Reupholstering a car ceiling with your own hands./ glue car ceiling with his hands
- Audi 80 ceiling. Sagging, sticking
- How to reupholster a car ceiling with original material
- Car ceiling restoration.
403 taf access is denied
After gluing, I ended up with excess material in the back of the base, but this turned out to be no big deal. Next, we leave the glued “structure” to dry. The end of drying is a COMPLETE DRY SURFACE of the ceiling. Making the edging. - After the ceiling has dried, gaps may appear between the edges of the rigid base and the rag.
We seal them with pre-purchased tape. Moreover, I simply pasted the tape along the side edges of the ceiling, without “bending” it and, accordingly, without gluing the remaining width of the tape on the back side of the ceiling. This was done on purpose, because the ceiling fits quite “tightly” into the body, and there are technological cutouts and mortises along the side edges, and it is not possible to properly glue the tape to the back side of the ceiling.- Because
How to reupholster a car ceiling yourself
Important
However, in order to use this tool correctly, you must carefully study the instructions. Video about reupholstering a car ceiling: Start small If you have never reupholstered an interior or dealt with car velor before, we recommend that you practice in advance. Try covering some small element with fabric first.
For example, drag handles, door sill parts or inserts on car doors. Once you are sure that everything is working out well for you, proceed to reupholstering more complex interior elements. Alternative materials for upholstery Of course, you do not have to reupholster the ceiling in your car with velor. There are other materials that have their own advantages. Let's take a closer look at the advantages of other fabrics for upholstery.
403 - access denied
Info
How to glue the ceiling in a car yt by removing it with glue Installing the ceiling trim: - In principle, everything is simple here, but just like with plywood, an assistant is needed. For me it is, my life partner. (Thank you, dear, for supporting me in all my fornications. ^_^ ) — I glued the sheathing itself with liquid nails. See photo. Installation of a complete set of lighting from the ceiling: - Did it completely without the collective farm: standard connectors, standard braid... See photo.
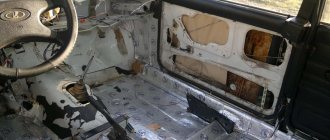
Result: Now the rear passengers can turn on their own lights (the so-called - Internal ceiling handles, with reading lamps), and not ask me to turn on the main one... And also my favorite one can look in the illuminated mirror (the so-called - Sun visors, with illuminated mirror and cover) .=) In general, practical and necessary lampshades. See photo. How to change the headliner in a car yourself Maybe I didn’t explain it very clearly, but when you try to remove the ceiling it will be clear. - We take the ceiling out of the car through the rear right door, bending it a LITTLE in an arc, but CONTROL THE BENDING OF THE FRONT CEILING JUMPER so that it does not break .- The ceiling is out! Washing the rag covering. - Having placed the ceiling on a flat surface, carefully peel off the rag covering. It comes off quite easily, I tore it off evenly across the entire width of the ceiling. - After removing the “rag”, its inner side is all sticky and there are remnants of the sound-absorbing coating of the base of the ceiling. - Take “Vanish” (at my dacha I had a type of powder in a pink plastic jar), dilute it according to the instructions (I even slightly increased the proportion of Vanish in the solution) in a basin. - Soak the ceiling “rag” in it for at least an HOUR!!! - After an hour, all the stickiness and remaining crumbs end up at the bottom of the basin.
How to change the headliner in a car yourself
Why CAREFUL, yes because the wife decided to clean it THREE!!!!! Raza. ALL ACTIONS ARE BETTER TO CARRY OUT WHEN THE INTERIOR IS HEATED TO REDUCE THE AMOUNT OF BROKEN PLASTIC!! Actions: After reading the search for the word “KELID”, I bought this glue for Vinyl and some other wallpaper with a pink indicator (a pack on the market cost 80 rubles). Next is removing the ceiling itself. Looking ahead, I will say that the procedure, in principle, is not complicated and even the first time it is performed, it takes about 1 hour. Sequence: Removing the ceiling - remove all 4 handles under the ceiling, each is secured with 2 screws, which are closed with plugs. We carefully pry them off with a thin screwdriver or an awl, they bounce off easily and the main thing is to then find where they fell. The screws are easily unscrewed with a Phillips screwdriver.
The best video
I succumbed to temptation, buying myself a sample piece 1.5 X 2 m (width 1.5 m). I brought it and placed it near the table at home, the roll safely collected dust for a couple of months and so I caught a cold, stayed at home ... contemplated the wall until my gaze came across a bored person at the wall roll. I’ll make a reservation right away: I’ve NEVER re-tightened ANYTHING before. I haven’t even glued wallpaper, I haven’t done anything ghostly similar to re-upholstering. And I’ve only sketched out how it’s done. Of course, YouTube can help, I found a video where some man was swearing and unsticking , glued it again, everything stuck together. He muttered again and peeled it off... Doubts crept inside me... Can I do it? With my hands at an angle of 90 degrees in different directions. My eyes are afraid, but my hands... well, in general, let’s call it “doing”. Like a smart ass, with a very businesslike look, I began to make a pattern so that I could understand which piece I needed to cut out. blah blah blah.
juristufa.ru
Removing the ceiling
Disassembling the ceiling in the cabin is not an activity for temperamental car enthusiasts. Patience and care are required to avoid damaging the fragile roof frame, wires and fasteners.
The procedure will differ depending on the make of the car. The exact location of fasteners, wires and the method of dismantling the ceiling are indicated in the repair and operating manual for a specific car model, but there are a number of rules and general recommendations. Compliance with them will reduce the risk of damage during dismantling.
Video: example of ceiling removal
Dismantling proceeds in the following order:
- We examine the ceiling. What we pay attention to: the presence of backlight bulbs, whether the pillar panels interfere with the dismantling of the ceiling, whether there are visible clips and how they are arranged, how the side ceiling handles are attached.
- In most cases, you will need to remove the panels that cover the posts. It is also advisable to drag the panels to match the color of the ceiling - it will look original. To remove the struts, you will need to unscrew the seat belt fastenings, move away the rubber seals, and find the hidden screws. To prevent “crickets” from occurring, the panels are mounted on self-latching connectors. Therefore, you will have to carefully, without fanaticism, pry them off with a screwdriver so that the connectors come out of their sockets.
- If the car has a hatch, you need to disassemble the seals around it, as well as remove the panel that covers the hatch. We will also drag this panel.
- We remove the interior lighting, if any - the heater or audio system control panels, visors and ceiling handles. It is important to identify the location of hidden screws and not damage the plastic parts.
- We find hidden elements of ceiling fasteners, they can be screw, “ruffy”, and also spacer. Depending on the type of clips, we select a tool for dismantling - a screwdriver, pliers, scissors or a knife. In most cases, the clips break when pulled out, so you should find out if there are similar ones in available auto stores.
- The order of removing fasteners is from the edges to the middle. If dismantled in the reverse order, there is a risk of breaking the ceiling frame. Get an assistant to hold the hanging edge of the ceiling.
- An important step is to remove the roof from the interior. In station wagons and hatchbacks this is not a problem - it is accessible through the rear door. In coupes or sedans, difficulties arise. You may have to remove the front seats or one door. If you cannot reach the roof through the door, you will have to remove the windshield - and this is an additional cost.
Depending on the type of car clips, we choose the method of removing them.
Before starting work, we determine the place where the removed elements and fasteners will be stored. If all the parts are in a pile, it will be difficult to install them in place.
Cleaning the ceiling frame
The old fabric and foam backing should be removed. The most common method is mechanical. A sharp knife, spatula, and coarse sandpaper will come in handy. If the fabric cannot be removed, try soaking it in 646 solvent. To avoid damaging the frame, it is better to conduct a test test in inconspicuous areas.
The ceiling frame must be carefully cleaned of old foam rubber and glue residues
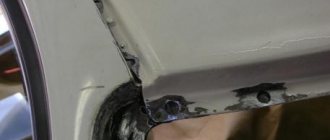
Frame defects
Cracks, wrinkles, frayed edges, breaks from airbags - the frame should be inspected, all difficult places should be marked with a marker. Based on the existing damage, a decision is made to replace or repair the frame.
It is recommended to repair using epoxy resin and fiberglass. The procedure is as follows:
- on the back side of the frame, the repair site is cleaned with coarse sandpaper;
- a layer of epoxy resin is applied, a fiberglass patch is placed on top and pressed into the resin;
- repeat the operation 1-2 times until a strong layer is obtained;
- On the front side, the damage is cleaned and puttied.
If the frame is badly damaged, it will be cheaper and easier to replace it.
Video: reupholstering the ceiling with airbags firing
Removing old fabric
First, you should free up space in the cabin by removing the front passenger seat. Then the plastic covering and fittings are dismantled - lampshades, plugs, handles. To remove the ceiling, you will need to remove the rubber seals and glass.
The dismantled ceiling is placed on a convenient table in a workshop or garage, and the glued fabric is removed, as well as the old foam rubber that is under the fabric. To clean the surface from foam rubber, use a metal brush or a stiff sponge.
Usually the old fabric comes off easily, but if it is stuck to the ceiling too tightly, you can treat it with a solvent. It is also recommended to use it if it is not possible to clean off the remaining foam rubber.
To ensure that the new fabric holds as firmly as possible, it is recommended to additionally sand the ceiling with sandpaper.
Then shake off any remaining glue and debris from the surface and wipe it with a dry cloth.
Selection of material for reupholstery
The material for upholstering the car interior ceiling has the following properties:
- elasticity;
- strength;
- environmental friendliness;
- non-flammability;
- durability;
- cleanable;
- have a wide range of colors that are resistant to fading.
Video: expert advice when choosing fabric
The market offers a variety of interior reupholstery options. Most Popular:
- automotive leather;
- eco leather;
- Alcantara;
- flock;
- carpet
Automotive leather is considered the most exclusive and expensive upholstery option. It is made from natural raw materials - cattle leather. Automotive leather is thinner than shoe leather, but thicker and stronger than haberdashery or furniture leather. During processing, the leather is covered with a layer of polymer material, which adds practicality and durability to the leather. Natural leather has two disadvantages: it doesn’t stretch well and is expensive. Therefore, it is better for a novice master to postpone this option, since a mistake will be expensive.
Eco-leather is cheaper, but looks the same as the real thing. Therefore, if you want to sheathe the ceiling, it is better to use it rather than natural leather. Eco-leather is made from fabric on which a layer of PVC or polyurethane is applied. When choosing, you should pay attention to polyurethane leatherette, which does not wear out and stretches well.
Alcantara is a popular material that is used instead of leather in car interior trim. This material is an artificial microfiber fabric that looks like suede. Alcantara was invented in Japan specifically for finishing the interiors of yachts and cars. The composition includes polyester, polyurethane and cotton. Thin interwoven fibers allow the material to stretch perfectly in all directions and also to adhere well. There is even an option on sale with an adhesive layer already applied. Alcantara is easy to clean, and over time retains its original appearance and does not wrinkle during use. In many respects, this is an ideal option for finishing a car interior. The downside is the price, which rivals that of real leather.
Another modern technological material is flock. This fabric is produced by spraying small fibers onto a base. A special glue holds the fibers together. A special feature of this material is its maintainability - if you have a special flock sprayer, you can repair a scratch or burn, or even paint a picture with multi-colored pile. The disadvantages of flock are that it does not tolerate exposure to solvents or alcohol cleaners.
Carpet is the most affordable and popular material for car ceiling upholstery. This is a non-woven material that resembles loose felt in appearance. Initially, the casings of audio speakers or podiums for speakers were covered with carpet. Due to its low cost and excellent performance properties, this material has gained popularity among car enthusiasts. Dense and thick carpet is used for car mats, and thin carpet is used as upholstery.
Carpet is widespread and can be purchased at any specialized store.
Photo gallery: materials for ceiling cladding
Stitches on the leather add relief and charm to the car ceiling
Eco-leather will help create an expensive appearance in the cabin
Carpet for budget cars: simple, but tasteful
Semi-matte splendor - Alcantara in the car interior
The flocker will help you create any three-dimensional patterns on the ceiling
There are other options for finishing the ceiling in a car - velor, traditional fabric. However, they are used less and less, since the above materials are more suitable for use in a car.
Purchase of materials
We’ve decided on the type of fabric - it’s time to go to the store to buy. But first we need to measure the dimensions of the ceiling and determine the need to paste the racks. When purchasing fabric, you should take into account a 5-10 cm allowance on each side of the part, as well as the fact that the fabric should be glued to the part without joints, in one piece.
Having purchased the fabric, we select the appropriate glue. There are different types of glue; before gluing, be sure to do a compatibility test of the fabric, roof frame and glue.
The following options are possible:
- glue No. 88 “Moment” is an excellent glue, it applies well and holds the fabric tightly. A day after pasting, you can smell the solvent, but after a while it becomes safe for health;
- special glue that can be applied using a spray gun. Unlike Moment, it has a liquid consistency. If you have a spray gun and a compressor, this is an ideal option, since it is easier to apply a thin, uniform layer with a sprayer;
- Spray fabric adhesive is a popular option. It is more expensive than the first one, but much more convenient, the layer turns out even. High-quality glue in a can is an excellent option for a novice craftsman;
- hot melt adhesive in spray form. It is applied to the fabric and frame and dries. After this, the fabric is laid on the frame, heated with a hairdryer and rolled with spatulas or rollers. After cooling, the fabric holds up well. This method is practiced by professionals, as it allows you to achieve excellent results with minimal effort and time. Hot melt adhesive is usually more expensive and requires a hair dryer with temperature control.
Video: expert recommendations for choosing glue
Car ceiling adhesive
In order to secure the result for years, you need to choose the right glue. When familiarizing yourself with the products, you need to remember about sunlight, composition, interaction with one or another facing material, and temperature conditions.
One of the most popular compositions is 88th glue. It is cheap, has good adhesion, which is why drivers often use it. But it was not without its shortcomings. The main one is fumes with a specific pungent odor that negatively affect the driver’s well-being (if their concentration in the air inside the cabin exceeds).
Use special compounds designed to work with car interior parts. They are more difficult to find, and you will have to pay more money. But this is a good solution for those who want to do the work and forget about modifications. Pay attention to the composition of "MAN". It can withstand temperatures up to 155 degrees. The adhesion reserve is such that it will be easier for a person to tear off the lining than to remove the glue from the base. Therefore, special automotive glue is a justified option.
Work procedure and valuable tips
The ceiling frame has already been cleared of the remnants of old fabric and foam rubber. You can sand it with 80-120 sandpaper for better adhesion. Before gluing, you need to remove any remaining dust and grease from your hands - we use degreasers, but it is not recommended to apply a lot - if the composition saturates the top layer of the frame, it can cause delamination of the material. Therefore, we are testing this method in a hidden area.
Pasting the frame with material
The ceiling has been laid on the table, fabric has been purchased, and a jar of glue has been opened. Let's get started!
Safety precautions require the use of safety glasses, a respirator and rubber gloves. It should be noted that glue that gets on the front surface of the ceiling will spoil the appearance and will not be cleaned off, so we apply the glue with rubber gloves and smooth the fabric without them.
Using a brush, apply a thin layer of glue to the frame area. We wait for a while according to the instructions, lay the fabric and press it in order, paying more attention to bends and indentations. A small roller, a plastic spatula, fingers and a cloth will help you press the fabric. It is important that the layer of glue is small and uniform; it is not advisable to rub the same place with your fingers - it can leave a stain.
You should not cover the entire frame with glue - there is a risk of not having time to press the fabric. Therefore, we apply in strips of 30–40 centimeters, this slowness will allow us to avoid mistakes.
The fabric at the edges can be cut along the edge with a sharp knife, or it can be folded onto the back side of the frame by 1-2 centimeters, cutting it with “teeth”. In this case, the fabric will hold up better. However, it is worth considering that installing the ceiling will be more difficult - it will become wider by the thickness of the fabric.
Video: plywood ceiling of a car in a workshop
What mistakes can a novice master make:
- applying a large amount of glue. It can saturate the fabric and protrude from the front side, ruining the appearance;
- violation of instructions for using glue. The glue has not set sufficiently or has dried out. In this case, the fabric will lag behind;
- poor fabric pressure, air bubbles;
- glue or dirt getting on the surface of the fabric;
- lack of material for pasting. Fabric laid crookedly at the beginning of work may “go” to the side at the end;
- poor quality finishing of frame edges.
The ceiling is glued - we give it a soak, the time of which depends on the instructions for using the glue. After this, we proceed to installing the ceiling.
Ceiling installation
To mount the ceiling, you must first carefully place it inside the car. Practice shows that it is easier to remove the ceiling from a car than to install it in place. Therefore, you should use the services of an assistant and wear clean gloves. We put the ceiling in place and fasten it. An assistant must support the sagging parts of the ceiling, preventing the frame from breaking or bending. If this is not done, wrinkles or folds will appear that will spoil the appearance of the finish.
It is better to select the fasteners in advance to match the color of the trim so that it does not stand out. It is also better to replace clips that are broken during disassembly. When tightening the screws, you should be extremely careful; a broken screwdriver will scratch the plastic or fabric.
Evaluation of work and rewarding of the master
The critical stage is acceptance of the completed work. A new ceiling in a car always looks nice, but don’t relax - we must look at all the shortcomings, loose spots, and dirty spots. We correct them if possible.
If you did the work yourself, be sure to reward yourself with a good emotion; if the work was done by a professional, in addition to money, you can leave a good review of his work, tell your friends about the talented master.
Installation of a car ceiling needs to be done only by two people: then the work will be done carefully
How to make a banner with your own hands
There is no need to give the car to the service center technicians. Reupholstery is not complete without:
- fabrics;
- glue;
- set of screwdrivers;
- degreaser;
- fine-grained abrasive;
- hard sponge;
- rollers for leveling the surface;
- masking tape;
- hairdryer (preferably a construction hairdryer, with the ability to adjust the temperature).
To hide the fasteners of decorative elements, you will have to break out the plugs. So buy them in advance.
Step-by-step instruction
A complete reupholstery consists of ten stages.
- Dismantling.
- Removing the old coating and cleaning the base with a hard sponge.
- Removing old adhesive residues with a degreaser.
- Sanding the frame with abrasive sandpaper.
- Applying a strip of adhesive to the central part. The length of the strip is up to ten centimeters.
- Smoothing the center of the fabric with a roller.
- Apply similar stripes on the left and right sides at a distance of 10-15 centimeters from each other.
- Stretching and smoothing the fabric.
- After completing the application of the fabric, re-align with a roller.
- Folding and gluing the edges of the fabric. The rest must be trimmed.
The repair is considered complete after reinstallation along with lighting and decorative elements. The naked eye will see how well the interior will be transformed.
Basic mistakes
The main mistake is using Moment glue instead of the compositions indicated earlier. In summer, the car gets very hot, which is why the glue will not be able to hold the fabric on the frame.
You need to start from the center. If you start re-upholstering from the edges, it will be difficult for the owner to align the fabric in places with sharp transitions.
Car ceiling painting
If the ceiling in your car has acquired an unpleasant color over time or after cleaning, do not rush to re-tighten it. Perhaps painting will help you.
For a high-quality result, it is best to remove the ceiling. If you don’t have the time or desire to remove it, you can simply paste over and cover the parts that cannot be painted.
You can choose aerosol paint for suede or fabric, or water-based paint, which is applied with a sponge, roller or brush. Plain enamel cannot be used for cars, as it is not intended for painting.
It is best to paint in dry weather; be sure to use personal protective equipment when carrying out work. To make it convenient to paint from bottom to top, it is better to use a spray gun; a spray can may not cope with this task.
The surface must be clean and dry before painting. the paint is applied alternately, in several layers. The quality of painting depends on the skills of the artist.
A well-painted surface looks no worse than a repainted one, and the cost of paint is much less. Therefore, in some cases it is more profitable to try painting the upholstery than reupholstering.
Painting the ceiling with a spray gun will allow you to achieve an impeccable result.
Iceberg Motors Estela concept car › Logbook › 22 - homemade ceiling
The need to make a car ceiling “from scratch” arises not only in such exotic cases as mine.
It happens that the standard ceiling on some rare car has become unusable, and there is simply nowhere to get a new one.
Or the ceiling may not be provided at all (on cargo-passenger buses, for example).
So, there is no ceiling, what to do?
In general, there are two types of ceilings: rigid, molded in one piece, and slatted, sewn from dermantine.
A solid ceiling can theoretically be made from fiberglass, but the labor costs will be enormous and I, for example, don’t know whether such components are intended for installation in the cabin, i.e. Will such a ceiling then release any toxic substances?
The slatted ceiling definitely won’t highlight anything, but it’s not realistic to do it yourself. It has a very complex design, such ceilings, even those made at the factory, always mess with people’s minds: sometimes they sag, sometimes they don’t fit, etc.
So I decided to do it my way. I have no pininfarina here, it was decided to take the simplest route.
Even at the welding stage, I welded brackets to the roof. It was possible not to cook them, but simply glue them on the finished ceiling, but it was easier for me.
Next, we cut a piece of hardboard to the size of the flat part of the ceiling, punch holes in it that correspond to the holes in the brackets on the ceiling and glue dermantine to it.
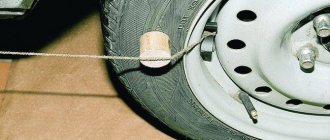
Then we put our ceiling in place, fixing it with ordinary foreign-made pistons.
Further installation of the ceiling is similar to any slatted ceiling: cut off the excess, glue the edges.
By the way, on the Volga the ceiling fabric is tucked under the windshield and rear window seals. That is, to remove the ceiling you need to remove the glass. This is genius.
I did not repeat this nonsense. I decided to make small strips that would press the edge of the fabric to the body along the glass (In a good way, this is exactly how the rack ceiling should be attached from the factory on all cars).
For now I just glued it with glue, having previously drilled holes for the pistons for the strip.
Source
Approximate prices depending on the material used
Upholstering the ceiling of an average sedan with standard foam-based material will cost the car owner 15,000 rubles , if there is a sunroof - from 20,000 . This amount includes reupholstery of the visors and pillars. If it is necessary to replace the fabric only on the visors, then the owner of the car will have to pay 2,000–2,500 rubles for each element.
When using Alcantara, the price tag will increase by one hundred percent. For a flat ceiling without a hatch - 30,000 , with a hatch - from 40,000 rubles . Other materials for upholstery are used less frequently.
Additionally, painting of ceiling plastic may be required: handles, lampshades, plugs. To tune some cars, combinations of different materials and exclusive designs are used, which requires significant additional costs.
Ceiling re-upholstery technology
The process of re-upholstering the ceiling comes down to gluing the material onto a matrix. This work can be compared to wallpapering - here it is also important to secure the fabric, making sure that there are no folds. For this reason, it is also important to work with an assistant here. The sheathing is glued from the center, moving towards the edges.
Re-upholstery process
The work algorithm looks like this:
- A thin strip of glue is applied to the center of the matrix with a length of no more than 100 mm.
- The central part of the selected ceiling fabric is placed in place with glue and smoothed well with a roller.
- The same strips should be applied every 100-150 mm.
- The material itself must be carefully stretched and smoothed each time (but not overly zealous). This is where you need an assistant, with whom the work will go faster and better.
- After gluing all the fabric, you should go over it with a roller again. Then you can dry it with a hairdryer at a not very high temperature.
- Now you should tuck the edges and glue them on the inside. All excess material is then trimmed off.
If the work is done correctly, the result will be no worse than factory quality. Some types of fabrics are sold with a self-adhesive backing, so there is no need for glue.
Preparing the ceiling trim for material replacement
- For repairs, the trim can be placed face up on a table or on studs.
- The next step is to remove the material from the casing. This can be done quite easily using your hands. Separate the material from the edge of the reverse side and gently pull, tearing off the entire area.
Remains of glue or foam rubber can be removed with a stiff brush.
- Next, you need to clean off any remaining glue or foam rubber from the hard substrate. If there is old foam left, you can use a wire or hard plastic brush to remove it. Here you need to be careful not to scrub too deep with the brush. This is a fairly lengthy process and can take 30 minutes or more. The reliability of gluing the material will depend on the preparation of the surface.
- After removing the remaining old glue and foam rubber, vacuum the headliner backing and degrease it.
- If the substrate has cracks, breaks or other damage, it can be repaired by gluing additional material. Depending on the substrate material, thick fabric or fiberglass can be used for this. Wrinkles on the substrate can be filled with putty. Remember that if thin material without a soft base is used for replacement, then every unevenness of the substrate will be visible after gluing the material.
Useful tips
When carrying out the ceiling covering procedure, follow some rules. First of all, we advise you to take care of a sufficient amount of fabric in advance. Also prepare auxiliary tools. The beauty of a material such as automotive velor is that it does not require the use of any special devices. All you need to do is prepare the fabric itself, good glue, a leather roller and a hair dryer.
Which glue to choose
Some drivers don’t bother too much about glue and fix the material using “Moment”. However, this should not be done, since such a product emits toxic fumes when exposed to sunlight. Therefore, the best option would be “88” glue. You can also buy spray adhesive. Its advantages are good surface distribution and quick drying. However, in order to use this tool correctly, you must carefully study the instructions.
Video about reupholstering a car ceiling:
Start small
If you have not previously reupholstered the interior or dealt with car velor, we recommend that you practice in advance. Try covering some small element with fabric first. For example, drag handles, door sill parts or inserts on car doors. Once you are sure that everything is working out well for you, proceed to reupholstering more complex interior elements.
What upholstery material to choose
Some drivers cover the ceilings with leather or leatherette, auto vinyl, or carpet. But we recommend that you use auto velor. This material looks very beautiful and is pleasant to the touch. The modern market offers us a wide variety of automotive velor. Choose stretch velor with a large cell structure. It looks like 3D carbon film and is very practical to use. Such car velor practically does not get dirty, and minor dirt can be easily removed.
As for the color of the future ceiling, we recommend choosing calm pastel shades. You should not give preference to bright white color - it is too easily soiled and will very soon turn into a dirty gray rag. It will be easier for you to work with materials in discreet tones, since flaws are not visible on them. In addition, bright colors distract the driver from the road, irritate and tire the eyesight. When choosing a shade of material for the ceiling, remember - it must be combined with the colors of other interior elements.