It is important for any car enthusiast that his vehicle has good and high-quality lighting. It is impossible to do without it in the dark or in conditions. But sometimes the light from the headlights turns out to be uneven or dim. Then the problem arises of how to improve the headlights.
The quality of lighting is influenced by a number of factors that will be discussed in this article. Many drivers, even with minimal experience, can solve most of these problems on their own. Let's list common cases and try to understand what could be the matter.
You can't drive a car without headlights
Any vehicle cannot completely do without lighting sources. In addition, according to traffic rules, the low beam must always be on, regardless of the time of day, which should have a better impact on the safety of all road users.
It is the headlights that provide drivers with the necessary visibility in front of the car while driving at night or in the late evenings. At the same time, it is important that both low and high beams work well, and each has its own task.
The role of low-beam headlights is to illuminate the space in front of the car, usually at a distance of 46-65 m. They are relevant when cars move on narrow roads and do not blind oncoming drivers. Without knowing this, it is impossible to understand how to improve the headlights on a VAZ or any other car.
The high beam headlights should already be clear. Their purpose is broader - to provide a wide and distant view of all objects on the road. The distance here is already much more than 230-250 m, with 15-20 m of roadside coverage.
Existing types of headlights for cars
The headlights available on the market for the VAZ 2115 are mainly a monoblock consisting of a plastic housing, a high and low beam source, reflectors and direction indicators, protected by a glass element. It also includes a device that allows you to adjust the focal length of the optical system, its tilt angle and other parameters. All models, regardless of manufacturer, have markings; deciphering them is very important for replacing the unit in case of damage. Basic designations:
- The letter “E” in a circle with a digital index at the bottom means “European standard”, and the index corresponds to the country of the headlight manufacturer. For example, E1 - Germany, E2 - France, E22 - Russia, etc.
- DCR - two modes, high and low beam devices with gas-discharge lamps.
- HCR - two modes, high and low beam with halogen lamps.
- PL - plastic diffuser.
- Numbers to the left or right of the letter E in a circle, such as 7.5; 10; 12.5; 17.5 (up to 50), show illumination in lumens.
- A horizontal arrow (if present) pointing to the right or left indicates whether the headlight is designed for right-hand or left-hand traffic.
Standard optics for the VAZ 2115 are supplied by several manufacturers, including Avtosvet, OSVAR, Bosch and Hella.
Factors affecting lighting
When a car is new, it pleases its owner, who is literally in it. But two or three years pass, and the light from the headlights begins to dim, which negatively affects driving safety. What can cause poor lighting quality? There are quite a few factors, and among them the following can be distinguished:
- presence of defects in the headlight design;
- quality or material of reflectors;
- harmful effects of the environment (dust, moisture, solar radiation);
- unsatisfactory quality of the lamps themselves;
- cloudy glass;
- clogged headlights;
- presence of condensation.
In addition, such a need as to improve the headlights on a Daewoo may be caused by their incorrect adjustment. There is also a purely electrical reason, which is expressed in low battery voltage and poor contact.
Right choice
You need to think about high-quality headlight lighting at the stage of purchasing them. There is no need to skimp here, since we all know how it turns out in the end according to one good old proverb. Therefore, it is necessary to choose only high-quality products made by manufacturers with a good reputation.
You can get advice from a specialist or manager of a specialized store. But first you should understand your personal needs:
- How much money is available to purchase car optics?
- How often do you have to drive?
Most professional and experienced drivers prefer halogen lamps. The tungsten coil in them evaporates in very small quantities, which increases operating efficiency. Typically the power ranges from 55 to 130 watts and the operating time is 400-1000 hours depending on the brand and model.
In solving the problem of how to improve the light of Volkswagen headlights, installation of xenon analogues helps, which will reduce the vehicle’s energy consumption (by about 3 times). They do not have a spiral like halogen light sources and are therefore considered more durable. With significant savings, the lamps produce more power (2 times), and the service life can be 2800-4000 hours. They just cost more, accordingly.
Fog lights on a VAZ car
Another common method of changing the exterior of a car and increasing the level of road illumination is installing fog lights.
The work is quite complex to perform and involves:
- Creating a special hole in the bumper.
- Selecting and purchasing the fog lights themselves and the mounting sockets for them.
- Laying and connecting wiring.
- Removing the switch to the dashboard.
Such modifications are carried out quite often, as it allows one to obtain a very attractive result.
Ways to solve the problem
Most road accidents are caused by the lack of vehicle lighting. In addition, not only the health of other road users depends on this. Therefore, it is extremely important to solve the problem of poor headlights in a timely manner before it is too late.
As for the ways to solve this problem, there are not many of them, but there are also a considerable number. Moreover, they may suit some, while others may refuse them for various reasons.
There are options for how to improve the headlights on a VAZ-2110 (and not only this make and model), which are not difficult, and any driver can handle the job, even without much experience. But before using other solutions, it is better to consult with a specialist who will tell you how best to do it.
Voltage problem
Also, the light may become dim due to any voltage problems. Due to voltage, problems with headlights may occur. The cause of the malfunction lies in the generator.
Advice. Any alternator replacement work should be carried out with extreme caution, so it would be best to consult a professional electrician.
Another cause of malfunction is incorrectly adjusted headlight position.
Comparison of luminous flux of different light bulbs
It also happens that a person initially adjusted the headlights properly, but due to some small push the adjustment was disrupted. This situation most often occurs due to a push. How to improve the headlights on a VAZ 2114 in such a case? This does not require any specialized optical devices, but you will have to spend quite a lot of time so that the direction of the light flux again becomes the same as before.
Adjusting the headlights
- The first stage is to place the car at a distance of 5 meters from a flat wall. Then you need to put a person in the driver's seat, and then fill the fuel tank. This is necessary in order to adjust the headlights as accurately as possible.
- Now you need to make special markings on the wall. It is necessary to ensure that the vertical center line completely coincides with the central part of the car, and the side markings coincide with the center of the headlights.
- Horizontal markings must be made at the level of the lamps.
- Now you need to remove the glass from the headlight. This is necessary to provide access to the screw that is intended for adjustment. The second headlight must be covered with some cardboard. The direction of the light must be “adjusted” until it hits the point where straight lines intersect as accurately as possible. It should be remembered that adjustment can only be made with the low beam headlights on. In this case, you can adjust both the low beam and high beam.
Didn't find the information you are looking for? on our forum.
Elementary procedure
An elementary solution would be to wash car headlights. It is unlikely that anyone will want to completely disassemble them, however, the module will still have to be removed. In this case, depending on the make of the car, it is necessary to simultaneously remove the radiator grille or even the bumper.
Most car enthusiasts know perfectly well how to do this on their vehicle; in extreme cases, there is an instruction manual. The whole procedure can be represented as follows:
- After removing the headlight, you must remove all the lamps that are in the module (direction indicators, low and high beams, dimensions). If installed, do not touch the glass bulb under any circumstances! Often, many owners of VAZ cars, deciding to improve the headlights (2114, for example), ignore this warning. As a result, grease stains from the fingers remain, which leads to premature failure of the lamps. If it is impossible to hold onto the plinth, it is better to wear medical gloves.
- Pour a small amount of cleaning agent through the holes in the optics.
- Cover the holes with tape or tape and shake the module well.
- Open the holes and drain the liquid.
- Repeat steps 2 and 3 several times until the water becomes clear.
- Using a household hair dryer, dry the interior of the headlight. Just do not select too high a temperature, otherwise you may damage the module. The goal is to get rid of small drops of moisture.
- Before you put the lamps back in place, you need to make sure that the inside is completely dry. You may need to give the optics a day to dry.
- If everything is in order, install the lamps and module in their places.
When using a soap solution, at the end of the cleaning phase, rinse the module several times with distilled water. You can also wipe the outer surface of the glass. Usually this procedure gives a positive result.
The problem with lighting affects not only domestic vehicles, but also foreign models, for example, the Nexia car. How to improve the headlights on it? Try the methods described, since most headlights have a common design.
Both headlights shine differently
Sometimes it happens that one of the headlights shines brighter than the other. This may be due to a number of reasons:
- Poor contact. Here you will have to disassemble the headlight in order to thoroughly check all connections, which will eliminate the malfunction.
- Mechanical damage. Everything is simple here, and there is only one solution - replace the optics.
- Dirty surface. The most common case, which can be solved simply by wiping with a wet cloth or adding some non-aggressive cleaning agent.
- Lamp failure. Here, too, only a replacement is needed.
Moreover, if halogen or xenon lamps are used, it is recommended to replace not one, but two lamps at once.
How to identify problems with optics
The need to adjust the light will be required in the following cases:
- the lamps shine strongly up or down,
- the beam is shifted to one side,
- uneven brightness of headlights when inspecting a car,
- insufficient light intensity, a clear daw is not visible,
- One of the headlights does not work.
The tuned optics of the VAZ 2114 or model 2115 cope perfectly with any weather conditions. To identify deficiencies, a visual inspection of the performance of the lamps should be carried out once a week, and adjustments should be made at least once a season.
Source
The headlights are sweating
A car can be compared to a person who is covered in beads of sweat in extreme heat. And this phenomenon is often noticed by many drivers, and it also negatively affects the quality of lighting.
How to improve the headlights of a VAZ if there are signs of condensation? Here, the first thing you need to do is check the tightness of all module connections. It is necessary to evaluate the condition of the seals, as well as how tightly the lids close. If the cause cannot be determined on your own, it is worth visiting a service station, where a technician will certainly do his job.
Polishing
During the operation of the car, the headlight glasses inevitably begin to dim, which is not entirely good. Then you can correct the situation by polishing the glass surface. In this case, it is not necessary to remove the headlight, although if the driver wants, the module can be removed.
Typically, the surface of all headlights is coated with a special varnish, which protects the optics from the effects of many external factors. At the same time, it improves transparency and adds shine. And problems arise precisely with the protective coating.
The polishing procedure, which will improve the headlights on 2110 and other cars, looks like this:
- The first step is to purchase a special product for this. Saving on this is highly not recommended, since a cheap polish will not remove small cracks and other defects.
- The garage (or any other suitable room) should be dry, and the headlight should be prepared: rinse well and dry.
- The required amount of paste is applied to the glass surface, and then rubbed with a rag over the entire area. To begin with, you can treat a small area.
- Now you need to rub the paste into the surface of the optics, and act quickly and in a circular motion, while simultaneously monitoring the change in the appearance of the headlight. The procedure is quite long.
Many people advise using expensive toothpaste for this. In reality, it does not always help, so it is better to use tools specially designed for this.
What do the experts say?
Egor. I decided to change the exterior of my VAZ and started with optics. I considered various options, but simple modifications, for example, painting the protective glass, in my opinion, practically do not change the car. I decided to install new optics, which are sold for my car. The tuning took about an hour, the investment was around 10,000, I couldn’t be happier with the result. The new optics not only changed the exterior, but also increased the illumination of the road surface - it became much more convenient to drive in fog, snow or just at night.
Maksim. I decided to make “angel eyes”. They look good, at first glance the work seemed quite simple. However, there were many difficulties. The process of creating a form for placing a strip with diodes and connecting it to the current required a lot of free time. However, not everything worked out as it should right away. Therefore, for those who do not have experience in performing such work, we recommend that you be patient.
Polycarbonate or glass
The question of how to improve headlights worries many drivers of older cars. After all, over time, dust, sand, and dirt accumulate on their surface, which ultimately leads to scratches. Because of this, the light is scattered, which reduces the quality of lighting. To improve visibility, you need to know what the surface of the optics is made of. If it is glass, then you can try polishing, but it is advisable to replace the entire module, preferably on both sides at once.
Many modern cars are equipped with polycarbonate headlights due to the following advantages:
- Safety. In the event of an accident, glass shards pose a greater danger than polycarbonate.
- Less weight.
- Easy production.
At the same time, polycarbonate is not without its drawbacks. It is easy to damage and scratch, which leads to rapid clouding of the surface. To avoid this, experts recommend using only special products.
As a good preventive measure for solving the problem of how to improve the headlights, purchase a protective film of medium thickness and stick it to the headlights. This will increase their service life.
Restoring reflectors
A decrease in lighting quality may be caused by a deterioration in the reflective properties of the reflector. New cars, of course, do not suffer from this, which cannot be said with certainty about vehicles that have traveled hundreds of kilometers. Here it is necessary to either replace the reflector or restore it. And since the cost of such work will be at least 1000 rubles, some car enthusiasts will prefer to do it themselves.
To repair the reflector, you need to remove the headlight module and completely disassemble it. And there are two options:
- Walk several times with a hot stream of air from a hair dryer.
- Place the headlight in an oven preheated to 100 °C for 20 minutes.
After disassembly, all parts must be cleaned of residual adhesive and sealant, rinsed well (liquids containing alcohol are not suitable) and dried. As for recovery, there are also several options:
- Metallized tape. It is inexpensive, around 30 rubles. The adhesive base can withstand both low and high temperatures, and the aluminum film has high wear-resistant properties. It is worth preparing several pieces of a suitable size, after which you can move on to the sticker. This will result in a smoother surface with minimal seams.
- Metal foil. This is also an effective technique for improving low beam headlights. To maintain the smoothness of the surface, you need to make a pattern from paper, and then cut out the parts from foil. It is better to glue the material onto epoxy resin, removing its excess during operation.
- Mirror film. We are talking about a film from Oracal, which can withstand a wide temperature range from -40 to +120 °C, while maintaining its performance properties for 2 years outdoors. Since the car headlight has a good seal, the service life will be longer. Glue in the same way as above. The film must be smoothed well to prevent air from entering. The joints and edges can be painted over with chrome paint.
- Chrome paint. The method is very popular, since there is no need to glue or cut anything, just spray the paint in an even layer. After treatment, the paint needs to dry for a certain time (indicated in the instructions for the can). In order for the coating to withstand high temperatures, you need to try to find a heat-resistant option, which is not easy.
Immediately before gluing the films, the entire surface must be degreased. All the work can be easily done in your garage. In addition, the family budget can be saved.
Bottom line
Many of the listed ways to improve headlights can be implemented independently. However, if in doubt, it is better to visit a specialist who will tell you what can be done. Or simply replace the module, although this will slightly cut the family budget.
Therefore, each car enthusiast decides for himself what to do. Just remember that incorrect lighting leads to various consequences, sometimes even tragic. Your life and the safety of others is priceless.
The direction of the light beams of the headlights should be such that the road in front of the car is well illuminated, and oncoming drivers are not blinded when the low beam is turned on.
How to improve
Polishing headlight glass
An expert on Lada cars with many years of experience. I own a Lada Granta car, I collect cramps based on the Priora. Sometimes I stay overnight in the garage. My wife is more jealous of cars than of women.
Also, budget-friendly ways to improve the glow of headlights include cleaning and polishing the glass. You can do this either on your own using special kits, or contact a specialized workshop. Inspect the reflector for integrity, because after five years of using the car, it could become rusty.
Due to such deposits, not a single headlight will shine normally.
Installation of tuned headlights
For cars of the Samara and Samara-2 family, similar sports headlights are provided, in which the low and high beam are separated from each other, and an additional lens is mounted, which will provide a much clearer and more even light output. A budget option for such a headlight, making and modifying it yourself.
How to adjust
1) Before you start making adjustments, think about how you will do it (Correctly or by eye), if by eye you don’t need to draw any diagram, just twist the screws and that’s it (More on these screws a little later), if you want the beam correctly direct the headlights, then in this case, first find a flat surface on which you can place the car (Asphalt is best) and opposite this surface there should be a strictly vertical wall, as you see in the photo below, you will need to park the car from this wall at a distance of 5 meters (In addition to the wall, you can use sheets of plywood or anything else that comes to your mind), then with chalk, draw three vertical lines on the plywood or on the wall, one of these lines is as you can see from the photo should be in the very center (In the central part of the front of the car) and go all the way to the bottom (Line “O” is this), the second lines are the side ones (They should be drawn strictly from the center of the headlights) in the photo they also have the letters “A” " and "B" are indicated, the same thing is indicated by the horizontal line 1, which should also be drawn starting from the center of the headlights, and the last line is the horizontal number 2, which is indicated, it should be drawn just below the first line (at 650 mm).
Note!
But there is one But! Before you start all this adjustment, so that it is more accurate, first check how much your tires are inflated, if necessary, inflate them to the desired level, in addition, wipe off all the dirt from the headlights so that they shine well, and also refuel the car (If not opportunity to completely fill it up, then at least fill half the tank) and put your friend or someone weighing approximately 75 kilograms behind the wheel, and finally, rock the car from the side so that the suspension springs are installed!
Oh yes, what else needs to be done, set the headlight hydro-corrector knob to the one-driver position (This is the number 0), below we have attached a photo in which the hydro-corrector knob is indicated by a red arrow (This was done for those who do not know what it is headlight range control), you will need to turn this knob to position 0, unfortunately it is not visible in the photo, because this number is on top and the upper part of the panel is covered, besides, in the photo everything is shown using the example of a VAZ 2110 car and not a VAZ 2114 , so this corrector knob you have is slightly different, but we will explain to you in a nutshell where it is located, namely, it is located on a car with a VAZ 2114 torpedo near the deflector on the left side (If you sit in the driver’s seat), there is another one near this corrector there is a handle, you will immediately find it after you sit in the driver’s seat of your car!
2) Now let’s move on to the adjustment itself, first close one headlight of your car (using a black rag, you can) and then proceed to adjusting the headlight that is not covered with a rag; to adjust it, open the hood of the car and on the back side of the block - headlights, find two manual screws, one of which is needed to adjust the light beam along the vertical plane (This is screw 1), and the other along the horizontal plane (This is screw 2), do not touch everything that is indicated by numbers 3, 4, 5 in the photo, so using these screws, adjust the headlights in the way shown in the photograph (meaning in the diagram) just above, namely, pay your attention especially to the points “E” that appeared by passing lines (“A”, “B”) and line "2"
According to traffic rules, a car driving on a highway must have low-beam headlights on. This, of course, shortens the life of the lamps, which causes their frequent failure. On the VAZ 2114 or VAZ 2115 models, lighting is used both during the day and at night, which requires vigilance and control over the integrity and quality of the lighting system.
In order to diagnose breakdowns of lighting fixtures in a timely manner, you need to regularly inspect your car.
We inspect the car.
Once you have discovered a breakdown of the high or low beam products, proceed to fix the problem - replacing the element. Contact specialists at a service station or replace it yourself, which will save your money.
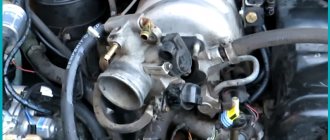
The headlight unit on the VAZ 2114 consists of the following components:
- housing (plastic);
- diffuser;
- reflector.
Model 2114 can be equipped with movable and fixed lighting systems with single or double filament bulbs.
Headlight block for VAZ 2114
How to adjust headlights on a VAZ 2113-VAZ 2115?
Note!
In fact, the headlights are not at all difficult to adjust on these cars, but if you take the classics, then in order to adjust the headlights there, you will need to take a screwdriver and turn the adjusting screws with it, but on cars of the Samara 2 family everything is simple, you just need gloves on your hands put on clothes so as not to get dirty and also stock up on chalk, it is necessary to draw a diagram on the wall on which you will adjust the headlights, if you don’t understand something, if you have a question: “What kind of wall is needed and why draw a diagram on it? » then in this case, just read the annotation further and you will understand everything!
1) Before you start making adjustments, think about how you will do it (True or by eye), if by eye you don’t need to draw any diagram, just turn the screws and that’s it (More on these screws a little later), but if you want correctly point the beam of headlights, then in this case, first find a flat surface on which you can place the car (Asphalt is ideal) and opposite this surface there should be a strictly vertical wall, as you see in the photo below
, you will need to place the car from this wall at a distance of 5 meters (Not counting the wall, you can use sheets of plywood or anything else that comes to mind), then draw three vertical lines with chalk on the plywood or on the wall stripes, one of these lines, as you can already see from the photo, should be in the very center (In the central part of the front of the car) and go all the way to the bottom (Line “O” is), the 2nd stripes are side stripes (They should be drawn, strictly from the center of the headlights) in the photo they are also indicated by the signs “A” and “B”, the same with the horizontal line 1, which should also be drawn starting from the center of the headlights, and the last line is the horizontal number 2, which is indicated, it is
slightly lower than
the first stripes (650 mm) must be drawn.
Read
Types of lighting fixtures
There are several types of light sources for the VAZ 2114:
- xenon
Available in models with a glass bulb containing gas (xenon). They provide higher brightness compared to incandescent light bulbs, which are currently losing popularity. In the absence of lenses to adjust the flow of light, oncoming drivers may be dazzled;
Xenon bulb
- incandescent lamps
. They are relatively dull, wear out quickly, but are inexpensive;
Incandescent lamps for auto optics
- halogen
_ They are presented in a wide range - from very bright models to universal (all-weather). The latter have a coating on the inner wall of the bulb that provides a yellowish tint to the light stream for better visibility during bad weather conditions (fog, snowfall). For example, a conventional lighting system will reflect falling raindrops, which will blind the driver. And light of a yellowish tint is characterized by less reflectivity, and therefore does not irritate the driver’s eyes while driving in a VAZ. Also, all-weather models will allow the VAZ 2114 to be more visible on the road surface during bad weather, which will reduce the risk of an accident.
Halogen bulb for cars
There are 2 most popular manufacturers of all-weather halogen lighting systems:
- Kirzhach
. The domestic manufacturer produces long and narrow models without a top wall and with a partition inside; - Bosch.
It has a wide reflector with walls on all sides.
So that motorists can easily choose which high beam bulb to install in their VAZ, experts in the field of automotive lighting, guided by the results of numerous tests, have compiled a list of some of the most popular models of the type
H4. They are suitable for use with the low beam or high beam system on the 2114.
The list includes the following brands:
- IPF (Superbeam model);
IPF Superbeam bulb
- Narva (Azzurro model);
Bulb Narva H4 Azzurro Rally Contrast+
- General Electric (AllDay model). The quality of the product justifies its high cost, according to auto tests;
General Electric AllDay Light Bulb
- Philips (Weather Vision model). It is the brightest model that can be installed in a low or high beam system.
Philips Weather Vision bulbs
Sources of light
It is important to know which light sources are used in the vehicle's optical system. Basic indicators such as luminous intensity, illumination and brightness depend on their type. They are divided into four groups:
- incandescent lamps;
- halogen;
- gas discharge;
- LED
Incandescent bulbs in the main high and low beam headlights are still found in older model cars. Their only advantage is their low price.
Halogen lamps are the most common; about 60% of the optical systems of modern cars are equipped with them. Its illumination is 2 times greater and is about 1600 lumens with the same power as an incandescent lamp (50 watts), and its service life reaches 1000 hours. Disadvantages include high temperature, sensitivity to power surges and the need for special measures during maintenance - the device cannot be touched with bare hands.
Product change process
Anyone can replace a failed component of the low or high beam system. You will need the following tools:
- awl (thin screwdriver);
- magnet equipped with a long handle (optional).
First of all, to replace you will need to remove the negative cable from the battery. If you do not do this, you may receive an electric shock.
After this, follow the instructions:
- Open the hood with the car's ignition off. Find the headlight units on both sides of the car.
- Unscrew the protective box of the light source on the headlamp from both sides. After removing the box cover, you will see under it a block with three contacts that are responsible for powering the lighting system, as well as a spring-type holder.
- Disconnect the block, and then, using a squeezing movement of the product fasteners, release the lighting element. You can remove it from the standard mounting location.
To replace and replace with another bright light product, follow the instructions in reverse order.
Why are the headlights on the VAZ 2110 and 2114 bad? Correct and improve
To understand and find out the reasons why the light
on VAZ 2110 and 2114 it does not shine well, you need it as quickly as possible. Light on the road. the key to your well-being after sunset, and especially in winter, when it gets dark early (and dawn late). If the overall theme and unfavorable conditions are added in the form of rain or snow, then the lack of lighting becomes quite literally dangerous.
Coming almost to touch, you risk starting with the integrity of your iron horse: an undetected hole can cause serious damage to the working hole and even provide a drift that is fraught with injuries not only to your car, but also to the attack/passage,
Why are there lights on VAZ 2110 and 2114
, To find the reasons necessary to be completely sure that it is this factor that prevents proper functioning. Simply replacing lamps with more powerful ones does not always solve the problem and may be a waste of money.
Installing new optics on a car
You can significantly change your vehicle by using ready-made optics kits. On sale you can find quite a few offers for replacing standard headlights with modernized ones that simply fit the car perfectly.
The features of this tuning method include the following points:
- The cost of modification will be quite high.
- You can carry out the work of replacing optics yourself.
- The changes will be significant. With the help of new optics, the car changes almost beyond recognition.
- The choice is quite large, which allows you to significantly change the appearance of the car.
- Many car owners change the exterior using a similar method.
Insert: Important: This tuning method is used not only to change the exterior of the vehicle, but also to improve the degree of illumination of the roadway, and to better identify oneself on the road.
We improve the headlights on a VAZ-2114 with our own hands
In order to actually improve the glow of the headlights, you can try installing new lamps from PHILIPS or OSRAM manufacturers. Some lamp models have the highest degree of luminescence, which will allow the road to be illuminated most clearly.
Thanks to this visualization, you can clearly see how the above-mentioned headlights shine.
Polishing headlight glass
The following two tabs change content below.
An expert on Lada cars with many years of experience. I own a Lada Granta car, I collect cramps based on the Priora. Sometimes I stay overnight in the garage. My wife is more jealous of cars than of women.
Also, budget-friendly ways to improve the glow of headlights include cleaning and polishing the glass. You can do this either on your own using special kits, or contact a specialized workshop. Inspect the reflector for integrity, because after five years of using the car, it could become rusty.
Due to such deposits, not a single headlight will shine normally.
Installation of tuned headlights
For cars of the Samara and Samara-2 family, similar sports headlights are provided, in which the low and high beam are separated from each other, and an additional lens is mounted, which will provide a much clearer and more even light output. A budget option for such a headlight, making and modifying it yourself.
Such a headlight not only shines well, but also looks better.
Benefits of headlight tuning
Tuning can also help in winter. It’s no secret that on the first models, both 2114 and 2115, the mirrors often freeze in winter. And the owners go to any lengths to get rid of this. But there is a simpler solution - installing heated mirrors on the car. Moreover, they help not only in winter, but also in summer, when mirrors can fog up or during rain. You can purchase new mirrors, or you can, if desired, install heating in old standard mirrors.
The following can be said about tuning VAZ 2114 and 2115 headlights. Tuning can be ordered from specialized companies, where everything will be done in the best possible way. But as professionals say, the full effect of tuning your car can be obtained only in one case - if it’s all done with your own hands.