Where is the fuel pump relay located on Gazelle 405
During operation of the submersible gas pump on the Gazelle, the following electronic relays, main relay, fuel pump relay, power control unit and fuses protect this electronic circuit. In addition, if the car is equipped with an anti-theft system, then another relay will be added to the circuit, which will cut off the supply to the fuel pump terminals.
And these Gazelle petrol cars still run on petrol and have an electronic circuit for the gas pump and an additional relay will be installed to turn off the gas pump when the engine switches to gas.
Therefore, the search for defects associated with a non-working gas pump on a Gazelle should begin with checking the integrity of the fuses. It is also necessary to check the condition of the contacts for oxidation. Next, we check the operation of all the relays used on this unit in the electronic circuit to supply voltage to the fuel pump terminals. If this doesn't help, you need to check the wiring harness and connectors from the electrical control unit to the main relay and the fuel pump relay.
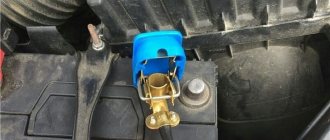
Another common condition for fuel pump failure is the oxidation or burnout of the negative terminal located on the fuel pump inside the tank. There is a white block, but don't confuse it with the gas tank side. Typically, this malfunction initially manifests itself as the gas pump repeatedly turning on and off. If this problem occurs, you must periodically clean these pins by removing the module by other means, and reconnect them permanently, bypassing the terminal.
Sometimes the driver is often unable to find the faults associated with the malfunction when the submersible fuel pump is running on the gazelle, and a competent auto electrician is required to solve this problem.
Share this article with your friends:
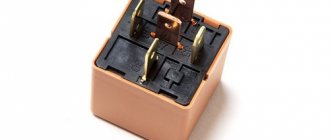
The fuel pump start relay is located in the relay block located in the right rear of the engine compartment. It is used to control the operation of the electronic fuel pump. For example, the relay breaks the pump power circuit if the engine stops when the ignition is turned on.
To start the fuel pump with the engine stopped, you need to remove the relay and close contacts 30 and 87 to a connector with a small wire 1.5 mm in diameter. On 520i / 525i / 524td models the fuel pump relay is brown, on 530i / 535i models it is orange.
Caution: The battery must be charged when testing the relay to activate the fuel pump.
READ How to Adjust the Carburetor on a Gazelle
Check fuse No. 23.
Connect a voltmeter to pins 30 () and 85 (-) on the relay connector. The voltage should be around 12 V.
If not to that extent. connect a voltmeter to terminal 30 and ground. If the voltage here is around 12V, check for the presence of the brown-green wire according to the wiring diagram. If it is not damaged, check the reddish wire and replace if necessary.
Turn on the ignition. Connect a voltmeter to terminal 86 () and ground. The reading should be approximately 12 V. Otherwise, check that the circuit is not an electrical wire and replace it if necessary.
Check the output signal of the engine speed/angle sensor (to do this, contact a service station).
Cover terminals 30 and 87 using short jumpers. If the pump starts, replace the relay. Otherwise, check for the green or purple wire if necessary.
If the wire is OK, replace the fuel pump.
Content
405 GAZelle Electric articulated motor
Zavolsky Motor Plant (ZMZ). one of the first Russian automobile engine manufacturers to begin producing engines with an injection system. One such high quality engine today is called the ZMZ 405, a four-cylinder engine that has been running for almost 15 years. This type of engine first appeared on the market back in 2000, installed on the GAZ-3111. The plant itself positions the engine as an engine for trucks and minibuses. It is set for them. Various vehicles in the GAZelle and Sable injector ranges have such engines.
The ZMZ 405 has proven itself to be a good, demanding engine in the past, ready for even the toughest highway testing. The 405 motor is capable of withstanding enormous loads without affecting its service life. Also, the extraordinary simplicity of the design of the device is inherent in the design of the engine. for repair and maintenance. This engine, installed on any car, can be used by anyone in a regular garage with minimal knowledge, which remains for our client according to the attached book, no questions asked. This also applies to the repair of the fuel metering software. Namely, the engine injector fuel pump is not difficult to repair without outside help.
READ Replacement of Front Silent Blocks of VAZ 2109
The GAZelle gas pump with the 405 engine, as in the main part of the injection machines, is not made without outside help, since the unit is located in the gas tank. This includes:
- Fuel pump;
- primary fuel filter;
- fuel level sensor.
This assembly saves space under the hood of the GAZelle 405 injector and increases the efficiency of each element of the block. For example, a filter cleans fuel even better because the gasoline pump is located immediately after the filter and supplies gasoline under pressure through the filter. The advantage of a fuel gauge is that the electronic wires going to the gas tank come with the wires for the pump, making it easier to connect. By the way, the fuel level indicator. it's just a float on a steel rod. A high-quality fuel pump is the key to good operation, allowing you to keep records (software) of fuel delivery to the car. GAZelle 405 Injector: Gas must be pumped out in the right volume and at the right time.
The importance of keeping the fuel pump in constant working order is that if it does not work properly, other components of the GAZelle 405 will begin to fail permanently and the injector will not work properly, otherwise it will fail completely.
Repairing a gas pump must begin with removing all additional parts, what needs to be found, what directly, in other words, to diagnose the problem. The first warning sign that the fuel pump is not working properly is that the GAZelle 405 injector moves unevenly, as if it is wobbly. If this is a special sign, you don't need to be discouraged. recovery, most likely, without the help of others. Also, if the GAZelle 405 engine was started a very long time ago and the injector usually always starts at half a turn, this is another bad sign that the fuel pump is starting to fail, although it is far from working with the failure option.
fuel pump is not working
Although, if you do not repair the fuel pump for a long time and do not focus on such a breakdown, one day the car may not start. A prerequisite for this problem is a drop in pressure in the fuel system, which makes the gas pump especially faulty.
READ Where is the VIN Code on a Mercedes W202
It is also possible to check the operation of the pressure gauge. This method is also quite accurate as long as you test the fuel pump correctly. We need a special pressure gauge to measure the pressure in the fuel line of the GAZelle 405 injector. What is left for our client to do the operations on their own is not require the help of professionals. The annotation for such a pressure gauge states that it must be connected to the injector ramp and secured so that the pressure gauge is visible from the passenger compartment. When the driver turns on the ignition, the pressure gauge should start and take the pressure reading produced by the fuel pump. The norm for pressure fluctuations in the GAZelle 405 fuel system is the injector from 300 to 380 kPa (kilogram Pascal). Then you need to drive along such a section of the road that it is engaged in at least 3rd gear, and then measure it again later. If the pressure gauge hasn't changed, you won't worry about it and will need to repair something other than the fuel pump.
In this case, the readings have undergone significant changes, after which you will need to consult a specialist in repairing the GAZelle 405 injector.
When the car starts to slow down, the fault is an electronic component. Make sure that the fuel pump is not working, it is working, of course, by organizing a test of the fuel pump relay. For this we use a regular indicator, and the test itself: when connected to the bulb and when the ignition is turned on, the light should burn very little. If the leak was found at low pressure and was found to be the culprit, then it would need to be repaired. To do this, you need to determine where the flow is, and only then, depending on the situation, choose what will help. change some gaskets, valves, diaphragms and much more. To quickly understand what is breaking and how best to fix the problem, you need to correctly understand the circuit diagram of the fuel equipment of the machine itself and what place the fuel pump occupies here.
Gas, Gazelle does not start, goes out. Important. Chewable candle
Source
The fuel pump does not turn off and overheats
Starter fuse for Lada Granta
One of the common malfunctions is that after turning the ignition key, the fuel pump does not turn off, that is, it hums constantly. In the list of the main reasons, auto electricians highlight:
- burning (sticking) of the contacts of the controlled circuit of the fuel pump relay;
- short circuit in the electrical wiring to the pump;
Less commonly, a malfunction of the ECU or the pressure sensor on the pump occurs (which depends on the fuel pressure device of a particular vehicle), which also forces the fuel pump to work constantly. Another reason could be injectors that are “pouring”, which does not allow the pump to create pressure in the rail and start the engine. You can check the condition of the spark plugs. If the spark plugs are flooded, then you should check the injector chain for a break.
The fuel pump relay is quite easy to check. A working element in a working system clicks after 3-5 seconds. after turning on the ignition, after which the pump turns off. If the relay does not make a click or there is a click but the pump does not turn off, then you need to remove the relay. Stopping the pump will indicate that the specified relay has failed. You can also take out the relay and lightly tap it, while simultaneously removing the terminal from the battery. This method often solves the problem of a stuck fuel pump relay.
Now a few words about pump overheating. If the fuel pump on the injector overheats, this manifests itself in a decrease in its performance and unstable engine operation. The electric fuel pump itself is submersible, that is, it is located in the fuel tank directly in the gasoline. This arrangement allows the device to effectively cool itself in the fuel. A low fuel level below 1/4 tank during active vehicle operation in high outside temperatures can cause such overheating.
Circuits of cars manufactured before 2003, protected by fuses
| Electrical circuits protected by fuses | |
| Upper fuse box | |
| Fuse no. (rated current) | |
| Heater motor, heater pump* | |
| Additional heater motor* | |
| Direction indicators | |
| Instrument cluster, parking brake warning relay, EPH system, heater control timer**, windshield wiper relay, reverse light, microprocessor ignition system fault indicator (ZMZ -4061, - 4063) | |
| Hazard warning lights | |
| Brake warning light, lighting fixtures for the right row of seats in the passenger compartment, * buzzer and platform lamp** | |
| Remote battery switch, radio equipment | |
| Horn, cigarette lighter, portable lamp socket | |
| Spare | |
| Lower fuse block | |
| Fuse no. (rated current) | Name of equipment of protected electrical circuits |
| Spare | |
| Cabin lighting lamp(s**), cargo compartment lamp (GAZ -2705, -27057) | |
| Instrument lighting, heater - heater | |
| Rear fog light | |
| Side lights (right front, left rear lights), side light indicator, license plate lights | |
| Side lights (right front, left rear lights) | |
| Low beam (left headlight), electric headlight adjustment | |
| Low beam (right headlight), high beam indicator | |
| High beam (left headlight) | |
| High beam (right headlight) | |
* For buses and cars with two rows of seats. ** Installed on car parts.
GAZ 2705 Checking the fuel pump relay
Checking the fuel pump relay
| GENERAL INFORMATION |
| EXECUTION ORDER |
| 1. Remove the fuel pump fuse No. 28. |
| 2. Connect a diode test lamp using an auxiliary wire between ground and one of the two contacts of the fuel pump fuse. |
| 3. Remove the upper trim in the area of the driver’s feet, on the left, and refer to the subsection Removing and installing the pocket on the driver’s side. |
| 4. Turn on the starter. You should be able to hear the fuel pump relay turn on. In addition, the diode control lamp should light up. |
| 5. If the relay does not turn on, check the supply voltage and control. |
| 6. If the diode control lamp does not light up, although the relay turns on, repeat the test on another fuse contact. |
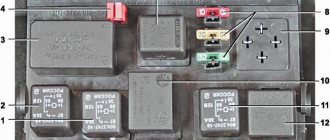
| 7. If the diode warning lamp does not light again, check the wire between pin 23 of the relay, location 4, and the fuel pump fuse. If there is a break, repair it. |
| 8. If relay power, control, and relay wires are OK, replace the fuel pump relay. |
| Power check |
| Remove the fuel pump relay from the relay board (relay location #4). |
| Turn on the ignition. |
| Connect the voltmeter in series: KIA Shuma FreeLancer Logbook Fuel pump filter – between contact 19 (plus the ignition switch) and ground; – between pin 17 (battery plus) and ground. Required value: 12 V (battery voltage). Otherwise, check the wire break according to the electrical diagram and repair it. |
| Turn off the ignition. |
CONTROL CHECK
PERFORMANCE ORDER 1. Connect a diode test lamp with an auxiliary wire between contact 16 (control ground from the engine control device) and contact 17 (plus) of the relay base.2. Turn on the starter. The LED should light up. Otherwise, find a break in the wire to the injection control device and repair it or replace the control device (service station work)
ATTENTION LED indicator lamps have a small current consumption. If the starter is not turned on, they have a faint glow and do not go out completely. 3
Insert the fuel pump fuse.4. Install the pocket in the area where the legs are located, and refer to the subsection Removing and installing the pocket on the driver's side.
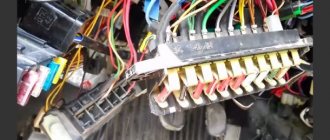
Gazelle fuse box design
The main functional purpose of the Gazelle fuse box, as in other cars, is to protect the car’s electrical appliances from short circuits or increased voltage in the on-board network. Its task is to promptly open the circuit during overloads, and thereby avoid failure of the electrical appliance it protects.
This is what a gazelle fuse box looks like
Depending on the model and year of production of the Gazelle, the protective mechanism of its electrical appliances differs from each other, since their set and functionality are also different. The type of pre-installed engine and the fuel used to operate it also affects the design of the fuse module.
However, despite all the differences, the implemented basic principles of electrical equipment protection are preserved in all modifications of the Gazelle.
Structural structure of the Gazelle fuse box
The electrical circuit protection system in Gazelle cars is implemented using a two-level model, which provides additional stability in the operation of electrical equipment and has the following features.
Fuses for Gazelle electrical equipment
- The first protective level is provided by power fuses located in a separate mounting block under the hood of the car. Their operation is designed for a significant change in current in the circuit, and their main purpose is short circuit protection. In this case, two main circuits of the electrical circuit are separated, including:
- main positive circuit, excluding lights, generator and starter;
- Interior heating.
- Turn signals and hazard warning lights.
- Glass cleaner and washer.
- Other additionally installed options.
positive generator circuit and light circuit.
In modifications equipped with an anti-lock braking system, two additional electrical fuses are installed that are directly responsible for this function.
Electrical fuses in the electrical network
This module uses fuses with a calculated operating current of 40, 60 and 90A, and depending on the Gazelle model, different circuits are protected by a fuse of their rated current. For ABS systems, as a rule, 25A fuses are used.
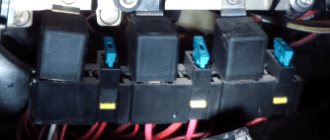
The main fuses and relays in most modifications are divided into two mounting blocks, which are located in the engine compartment. Wherein:
- the lower one provides protection for lighting devices and is equipped with electric fuses with an operating current of 8 and 16A; Electrical headlight connection system for Gazelle
the top one with the same fuses 8 and 16 is responsible for additional functions, such as: Sound signal.
Designations on the relay of the Gazelle mounting block
It should be noted that in cars manufactured after 2003, new type mounting modules are used, with a more modern fusible design, in which the fusible thread is sealed into a plastic case. At the same time, the electrical circuit diagram for the old and new-style units is different, so replacement with a modern module is possible only with additional modification.
This is what the old fuse box on a Gazelle looks like
The distribution of electrical fuses for different purposes and different tripping currents among individual modules ensures not only maximum protection of electrical equipment, but also convenient operation of the vehicle as a whole.
Engine ZMZ 406
This is the next stage in the development of engines for the Gazelle, which replaced the ZMZ 402.
Despite the slight differences in numbers between them, this motor has undergone dramatic changes compared to its predecessor.
The main differences include the following changes:
- changing the location of camshafts;
- 16 valve engine;
- hydraulic compensators are installed, which avoids the constant need for their adjustment;
- a significantly improved timing drive, the service life of which is 100,000 km, but in most cases can withstand loads twice as large. The engine camshaft is driven by gears with helical teeth. At the same time, a steel gear is mounted on the crankshaft, and a textolite gear with a cast iron hub is mounted on the distribution shaft to ensure silent operation.
Fuel pump makes a lot of noise - troubleshooting
In most cases, an increase in noise level occurs due to an increasing load on the gas pump, which becomes more difficult to pump the required amount of fuel.
Overheating or failure of the pump itself is less common. At the initial stage, it should be understood that if the gas pump makes a sound (albeit different from normal), then power is supplied to the device and the pump itself reacts to the supply of electricity. Based on this, the problem can be localized faster. Before diagnostics, it is recommended to replace the fuel filter to eliminate the possibility of a decrease in throughput in this area.
To start checking the fuel supply pump, you need to measure the fuel pressure in the fuel rail with a pressure gauge. The average pressure is considered to be 3 atmospheres. This method allows you to accurately assess the performance of the fuel pump.
There is also a simple solution that allows you to quickly check the status of your device. The method involves removing the return hose and inserting it into a separate container suitable for pouring gasoline. Next, you need to measure how much fuel is drained back into the tank. The norm for many gas pumps is a minimum value of 1.5 liters per minute or more. The disadvantage of such measurements can be considered very approximate readings, which do not allow obtaining accurate data.
If the check shows that the pump does not produce the required pressure or constantly works to maintain it, then you need to change or clean the fuel pump strainer. To do this, you will need to remove the fuel pump, which is usually located in the rear of the car under the seat.
Please note that on cars that have been in use for a long time, in parallel with replacing the mesh, it is necessary to wash the gas tank itself. The fact is that dirt and deposits will quickly damage the new filter.
After replacing or cleaning the pump filter, you should also check the pressure regulator in the fuel rail and clean the injection nozzles. In most cases, these procedures can reduce the noise level or almost completely eliminate the whistling and hum of the fuel pump. If the pump continues to make noise, then there is a high probability that the pump motor needs to be replaced.