The engine management system of a modern car includes a number of sensors that collect information about how correctly one or another of its components functions. Thanks to them, the electronic “brain” of the car has the ability to make certain adjustments to the operation of the power unit.
One such information device is an oxygen sensor (lambda probe). It is installed on all cars that meet environmental standards higher than Euro-2, including domestic cars.
In this article we will talk about the purpose, functions, design and malfunctions of the lambda probe using the Lada Kalina as an example.
The role of the lambda probe
The oxygen sensor is installed on one of the elements of the exhaust gas removal system. This is usually the manifold or downpipe. Its sensing element is placed so that it is in constant contact with the exhaust gases.
The probe's task is to determine the amount of oxygen in the exhaust. He informs the electronic engine control unit about this. The latter, in turn, based on data from the lambda probe, as well as the mass air flow sensor (MAF), adjusts the amount of fuel supplied to the intake manifold.
But car manufacturers are thus not so much concerned with ensuring that your car consumes less fuel, but rather with ensuring that it meets mandatory environmental requirements. Without this, the car simply will not come off the assembly line. The oxygen sensor is very important here, because if the engine consumes the ideal fuel mixture, the amount of harmful impurities in the exhaust gases will be reduced to a minimum.
Description and device
For the sensor to work normally, it must have a temperature of at least 300°, so after the engine starts, it is heated by the built-in thermal element. Please note that when using leaded gasoline, poisoning of the oxygen sensor may occur. This is also possible when the factory seals the engine with silicone sealants that release volatile substances.
Their presence can damage the device and negatively affect the operation of the motor itself if it enters the combustion chamber. The engine controller reacts to this by writing an error message to the ECU memory. The first oxygen sensors were heated only by exhaust gases. The name “lambda probe” is also found. On automobile forums, many pages have long been written on the topic of what a lambda probe is and what malfunctions it has.
Lambda is exactly the thing that mechanics and diagnosticians encounter most often. The easiest way to diagnose a UDC is to measure the voltage at the signal output. If it does not exceed 0.45 V, this means that the probe is working properly. A particular danger to the normal operation of the oxygen sensor is the soot deposited on it when the engine runs on an over-enriched mixture.
The sensor is located in a special hole in the exhaust manifold on a thread very close to the cylinder block. With a faulty oxygen sensor, you will not be able to legally pass a scheduled technical inspection. The car will be sent for repairs, and the ECU will put it into emergency mode, in which it will not deliver its full power potential.
The frequency of replacing a lambda probe with a new one is on average 50,000 km. That is, after the first 50,000 mileage and beyond. The number of probes on a modern car can reach 4 (on Kalina there are usually two). Based on the number of contacts available, the oxygen sensor can be:
- single-contact;
- two-pin;
- three- and four-pin.
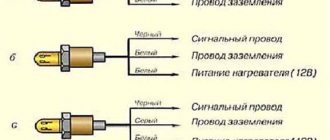
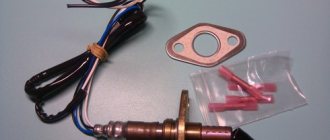
On the Lada Kalina the sensor is a three-pin system. One wire is a signal wire and goes to the engine control unit, the second to the heating element, and the third to ground. Their accuracy is much higher than that of simpler single-contact ones.
The quality of the fuel, namely the presence of organometallic additives in it, directly affects the accuracy of lambda readings. These additives are the most dangerous pollutants for the oxygen sensor when forming exhaust gases.
Where is the oxygen sensor on Kalina?
As for the location of the lambda probe, in Kalina it is installed on the exhaust manifold (pants). But there is one nuance here. If your car meets the environmental class Euro-3 and higher, i.e. belongs to the latest modifications, it has not one, but two oxygen probes installed: control and diagnostic.
The first, as mentioned, is located on the exhaust manifold. It is he who performs the above functions. Where is the other one?
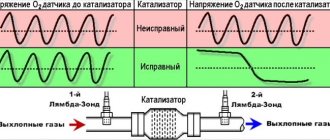
A diagnostic oxygen sensor is installed after the converter. “Kalina” uses it to control the first probe, and if it fails, the electronic unit will immediately notify the driver.
Causes of oxygen sensor failure
- Poor quality fuel. The impurities it contains clog the sensor electrodes.
- Worn oil scraper rings.
- Antifreeze or solvents get on the ceramic tip of the controller.
- If the oxygen sensor housing overheats, this may occur due to incorrect operation of the ignition system.
- Incorrect connection of this part.
- Multiple attempts to start the engine with short intervals between them. In this case, unburned fuel accumulates inside the exhaust manifold, which may result in a fire.
How does a lambda probe work?
The Kalina oxygen sensor has a simple design, which is based on two electrodes coated with zirconium dioxide. They are located in that part of the body that fits inside the exhaust system element, and are protected on top by a perforated steel screen. The contacts are connected to the sensor connector, through which it is connected to the control unit. The probe design is enclosed in a metal case with a thread and a skirt for a wrench in the lower part. Some modifications of modern sensors are additionally equipped with electric heaters. They are necessary so that the device begins to function from the first seconds of starting the engine. Without them, it starts working only after the temperature inside the collector reaches 300-4000C.
The diagnostic probe has the same design as the control oxygen concentration sensor. “Kalina” benefits in this regard due to the fact that these devices are interchangeable.
Replacing the oxygen sensor and choosing fuel
Since the lambda probe cannot be repaired, if it fails, it is simply replaced, and it costs around 1,500 rubles, which is not such a large amount. To replace, you will need a multimeter or voltmeter, an inspection hole and a special key. The replacement procedure begins with the sensor being disconnected from the on-board computer.
Next, use a voltmeter to measure the voltage level at the sensor by turning on the ignition. The normal voltage value is considered to be 0.45 V. If it is absent or differs by 0.02 in one direction or another, this may indicate a malfunction of the oxygen sensor.
Having determined that the sensor is faulty, they begin to replace it. To do this, remove the sensor wire holder from the hole in its protective screen. Next, use a 22 key to unscrew the sensor from the catalytic manifold.
Directly to dismantle it you will need a special key of a special configuration. At the same time, some experienced car enthusiasts unscrew the sensor with a regular 22 open-end wrench.
Installing the new sensor in place is done in the reverse order.
Principle of operation
The operation of a lambda probe, regardless of its modification and make (model) of the car, is based on the potential difference between its electrodes. In other words, the electronic control unit determines how much the voltage it supplies to the oxygen sensor changes. "Kalina" is no exception. Its probe is capable of detecting voltage fluctuations at the contacts in the range of 50-90 mV. A low signal level indicates that the fuel mixture is too lean, i.e. it contains a lot of oxygen, and vice versa, the higher the voltage, the richer the mixture entering the cylinders.
As already mentioned, the lambda probe begins to work only after warming up to 300-4000C. Before this, the electronic control unit does not take into account its readings. In the first minutes of engine operation, the concentration of the fuel mixture is calculated based on data from sensors of mass air flow, coolant temperature, throttle position and crankshaft speed. When the probe warms up to the desired temperature, and this requires 5-7 minutes, the electronic control unit includes its indicators in the general formula for calculating the amount of fuel.
Device
The lambda probe consists of the following elements:
- Ceramic insulator.
- Rings and cuffs (serve for high-quality sealing).
- Tip with drilled hole.
- Protective shield (also has a hole for exhaust gases).
- Spirals (it is placed in a separate tank).
- Conductive contact.
- Postings.
All this is enclosed in a metal heat-resistant case. The Kalina oxygen sensor is attached to the exhaust manifold using a threaded connection.
Note that the technical characteristics of the lambda probe do not allow measurements to be taken at temperatures below 250 degrees Celsius. In order for the Kalina oxygen sensor to show the correct values, its ceramic tip must warm up to operating temperatures. These are considered values of 300-400 degrees Celsius. But how does the element work when starting a car “cold”? In this case, the control unit uses average lambda values that come from other sensors (crankshaft speed and coolant temperature). A little more fuel is burned in the cylinders than required by the standards. But as soon as the temperature in the exhaust manifold reaches three hundred degrees, the fuel to oxygen ratio will return to normal and will be 1:14.7.
Signs of a malfunctioning oxygen sensor
A malfunction of the oxygen sensor can result in more serious problems for Kalina and its owner. The fact is that without it, the engine operates in emergency mode, and this is fraught not only with increased fuel consumption and violation of environmental standards, but also with the occurrence of such a phenomenon as detonation. To prevent this, it is important to know what signs your Lada Kalina may show if its oxygen sensor has failed. Symptoms of a malfunctioning lambda probe may include:
- “CHECK” warning light constantly lit on the dashboard;
- noticeable reduction in power;
- floating idle speed;
- increase in fuel consumption.
Checking the lambda probe: method No. 1
The simplest diagnostic method is visual inspection. To make sure that the Kalina oxygen sensor is faulty, you need to inspect its tip. It should not have any traces of soot. If any are present at the tip, it means that an enriched fuel mixture has entered the cylinders. As a result, part of it did not burn and went directly into the collector.
Another sign of a malfunction is a shiny coating. This indicates a high concentration of lead in the fuel. It is worth noting that this metal severely damages the ceramic particles of the sensor and the latter is not able to work normally. Usually the presence of lead indicates poor fuel quality. You should not refuel at questionable gas stations.
Gray deposits also lead to sensor replacement. This indicates the presence of engine oil in the exhaust. This happens due to worn rings in the cylinder-piston group. But gray deposits also form when using third-party fuel additives.
Modifications of lambda probes for Kalina
If you discover a faulty lambda probe, hurry to replace it. This, of course, will cost you a lot (about 2,500 rubles), but it’s better not to drive with a broken sensor. Before replacing the device, ask which oxygen sensor in Kalina is installed from the factory. This is the model you should buy to replace it.
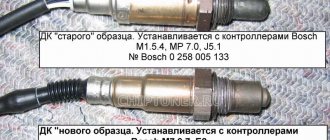
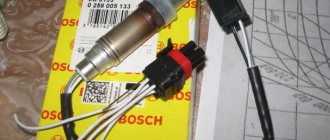
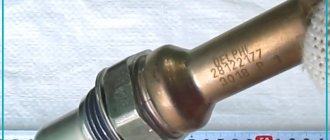
The first Kalin models, complying with Euro-2 standards, were equipped with probes (catalog number 0 258 005 133). These same sensors were also used for later models as the first probe.
Currently, devices of the same type, but with modification 0 258 006537, are more often used. They differ from previous sensors by the presence of a heating element.
Oxygen sensor "Kalina" 2nd generation
Note that the latest versions of Kalina have several such elements installed. The control sensor is still located in the exhaust manifold. And the second (diagnostic) is located behind the catalyst. Thus, the sensors measure the oxygen concentration before and after gases enter the neutralizer. Both lambda probes are closely interconnected. When one of them exits, a sensor on the instrument panel will immediately light up, indicating an error. But this is not the only symptom.
Replacing the oxygen sensor on Kalina
In order to replace the lambda probe, it is not necessary to contact a service center. If you are sure that it is faulty and have already purchased a new device, you can install it yourself. For this you will need:
- key to “10”;
- anti-rust fluid (WD-40 or similar);
- key to "22".
The order of work is as follows:
- We place the car on a level area. If the engine is hot, let it cool.
- Using a key set to “10”, unscrew the bolt on the “negative” terminal of the battery. We remove the terminal.
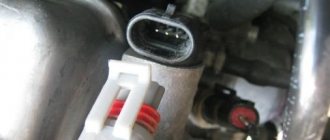
- We find the sensor and disconnect the connector with the power wires from it.
- We treat the junction of the probe and the collector with anti-rust liquid. We give her time to “work.”
- Using the key “22” we unscrew the sensor. We install a new one in its place. We connect the connector.
- We connect the “negative” terminal to the battery and fix it.
That's basically all the work. Now all that remains is to start the engine and check its operation at idle. If the warning light goes off and the power unit begins to work with a noticeable improvement, then we have done everything right.
As you can see, there is nothing complicated either in the device or in replacing the Lada Kalina oxygen sensor. It is only important to notice the malfunction in time and eliminate it. To ensure that your car’s lambda probe lasts as long as possible, fill it with high-quality fuel.
Replacement
In order to replace the oxygen sensor on Kalina, you will need a set of open-end wrenches and WD-40 fluid. If the design provides only one lambda probe, it is not necessary to carry out work in the inspection hole. This sensor is located on the exhaust manifold - to get to it, just open the hood.
Please note: work on removing and installing the oxygen sensor must be carried out with the engine cooled down.
The lambda probe must first be treated with VD-40 liquid. What is it for? During operation, the thread strongly sticks to the manifold, so it becomes impossible to unscrew such an element. Next, remove the block with contacts. It can be mounted on a plastic clamp. The last one will have to be cut. The contacts themselves fit into the cooling system pipe. At the next stage, using a 22mm wrench, unscrew the oxygen sensor outward. Then all that remains is to install the new element in the reverse order.
Please note: the wires from the oxygen sensor must not come into contact with any metal part of the engine. Otherwise they may melt.
Diagnosis of oxygen controller malfunction
High-quality diagnostics will help identify a failure of the oxygen sensor. It is recommended to carry it out every thirty thousand vehicle miles.
A malfunction of the oxygen probe is indicated by an incorrect output voltage when the engine is idling at 2 thousand rpm. If the voltmeter readings are more than 1V, the sensor is faulty.
To measure residual oxygen in exhaust gases, the sensor temperature must be at least 300 degrees. Only under these conditions does the zirconium electrolyte conduct a current, which arises due to the difference between the oxygen in the atmosphere and the oxygen contained in the exhaust gases. Thus, voltage appears on the electrodes of the oxygen sensor.
It is imperative to measure the resistance of the controller heater by first disconnecting the plug. Readings of 2-14 ohms are considered standard. And the output voltage recommended by the manufacturer should correspond to 10.5 V. The readings below indicate malfunctions. You need to check the battery voltage, electrical wiring and contact connections.
There is another simple and reliable diagnostic method that can be used to check the Kalina oxygen sensor without using additional equipment. To do this, you need to turn off the car’s ignition, disconnect the harness connector and check contact X1/C4. If the controller malfunctions, there will be no short circuit with the on-board network.
