How to make a cheap gas hood stop for Lada Granta and Kalina with your own hands
In the standard version, the hood of the Kalina and Grants is held in the open position by a stop (popularly called a “poker”). If you often have to look into the engine compartment, the design can be modified by purchasing a special hood shock absorber, the price of which starts from 1,200 rubles. Want to save money? Install the hood gas stop yourself for only 100-200 rubles.
It's no secret that most of Grant's technical solutions migrated to Kalina. The hood of these two models is the same, so installing the hood damper is no different.
Required:
- Gas stop from Chery with a force of 300 N (catalog number: S21-5605010) - 1 piece;
- Furniture corner dimensions 60x30x20mm;
- Bolt M8*16 - 1 pc.;
- Nut M8 - 1 pc.;
- Enlarged washer M8 - 1 pc.;
- M8 washer - 2 pcs.;
- Connecting nut (barrel) M8*20 - 1 piece;
- Ball gas stop holder 21080-6308134-00 - 2 pcs.
Installation procedure:
- Install an M8 bolt with a nut, a barrel and a ball stop holder into the technological hole near the left headlight;
- Unscrew the hood fastening bolt and install the hood support bracket, having previously made a hole in it for the ball holder;
- Insert the hood gas stop into the ball holders.
The most difficult part of this modification is finding the hood gas strut bracket. There are two ways to do this:
- Make it, for example, from a furniture corner measuring 60x40x40mm, cutting off one edge;
- Use a 20x20mm corner and cut off part of the metal in the engine compartment on which the seal is installed. Otherwise, the corner will rest against it.
As a result, the force of one shock absorber (300 N) will be enough to hold the hood open. The procedure for installing the gas stop is also shown in the video:
Let us remind you that you can “kill two birds with one stone.” To do this, we install a front strut strut, which has the ability to install a gas stop. By the way, an additional hood seal will help keep the engine compartment clean (installation for Granta, for Kalina 2).
Source
Gas struts
I don’t know, but apparently I’m haunted by the thought that something needs to be improved in the car.
I've been looking at gas struts for the trunk lid and hood for a long time.
Somehow I started looking for these elements, but somehow I couldn’t find kits in online stores in Moscow so that everything would be in stock.
But in one store I found a kit for the trunk and hood.
Since I have a trunk lid without trim or any weights, I used stops with a pressure of 250 units.
There were stops with a pressure of 415 units, but the seller did not recommend that I install them.
I wanted to get the hood gas stop cheaper, but the store consultant recommended taking all the equipment from the Togliatti company Tehnomaster.
In general, I won’t describe the installation of additional elements, everything is simply simple and stupid. Unscrewed, inserted, tightened. Everything fit perfectly, without any problems. the result is in the photo.
I would like to draw your attention to the fact that, of course, now it seems like some kind of miracle that the trunk lid was opened, I played with it all evening. Cool
But I would like to point out that you now have to force yourself to close the trunk. For a girl I think this will be an impossible task!!!! so think before installing trunk stops
I haven't started removing the torsion bars yet.
The hood stop is also convenient, now you don’t have to reach for the old stop with your hands.
The hood lifts up on its own, which is convenient. But you also need to make an effort to close it.
At the same time I decided to change the brake pedal sensor. changes simply. It’s just very inconvenient to change, well, very inconvenient.
The old sensor looks good on the outside, I'll try to take it apart to see what's inside.
I noticed a long time ago that when the car is idling, two puddles of water form on the floor near the muffler. Today I once again fell to my knees and then onto my back under my favorite car.
I found holes on the belly of the resonator. At first the first thought was, well, the quality is crap, there are already holes
Today I once again fell to my knees and then onto my back under my favorite car. I found holes on the belly of the resonator. At first, the first thought was, well, the quality is crap, there are already holes.
But upon closer inspection, it turned out that the muffler had not burned out, but that the holes had been carefully made. I haven't seen this on previous cars. It’s strange how the plant started making holes to drain condensate!?
Or did they do something wrong with my muffler?
In my plans I want to change the door closers - door stops. To Czech plastic ones. But the price is 1000 apiece. I looked at the reviews on these door closers, they say and write that they are not very suitable for cars made before 2014, the technological hole is too small for them, and they work hard and bend the door inside, you have to work with a file, like.
If anyone has done it, please write whether it’s worth the trouble.
Thank you for your attention
Installing hood stops
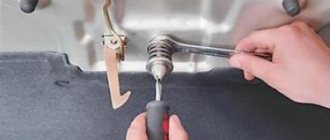
Unscrew the bolt 10 mm next to the coolant reservoir. Don't get confused! The top row of bolts is the front fender mount. After we have unscrewed the bolt, we take a small bracket (by the way, the left and right brackets are the same) and install it in place. We thread the lower gas stop mounting bolt into the hole. We orient the head so that it is directed into the engine compartment. Use a 10 mm wrench to hold the nut, and use a 12 mm wrench to tighten the bolt. By the way, the kits may contain the same 13 mm bolts.
The brackets are in place. We fix the gas stop itself on bolts with a ball head. The stop on the opposite side is installed in the same way. An important nuance is that you need to remove the standard hood stop (metal rod) so that it does not interfere with closing the hood. We remove the rod and leave it in the trunk just in case.
All that remains is to check how the stops on the hood work. We press the lock tab, slightly lift the hood - little force is required. The hood needs to travel a certain distance, and then it opens on its own. The stops successfully cope with their task: the hood does not fall! Lightly press on it, lowering it down a little. The stops lift the hood back up.
Do-it-yourself installation of a Lada Granta hood shock absorber
Gas type shock absorber
- We place the car on a level platform, install wheel chocks, and activate first gear.
- Open the hood and unscrew one nut on the right side that secures the hood.
- We put on the support and tighten it with a nut.
- On the right side, along the inner perimeter of the wing, unscrew the bolt (key set to “14”). Install the lower shock absorber support.
- We put the shock absorber on the upper and lower mounts. Remove the metal support.
Review of Manufacturer Prices
| Name/article | Price, rub.) | Name/article | Price, rub.) |
| Hood stop | |||
| "AutoUpor" ULALAR012Rival (gas-oil) | From 1800 | Rival A.ST.6007.1 | From 2100 |
| ULAXRA011 | From 2150 | A.ST.6003.1 | —/— |
| ULAVES021 | —/— | A.ST.6011.1 | —/— |
| ULA211011 | From 1800 | A.ST.4701.1 | —/— |
| ULAPRI012 | —/— | A.ST.6002.1 | From 2300 |
| "A-Engineering" KU-RE-LO00-02 | From 2400 | A.ST.6008.1 | —/— |
| KU-LD-VS00-00 | —/— | A.ST.6002.1 | —/— |
| KU-LD-XA-00 | —/— | ULAKAL/GRA012 | From 1800 |
| Berkut LGRA.G2 | —/— | ULAVES011 | —/— |
| Trunk lid stop | |||
| Rival (gas-oil) AB.ST.6002.1 | From 2900 | Berkut LGRA.G2.Z | From 2300 |
| LXRY.G2 | —/— | Berkut LPRI.G2 | —/— |
| LVST.G2.Z | —/— | LGRA.G2.Z | From 2900 |
| LVST.G2 | —/— | LPRI.G2 | —/— |
| LGRA.G2 | —/— | LXRY.G2 | —/— |
| "A-Engineering" KU-LD-GR00-01 | —/— | KU-LD-RG00-01 | —/— |
| KU-LD-RG00-02 | —/— | KU-LD-GR00-01 | —/— |
*prices are current as of October 20, 2018.
Procedure for installing the gas stop
The sequence of actions is as follows:
- We open the engine compartment of the Lada Granta and remove the plastic holder in the center of the engine shield, which holds the soundproofing sheet of the engine compartment. Nearby (below) there is another similar internal fastener; several bolts inserted into these holes will hold the lower fastener.
- We disconnect the plug that holds the plastic engine casing.
- We screw the mount to the bottom and, having inserted the bolt at 10 on top, tighten the nut from below.
- We place emphasis on the lower mount.
- We remove the casing.
- If there is a hood deflector, we also remove it so that it does not interfere.
- Place the top bracket directly on the car. It has technological holes into which the upper fastening brackets will be placed. After removing the plugs, we insert the brackets into the slots, screw on the bolts and washers (but do not tighten them).
- Using a screwdriver, center the hole in the mount with the hole in the hood so that the hole does not move out during the process of tightening the bolts. Once the holes are aligned, you can tighten the mounting bolts.
- We mount the trim and hood seal in place from below and fix it with plugs to make a smooth hole in it exactly for mounting the Lada Granta holder.
- We lean the trim against it, mark the outline and cut out a hole with a sharp knife, then tuck everything in carefully and check all the joints. On occasion, you can install a hood deflector.
The gas hood stop on the Lada is installed by true connoisseurs of high-quality tuning. It provides a spectacular, effortless opening of the hood. The stop ensures safety when working in the engine compartment of a car.
Recommendations for choosing parts for installation
The cost of products from a domestic manufacturer is 10–15% lower than their foreign counterparts. The quality of parts made by different manufacturers does not differ much. It is not rational to overpay interest for a trademark.
Another thing is the type of pusher. As mentioned above, shock absorbers are made with oil and gas filler. Obviously, gas models are more durable, more reliable, but are 15% more expensive than their oil counterparts. The final choice is up to the owner of the technical device.
Lada Granta: repair, operation, tuning and maintenance
During the operation of the vehicle, it may be necessary to either adjust the hood or remove any parts to repair other parts or the hood itself. Let's consider sequentially all the steps regarding the Lada Granta hood that may be required for your purposes. In order to open the hood, you need to pull the hood lock drive handle; it is located in the car interior to the left of the steering wheel, under the instrument panel. After this, between the radiator trim and the hood you will see a small gap, approximately in the middle in it we find the foot of the safety hook and lift it.
Steps required to remove the hood latch (the hood latch is made in the form of a spring):
— first you need to remove the radiator trim by unscrewing three screws along its upper edge and removing two latches along the lower edge;
— then you need to pull out the end of the lock drive cable sheath from the bracket;
— on the other side, we also remove the cable tip from the locking spring loop;
— using pliers, grab the end of the locking spring, which is located in the hole under the radiator frame, and remove the spring through this hole.
To remove the lock drive cable, you must perform the following steps:
— find the hood opening handle and unscrew the bolt-axis of this handle;
— we see the closed end of the cable, straighten it and remove it from the hood release handle;
- to pull out the cable, for convenience, you need to tie a cord to its end that is longer than the length of the cable;
— pull out the cable through the hole in the body in the engine compartment;
- then remove the cord in order to remove the plastic tip and flat washer from the cable;
— we tie the cord again and finally take out the hood lock drive cable.
Removing the safety hook is very simple: unscrew the two nuts securing the hook with a 10mm wrench.
To remove the hood latch, perform the following steps:
- loosen the large locknut;
— then unscrew the latch itself.
Using the hood lock, you can adjust the position both in height and horizontally. Height adjustment: to do this, loosen the large locknut, and, holding it in one position, simultaneously unscrew or tighten the adjusting rod of the hood latch. Then be sure to tighten the locknut back. Horizontal adjustment: loosen the locknut, close the hood without latching it. Due to the loosened locknut, the lock should move relative to the hole in the hood. When the lock is in the desired position, open the hood and tighten the locknut.
List of online stores, addresses of companies providing services
| № | Name | Contacts, address |
| 1. | "Alta Carter" | Russia, Moscow, st. Molodogvardeyskaya, 57, building 10 |
+7. Online store "Alta-Carter" https://alta-karter.ru/
| 2. | Online store of towbars and accessories EVAS-AVTO MSK LLC | Moscow, Mozhaiskoe highway, 30 m. Kuntsevskaya or Slavyansky. https://evas-auto.ru/ Moscow, st. Svobody, 89, building 5, metro station Planernaya Moscow, Yurlovsky pr-d, 14, bldg. 4 m. Biberevo |
| 4. | JSC "World of Roads" | +7 Moscow, Dmitrovskoe highway 110A, building 3 Delivery across Russia |
| 5. | OJSC "Prosport Performance" | Moscow Moscow, st. 2nd Zvenigorodskaya, 13, building 17, office 216. |
Procedure for installing the gas stop
The sequence of actions is as follows:
- We open the engine compartment of the Lada Granta and remove the plastic holder in the center of the engine shield, which holds the soundproofing sheet of the engine compartment. Nearby (below) there is another similar internal fastener; several bolts inserted into these holes will hold the lower fastener.
- We disconnect the plug that holds the plastic engine casing.
- We screw the mount to the bottom and, having inserted the bolt at 10 on top, tighten the nut from below.
- We place emphasis on the lower mount.
- We remove the casing.
- If there is a hood deflector, we also remove it so that it does not interfere.
- Place the top bracket directly on the car. It has technological holes into which the upper fastening brackets will be placed. After removing the plugs, we insert the brackets into the slots, screw on the bolts and washers (but do not tighten them).
- Using a screwdriver, center the hole in the mount with the hole in the hood so that the hole does not move out during the process of tightening the bolts. Once the holes are aligned, you can tighten the mounting bolts.
- We mount the trim and hood seal in place from below and fix it with plugs to make a smooth hole in it exactly for mounting the Lada Granta holder.
- We lean the trim against it, mark the outline and cut out a hole with a sharp knife, then tuck everything in carefully and check all the joints. On occasion, you can install a hood deflector.
- We guarantee fast processing of your order during business hours (we work from 11-00 to 20-00, Saturday and Sunday are days off).
- We guarantee reliable packaging of your order (when sending it by Russian Post or transport company).
- We guarantee the fastest possible dispatch of your paid order (within 2-4 business days after receipt of payment).
- We guarantee a refund or exchange for another product (with recalculation) within 14 days from the date of receipt of the order (the product must be in good condition, without traces of installation, delivery costs are not reimbursed).
- We guarantee a free exchange of goods (transportation costs at our expense) if the purchased goods turn out to be defective.
Reviews of companies
- Vladislav: a year ago I installed pushers on Granta at the Alta-Carter service station. The craftsmen did everything quickly and efficiently. My recommendations to Grantmakers.
- Ignat: after purchasing Grants, I replaced the torsion bars on the trunk with gas pushers. I ordered the service from the service station "EVAS-AUTO MSK". They work professionally, they have specialized equipment, they are experts at everything “100”.
- Sergey: my garage comrades recommended installing a gas pusher on the hood. I bought it at the Mnogofactors parts store. Good quality, reasonable prices.
- Gennady: I drove for a year on standard trunk lid torsion bars and decided to switch to oil pushers. I bought it from World of Roads. Six months have passed since installation, no complaints, my recommendations.
- Kirill: I’m leaving my positive review about the auto parts store Prosport Performance OJSC. Professional advice, reasonable prices, bonus discounts.
Installing a trunk lid shock absorber on a Lada Granta
Trunk lid gas struts
- Place the car on a level platform and release the handbrake.
- We open the trunk lid and support the structure with a wooden stand to prevent any inclination.
- Remove the two torsion bars from the rear side of the trunk lid mount.
- We fix metal supports with rubber bumpers onto the standard mounting arches.
- There are holes on the side of the interior wall; screw on the lower support mount.
- We put on the shock absorber.
By analogy, we will equip the opposite side.
The installation of trunk shock absorbers on the Granta Liftback is somewhat different from the Sedan configuration. We install accessories in place of standard ones. What makes the new pushrods different is the pre-installed springs at the end of the cylinder. When the trunk lid is lowered, the springs prevent it from slamming shut and lift the structure a few centimeters.
The hood seal on the grant helps retain engine heat in the engine compartment for longer.
We will purchase a door seal from a VAZ-2108 from the store in advance; we will use it as a grant hood seal.
| We attach the seal to the standard hood insulation |
| It is not difficult to attach: we move the standard thermal insulation a little and put the purchased seal on it |
| We also install a seal at the point of contact between the hood and the radiator grille |
| We attach it to the partition, it holds quite firmly |
| Also, the seal on the frill prevents water from entering the area of the windshield wiper motor and cabin filter. |
Don't forget to install a seal at the point of contact between the hood and headlights.
Now on the highway the oncoming flow of air will not blow into the engine compartment and will not cool the engine (especially important in winter!). Also, coupled with the heat and sound insulation of the hood, it allows you to retain engine heat longer and also contributes to its rapid warming up.
The Lada Granta has a number of disadvantages, just like any other car. One of them is the gap between the hood and the body (radiator grille and headlights), through which dirt gets into the engine compartment. This problem can be solved with a simple modification, which consists of installing an additional rubber seal.
On the Lada Granta, an additional hood seal can be installed in several ways in different places. To achieve maximum results, we recommend using all options in combination. You will need to buy VAZ 2108 or VAZ 2109 door seals, and then install it on the radiator grille.
The second attachment point for the additional seal from the “nine” is the hood soundproofing. We snap off the plastic clips, and then place the seal over the edge of the sound insulation.
Another D-shaped seal, which can be purchased at a hardware store, will help supplement the protection of the engine compartment from dirt. We glue it along the edge, the perimeter of the hood.
The process of installing the seal on the Granta hood is also shown in the video:
As a result, the seals will prevent dirt and dust from entering the engine compartment during rainy or dusty weather. Let us remind you that other modification instructions can be found in the Lada Granta Tuning category.
Join our club, share your first impressions of the car, start your blog on our website. In the near future we will hold a competition for the best review of the Lada Granta.
Do you have dirt under the hood? The fact is that the manufacturer, as usual, saved money and did not install a hood seal on the Lada Granta. To get rid of this, we’ll install it ourselves.
To protect the engine compartment from flying dust and dirt, we need a regular door seal from a number eight or ten.
Worth checking out:
- Screw on the gas supports one by one. The photographs show an example when the task was simply to hold the hood, and not to open it yourself using a stop.
Tuning VAZ: installation of gas hood stops for VAZ 2108
- If you do the work yourself (without an assistant), you should screw the stops onto the hood, then onto the body.
After installing the VAZ 2108 gas stops, you need to make sure that the hood opens and closes well. Close the hood carefully to avoid distortion.
Lada Kalina Hatchback › Logbook › Installing Finwhale gas struts on the hood
There were a lot of things planned to be done on Kalina, but the idea of installing gas struts on the hood began to be heard only in the last 2 months, all that remained was to go to an automagazine and find a suitable strut. Having studied posts on this topic on Drive, I bought two stops from Niva 2121, as well as Finwhale gas stops suitable for the 10 family, among others.
These stops turned out to be the smallest with the maximum extension of the rod, about 450 mm, and with a compressed rod, about 250 mm. I purchased 4 ready-made corners from OBI; all that remained was to make wider holes for the mounting bolts on the body. The initial version of the installation, without exact dimensions, turned out to be so crude that one of the stops had to be removed for a while, due to a slightly incorrect fastening of the corner on the hood lid; when closing, the stop itself rested on the protruding part of the wing and when the hood lid was completely closed, it started to rise up, which was not good. However, the first pancake, as they say, is lumpy)
In addition, the stop turned out to be too long for the places where it was possible to fasten the corners, so both stops did not extend all the way when opening, and the edge of the hood lid touched the windshield wiper at maximum opening, which was also not good. And at some point, due to high pressure, the end of the stop jumped out of the hinged mount, but it happened once and then luckily it didn’t happen again.
At the end of last week I completed all the fastenings to their logical conclusion. I had to use a trick so as not to drill unnecessary through holes on the edge of the wing; I used a grinder to cut out profile corners 13 cm long.
Thus, without any extra holes, I increased the distance and secured a stop at the other end of the profile corner; on the hood lid I only had to turn the corners towards the inside of the hood so that the stop would lie not on the flat edge of the wing, but on the side of it, thereby not sticking out the lid anymore hood
Lada Granta Podvenechnaya › Logbook › 86. Dream or reality? Gas stop for hood for 200 rubles.
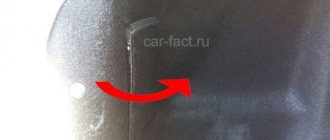
When it comes to cars, I am a confused person and my car stoically endures all my new and new research. At one time I was wildly pressed to install a gas stop on the hood, I was crazy about a similar scheme on my then-grandfather’s 2111 and definitely wanted to do the same for myself, so as not to insert the poker into the stop and not get my hands dirty every time. Distrust in the poker is also caused by the fact that in case of strong wind or the presence of a fool who closes the hood with the stop sticking out, the lid is not so weakly broken. The helicopter-like appearance could still be removed after this, but the pokes on the back side of the inlet hole are no longer there. I was looking for options online and the thought kept haunting me that I saw reviews, and quite often, that the hood stops that are sold in on the Internet, they bend the hood. And my distrust was intensified when I saw the hood of a man who assured me that there was no distortion. I hadn’t even approached the car ten meters, and I had already noticed the distortion, but the owner didn’t see it and wrote to everyone on the Internet that “It’s all hockey, boys.” After this, the percentage of trust in those who wrote that everything was fine with them dropped significantly ( although maybe everything is really fine with you, I hope
) I didn’t want to play Russian roulette for 1.5-3 thousand rubles, it’ll work, it won’t work, I honestly didn’t want to.
There was an option to install double Rival stops, but the price tag is simply outrageous; for two penny stops, sellers ask from 2.5 thousand and above. But then luck turned up, in my VK group, comrade Kostinalex gives me an option on how to assemble a hood stop no worse than the factory one for literally three kopecks. I bow to him for this. His idea was based on the well-known scheme for attaching a gas stop, with the exception that he did not take the stop from a VAZ, which everyone sells, but from a Chinese Cherry car, their stop is both cheaper and weaker, which means bending the hood lid will not be. The power of the VAZ stop is 340N, and that of the Cherry is 300N. Looking ahead, I’ll say that it really doesn’t bend. The gap remains penny to penny the same as before installation. So, for a complete installation we need: Gas stop S21-5605010
- 1 pc.;
Corner 40x60
- 1 piece;
Bolt M8*16
- 1 pc.;
Flat washer enlarged M8
- 1 pc.;
Flat washer M8
- 2 pcs.;
Connecting nut (barrel) M8*20
- 1 pc.;
Nut M8
- 1 pc.;
Ball gas stop holder 21080-6308134-00
- 2 pcs.
I bought the gas stop at Exist, it was the most expensive there, but the pick-up point was in my area of the city. In Yulsan and other stores it was either the same or a little cheaper, but it was about 100 km round trip. Not profitable. According to the fastening method, there is nothing complicated, in the wing, near the headlight itself, there is a technological hole, insert an M8 bolt with a washer on the reverse side ( the hydraulic corrector gets in the way a little
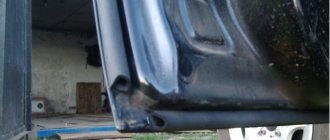
), we put an enlarged washer and a connecting nut on top. For those who don’t understand, watch the video, it’s not long, and again I didn’t take any photos. The whole difficulty was in making the corner of the upper attachment point. Alexey took an ordinary furniture corner 20*20, the first thing I did was take the same one, drill holes in it with an 8-point drill and put everything on the car. It holds the stop - it's great, but it's impossible to close the hood. And so I turned this and that, it turns out that Alexey cut off the little metal on which the seal lies, it is this partition that prevents us from closing the stop. I didn’t want to cut metal under the hood, okay, I sawed down the doors to the music, it’s invisible and doesn’t rust, but here there’s always an open place for all the shit. I began to study the method of attaching this type of stops from the factory. We find out that the factory stops are attached with an angle with an offset center, as in the photo.
Here I made a second assault on the hardware store and took a 40*60 corner from the most suitable one. Its length is perfect, but the edges needed to be reduced. The part that we attach to the hood is 30mm, and the side where we attach the gas stop is 20mm. The excess metal was removed in 15 minutes on a diamond wheel.
The only thing left to do is drill 8mm holes and mount them in place. Now it doesn’t touch anything or rest against anything and the metal is intact.
You just need to paint it in the body color. I painted the first test corner, but the brush from the bottle broke and the paint ran out.
According to the results. The stop reliably holds the lid in the raised state, tested by the stormy wind that happened today during the filming of the video for the channel. Unlike the VAZ stop, the lid does not shoot out, but follows the hand with a pleasant modulation. The gaps, as mentioned above, remained unchanged.
Well, for clarity, video:
For all this, thank you all for your attention and good luck on the road!
To keep it clean under the hood! — logbook of Lada Granta 2190 PORT 2012 on DRIVE2
I bought a seal kit for the 2108 a long time ago in order to put it under the hood to keep the engine clean.
The engine was also washed before the start of winter.
and today it was time to install the seal itself. The topic, in principle, is not new, but I will share how I did it. I installed it on the hood itself, on the trim, as well as to the edge of the radiator grille and to the headlights. It is attached to the hood trim quite easily, the clips are removed one by one and the seal is gradually tried on and attached.
It is better to remove the clips, after installing the seal, return them to their place
It opens easily, locks tightly, and cuts easily. At first I wanted to install it from edge to edge, but I saw that there was quite a lot left and let it all go along the perimeter of the sheathing.
It also fits very well to the grille. But when I installed it, I loosened the bolts so that the seal would fit straight into place.
And the final touch.
Everything is ready, I’ll see if there is any effect.
Lada Kalina Sedan K-Line › Logbook › Gas stops on the hood. Part 3 (of 3). Completion
The gas struts are installed and are working properly. In previous posts about gas struts, many people noticed the rusty corners. I should paint it
Now it's time to paint)
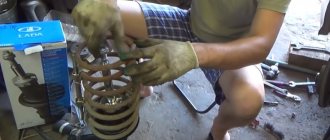
1. Remove the stops from the car along with the mount.
2. We clean our corners using a drill and iron attachments. To clean the corner from the outside, simply secure it in a vice, but in order to clean the corner from the inside, I screwed in a bolt with a nut, which was safely and firmly clamped in the vice
3. For comparison, I laid out the corner before and after cleaning. The result is very impressive
4. After cleaning, two corners are ready for painting)
5. I decided to remake the upper corners from 3 mm metal, because... The old ones bent well.
6. Here, for comparison, are old ones made of 2 mm metal and new ones, just prepared, made of 3 mm metal.
7. The corners are cleaned and ready for painting.
8. Degrease with solvent 646 and apply primer in one layer.
9 Wait until it dries and apply a few more layers
10. For quick drying, I used an electric heater.
11. Priming was successful. Now let's paint.
12. Apply several layers of paint with preliminary drying.
13. The paint has dried. Now you can varnish it. So that everything is according to Feng Shui)
14. Varnished in one layer. It will do) Leave the parts to dry overnight...
15. Everything has dried up. Let's move on to installing devices. Self-locking nuts for M8 were purchased earlier. Nice stuff...
16. Looks beautiful now!
18. The supports are in their rightful place! Corners according to Feng Shui: both beautiful and the metal is protected)
Conclusion: 1. Corners are protected from atmospheric influences2. Looks nice like a factory part3. It would have been possible to paint everything with a brush (it would have been easier, and less paint would have been used), but since you have a spray gun, it’s useful4. The upper newly made corners did not fit (the hood sticks out a lot), I had to leave the old corners made of 2 mm metal