Salam to everyone! There are already articles on this topic, but since each case is unique in its own way, I will describe in detail how it all happened. I’ll say right away that the article is not for the faint of heart and not for those whose hands do not grow from their shoulders. There are many places where non-standard situations arise: somewhere to knock, somewhere to bend, somewhere to file, and somewhere to weld. Everything needs to be done reliably, carefully thinking through every step.
It all started with a “Shniv” gearbox, which was accidentally caught at a flea market and was given away for almost nothing.
Next, I began to look for other spare parts and came across the website of the manufacturer of these same devices: “Steering Components LLC.” I’ll say a few words about this resource. Since I had not installed power steering before this incident, the support representative was at one point inundated with a barrage of my chaotic and not entirely competent, or rather not at all competent, questions. The representative withstood my onslaught with dignity and brilliantly answered each of the questions, thereby creating in me strong confidence in the seriousness of their enterprise. In the process of communication, it turned out that a ready-made “GUR FOR VAZ 2101-2107 CLASSIC” kit is currently available for purchase. This is a kit that is installed in the corresponding car without any “collective farm” (in the worst sense of the word). But since this option is too expensive for me, and I already had the Chevy-Nivovsky gearbox in stock, after clarification of all my questions, the rest of the VAZ kit was additionally ordered without, accordingly, the gearbox.
I would like to express my gratitude to the plant representatives for their contact and comprehensive assistance in installation!
In addition to the power steering kit itself, the fan, brakes, and steering wheel were modified. The fan remains the same, let's finish it a little.
You need to buy an additional Vacuum Brake Booster (VUT) from Niva, also known as the “nine-wheel” one, and you will also need a very rare part, this is the “Nivovsky” bracket for the VUT. The main brake cylinder (GTC) can also be supplied from the Niva, but I personally am not satisfied with the presence of brake hoses, so the GTZ was also supplied from the Nine.
Note from factory:
As it turned out, a small series of “classic fives” equipped with this same power steering was released. As I understand it, they did not change the standard VUT and GTZ, they simply shifted it forward by 6 mm using an adapter plate, and re-drilled the hole in the brake pedal with a shift of 6 mm (the old hole was pre-welded).
Yes, I almost forgot, the brake/clutch pedals will have to be removed, the plate at the bottom (under the gearbox) is slightly filed down and the brake pedal is bent to go around the thicker steering shaft and the gearbox housing protruding into the interior. In this regard, I don’t know what options there are, maybe some kind of Nivov pedal, in short, I “hit” it with a copper hammer and digested a nickel of the pedal itself, much like in this article.
You can also buy a steering bracket with a short shaft.
For convenience, the hood was removed, the fan was removed, the washer and antifreeze tanks were removed or moved aside, the old VUT was removed, the gearbox and pedals were removed. The clutch was also completely removed.
By the way, I pressed the steering rod fingers in with a special puller, thanks to my neighbor Volodya for the torque wrench and tools)))
I started by making a template for making a hole in the engine shield. I wasn’t happy with the options from the web, so I made the template according to my own understanding. The task was to ensure that the gearbox boot would fit, so that everything would look human, and not just like that...
I made the hole like this: I marked points along the line, taking into account the thickness of the drill by 6 mm, drilled holes, then sawed and leveled everything from the interior side with a Chinese Dremel with home-made discs from a Bulgarian cutting wheel. A Dremel, even a Chinese one, is great! I highly recommend it! Looks like a mini grinder!
The long-awaited moment of installing parts!
Unfortunately, the lower part of the boot pressure plate had to be cut off; the gearbox rested against it and did not reach the mounting holes.
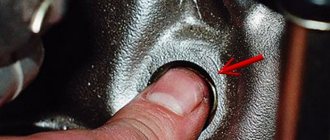
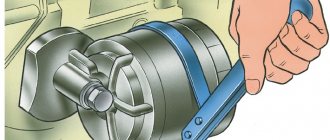
Before installing the oil pump, you need to drill a hole in the cylinder block in a special protrusion. First, we screw the bracket, mark it, remove the bracket, drill a hole in the protrusion of the block with a 6.5 - 6.7 drill to a depth of 15 mm, for an M8 thread. I was afraid of chipping the protrusion, so I cut the thread very carefully with minimal effort, using progressive movements to tighten and unscrew the tap.
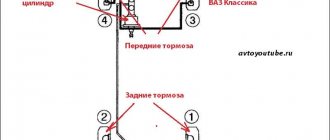
As for the brake pipes, in my case it turned out as follows: the right front pipe (on the passenger side) remained unchanged, I just snapped off the fastening to the body in one place and it reached there. I replaced the left front tube (on the driver's side), it was missing some 15-20 cm, in short, I bought some kind of rear "nine" at the market, in general, it turned out to be a little long, I had to twist it with a ring. The pipe going to the rear wheels had to be extended using a tee and a short, literally 20 cm, pipe. At first I used a cast tee (cheaper), it cracked when tightened, I took a milled one (more expensive), but everything was fine, we draw conclusions.
With the steering bracket everything is simpler; we remove the old one and replace it with another one with a short shaft.
Note from me:
here one problem has come up, the solution to which will not be included in this article, I will do this sometime later, and I will warn you in advance what the problem is. The “Shokhovsky” bracket differs from the “seven” bracket by the presence of height adjustment. The seven does not have such an adjustment, and the plastic steering wheel cover is shifted 15 millimeters lower. Most likely, I will buy another bracket from flea dealers and rework the mount below, or I will remake the “Shokhov” bracket for a short shaft. This is the catch.
Another problem, the sound signal disappeared. The problem turned out to be that the steering cardan from the kit is assembled from two parts, one inside the other, two tubes, they seem to be telescopically inserted into each other. They most likely used plastic inserts; in short, they do not lock. I connected the bolts on the cardan with wiring, and the signal appeared.
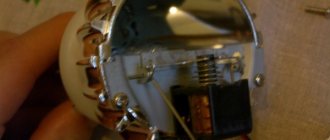
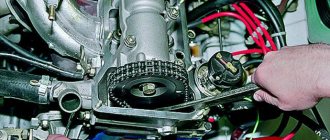
I installed the power steering belt pulley:
I tightened the oil pump belt, I don’t know how to measure the force, according to the instructions the belt is tensioned with a force of 10 kgf, the deflection should be 10 - 12 mm. In short, I press with force with my finger, it bends a little more than a centimetre, it feels like it’s pulled tight.
I immediately recommend buying a crankshaft rotation key “under the head”. The pulley nut is hidden deep into the pulley and ordinary stamping will no longer fit there! And in general it will be useful on the farm.
Power steering for VAZ 2107
Power steering is no longer an option or luxury, but standard equipment on all modern cars. Since owners of classic VAZ models cannot say that they own a modern car, this option is not available to them. We could put an end to this and keep turning the steering wheel of the 2107 until we’re blue in the face. Still, let's give credit to the designers. Without power steering, the seven handled well anyway, and power was never an urgent need.
Why do you need power steering?
Nevertheless, if the opportunity arises, why not install power steering on the VAZ 2107? At least it won't make her handling worse. But first, let's figure out what this thing is and why it is needed.
The need for power steering is felt when, after 12 hours of active taxiing around the city, with a lot of turns, parking and complex maneuvers, your hands simply fall off. This cannot be explained, it must be felt, or better yet, not felt. In a nutshell - why do you need power steering?
Relevance of power steering on classic VAZ
Domestic automakers are still at the stage of embryonic development and simply cannot offer any sensible way to achieve comfort when driving a car. At the same VAZ there are a number of offices that offer installation of everything that the plant did not deliver, but the quality of these tchotchkes is questionable, they are expensive and no one can give any guarantee on them.
But there are manufacturers who are developing additional equipment for antediluvian VAZs, and the owners are already installing what they are missing in their kopecks, sevens and other archaic-nostalgic automobile layers.
Types of power steering
Therefore, today we will talk about devices that reduce steering effort. This topic is also interesting from a practical point of view, since any of the amplifiers that we will consider briefly can be used on a VAZ 2107.
Hydraulic booster (power steering)
Power steering is a complex and expensive device. It is rarely installed on cars for which this unit is not designed for, but installation is, of course, possible. The power steering consists of a pump, a hose system, an oil tank and a hydraulic gearbox, which contains the working fluid - oil. Such devices are not easy to install and require periodic maintenance.
Mechanical power steering
The simplest of all power steering. Roughly speaking, it is a standard steering mechanism with changed parameters. The worm pair simply has changed gear ratios, as a result of which the force on the steering wheel changes. Installing such an amplifier is simple, it is inexpensive, and it is of little use.
Types of power steering
If you decide to equip your car with an amplifier, then you have several options - expensive and cheaper:
- Power steering for the VAZ 2107 is a more expensive option. Such a system consists of a pump, supply lines, a pipe and a reservoir for working fluid. In this case, the working fluid is oil, which is under pressure in the system. The installation procedure is quite complex, like the design of the system itself, and the car owner will also have to periodically maintain the system. As practice and prices on the automotive market show, there is no point in installing such a unit, since its cost is almost half the price of a used 2107.
- A cheaper and more suitable option for the “seven” is an electric booster. In practice, this unit allows you to cope well with the load placed on it, especially since its installation is simpler. In fact, the electric power steering works on the “seven” almost as efficiently as the hydraulic booster. It should be noted that the main advantage of such a system is the absence of the need for regular maintenance. The EUR on a VAZ is connected to the on-board network, since its operation requires 12-volt voltage.
"Seven" electric amplifier removed
Basic information about the hydraulic booster
What makes the power steering for a VAZ 2107 car stand out? Experienced motorists highlight several main advantages of power steering on a VAZ 2107 car, such as:
It is also worth paying your attention to the fact that the hydraulic booster has two schemes, such as transmitting force to the river or the steering shaft. Car enthusiasts distinguish two systems of such amplifiers:
The device of the power steering on a VAZ 2107 car
The power steering for VAZ 2107 cars includes the following basic elements:
- When turning at high or low speed;
- Returning car wheels to the middle position and maintaining them in this condition;
- When turning.
And thanks to the torsion, torque is transmitted to the steering system, while simultaneously measuring the twist and angle of rotation of this wheel. To carry out such measurements, special sensors are used, and the received information is transmitted to the hydraulic booster. This is how the hydraulic booster is maintained in the required mode. After this, the torque goes to the steering mechanism and the drive wheels of the car. Turning at low speeds is typical for parking a vehicle, and the steering angle of the car is not small. The torque is provided by an electronic control circuit with the help of maximum functioning of the car engine.
How to correctly install power steering on a VAZ 2107 car?
Naturally, it will also be necessary to adjust the gearbox speed sensor, otherwise the driver will not notice any changes when starting to drive at low speeds. That is, the steering wheel will be a little harder to turn. When high speeds are reached, the steering wheel will pass to the vehicle owner with a low level of resistance. Also, if you do not have a speed sensor, then you will also need to install it.
- Reducing the number of steering revolutions;
- Reducing the effort when turning the steering wheel.
- High cost;
- Difficulty in establishing;
- Significant changes to the steering system of the vehicle;
- Needs regular maintenance.
Do-it-yourself installation of electric power steering on a VAZ is carried out using 2 methods:
Installation of power steering 2110-2112 in VAZ 2109
Task:
installation of power steering on Lada 2109
Stages:
1. Installation of the pump (and all associated)
2. Installation of the rack
Pump installation
We remove the old generator, its bracket and pulley (the pulley must be placed under the ridge belt).
We install a new pulley.
Let's move on to the pump, it already comes with a bracket from Lada 2110
We need to modify it, namely, remove the support (we simply unscrew it) and saw off the ears to which the support was screwed (they rest against the lever), and in the end we get this product.
Having estimated the engine, it turned out that the third (rightmost mount) is also in the way for us; it gets on the bolt that mounts the engine mount. You can, of course, file it in a figure, take a longer bolt and leave it as is, but it seemed to me that two bolts are enough to hold the pump, so we remove it too.
Then everything is simple: we put a pump in place of the former generator (our generator will move higher)
One bolt fit perfectly, the second one needed a short one; I didn’t have it (you can see it in the photo above), I screwed it on as best I could in order to continue the assembly and understand what else was needed.
Next we install a new generator bracket. I took the bracket from Viburnum for the tension roller; when assembled with the generator, the whole thing looks like this.
So we install the bracket, it stands up without any difficulties, 3 bolts and everything is in place
What remains is the final generator (by the way, the gene is also from 2110) and this is where problems arose. I had to adapt it a little, using metal scissors.
Then we just install the generator without hindrance and put on the belt.
In general, that's all. The power steering pump on the VAZ 2109 is installed and working. By the way, the belt needed is 6PK975 or 6pk970.
Installation of the rack.
First of all, remove the old rail. In general, nothing complicated, we remove the steering tips, unscrew the bolt that connects the steering rack and the steering shaft (located in the pedals) and unscrew the rack itself, it is held on by 4 bolts.
We take a new rail. The number one problem is the tie rods. It is necessary to leave the relatives from the nine (or the collapse will not be done) They differ in silent blocks and their diameter.
On the left in the photo, the rod from the nine has a smaller internal diameter and the bolt from the ten will not fit into it, plus there is a bushing sticking out of the silent block, which we also don’t need. There are two options for solving this problem: First, cut off the bushing and drill a larger hole. The second is to take new silent blocks from dozens, grind them and press them into the first service that comes up. I went with option number 2 and it turned out like this.
Today I went to the alignment and they told me that it was all bullshit and the thrust could have been left at ten, but what can I do? Internet, such Internet)
That's it with the rods. Problem number two is the size of the window in the engine panel. It’s small and a rail from ten won’t get there by any miracle.
That is, you need to cut. I overdid it a little, and there was a gap on top of me. about 1cm
Half of this hole is now covered by a casing that goes from above, but in any case there is a gap.
To prevent this from happening to you, do not cut too much upward. From the main hole, saw upward 1 cm further if necessary.
So, the rods for the VAZ 2110 are ready, there is a window.
Let's move on to the rail itself.
First of all, you need to unscrew all the tubes, in order to do this without problems and not tear off the splines (like me, for example), tap each bolt and they will unscrew without effort. After the tubes are unscrewed, you need to remove the mechanism itself, it can also be removed without problems (2 bolts), and in the end you will be left with a bare rail.
And now she will enter her place through the right window (near the wheel) without any problems. Next is the assembly (before you start installing the rack, practice inserting the mechanism into the rack, there is a certain principle, you need to rotate the shaft counterclockwise and press down) We push the rack. We find more or less free space under the hood and put it together in it. I did this somewhere between the vacuum and carb.
We screw it from the end of the tube through the same window as we inserted the rail
Once everything is screwed down, we put the rail in its rightful place and tighten it. I advise you to disassemble the high-pressure hose into pieces and screw it on when the rail is already in place. Next to the rack we put the rods in place.
That's all with the rack
The next (and last) problem is the steering shaft. it needs to be shortened. Measure 7 times, cut 1 time (extra)
We go to a turner, grind out a bushing (or find a piece of pipe of a suitable diameter) and weld the whole thing. I also drilled a couple of holes and drove bolts into them.
In general, everything is ready; all that remains is to connect the pipes, secure the tank and bleed the system. I won’t tell you how to lay the pipes, the only thing to keep in mind is that the metal tube (return) can be replaced with a hose, the main thing is to maintain the internal diameter and that it is designed for this. Any Volga and GAZ spare parts store will find such a hose for you without any problems. (the main thing is to say that for the guru)
Mounting the tank, also based on taste and color, I did this: I took the standard bracket and sawed off the excess from it.
And welded the right one
Looks like this in the hood
Result: everything works. The steering wheel can be turned with just one finger. The steering wheel is stable, does not jump out of your hands on bumps, and does not pull anywhere. And of course, a short rack of 2.8 turns instead of the standard 3.8, this is a small miracle that makes itself felt, a very sensitive sharp steering wheel, in yards with a lot of sharp turns you want to ride in circles. In general, a short rack is perhaps the coolest modification of all that I have done to the chassis and it radically changes the steering.
The work on installing power steering on a VAZ 2109 has been completed.
next article:
Installation of power steering rack VAZ 2108
Task: strengthen the steering rack in the VAZ 2108
Rating 1.00 [3 Vote(s)]
Main parts of power steering
- torsion bar and steering shaft,
- electric motor,
- ECU,
- non-contact torque sensor,
- rotor position sensor.
- Input sensors directly related to torque and steering angle determination.
- Executing device - it receives control signals that are generated by a special program.
- Control unit - processes the signal from existing sensors.
- when turning,
- turning at low and high speeds,
- returning the wheels to the middle position and maintaining them in this state.
Turning at low speeds is typical for parking a car. At the same time, the steering wheel rotation angle is large. The electronic control system provides torque by maximizing the work in the electric motor.
Stages of work execution
In any case, you will need to adjust the gearbox speed sensor. Otherwise, when starting the VAZ and driving at low speeds, the driver will not be able to notice any changes. Thus, it will be difficult to turn the steering wheel. When accelerating at high speed, the steering wheel will yield to the car owner with little resistance.
- transfer of another choke cable, which is included in the kit for the VAZ 2108 electric booster,
- replacing the gearbox - you will need to take this unit with a short worm shaft, and the bipod must be original,
- If the 2107 has a contact ignition system, you will need to install the MUR1100E diode yourself.
- Speed sensor.
- Fasteners.
- Choke cable.
- The ignition switch, steering column switches, steering column cover - these parts must be from 2110.
- Installation instructions and passport for electric power steering on a VAZ.
Replacing the steering column of a VAZ 2107
Replacing a steering column is a rather difficult task, but it can be done independently if you have some experience in car repair. You will need the following tools:
- Wrenches 17 (socket and open-end).
- Socket heads for 17 and 30.
- Handle with ratchet.
- Mount.
- Hammer.
- Collar.
The column is removed in the following order:
- Disconnect the battery.
- Remove the steering wheel.
- Remove the steering shaft housing.
- Remove the wire block from the ignition switch.
- Remove the ignition switch.
- Remove the steering column switches.
- Remove the steering shaft clamped in the column.
- Using a 30mm socket and a powerful wrench, unscrew the steering column mounting nut. The tightening force here is significant, so the knob must be a fairly long lever. If you can’t unscrew it, you can lengthen the knob by putting a piece of pipe on it.
- Unscrew the 3 bolts securing the column to the body. The procedure is not easy - the distance between the parts and the body is too small, the bolts are difficult to keep from turning. A handle with a ratchet will come in handy here, which will speed up the process.
- Remove the column from the shaft. To do this, you need to knock the column off the tie rod splines using a pry bar. This must be done in jerks, resting your feet on the body.
- Unscrew and remove the shaft seal installed at the bottom of the column.
After dismantling the old column, it is necessary to clean the seat from dirt. Before installing a new column, you should check the condition of its hinge joints and needle bearings. If everything is in order, you can begin installation, which is done in the reverse order of removal.
When installing a new VAZ 2107 steering column, you must pay special attention to ensure that all fastening bolts and nuts are well tightened. Considering how important this unit is for driving a car, play, and even more so, slippage of the steering column splines can lead to tragic consequences
When installing the steering wheel, pay attention to the position of its spokes. After completing the installation of parts and connecting the wire block to the ignition switch, you can connect the battery
Column replacement completed
After completing the installation of parts and connecting the wire block to the ignition switch, you can connect the battery. Column replacement is complete.
Basic Installation Recommendations
Then the steering wheel is inserted (you can take it from a Lada Kalina). The next step is to connect the electrical part of the EUR. The red wire to the battery is connected through the fuse. The brown one connects to any mounting pin of this mechanism. The orange wire (ignition) is connected to the blue (ignition switch) through a fuse. The tachometer cables are connected to the dashboard chip to the blue-brown wire. The gray cable from the speed sensor is connected to the wire running from its 2 to 9 pin of the ECU.
Some VAZ 2107 drivers decide to install power steering on their car. This pleasure will cost them 5-6 thousand rubles. more expensive than installing an electric booster system. However, the workflow will take longer due to upcoming rework.
VAZ 2107 is the legendary AvtoVAZ model. However, for all its advantages, by modern standards the design clearly lacks advanced elements. For example, power steering - after all, all cars of the latest generation, even in basic configurations, are necessarily equipped with this mechanism.
Power steering device
We can say that the “seven” is equipped with the simplest type of power steering. It contains several basic elements that make it easier to control the car:
- Hydraulic pump mechanism. It is through the cavities of the pump that an uninterrupted supply of working fluid is carried out and the necessary pressure is created.
- Steering gearbox with distributor. This device is designed to ensure the passage of air flow. The air directs the oil in two directions: into the cylinder cavity or in the return direction - from the cylinder to the tank containing the working fluid.
- Hydraulic cylinder. It is this mechanism that converts oil pressure into movements of the piston and rod, which reduces physical force when applying pressure to the steering wheel.
- Working fluid (oil). Oil is necessary for the stable operation of the entire power steering system, since it not only transmits movement from the pump to the hydraulic cylinder, but also simultaneously lubricates all components. Oil is poured into a special container and supplied through high-pressure hoses.
Typical equipment of the VAZ 2107 implies two schemes for the operation of the hydraulic booster: transmission of movement to the steering rack or to the steering shaft.
Is it possible to install a hydraulic booster on a VAZ 2107
If we talk about equipping the “seven” with a non-factory power steering, then we can consider this operation appropriate and even necessary.
The installation of power steering on a VAZ 2107 is dictated by the complexity of the vehicle’s management in various operating modes. Only with a booster does the quality of control and reliability of driving on uneven roads improve.
Thus, structurally, the “seven” of any year of manufacture is ready for installation work, however, it is recommended to turn to specialists for this service, since it will be extremely difficult to install the power steering mechanisms yourself.
You should also take into account the disadvantages that the driver of a VAZ 2107 will inevitably encounter after installing a power steering wheel:
- high cost of the power steering kit;
- installation work is problematic (you need to pay for the services of a professional);
- the need for regular maintenance (checking the oil level, lubricant, etc.).
Steering VAZ 2107
The steering mechanism of the VAZ “Seven” consists of several units connected together by means of fasteners. These components and their constituent elements, like any other part of the car, wear out over time and become unusable. The purpose, design, repair and maintenance of the VAZ 2107 steering system should be discussed in more detail.
Purpose
The main function assigned to the steering mechanism is to ensure the vehicle moves in the direction specified by the driver. On most passenger cars, the trajectory of movement is carried out by turning the wheels of the front axle. The steering mechanism of the “seven” is quite complex, but at the same time it provides trouble-free control in different situations on the road. The car is equipped with a safety steering column with a driveshaft that folds upon impact. The steering wheel of the mechanism in question has a diameter of 40 cm and to completely turn the wheels you need to make only 3.5 turns, which allows you to perform maneuvers without much difficulty.
What does it consist of?
The front wheel control mechanism on the VAZ 2107 is made of the following basic elements:
- steering wheel;
- shaft;
- gearbox;
- bipod;
- trapezoid;
- pendulum;
- steering knuckles.
Steering shaft
Through the shaft, rotation from the steering wheel is transmitted to the steering column. The shaft is secured with a bracket to the car body. Structurally, the element is made in the form of a cardan with crosspieces and an upper shaft. In the event of a collision, the mechanism folds, thereby ensuring the safety of the driver.
Gearbox
The VAZ 2107 is equipped with a worm steering column, which converts the rotational movement of the steering wheel into the translational movement of the steering rods. The operating principle of the steering mechanism is as follows:
- The driver turns the steering wheel.
- By means of cardan joints, the worm shaft is driven, thereby reducing the number of revolutions of the steering wheel.
- The worm element rotates, moving the double-ridge roller.
- The secondary shaft rotates, on which the bipod is fixed, driving the steering rods.
- The trapezoid moves the steering knuckles, turning the wheels in the desired direction.
The steering bipod is a part through which the steering linkage is connected to the steering gearbox.
Steering linkage
The radius of the vehicle's trajectory when turning depends on the angle of rotation of the wheels. Since the outer wheel has a larger radius than the inner one, in order to avoid the latter slipping and deteriorating traction with the road surface, the front wheels must deviate at different angles.
This is what the steering linkage is used for. During the maneuver, the transverse thrust of the mechanism shifts under the influence of the bipod. Thanks to the pendulum arm, it pushes and pulls the side rods. Since misalignment occurs, the impact on the tie rod ends is different, which leads to the wheels turning at different angles. The tips of the trapezoid with the rods are connected through adjusting couplings, which allow you to change the angles of rotation of the wheels. The parts of the trapezoid are connected to each other by identical ball joints. This design contributes to the normal operation of the unit even when driving on bad roads.
Installing a hydraulic booster on a VAZ 2107
You should be very careful when choosing a power steering configuration. Thus, car enthusiasts on forums often write that factory hydraulic boosters from Lada Priora or Niva often jam, and during operation they require increased attention from the driver.
Therefore, it is more advisable not to chase new products from the domestic automobile industry, but to install standard power steering from the VAZ 2107. And since the “seven” is a rear-wheel drive car, the front suspension will use a mechanism with two pairs of transverse link elements at once. The entire steering system on the VAZ 2107, without equipping it with a hydraulic booster, consists of the following components:
- steering gear;
- three rods with steering tips;
- pendulum;
- swivel axles with rods.
Accordingly, in order to install power steering into this harmonious system, some modifications and upgrades will be required. The new power steering kit for the VAZ 2107 must include the following parts (you need to check their availability before purchasing):
- Hydraulic pump complete with pulley.
- Oil tank.
- Gear mechanism.
- Hydraulic cylinder.
- High pressure hose kit.
To install the power steering on the “seven” yourself, you may need a set of open-end wrenches and removable devices, however, without extensive experience working with car structures, it is not recommended to perform this work.
Installation procedure for power steering
Traditionally, specialists in auto repair shops install a hydraulic power steering wheel according to the following scheme:
- The car is securely fixed on a lift or on a pit.
- The front wheels are removed, as they make access to the steering rack difficult.
- Using special removable tools, the rod ends are disconnected from the bipod of the steering rack. In some cases, it will be necessary to use lubricant to separate rusted parts from each other.
After completing all of the above work, it will be necessary to bleed the hydraulic system and remove any air pockets from it. Pumping is performed as follows:
- Turn the steering wheel sharply all the way, first in one direction, then in the other.
- Perform turning inside out several times.
- Start the power unit.
- Almost immediately after turning on the engine, the force on the steering wheel will be significantly reduced. There should be no leaks in the hydraulic system.
Video: installation process
Before putting the car into operation after installing the power steering, it is imperative to check the installation angles of the front wheelset. This work is performed by a specialist at a special stand. If necessary, you need to do a wheel alignment.
Detailed guide to installing electric power steering
Buying an electric amplifier today is not a problem; all you have to do is go to any specialized store. The design features of the “seven” allow the installation of an electric amplifier from the Lada Priora. But before you purchase this unit, you need to take into account that for installation you will need to make or additionally buy a cardan, as well as an adapter plate. We will not describe the entire process in detail, because if you understand what we are talking about, then the instructions below will be enough for the correct and complete installation of the system (the author of the video is the Anton Mariyan channel).
If you are faced with the need for installation for the first time, then it would be better to seek help in this matter from qualified specialists. After all, if you make mistakes, getting rid of malfunctions can be problematic, so if you lack experience, it is better to immediately entrust this matter to professionals.
So, here's how the installation procedure works:
- First, you should completely de-energize the on-board network to prevent a possible short circuit during repair work. To do this, simply open the hood and disconnect the terminals from the battery.
- Next, you will need to remove the protective cover from the steering wheel. To do this, simply unscrew the bolts that secure the two parts of the cover.
- At the next stage, the old steering cardan is removed, as well as the installation of a new part, which comes with the purchased system.
- After completing these steps, you will need to use a drill to drill holes to fix the electric amplifier. Depending on the design features of the new EUR, the holes may be different, so at this stage you need to use the installation instructions that should come with the kit.
- Once the holes are drilled, the electric amplifier must be fixed.
- Next, the wires from the speed and speed sensors are connected. When connecting, be careful - you cannot allow the presence of bare wires in the electrical circuit, so all cables must be carefully insulated.
- After completing these steps, the power circuit of the unit is connected; remember that the electrical circuit must include a safety element.
- Actually, at this point the process of installing the electric booster system can be considered complete. All you have to do is reinstall the protective steering wheel pads and tighten all the bolts that were unscrewed earlier. Then the battery terminals are connected and the functionality of the system is checked. If problems arise with the operation of the electric amplifier, you need to check the correct installation and also make sure that you did not make mistakes when connecting the wires. As practice shows, one of the main reasons for the incorrect operation of the ESD is incorrect wiring.
Electric booster for VAZ 2107
An easier way to make the 7 easy to drive is to install electric power steering. Structurally, the VAZ 2107 is ready for such a procedure; moreover, due to the absence of oil containers, installation will be easier and faster.
The electric power steering wheel copes well with loads; in terms of operating efficiency, it is practically no different from the effectiveness of hydraulic power steering. At the same time, the electric mechanism does not require maintenance or constant monitoring.
The most affordable version of the EUR for the VAZ 2107 is the “Aviaagregat” mechanism from a domestic manufacturer. The mounting location for this device is the location of the standard steering column. The design of the electric amplifier includes a relatively small number of parts:
- the amplifier itself;
- bracket for its fixation;
- intermediate value cardan;
- casing, wiring and fastening elements.
In terms of cost, the EUR is inferior to the power steering, so VAZ 2107 owners often prefer to install “electrics” rather than “hydraulics”.
VAZ 2107 steering wheel diameter standard
The size of the braid depends on the diameter of the steering wheel
BRAIDS SIZE M (120 products)
M – 37-39 cm
Deciding on the size of the steering wheel cover is quite simple. To do this, you just need to measure the diameter of your steering wheel and select the size of the cover according to it.
How to choose the steering wheel braid size?
Today on sale you can find covers of various sizes: S (35-37 cm), M (37-38 cm), L (39-40 cm), XL (42-43 cm), XXL (47 cm), XXXL (49 cm).
Size S (35-37 cm). This size is perfect for small cars: Oka, Tavria or for cars with a sports steering wheel. This size will also fit the Kia Picanto; it has a steering wheel diameter of 37 centimeters (the cover will fit with difficulty, but will fit clearly).
Size M (37-38 cm). The most common size that fits most foreign-made passenger cars. Size M can be confidently called standard, it is suitable for cars: Kia (Rio, Venga, Ceed, Soul, Sorento, Optima, Sportage, etc.), Nissan (Murano, Almera, Terrano, Sentra, Juke, Teana, etc.), Ford (Focus, Mondeo, Kuga, Ranger, etc.), Toyota (Corolla, Auris), Volvo (V40, S60, S80, etc.), Chevrolet (Cruze, Aveo, Spark, etc.), VAZ (2108-2109, 21010 - 2115, Granta, Kalina, Priora), and many, many other foreign cars. In general, you understand, if you have a foreign passenger car or a domestic car from the list above, then you can take size M with 95% confidence.
Size L (39-40 cm). NIVA, VOLGA, MOSKVICH, VAZ-2101, 2107, 21011, 21013.
Size XL (42-43 cm). UAZ, GAZelle, etc.
Size XXL(47 cm). Imported trucks.
I made a dish for a friend. Auto VAZ 2107. See the result for yourself. If anyone is interested, ask, I will answer everyone...
The lead time for order fulfillment from the moment measurements are taken until you receive the finished braid (cover), provided you install it yourself, does not exceed 1 week, provided that I carry out the installation, the turnaround time is 3-4 days. Installation takes 40-60 minutes.
The braid improves the grip between the driver’s hands and the car steering wheel and prevents hands from sliding along the steering wheel and turning it. The thickening of the steering wheel when braiding appears helps to better feel the steering wheel. A correctly selected such accessory will come to the driver’s rescue in emergency situations on the road, and he will cope with them many times faster.
Special models made of fur increase driving comfort, causing pleasant tactile sensations. The coating of the car's steering wheel is now reliably protected from dirt and abrasions, and the presentation of the car is preserved for a long time. When selling a car, this point is very important, because with such car care, by removing the braid, you will only dry-clean the interior - and the car can be sold in a matter of days.
Having purchased “clothes” for the steering wheel, you will be surprised that you have bought not only a convenient and useful accessory, but also a stylish part of the interior interior.
Select and put the braid on the steering wheel
Once you find yourself in the accessories department on our website, you will immediately see that there is a huge amount of steering wheel braids available here. And in order not to make a mistake with your choice, you need to understand how to choose the right braid for your car. The diagram is presented below.
The most important thing that influences the selection of braid is your tastes and desires, which will be reflected in the design of the selected accessory. Don’t forget about the diameter of the steering wheel: it needs to be measured and compared with the models in the store.
Most passenger cars are produced with a steering wheel diameter of 37 cm and 38 cm. But in our group’s auto stores you can find braiding even for a Gazelle. Using a special table, you will determine what size steering wheel clothing suits you.
https://xn—-7sbgz2air6b.xn--p1ai/%D0%BE%D0%BF%D0%BB%D0%B5%D1%82%D0%BA%D0%B0-%D0%BD%D0% B0-%D1%80%D1%83%D0%BB%D1%8C-%D1%80%D0%B0%D0%B7%D0%BC%D0%B5%D1%80%D1%8B-%D0 %B2%D0%B8%D0%B4%D1%8B-%D0%B8-%D0%BE%D1%81%D0%BE%D0%B1%D0%B5%D0%BD%D0%BD/https ://bumper.guru/klassicheskie-modeli-vaz/rulevoe-upravlenie/rul-vaz-2107.htmlhttps://prostoloca.ru/kak-vybrat-opletku-na-rulhttps://remam.ru/tune/tyuning -rulevogo-upravleniya-vaz-2107.htmlhttps://www.avtobox.info/index.php/price.html?page=shop.browse&category_id=115&Treeid=167https://kekso.ru/avtovaz/diametr-rulja-vaz -2107-standartnyj/