Setting the clock on the standard on-board computer of the Lada Priora
- First of all, using the button at the end of the right steering column switch, select the “current time” item on the instrument panel display.
- Next, you need to press and hold the “Reset” button, which is located at the bottom of the switch until the readings (time) on the dashboard begin to blink.
- Now, using the buttons that were described in the first paragraph, we set the current time.
- By pressing the upper key we adjust the minutes, and the lower key – the hours.
- After setting the required data, you can exit this menu item by clicking on the “Reset” button.
As you can see, everything is banal and simple, and to explain some points it’s worth taking a couple of photos.
If this process is not clear to anyone from my description, then a video from my YouTube channel will be embedded below specifically for this purpose.
Instructions - how to set the clock on a Priora
Lada Priora is a car loved by many.
Oddly enough, just for convenience, Priora made two types of watches. Setting them up is easy - more on that later. The clock on the Priora is in 2 places: the dashboard, the control panel, where the speedometer is. Sometimes additional equipment is installed on the Priora - some believe that it is better to install a voltmeter in the dashboard in order to always know the network voltage. Of course, every trip for your beloved “swallow” should be comfortable. For each of us, time is important, so “time” should always be “at hand”, and while driving – before our eyes. It is inconvenient to be distracted and look at the phone screen while driving, so the clock on the Priora must always be precisely adjusted so as not to distract the driver from driving. Our article will help you set up, modify or remove your Priora watch. Step-by-step implementation will save even those Priora owners whose watches do not work. The built-in standard ones are always in front of your eyes - on the dashboard, also in the factory interior, the time is built into the dashboard.
How to set the standard clock on a Priora
The standard device is as simple as possible - the time is displayed on the display located in the center of the dashboard, under the speedometer. The total mileage is also reflected there. Analog (center console) are configured separately, manually. In the Lada Priora, everything is adjusted using the “old-fashioned method”: one press of the button in the center of the dial starts the hands moving 1 minute forward. If you hold the button, the minute hand will “run” forward even faster, followed by the hour hand.
Engineers installed the simplest classical method, passed on from older models. When setting the central panel clock: your attention should be completely concentrated on the right switch lever. On the right is a rocker with two buttons. At the bottom, under the thumb, there will be a “reset” button conveniently located.
To set up an electronic clock in 2170, you need to:
On the right switch lever behind the steering wheel, find a “rocker” with lower and upper buttons and a “Reset” button; Press the bottom button until the display shows the time; Press the “Reset” button; Change time: the top button is responsible for minutes, the bottom button for hours; Press the “Reset” button to set the time.
How to remove a watch on a Priora
You can remove the device according to the instructions below:
- Unscrew the two screws of the center console behind the “Open” cover and the two screws under the ashtray;
- Remove the radio;
- Unscrew two more screws;
- Remove the decorative panel;
- Armed with a knife or flat-head screwdriver, press the tight latches of the case;
- Carefully pull the device out of the socket.
It is recommended to work carefully, trying not to scratch the decorative panel.
How much do watches cost?
Instead, you can put three options:
- Analog – original and with modifications;
- Conventional electronic;
- Voltmeter and various accessories.
Analog ones are available in parts stores and the aftermarket. Their price starts from 200 rubles - lovers of the classics can get themselves a new device to replace the faulty ones. A factory malfunction may be the result of a breakdown in the electrical wiring or the mechanism itself.
The main modifications made by the craftsmen are the backlighting of numbers and hands, as well as a black bezel instead of the original gray one. It will become easier to tell the time at night, but note: according to statistics, in order to tell the time, a person looks at an analog device much longer than at an electronic one. This can play a key role in a traffic situation, because according to traffic rules it is not recommended to be distracted from the road.
Regular electronic watches are sold in 2 versions: assembled and in parts. Collected ones can cost from 450-500 rubles. They come in a variety of colors, with tinted glass, but most sellers only offer the original gray bezel, so aesthetes will have to paint this part black themselves. You can assemble this simple device yourself: tint the glass, connect the electrical, set the time. The whole set will cost about 400 rubles.
The voltmeter and various modifications are the result of an engineer’s wild imagination; these specimens deserve attention.
Network voltmeter - instead of a clock
You can actually put a voltmeter in the Priora instead of a clock! This device helps monitor the mains voltage and generator operation.
It doesn't end with the voltmeter! You can add a voltmeter and a thermometer to the electronic clock discussed above, which will show the temperature inside the cabin. You can choose the display color of these models - fortunately there is a choice. The backlit device also looks great in the evening when dusk sets in, adding coziness to the Priora’s interior.
Time in any car is part of a comfortable trip. They, like any other element, should become part of the interior. There is no limit to perfection - you shouldn’t be content with factory solutions.
Trip computer
Trip computer (MC), shown in Fig. 37, is installed in a variant version instead of a clock in VAZ 2110, VAZ 2111, VAZ 2112 cars. The MK has 15 functions, divided into 3 groups (see Table 2). The group is selected using buttons 1, 2 and 3.
In each group, functions are divided into basic and additional. The main functions are navigated through the ring using buttons 1, 2 and 3. Additional functions are navigated through button 5. When the ignition is turned off, the computer is always in the “Current Time” mode. When the battery is removed, the clock progress and all accumulated parameters are retained for at least 1 month.
Network voltmeter - instead of a clock
You can actually put a voltmeter in the Priora instead of a clock! This device helps monitor the mains voltage and generator operation.
It doesn't end with the voltmeter! You can add a voltmeter and a thermometer to the electronic clock discussed above, which will show the temperature inside the cabin. You can choose the display color of these models - fortunately there is a choice. The backlit device also looks great in the evening when dusk sets in, adding coziness to the Priora’s interior.
Time in any car is part of a comfortable trip. They, like any other element, should become part of the interior. There is no limit to perfection - you shouldn’t be content with factory solutions.
ADJUSTING THE COMPUTER FUNCTION
Clock correction
Press button 4 in the “Current time” mode. At the sixth signal of the exact time, press button 1, this resets the seconds and rounds the clock readings.
Setting the current time (calendar)
- Press button 4 in the “Current time” (“calendar”) mode.
- Use buttons 5, 6 to set the desired hour (day).
- Press button 4.
- Use buttons 5, 6 to set the desired value for minutes (month).
- Press button 4 to complete the time (calendar) setting.
Setting an alarm
- Press button 4 in Alarm mode.
- Use buttons 5, 6 to set the desired hour value.
- Press button 4. Use buttons 5, 6 to set the desired minute value.
- Press button 4 to complete the alarm setting.
- In the “Current time” mode, the alarm symbol will light up (the alarm is on).
* If the counter of any of the accumulated parameters (“Travel time”, “Travel time with stops”, “Total consumption”, “Trip mileage”) overflows, all accumulated ones, as well as calculated ones (“Average fuel consumption”, “Forecast”) are reset mileage on remaining fuel", "Average speed") parameters, with the appearance of a two-tone sound signal.
Turning off the alarm
- Press button 4 in Alarm mode.
- Press button 1 to turn off the alarm. “—.—” will appear in the digital digits, and in the “Current time” mode the alarm symbol will not light up (the alarm is turned off).
Adjusting the brightness of the indicator backlight
When the side lights are on, the illumination level is adjusted using the instrument scale illumination regulator. When the side lights are turned off, the backlight level is adjusted by software:
- — press button 4 in the “Traveling time with stops” mode. All single segments (pictograms) will be displayed on the indicator, which is a sign of the backlight level adjustment mode, and the digital digits will display a number corresponding to the backlight level as a percentage of the maximum value;
- — use buttons 5, 6 to set the required level of backlight brightness; press button 4 to end the brightness adjustment mode.
Setting the time on the Lada Granta on-board computer
Car : Lada Granta. Asks : Oleksandr. The essence of the question : I removed the terminal, the time on the BC is off, how to set it?
Good day, just last year I bought myself a brand new Lada Granta and now this seemingly minor problem has appeared. And since for me even a minor problem is a real PROBLEM, I would like to ask you about this: how to set the time on the on-board computer of the Lada Granta.
I really don’t know, like everyone else, I don’t really want to go to the masters, they love money, I would like to learn myself. In principle, I’m not the last person in electrical equipment, but I would like some advice from real professionals, otherwise I’ll screw it up and then it will all cost me a pretty penny, thanks in advance.
What is required to set the time in Grant
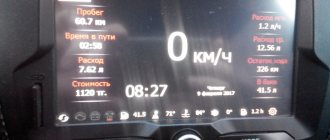
The clock in the Grant car we are considering today is located on a modern liquid crystal screen, respectively, on the instrument panel. All digits on this clock are significantly larger than any other digits or symbols on the rest of the screen. The display, in addition to the exact time, displays fuel consumption, total and daily mileage, and other information data.
Kalina starter repair
Lada Kalina won't start reasons
Lada Kalina fuel consumption per 100 km
Now you need to pay special attention if you want to know how to set the time with your own hands in a modern liftback from the AvtoVAZ automobile manufacturer. You must determine exactly where the following controls are located in your car:
- Button for self-control of the car dashboard display. This is the same button that resets the so-called daily mileage.
- A car ignition switch, or a size switch located on the instrument panel.
- The lever that controls the windshield wipers (this is the so-called steering column switch on the right). This lever performs various functions, including it always scrolls in a circle the modes of direct operation of that same display, thus displaying information about the current time, fuel consumption, and mileage.
Vesta on-board computer functionality
The computer in Lada Vesta displays a certain set of parameters. Such information greatly facilitates the driver’s fate, since he has an understanding of the performance of some important electronic and mechanical systems of his car. Also, having information about error codes, you can quickly resort to measures to eliminate failures and malfunctions.
So, the computer displays the following indicators (without taking into account the codes):
- on-board network voltage;
- range based on the amount of fuel remaining in the tank;
- the residual volume of this same fuel;
- average and current level of fuel consumption;
- watch;
- average speed value;
- daily and total mileage;
- outside atmosphere temperature;
- signals about the need to change gears;
- cruise control parameters (if installed);
- symbol of the currently engaged robotic gearbox (if available).
To control the on-board controller in Vesta, you need to use two switches located on the steering column selector. By pressing the indicated keys we enter the menu, after which we select the required parameter, which will immediately begin to appear on the display. Through such simple switches, the driver will have operational information about the state of the systems.
Malfunctions and settings of the on-board computer on the VAZ-2114.
Often no additional manipulations are required - just enter the parameters according to the manufacturer's instructions. If the BC does not function, check the fuse and wires for integrity. If there are glitches in the system, try to reset it. To do this, press the reset button, disconnect the connector or battery terminals.
If it is necessary to reset errors, warm up the engine, disconnect the battery for 15 minutes and connect it back. The key in the ignition switch is turned, stopping it in the pre-start position. After turning on all the lights and indicators on the dashboard, leave the key for a couple of minutes, then return it back.
After completing the steps described above, start the internal combustion engine and let the car idle without pressing the gas pedal. Repeat the procedure several times to reset the system. If the method does not work, use the “software” analogue. When a signal appears on the display, understand the situation.
Possible errors and methods for correcting them
When operating a car, sometimes malfunctions occur, information about which is displayed on the BC screen in the form of digital codes. The most common errors are: • 0217 – engine overheating; • 0230 – fuel pump failure; • 0301 – ignition fault; • 0351 – damage to the ignition coil; • 0654 – tachometer failure; • 1617 – bad road. The standard onboarder for Lada 2180 not only shows malfunctions of car components, it is also susceptible to errors in operation. These faults can be checked quite easily: if no information appears on the screen when the ignition is turned on, you need to check the connector between the ECU and the computer. Display of incorrect information appears when the protocol fails. To correct the error, you should reboot the bookmaker, in the menu that appears, select the protocol that matches the characteristics of Vesta and install it. If more serious faults are detected, it is better to contact the warranty service. Leaving a car in the open air and in the cold for a long time negatively affects the operation of the BC, so you can remove it for this time. It is also prohibited to operate the Lada Vesta on-board computer if water gets into the unit or if the electronic equipment is faulty.
Setting up the on-board computer clock
This option raises questions among some Vesta owners, although the algorithm is quite clear.
- Hold the top button pressed for about 3 seconds. The device will go to the editing menu.
- The screen displays the previously set time. Press the key again for 2 seconds.
- We observe the blinking of the first reading (hours).
- Using the arrows we achieve the required value.
- We repeat the procedure of pressing and holding until the menu switches to the minute selection mode. Set the required value again.
- We move on to storing the selected values by the computer. To do this, hold down the same key (up).
Main functions and capabilities of the Lada Vesta head unit
Firstly, the radio tape recorder 100% fulfills its purpose - it plays music files and radio. Music can be listened to via AUX, SD card or via USB devices that can be connected as a file drive. You can also connect the radio via Bluetooth to your phone and play music on your car speakers.
Secondly, the radio displays the time on a monochrome display.
Thirdly, it has a Hands free function.
As you can see, the radio has all the necessary functions for comfortable listening to sound.
Network voltmeter - instead of a clock
You can actually put a voltmeter in the Priora instead of a clock! This device helps monitor the mains voltage and generator operation.
It doesn't end with the voltmeter! You can add a voltmeter and a thermometer to the electronic clock discussed above, which will show the temperature inside the cabin. You can choose the display color of these models - fortunately there is a choice. The backlit device also looks great in the evening when dusk sets in, adding coziness to the Priora’s interior.
Time in any car is part of a comfortable trip. They, like any other element, should become part of the interior. There is no limit to perfection - you shouldn’t be content with factory solutions.
Options for replacing the standard BC
There are many models from different manufacturers on the car computer market. Unfortunately, most of them cannot be used for Lada Vesta due to incompatibility. But there are BC models that are adapted to various AvtoVAZ models and have proven themselves well. Such brands include Multitronics. The company produces on-board computers for a wide range of cars, with advanced diagnostic functions, navigation, audio and TV systems.
The models produced have various mounting options, and at the owner’s request they can be placed on a dashboard or secured in other convenient places. Below are Multitronics BC models with different types of mounting.
In addition to the above functions of a standard computer, Multitronics has very useful additional ones:
- Displays information about vehicle malfunctions, errors, their codes, and also duplicates this message in voice mode.
- Sends a voice notification to the driver about the need to refuel the car.
- Conducts quality control of the filled fuel and displays an alert on the screen.
- Reminds the driver to turn off the lights or low beams.
- It is a full-fledged navigator.
- Allows you to use multi-channel television.
- Automatically maintains the set temperature in the cabin.
The Multitronics on-board computer has a fairly large convenient screen, simple controls and a user-friendly interface. For owners of domestic cars and, first of all, for owners of various modifications of the Lada, a special model “Multitronics Comfort” has been developed.
Along with the BC models presented above, there is also computer equipment of the domestic brand "STAT" (Tolyatti), widely used on AvtoVAZ models. All of the company's products are adapted for installation on domestic cars, primarily Lada. The SHTAT brand BC has a backlit liquid crystal display and a convenient mount on the car dashboard. Below is a model of an onboarder from this company.
Connection of on-board computers is carried out by connecting the standard cable of the electronic control unit (ECU) to the OBD-II diagnostic connector in accordance with the instructions. After successfully installing the BC and connecting it to the ECU, you need to configure the onborder.
To do this, you need to start the engine and select a “custom” mode from the two offered on the display so that the type of ECU unit is automatically detected. To read sensor readings, you need to set “automatic selection” in the menu, and the computer will begin to receive information about all components of the car. Diagnostics will be carried out in accordance with the protocol corresponding to the machine model. The next stage is entering data into the BC that allows the computer to fulfill its functional purpose: the desired temperature in the cabin, the route and other parameters according to requests that will be displayed on the screen.
We control the bookmaker
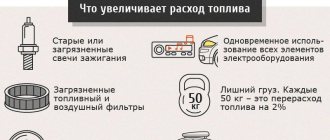
Of course, it is difficult to achieve 100% accuracy in the readings of an electronic device, because the operating conditions of the engine may be different. For example, when idling, gasoline will not be consumed in full. If there is air conditioning in the cabin, you should add 20% of the fuel consumption. In winter, some of the gasoline is used to warm up the engine. And if you move through potholes, ice, or slip in mud, then the throttle valve will open to its fullest extent much more often than usual.
To make car PC readings more accurate, try resetting the power to all electrical appliances. To do this, disconnect the “-” terminal on the battery.
And after that you were dissatisfied with the work of the car computer? Perhaps you should monitor your own driving style? Try to accelerate as little as possible so that you don’t have to brake suddenly. Do not allow the engine to exceed 3000 rpm. If you do everything right, perhaps the BC will stop annoying you with its inflated fuel consumption rates.
Installing a third-party computer
In the Lada Vesta model segment there are modifications that are not initially equipped with an on-board computer. Today this is not a problem, since a similar device is available for sale. The owner purchases it, and the station masters carry out the installation and connection. You can perform this activity independently, but this will require knowledge and experience.
Almost all models of on-board computers support the specified parameters, and some of them are capable of reading and displaying fault codes (errors).
0 0 vote
Article rating