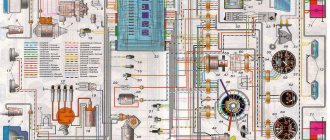
Electrical diagram of the grant of the rear part of the VAZ 2190
Electrical diagram of the rear part of the car: 1-block of the rear wiring harness to the block of the instrument panel wiring harness; 2-rear wiring harness block to the instrument panel wiring harness block; 3-side direction indicator right; 4-side direction indicator left; 5-handbrake sensor;
6-element for rear window heating; 7-interior lighting lamp; 8-switch in the driver's seat belt; 9-trunk light; 10-electric fuel pump module; 11-light right; 12-trunk lock electric motor; 13-switch for interior lighting; 14-additional brake signal;
15-left lamp; 16-rear wiring harness block to the rear left door wiring harness block; 17-rear wiring harness block to rear right door wiring harness block; 18-rear wiring harness block to the front right door wiring harness block; 19-rear wiring harness block to the front left door wiring harness block; 20-airbag control unit; 21-rear wiring harness block to license plate light wiring harness block.
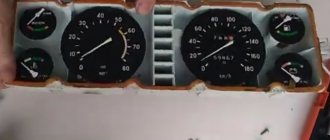
- 1 – indicator of lubricant pressure in the crankcase of the power plant;
- 2 – generator connector;
- 3 – power supply to the fuel mixture supply valve;
- 4 – cooling system thermometer;
- 5 – sending a signal to the dashboard;
- 6 – adsorber purge;
- 7 – speedometer;
- 8 – mass air flow sensor;
- 9 – DPKV;
- 10 – DC in front of the catalyst;
- 11 – control pulse device;
- 12 – oxygen concentration sensor in exhaust gases;
- 13/14 – coil and spark plugs, respectively;
- 15 – injector drivers;
- 16 – ignition contact group;
- 17 – detonation measurement sensor.
Read more: Renault Megane 2 timing belt: do-it-yourself replacement
Good day everyone, I’ve been on the Internet for two days now searching for a bunch of wires coming into the connector on the instrument panel. I need to find out which wire the signal is coming from so that the “seat belt not fastened” lamp turns off, and what appears on this contact plus or minus or disappears? There is no such information in repair magazines, but if I simply didn’t see it there, and you poke my nose at it, I won’t be offended, but I’ll say thank you.
Phased replacement of lighting fixtures
To ensure that replacing the light bulbs on the instrument panel of the Lada Kalina is done correctly, experts recommend doing it in the following sequence:
- After removing the dashboard dashboard, use a Phillips screwdriver to unscrew the two fasteners that secure the speedometer.
- Next, the contact block is disconnected from the panel; when disconnecting, you should take into account their color so that nothing is confused during assembly.
- After disconnecting the wiring, the tester is activated, with the help of which each light bulb is checked for functionality. If the device shows that the element has failed, it should be replaced by removing the base.
- It is most convenient to unscrew the base using ordinary pliers, turning the base counterclockwise with it.
- A new one of the same size is installed in place of a light bulb that has become unusable.
- All parts that were removed are installed in their original places in reverse order.
Next, all that remains is to check the result of the work performed by turning the ignition key. If the lights on the dashboard light up, it means the work was done correctly and the car owner, even without experience, can be proud of his success.
At this point, the process of replacing conventional lamps can be considered complete, and such an event will take no more than 2 hours, taking into account the preparatory process and the selection of the necessary tools. It’s hard to disagree that replacing light bulbs on the instrument panel is quite easy without the help of professionals, but if difficulties arise during the work, you can watch a training video on the Internet resource at any time.
Making an optitron
I'm trying to clean the filter at the edge of the scale. The peculiarity of these scales is that they are designed for the use of ordinary light bulbs, so they have an additional layer of dark filter (dots) applied to them, which ensures uniform illumination (closer to the light bulb, darker). A yellow filter is also visible under the white scattering layer. I would leave the yellow one, but removing black and white without affecting the yellow is unrealistic.
This is what it looks like in the light. Despite the white backlight, the numbers are still yellow thanks to the yellow filter, so you will have to remove it, although I didn’t want to.
Illuminated fuel and temperature gauges. I was afraid that there would not be enough three LEDs for the scale, but it turned out to be in vain - the scale is illuminated evenly, the gradient is not noticeable to the eye. Yes! As a result, only 3 tracks remained.
Rear temperature and fuel gauges. The light filter has been partially removed in the right places.
Ready-made temperature and fuel scales.
I remove the light filter on the tachometer. I use nail polish remover and pieces of cotton pads (we take everything from my wife/mother/sister’s arsenal). The technology is as follows: soak the pieces in liquid and apply to the area for a minute. While we are making the next one, the previous one soaks and the coating can be easily removed with a fingernail. Carefully! The front side is very sensitive to solvents, especially alcohol!
Installing tachometer backlight. Hot glue from a “gun” serves as supports and at the same time fasteners. The downside is that in this version the tachometer is not removable.
Finished tachometer scale.
"Combined" lighting. LED tachometer, regular speedometer. The temperature scale and fuel gauge are double backlit. Here the photo does not convey the effect quite correctly.
Speedometer backlight board. The main difficulty, it turned out, was precisely here. Due to the built-in odometer, the speedometer device is very bulky and there is very little space left for illumination. As a result of trimming and pointing, very little remained of the scarf.
Rear speedometer backlight board. I had to restore the path this way
I'm installing the speedometer light. Two lights didn’t fit, so I moved them to the side surface
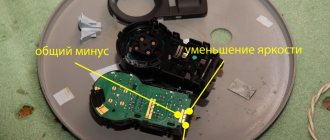
I turn on the speedometer light and check it. Between the tachometer and speedometer, the common plus and minus are brought out into the T10 socket; a protective diode and a common current-limiting resistor (all from the same lamp) are also installed in it, plugged into the standard socket from under the backlight lamp.
Finished speedometer scale
Complete tidy. Currently in finished condition.
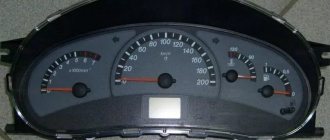
Appearance of the instrument panel on Lada Kalina
Dashboard for Lada Kalina
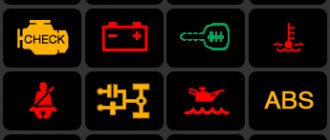
- Tachometer. Using it, the driver can find out what the crankshaft rotation speed is. The dial is divided into sectors. If the arrow is on red, this means that the engine is operating in a dangerous mode.
- Indicator of a malfunction of the system that controls the motor. This light turns orange when the ignition is turned on and goes out when the engine starts running. If it lights up while the engine is running, this means that the engine must be stopped and the cause of the malfunction eliminated. Operating the engine with the indicator on is prohibited.
- A diode that signals the activation of the left turn signal.
- Indicates low oil pressure in the system. After the motor starts running, the indicator goes out. If the light stays on for more than 5 seconds after starting the engine, this will indicate that the oil pressure in the unit is insufficient.
- ABS. Lights up when the ignition is turned on and goes out two seconds after starting the engine. If it continues to burn, this will indicate that the brake system is faulty. It is not recommended to use the car in this case. We need to find the problem and fix it.
- Immobilizer. Lights up orange. The driver can use it to determine the operation of the car’s security system.
- Coolant. The indicator displays the temperature of the coolant in the system. After starting the engine it goes out. Also, during operation of the car, the indicator may light up when the fluid temperature is above 115 degrees. When the temperature drops to 110 degrees, the light bulb will go out. It is not recommended to operate the vehicle if this indicator is constantly on. This may lead to motor failure.
- Parking brake. After starting the engine it goes out. If the indicator lights up while driving and a beep is heard, this will indicate that there is not enough fluid in the brake system. If the indicator lights up, it is prohibited to operate the vehicle.
- The light indicates that the right turn signal is on.
- Battery. Lights up red. Goes off after starting the engine. If the light comes on at full intensity while driving, this means that the battery charge is low. In this case, the alternator (or alternator belt) or voltage regulator may be faulty. It is prohibited to operate the machine with the indicator on.
- Speedometer. Shows the speed at which the car is moving.
- ESC. Lights up yellow. Goes off after starting the engine. If “ESC OFF” lights up while driving, this indicates that the system is not working. If the lamp flashes while driving, this will allow the driver to understand that the system is working. In all other cases, the lamp will indicate that the exchange rate stability system is not working.
- Shift to higher gear. Not applicable on this car.
- High beam. It indicates that the high beams are on in the car.
- Fog lights. It says the rear fog lights are on.
- Low beam. The car has low beams on. If the headlight does not light, check the fuse, then replace the low beam lamp.
- Front fog lights. Indicates that the front fog lights are on.
- Reset daily mileage. When you press the button, the counter is reset to zero.
- On-board computer display.
- Unclosed doors. Indicates that one of the doors in the car is not closed.
- Fuel. Indicates the amount of fuel in the tank. It is not recommended to allow the gasoline in the tank to run out completely. This may cause the fuel pump to fail.
- Tire pressure. Indicates insufficient tire pressure.
- Power steering indicator. Lights up orange. After starting the engine it goes out. If the lamp lights up while the engine is running, this indicates a malfunction of the amplifier. The problem needs to be fixed.
- Unfastened seat belts.
- Motor malfunction. Not used on cars.
- Airbag condition. Goes off after starting the engine. If the lamp continues to light, this indicates a malfunction. The problem needs to be fixed, because if necessary, the pillow will not open.
Ignition is on, check indicators come on
On-board computer display
On-board computer display (explained below)
All data is processed by a trip computer. It is installed on the car depending on the configuration. There are three types of such computers. The difference between them is the amount of information they provide to the driver.
- Current time or gear shift prompt indicator.
- Car mileage.
- Outside air temperature.
- Gasoline level in the tank.
Replacing instrument panel lamps Kalina
During vehicle operation, the backlight of the vehicle's instrument panel may burn out, causing some of the readings to lose their illumination. There is no need to disassemble the “tidy” for this. This instruction tells you how to change the light bulbs on the dashboard of a Priora or Kalina. The process looks similar on both cars.
You will need : remove the instrument cluster, buy new backlight lamps for the instrument cluster (A12-1.2 W1.2W with a power of 1.2 W).
Procedure:
- Turn the panel with the back side facing you.
- Remove the backlight bulb by turning the socket counterclockwise.
We install the lamp and socket in the reverse order.
The panel can use various sockets, some of which require the use of a soldering iron to install the lamp. In this case, to save time, it is recommended to buy the lamp together with the socket assembly. By the way, you can use LEDs instead of conventional lamps. When installing them, observe the polarity, otherwise it will not burn.
The entire process of replacing lamps in the instrument cluster is also shown in the video:
Let us remind you that the backlight can be modified so that it turns on with the ignition.
With the panel in the Lada Kalina model, situations sometimes occur related to the failure of the lamps responsible for providing the backlight. This creates certain inconveniences in driving, which is especially important during the dark period of the day. Here the driver loses immediate control over the state of various vehicle systems, the indicators of which are present on the instrument panel. Since the resulting situation can provoke a dangerous situation on the road due to the driver’s distraction from the situation, it must be eliminated as quickly as possible. Many car enthusiasts are interested in the question of how to change light bulbs, as well as how to remove the instrument panel, and questions about what kind of backlighting the instrument panel should have.
Preparation before replacement
Replacing light bulbs in the dashboard is a complex operation, so even an inexperienced Lada Kalina owner can carry out work of this nature. The greatest difficulty is getting to the mounting locations for the lighting elements. The disassembly procedure is performed not only to replace lamps that have become unusable, but also when there is a desire to install LED analogues.
The essence of the preparatory work is to dismantle the panel itself. After that, we stock up on the following tools and diagnostic tools:
- tester;
- a set of screwdrivers;
- new lighting components.
Replacement of instrument panel light bulbs should be carried out in a sufficiently lit area.
Step-by-step replacement process
Now we’ll tell you how to change light bulbs. In order to ensure correct replacement, it is recommended that specialists perform the entire list of manipulations in the following algorithm.
- After dismantling the panel, using a Phillips screwdriver, unscrew the two screws holding the Lada Kalina speedometer unit.
- Now we move on to disconnecting the electrical connectors of the wires from the panel. It is important not to confuse the connection points. For this purpose, it is recommended to perform additional cable marking.
- Next, using a tester, we check each lamp separately. If any of the lighting components is faulty, then we replace it with a new analogue. The lamp is removed using pliers. To do this, hold the base with them and turn the lamp counterclockwise. We install a new lamp on this seat, performing manipulations according to the reverse algorithm. We do this with every lamp that has become unusable.
- We return all dismantled interior components to their original places and make connections with the on-board network, eliminating the possibility of confusion.
- We check the result of the operation performed by turning on the ignition. If everything is done correctly, the lamps will glow, illuminating the panel.
Replacement of the dashboard light bulbs is complete. The owner will spend about two hours on the work, taking into account the preparatory procedure and the use of a full list of tools. Sometimes owners encounter various kinds of difficulties in the process. In such cases, we recommend contacting a specialist or watching online training videos on relevant topics.
How to install LED sources?
Quite a lot of Lada Kalina owners are fans of tuning. They are leaning towards replacing the standard lamps present in the panel with LED options. These components are significantly brighter than their traditional “competitors,” which radically changes the appearance of the panel, especially in the dark.
For installation, both the diodes themselves, which are to be installed in the mounting sockets for standard lighting components, and diode strips are used. In the second option, the products are glued around the perimeter of the LADA Kalina dashboard.
The following procedure is identical to the algorithm of actions described here. A significant difference is the need to file the tip of the diode before direct installation. This manipulation should be performed with the utmost care to avoid damage to the lighting component itself. Without the specified undercut, the diodes will not be able to provide light scattering, but will begin to direct the light beam to a point.
Let's sum it up
Replacing the light bulbs in the dashboard of a LADA Kalina car is a necessary undertaking. The safety of the driver largely depends on the serviceability of the panel lighting, because the time spent by him studying instrument readings in the dark will be significantly less when the entire list of lighting elements retains its functionality. Doing this is not problematic, especially if you know how to change it.
How to replace light bulbs in the dashboard
of a Lada Kalina
It is not often, however, that it happens that the backlight on the device panel stops working or works, alas, intermittently. Without glowing light bulbs, it is uncomfortable and dangerous to drive a car, both at dusk and at night. After all, the driver not only has to find a suitable item by touch, but he loses the opportunity to control the technical serviceability of the car, because the electrical characteristics simply will not be displayed on the dashboard.
Such a malfunction, as some have already guessed, leads to the creation of an emergency situation on the road, so it should be removed quickly.
Preparing to replace lamps
Replacing light bulbs in the dashboard of a Lada Kalina is an easy process, so even a driver without experience will be able to cope with such an event. The only thing that is more difficult in this work is to get to the lighting devices; this event is carried out not only to replace failed light bulbs, but also when, if the owner of the car wants to change an ordinary lamp to LED ones.
artempetroff › Blog › Overexposure of the Lada Granta (Lux) tidy
Today I’ll tell you about the overexposure of the Lada Granta
in one of the TOP configurations!
Go!
There are several interesting points about it and about the work - so I decided to share, despite the fact that there was already a grant
In general, we have a panel from Granta in the “maximum” package “Luxury” (without navigation).
The changes on the panel are immediately noticeable
Compared to stock:
- Second screen from the top - Plastic wells on the scales. — Changed arrows (beautiful by the way :-))
—
Various additional indicators
(for robot, e-gas, cruise control, navigation, etc.)
Unfortunately, there’s “green stuff”
from the factory.
The tasks were set: - Replace green with white - Arrows from orange to red - Invert LCD Screens - Smooth ignition and brightness adjustment
Disassembly... in general, like a regular panel, from simple configurations...
with one BUT:
- Top screen. You only need to disconnect it by removing the scale itself and pulling it out of the plug - the CABLE. If you don’t do this and immediately remove the board, you will most likely break this cable... and end up with a new device (and it’s new, I looked at 8-10k
)
So pay attention to this! I hope the information will be useful for someone!
Having disassembled it, we see that the board layout and the components themselves are located differently
Resoldering the diodes did not cause any problems
. It's business as usual here.
But what can't be said about displays?
. more precisely about the new, TOP!
The fact is that it is of
a different type
, not like the bottom one - symbolic, the top one here is pixelated, monochrome!
a polarizing film
on top , and it would seem to need to be turned over.
no such luck
:
Then it turned out something more or less)
But it immediately became clear that it would have a different
- lighter blue
.
After the arrow turns to RED
, I noticed again... that the arrows on this device are really nice
…
Overexposure (backlight tuning) of the instrument panel Lada Granta, Kalina 2
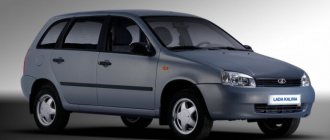
The dashboard of Granta or Kalina can be called modern. This can be confirmed not only by its appearance, but also by the use of LEDs, rather than lamps, to highlight readings and indicators. Let's look at how you can change the standard green color of the instrument panel backlight.
Which LEDs to choose for instrument panel illumination
To highlight the readings in the Granta or Kalina instrument cluster, green SMD-3528 LEDs are used. Instead, you can use SMD LEDs of different brightnesses. Here are the most commonly used:
- very bright SMD 5050 (luminous flux - 15 Lumens);
- bright SMD 3825 (brightness 7-9 Lumens)
- medium brightness SMD 3528 (about 5 Lumens);
- medium brightness SMD 3028 (about 5 Lumens);
- not bright SMD 3020 (about 4 Lumens);
- not bright SMD 3014 (about 3 Lumens).
The numbers after SMD mean the ratio of width and length, for example, an SMD 3528 LED has dimensions of 3.5 mm by 2.8 mm. You can buy everything you need on AliExpress (see catalog).
The approximate difference in LED brightness is shown in the photo:
Please note that using very bright LEDs to illuminate the instrument panel, reading readings in the dark may not be comfortable (they will dazzle). In this case, you can reduce the brightness by tinting the dashboard with film (we select the light transmittance to taste)
We recommend using SMD LEDs with a luminous flux of up to 5 Lumens for tuning the instrument panel.
How to change the color of the instrument cluster illumination
1. Use SMD of the desired color. For example, use white LEDs to illuminate one part of the panel, and blue LEDs for the other.
2. Use a light filter (electrical tape or film of different colors) together with white LEDs. We stick it on the desired area, as a result of which we get the illumination of the desired color. To change the color, you do not need to use a soldering iron, just disassemble the instrument panel and stick a film of a different color.
It is worth noting that the hands have an orange coating. To change the illumination of the hands, wipe off the varnish with nail polish remover and, if necessary, apply a new varnish of a suitable color. Another option is to use LEDs for the arrows of the desired color.
You can change the backlight of the screen (display) not only by replacing its LEDs, but also by turning the film over. First, we tear off the film from the display, clean the remaining adhesive with a solvent and glue the film on the back side. This results in an inversion of the panel display:
3. Use RGB-SMD LEDs. If you want to change the backlight color at once. In this case, you will have to additionally output switching control.
Do-it-yourself dashboard overexposure
You will need: remove and disassemble the instrument cluster, SMD LEDs (unsoldered from LED strip or LED lamp), soldering iron.
The process of replacing LEDs on the instrument panel board consists of unsoldering the standard SMD LED and soldering a new one in its place. During such tuning, there are several important points to consider:
- take your time so as not to damage the conductive traces of the board;
- observe the polarity (SMD LEDs have a bevel on one side, install a new LED in the same position);
- do not overheat the LEDs; high temperatures may cause them to fail;
After soldering the required LEDs, it is recommended to check the backlight. To connect the instrument cluster at home, you need to apply +12V to pins 19 and 21, and ground to 17. You can also verify that the installed LEDs are working properly using a multimeter in “tester” mode, connecting the probes to the LED according to the polarity (red probe is plus) :
If all LEDs are installed successfully, reassemble in the reverse order. Relighting the instrument cluster of Grants or Kalinas is a great way to make your car more individual and stylish. It is noteworthy that there are a lot of options for implementing such panel tuning, but which style suits you best? Participate in the survey, share video materials and photos of your improvements.
Let us remind you that the website presents other modifications to the instrument panel, for example, you can reflash it and install an outside air temperature sensor.
Photo: logbook ARIST0KRAT and serg156
Keywords: instrument panel Lada Granta | dashboard of Lada Kalina | interior lighting for Lada Granta | interior lighting for Lada Kalina | torpedo Lada Granta | Lada Kalina torpedo
Found an error? Select it and press Ctrl+Enter..
How to remove the instrument panel on a Niva 4x4 (VAZ 2121, VAZ 2131) Installing LEDs instead of lamps in the headlights (DRL) of Lada Vesta, Kalina 2 and Granta Replacing light bulbs in the dashboard of Lada Kalina, Priora
Replacing light bulbs in the dashboard of Lada Kalina and Priora. When everything broke again
oapv; User menu oapv View oapv profile Read diary View downloads. Reputation weight: Re: Illumination of the instrument cluster and controls - 1.
Good afternoon The backlight of the instruments, as well as the light control module and the climate control unit, stopped working completely.
At the same time, the tidy indicator lamps work, as well as the tidy itself. But the glove compartment light bulb turns on when the headlights are turned on, as it should, the interior lighting and the radio are working normally. Where to look and what to do? User menu madbee View madbee's profile. Cigarette lighter illumination, probably!
I have a Granta console installed, so the cigarette lighter is in the ashtray and sparks periodically. Which wire is responsible for lighting the cigarette lighter? And how do I actually fix the dashboard lights? Don't kick with your feet, nothing electrical. madbee. Reputation weight: 0.
The lamps in the upper part of the instrument panel do not light up, the illumination of the tachometer, speedometer and coolant, fuel level. At the bottom, everything is on fire. In addition, the backlight lamps on the dashboard and the cigarette lighter do not light up.
Replacement of the Lada Granta dashboard
As you know, AVTOVAZ removed the internal combustion engine temperature scale from the panel on the new Grants and Kalinas and left only the overheating light, but if it lights up, then this is already the beginning of the end. Therefore, in luxury trim levels, the coolant temperature display was added to the on-board computer readings, and for all others, only a collective farm is assumed in the form of installing additional screens in place of button covers or external On-board computers.
To fix this problem, you can update the dashboard firmware of Lada Granta and Kalina 2 cars.
First, we find out what version of the firmware is embedded in the instrument panel.
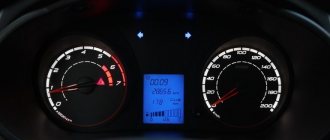
- With the ignition off, press the daily mileage reset button on the panel and, without releasing it, turn on the ignition, the service mode of the panel is activated, in which all the indicators light up and the arrows begin to move
- release the button and press again. Numbers will appear on the display, this is the software version
Now let's decipher them
The first numbers (2190 or 2192) indicate the car model (Granta or Kalina 2). This is followed by the numbers 00, 20 or 40, which stand for “standard”, “norm” or “lux”, respectively.
Now, using the table below, you can see if it is possible to flash your panel so that it displays the temperature.
FIRMWARE VERSIONS OF INSTRUMENT PANELS LADA GRANT AND KALINA 2
Here is an example of firmware for the Grants Norma panel. Initially, the panel is sewn with firmware 090
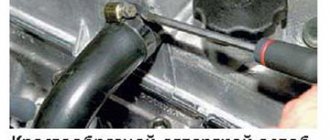
We take out the panel, remove the back cover, and connect the programmer to a special connector on the panel board.
We upload the new firmware and go try it in the car. As you can see, the version has been updated and now firmware 092 is installed
And using the buttons on the right switch we switch the on-board computer readings and see that the temperature display has appeared.
In preparing this article, information was used from
As we know, the standard equipment has an instrument panel without BC.
In general, about a month ago, I bought myself an instrument cluster from a used luxury grant. I wish BC would appear.
Since the device was used, it did not work correctly. Namely, the indication of ABS, faulty brakes and transmission was on.
There is also no indication of low and high beams, although during the instrument test the diodes are lit, which means they are working. To fix this problem, you need to go to the OD and reset the instrument panel configuration. I took a different path. I ordered a USBDM programmer from Aliexpress. And then my programmer arrived. Solving the matter is not difficult, I was guided by ready-made tips from these entries: www.drive2.ru/l/6010764/?page=1#commentswww.drive2.ru/l/8229206/www.drive2.ru/l/7673604/Thanks to the authors!
In general, I decided to upload the firmware from Kalina 012, and was led by the gear shift prompt. I’ll say right away that it didn’t appear, for what reason I don’t know. The ECU firmware I have is I484GR15, the same is on my brother’s car with the 025 configuration, it all works there. Also on the 025 configuration there is a 2-display tidy and another steering column switch with a joystick. Maybe there is no prompt because there is no switch with a joystick? But for this device it doesn’t seem to be needed. I used the EraseMass function to erase everything unnecessary, restored the mileage, activated the immo again. The abs, brake and transmission indicators went out, since I don’t have them, everything seemed to be fine, but the low and high beam indication did not appear. Why? It’s not clear... There are also differences: on the PO-38 the turn signals beeped, but on the 012 they didn’t.
The dashboard of Granta or Kalina can be called modern. This can be confirmed not only by its appearance, but also by the use of LEDs, rather than lamps, to highlight readings and indicators. Let's look at how you can change the standard green color of the instrument panel backlight.
Briefly about the panel features
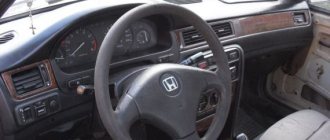
The combination of instruments under consideration has its own characteristics; 39 instruments “get along” with sufficient brevity, which is quite reasonable. All components will delight you with an excellent appearance. The instructions clearly show this. The car’s belonging to the domestic industry is indicated by the logo in the center of the steering wheel.
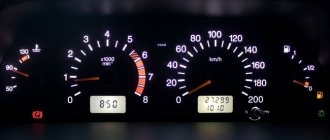
Traditionally, the main instruments are positioned as a pair: speedometer and tachometer. Due to the large numbers, it is convenient to read the data without being distracted for long from the road situation. At night, the dials will be illuminated with a gentle green backlight, which will not strain the “pilot’s” eyesight. Among the designated main instruments, the trip computer display for LADA Granta has found its niche. It allows you to quickly track fuel consumption and specific mileage.
There are 4 air ducts located along the edges of the panel perimeter: a pair is concentrated in the center, and the manufacturer placed the remaining two elements at the edges.
The basic equipment will delight you with the presence of a current element of the safety system - the airbag of the same name. The instrument panel displays all this.
The central part attracts the eye with a harmoniously placed radio tape recorder. For the “Standard” and “Norma” equipment versions of the Lada Granta, there is a niche cover at the location of the device.
Its dismantling is not capable of generating difficulties for LADA Granta owners. The constructive idea is implemented in such a way that any average person can figure out the algorithm for removing it for subsequent installation of the device.
How to remove the instrument panel on Lada Largus
Removal and installation of the Lada Largus dashboard
The interior of such a popular car as the Lada Largus is almost identical to the interior of the Renault Logan. Almost the same central panel, round channels and buttons. A short time later, after changing the appearance of the dashboard, the buttons on the center console have a new design, and the lining is made of lacquered pianoforte. The weight of the instrument found a nice silver edge.
The Largus instrument panel itself is a prefabricated structure consisting of a frame and a decorative panel. The frame is made of steel reinforcement. It is supplemented with system units and wiring harnesses, as well as all steering elements. The frame itself is attached to the front panel, A-pillars and the base of the body. It is part of the body's power structure.
Lada Largus Information panel
As for the decorative panel, it is a rigid molded plastic piece that is screwed to the frame. In addition, the elements are attached directly to it. driving a car in general, ventilation and heating (air conditioning) systems in particular. It also has controls and covers that cover the under-dash assemblies or are needed to install controls, gadgets, glove box and air vents.
Disassembly procedure
Sometimes you need to replace a part under the dashboard or even replace a complete frame or trim panel
It is important to know how to do this yourself, because there are different cases in life, and this knowledge can be useful
To remove the dashboard, you will need a special plastic mounting knife or a flat-head screwdriver. You will also need TORX T20 and T50 wrenches and Phillips screwdrivers.
how to remove the instrument panel Lada Largus 2015, how to roll it at home
. How to turn yourself into a Renault Logan 2013 at home How.
Removing the dashboard
The disassembly procedure itself consists of steps in a certain sequence:
First you need to disconnect the terminal from the “-” battery. Then remove it from the bracket attached to the windshield. After this, the wheel is removed. The next step is to remove the switches on the steering column assembly with the driver's airbag. Then you need to remove the entire combination of tools. The tunnel floor is then laid. The lining of the two front body supports has been removed. Then carefully punch through the edges of the center panel
dashboard and disconnect it from the panel itself. It is important to understand that there is a possibility of resistance to the spring clips, and proceed with extreme caution, as rigid latches and excessive force will not detract from the appearance of the trim or panel. The next step is to disconnect the wiring block from the central locking switches, front door windows, alarms, rear window and dashboard center cover. Then remove the main audio system unit. Next, remove the screw that holds the trim panel through the open hole. By lightly pulling the axle, you can remove the headlight range control. Then remove the 2 screws that secure the controller to the panel and insert the controller into the panel. It is also important to carefully lift and rotate the left and right decorative screw caps on the lower instrument panel mounts. Next step. Remove the two screws that secure the console to the bracket on the chassis base. Then unscrew the bottom side fixing screw to the right and left. Then unscrew the two top side mounting screws to the left and right. Next, the wheel position levers are removed. The next step is to remove the front and right rear mounting studs. After completing all the above steps, you can remove the entire dashboard by removing the diagnostic connector from the storage slot during removal.
After replacing the necessary parts, the instrument panel must be replaced by performing all operations in reverse order.
In the video. Replacing light bulbs on the dashboard:
As can be seen from the description of the disassembly, the action is not too complicated and is quite capable for any car owner. Therefore, if you need to replace the panel yourself, then you can do it, it will not be difficult.
Removing the center trim
Before you begin the repair procedure for the Kalina stove backlight, you need to stock up on everything you need. The list of required tools is modest: you will need Phillips and flathead screwdrivers, LEDs with resistors or assembled lamps. The algorithm for removing the center console itself is as follows:
- Turn off the radio. The device is removed completely after first disconnecting the wires going to it.
- Removing the plugs. The plugs located next to the alarm button are removed by pressing them from the inside through the space vacated by the tape recorder.
- Freeing the emergency lights from the wires. The plug is held in place by a latch on the button, but there is enough space here for comfortable manipulation.
- Unscrewing the bolts. Two screws for a Phillips screwdriver are hidden under the plugs; if you unscrew them, the console will only be held in place by the latches around the perimeter.
- Removing the heater adjustment levers. To remove them, you need to pull them towards you with a slight force. It was possible to remove them earlier, the main thing is not to forget (note that the speed controller does not need to be removed).
- Removing the center console. Starting from the bottom, you need to pull the console towards you, removing it from the metal clips. Try not to make too sudden or rough movements to avoid damaging the panel.
- Disconnecting the last wires. After removing the console, you have access to the wires leading to the speed controller, as well as the lighting bulbs. This is the last thing holding the plastic module.
In situations where it is difficult to remove the radio, a flat-head screwdriver will come in handy - you can use it to remove the plugs. Then standard actions are carried out according to the algorithm, only the wires from the radio are disconnected in the last step.
Replacing dashboard light bulbs “Lada-Kalina”
To install new elements you will need to disassemble the “tidy”. For Lada Kalina, work according to the following algorithm:
- lower the steering wheel down (otherwise it will get in the way; the regulator is located behind the column);
- unscrew the self-tapping screws securing the cover (get from below);
- pull the part towards you;
- unscrew the fasteners with a magnetized tool;
- disconnect the wires with the block by tilting the panel.
During the process of replacing the Kalina dashboard lamps, be careful not to lose small parts. When going on a road trip, make sure you have a spare “lighting” kit and a minimum set of tools in your car. Then an unexpectedly faulty dashboard will not become a critical event - you can quickly correct the situation. If you have doubts about your own knowledge, find a video with step-by-step instructions.
Removing the instrument panel
Dismantling the Lada Kalina instrument panel is carried out as follows:
- lower the steering wheel to the lower position so as not to interfere. The regulator is located under the steering column;
- Unscrew the two screws holding the decorative trim. They are located in the upper part, you can get to them from below;
- pull out the cover by moving it towards you;
- Using a magnetized screwdriver, unscrew the two fasteners holding the instrument panel;
- tilt the panel and disconnect the block with wires. She is there alone, no other elements hold the dashboard.
It is necessary to act carefully and ensure that fasteners do not fall inside or onto the floor.
Sequence of replacing the backlight lamps of the Kalina dashboard
The technology is very simple. To remove cartridges, turn them half a turn counterclockwise. Remove the burnt element with your hands or pliers, picking up the shank. Install a new spare part. Install the cartridge (turn clockwise).
This will eliminate the need to repeat the procedure in the near future. Although it is simple, it is still labor-intensive. Another important advantage of this advice is the uniform illumination of the entire “tidy” (the elements produce a glow of different intensities over time). The work is quite simple, but you should not lose your vigilance - there is always a risk of damaging the threads or thin elements.
Step-by-step replacement instructions
Replacing light bulbs is not difficult. In order to remove the cartridges, you need to turn them half a turn counterclockwise. Procedure:
- remove the burnt out lamp. You can do it with your bare hands, but more often you carefully grab the cartridge shank with narrow pliers and easily turn it counterclockwise;
- insert a new lamp into the socket;
- install the cartridge into the socket by turning it clockwise.
Advice! Experienced users recommend changing the entire set at once in order to know exactly when to start using it. Having to repeat the entire procedure a week later because a nearby light bulb has burned out will not make anyone happy. In addition, all lamps will have the same brightness, which will provide uniform illumination of the panel. If this option is not suitable, you can arm yourself with a tester and check the lamps for functionality. After this, the burnt-out copies are replaced.
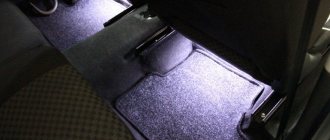
LED-based instrument lighting
It often happens that the dim factory backlight of the instrument panel confuses the instrument indicators or is not visible at all. Also, due to such illumination, the driver’s eyes get tired, which can lead to an accident.
The most modern method is LED lighting based on strips. Firstly, they are easy to buy at any auto store, and secondly, they are quick and easy to install. The first thing we need is to remove the instrument panel, depending on the make and model of the car, the panel is removed in different ways, so we will not describe the process of unscrewing and removing the panel.
Next, you should be good with a soldering iron; you will need to remove the standard light bulbs and solder an LED strip in their place. As a soldering fastener, you can use two small wires, but not very thin ones; they can burn out due to the load.
It is advisable to place the LED strip evenly over the entire surface. As practice shows, it is better to solder several short strips than one long one, and the likelihood of combustion is less, and there will be no load on one power supply.
If you are not comfortable with a soldering iron, then it is better to turn to experienced ones, since here you need to be careful and careful, the slightest short circuit can burn the entire instrument panel.
Once all the strips have been soldered, it’s worth checking, connecting the instrument panel with a surface-mounted installation and turning on the backlight; if everything is done correctly, all the strips will glow. The strips themselves can be attached using double-sided tape, so the backlight will be distributed evenly across all devices. All that remains is to put everything back together in reverse order, tighten the instrument panel and enjoy.