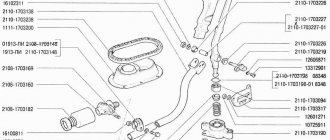
Replacing the backstage on VAZ 2110, VAZ 2111, VAZ 2112
Welcome! The rocker - it is responsible for changing gears in the car, it stands under the bottom of the car and goes into the interior, at the end of the rocker (on its rod) a cover is put on, which is popularly called the gearshift knob cover, you also grab this cover when changing gears in the car .
Note! To replace the rocker on a car of the tenth family, you will need to stock up on: A set of wrenches, as well as an extension cord with a socket head and a screwdriver!
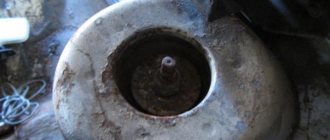
Where is the backstage? As mentioned earlier, it is hidden under a cover (Indicated by an arrow), so to get to it you will need to first pry the cover in the front part with your nails and then remove it from the backstage and then you will have almost complete access to it, and practically because that the rest of the rocker is located under the bottom of the car.
When do you need to change the backstage? Many people at the very last moment think about the rocker, because if the rocker is incorrectly adjusted or worn out, such things happen to the car that the first thing that comes to mind is a malfunction of the box, but still, let's look at these things that will tell you that the rocker is not adjusted correctly or needs to be replaced, firstly, the rocker may stop engaging the first gear, and with the exception of all the others except the first, the fifth may not engage, and the last sign that also indicates a malfunction of the rocker is when you get into the car, engage first gear and then give the gas to take off beautifully, but instead of your car starting to move forward, it suddenly goes back into the car parked behind, of course I don’t want you to find yourself in such a situation, well, the point is that when malfunction or if the rocker is incorrectly adjusted, after engaging first gear, reverse gear can easily engage and you will go back without expecting it.
Backstage adjustment:
Note! Before you go to the auto store and buy a new rocker, be sure to try to adjust the old one first so as not to waste money, maybe everything is fine with the old rocker!
1) At the very beginning of the operation, we will tell you why the adjustment of the rocker may go wrong, namely, after removing the box, after replacing the cardan shaft, or after unscrewing the nuts and bolts that secure the tension clamps of the rods that come from the rocker, and in other cases.
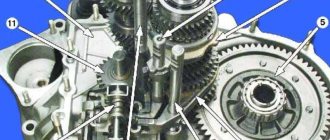
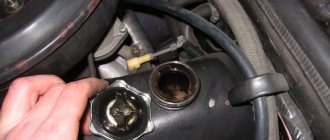
2) Now let’s move on to the actual adjustments, firstly, you will need to first drive the car into a pit or lift it using a lift, then climb under the bottom of the car and there you will find the boot under which the driveshaft itself is located (the boot is indicated by a red arrow), next to with this cardan and the boot that covers it, the end of the rod coming from the rocker itself will be attached, and this end will be attached using a tie clamp, so take two screwdrivers in your hands and with their help loosen the bolt nut a little (the nut is indicated by a blue arrow, and the bolt green), while when you loosen, hold the bolt itself with one wrench so that it does not turn, and with the other at this time loosen the nut, after the nut is slightly loosened, take a screwdriver in your hands and insert it into two holes, namely in the hole between the tie clamp (Indicated by a yellow arrow) and into the hole of the rod itself (Indicated by a white arrow), thereby widening both holes (In fact, these are not holes but a groove, so in the future we will use this word) so that the link rod can easily move relative to gear selector rod.
Lada Priora backstage repair
First, you should decide whether you will buy a ready-made short-stroke part or make it yourself. For Lada Priora drivers who have not upgraded components, we recommend choosing the first option. The instruction will be carried out taking into account modifications.
For work we will need:
- Two metal plates.
- Kardanchik from Kalina.
- Welding machine.
- A set of keys, including spanners.
- A grinder with a cutting wheel; alternatively, you can use a hacksaw.
Step-by-step instruction
- Repair and replacement begins with removing the decorative cover from the gearshift lever. The knob may not give in, but it is not secured by anything, so just pull firmly towards you;
After removing the cover, you can begin dismantling the lever
The next step is to dismantle the gearbox lever rod. Using the 13th key, you need to loosen the clamp and release the reverse gear start lock ball. The ball should be removed first. Remove the retaining ring. You can’t pull the gearshift lever up, deal with the ball first;
We take out the ball, spring and lever from the plastic case at the same time
The spring, retaining ring and ball are mounted in a plastic housing - remove all elements at the same time. The lever with the rod must be pulled out at the same time. To make it more convenient to work, you can disconnect the rod and gearshift lever. We continue the repair and move on to the cardan. There are latches on the left side; you can get to them after removing the cover; Now we can compare both parts, as you can see, the Kalinovsky cardan is longer.
You need to shorten the Kalina component, taking into account the type of new link. It is necessary to shorten the cardan by 10-20 mm;
When the adjustment of the cardan is completed, it can be installed in its normal place. Thoroughly lubricate it from the inside with lithol and screw it in. The cone bolt fits in easily, so be careful not to overtighten it. The traction is installed through the interior of the Lada Priora.
It will be easier to do the work with a partner: one stretches the rod, and the second holds it by the elastic band inside the car;
We stretch the backstage through the Priora's interior
- It is necessary to install a rod on the rod and assemble the reverse gear unit; it is recommended to lubricate the ball;
- Next comes the gearbox adjustment - install it securely and check how it moves between gears. We fix the rod with a clamp;
We install the lever, then it needs to be adjusted
Due to the installation of an aftermarket rocker, the reverse gear mechanism may not be aligned with the plate, so it needs to be readjusted; Remove the plate and set the hook. You will see a cutout in the plate - a part of the reverse gear assembly should cling to it. Adjustment can be made using a file, the main thing is not to overdo it;
Done, replacement and repairs are complete, all that remains is to install the cover.
Do-it-yourself adjustment of the scenes on a VAZ 2110
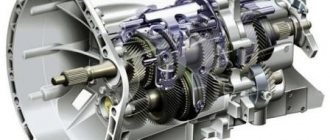
The gearbox of the car performs the function of blocking spontaneous changes in the gear ratio
It is very important that this component of the transmission is clearly adjusted, because the condition of the gearbox as a whole depends on it. With a precisely adjusted rocker, gear shifting will occur in a timely manner, clearly and with the correct position of the handle
Refinement, adjustment of the short-stroke gearshift link and replacement of the linkage bushing in the Lada Priora
I decided to start treating this painful problem - gearbox lever rattling.
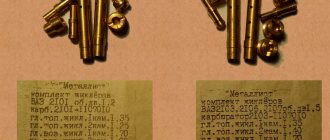
At first I thought to disassemble and simply change the repair kit for the rocker, but that was not the case, there is no repair kit for my rocker anywhere (the car is 12 years old). I took a photo of the catalog number of the link bushings, maybe it will be useful to someone or someone will get confused and still find this repair kit somewhere.
And as far as I know, this type of slide like mine has been installed on Prioras since the middle of '11. Then it was decided to cut out round pieces from under the canister and place them on both sides of the iron washers, that is, to increase the thickness of this entire structure... It could have been done easier, just grind off the bushing that is there by 1.5-2.0 mm somewhere. But I didn’t really like this idea...
It's no secret that the Priora has a congenital problem - the rattling of the gearbox driveshaft.
Lada Priora Sedan designer assemble it yourself Logbook Mileage and clutch replacement
In almost all Priora, the rubber boot of the gearbox driveshaft is destroyed after some time. One glance is enough to give a verdict: the boot is made of burnt rubber, so it doesn’t last long! The markings on the cardan shaft boot were not Balakovsky.
It was decided to replace the Priora boot with a Viburnum boot, and also replace the Priora gearbox driveshaft itself with a Kalina driveshaft - it is too praised on various forums.
| The original boot of the gearbox driveshaft was cracked, and there was even a hole in its “accordion” | |
| I purchased a Balakovo-made boot and a Tolyatti gearbox driveshaft, all from Kalina | |
| I had to tinker a little with the Kalina gearbox driveshaft: the Kalina driveshaft rod is longer than the Priora rod by about 2 cm. Since I didn’t have the opportunity to compare the Kalina driveshaft with my own driveshaft (it was still on the car at that time), I had to cut it “blindly”. I measured 1.8 cm from the edge and started sawing | |
| I don’t have a grinder, I sawed with a hacksaw for metal - it took about 40 minutes of time, 2 hacksaw blades and a slightly ground corner on the emery))) It’s very difficult to saw, because the metal is strong! After sawing off part of the rod, I made a conical chamfer using sandpaper and a file. | |
| Let's start removing the original gearbox driveshaft. We loosen the clamp and tighten the torn boot. Next, we unscrew the fixing bolt, but unfortunately this is not so easy to do: the bolt is coated with red thread locker and there is no way to unscrew it. The open-end wrench turned, “licking” the edges, but the powerful socket head did not fit; the gearbox housing interfered with it. In general, in order to remove the fixing one, stock up on spanners. Replacing the boot and drive shaft itself takes about 10 minutes | |
| I sawed at random, but the size was amazingly accurate - the length of the rod of the original Priora gearbox driveshaft and the Kalina gearbox driveshaft are the same! | |
| The original driveshaft of the Priora gearbox is essentially not a driveshaft at all: it bends only in one plane, while the Kalinov gearbox driveshaft bends in 2 planes. In addition, the photo clearly shows a huge gap of 2-3 mm on the original Priora driveshaft | |
| The anthers differ slightly, but the Kalinovsky anther has better workmanship than the original Priora anther | |
| A little about adjustment. While unscrewing the fixing bolt, the reverse gear jumped out. We had to manually select the desired gear using pliers, but we couldn’t do it the first time. Having assembled the mechanism, it turned out that in place of the reverse gear it turned out to be the first, and the second could not be engaged due to the reverse speed limiter. I had to redo everything. The repeated adjustment turned out even worse, only 3, 4, 5 gears remained. It was possible to adjust it normally only the 4th time, using pliers to find the reverse gear. And we found it this way: having removed the link and clamped the cardan shaft with pliers, turned it counterclockwise until it stops and pushed the hinge forward. In order to make sure that we had engaged reverse gear, I started the engine and carefully moved off - the car went backwards! Let me make a reservation right away: absolutely nothing will happen to the box, nothing will fly out or break. | |
| We install the gearbox driveshaft in place. Having straightened the clamp clamp a little, we connected the gearbox driveshaft to the rocker, set the lever to the reverse gear position and tightened the clamp clamp! The check showed that all the gears are there and they work perfectly. The feeling is very pleasant, the gears are engaged very softly and smoothly, no snagging. The lateral play of the lever has not changed, the longitudinal play has become smaller, but this difference is not noticeable either while moving or standing still. The position of the lever has changed a little, it has become a little closer to the driver’s seat, but it doesn’t touch anything, and it’s not noticeable from the outside, just by feeling it! But now you don’t have to reach so far for fifth gear |
Installing a short-stroke rocker on a Lada Priora - step-by-step instructions
5. We take out the lever together with the rod through the interior; for convenience, you can disconnect the lever from the rod, although you don’t have to do this.
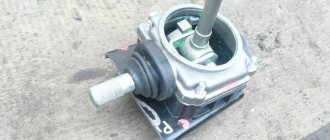
6. Remove the cardan. First of all, you need to pull off the rubber boot, then using a “10” wrench, unscrew the fastening bolt on the left side of the cardan.
7. As you can see in the photo, the cardan rods differ in length. The problem is solved by shortening the Kalinovsky rod; this must be done taking into account the type of short-stroke link. In some cases, the rod may not go in completely, as a result the gearbox lever will move towards the handbrake. If you also need to shorten, then know that you need to cut off about 1-2 cm.
8. So, we install the “Kalinovsky” cardan, having previously lubricated it with lithol from the inside. The bolt screws in easily because it has a cone shape, but do not overtighten.
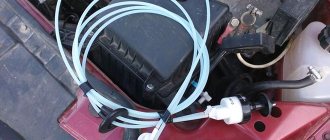
9. Traction is also installed through the interior. It’s more convenient to do this in pairs with an assistant: one holds it by the elastic band in the cabin, and you carefully pull the traction.
Also check out
- Install the Kalinovsky cardan by applying lithol to its inner surface. Since the bolt is cone-shaped, screwing in is not difficult.
- The thrust should be installed through the interior. It's good if you have an assistant nearby. He will hold it by the elastic band in the cabin, at this time you need to stretch the traction.
Assembly is performed in reverse order
- First, we put the rod on the cardan shaft.
- Then you can begin assembling the reverse gear locking mechanism. Lubricate the spring ball.
- Adjust the gearshift lever.
- Tighten the clamp on the rod.
Attention!
If you first assemble the reverse gear locking mechanism, the long rod will not allow you to put the rod on the cardan shaft. The problem can be solved by shortening it. It is important not to forget to put the boot on the driveshaft.
How to install a short-throw rocker on a Priora
How to make a short-throw rocker on a Lada Priora
Adjust the reverse gear locking mechanism, since the consequence of adjusting the scenes is that the mechanism does not match the plate to which it clings. The problem can be solved by removing the plate and adjusting the hook (it is a cutout on the mounting bracket). You can sharpen it with sandpaper or a file.
The photo shows the adjusted toe.
Installation of a short-stroke rocker on a Lada Priora
To complete the procedure, you need to put on a manual transmission cover with a knob.
The device of the backstage at the Priora gearbox, the main malfunctions and solutions
On a Lada Priora car, replacing the gearbox seal does not cause serious difficulties.
The rocker is an integral part of any car with a manual gearbox (MT). The comfort and safety of driving depends on its condition. Therefore, every owner of a Lada Priora should know where the Priora checkpoint gate is located and how it works.
Gearbox lever play on Priora, rocker. Causes
Initially, all Priors of the early years of production suffered from increased play on the gearshift lever and, as a result, slurred and uninformative shifting. A couple of years later, AvtoVAZ heeded the groans of the owners and replaced the initially defective universal joint with the same one from the Lada Kalina.
How much this helped is known to those who installed the Kalinovsky cardan on the Priora’s rocker with their own hands. It didn’t help, at least it didn’t radically solve the issue with the lever looseness. And it’s difficult to solve it, since the design of the backstage itself (even after restyling and modification) looks dubious.
What to change in the backstage if it doesn't work
The only option to somehow improve the situation is to carefully refine each connection in the backstage with your own hands, without allowing a single inaccuracy. To do this, we will have to buy a repair kit for repairing the scenes of either the Lada Grant or the Lada Kalina.
Adjusting the car rocker
The gearshift linkage can be subject to tuning, for example, replacing the standard linkage with a short-throw one. After such a replacement, you need to properly adjust the rocker , otherwise you may have problems engaging gears . If there is no assistant nearby, then adjusting the rocker may require time and patience. Repairing the rocker is another reason why reverse gear does not engage or 5th has disappeared. adjust the rocker with your own hands in several ways: 1. Adjusting the rocker in reverse gear .
We turn on the reverse speed, loosen the clamp on the rocker and put the lever where it should be when the reverse is engaged (so that the handle does not reach the driver's seat a little), tighten the clamp. 2. There are cases when it is not possible to engage reverse gear, then you can try
adjusting the rocker in first gear .
We engage 1st gear, loosen the rocker clamp, turn the rocker drive counterclockwise until the gear lever stops in the plastic reverse speed clamp, and tighten the clamp. The neutral position of the lever is adjusted by the depth of installation of the link on the cardan.
If you are used to using manuals from AvtoVAZ, then read this chapter.