Antifreeze is running out, no vases are leaking
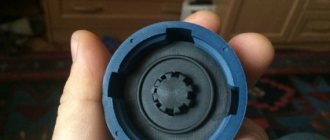
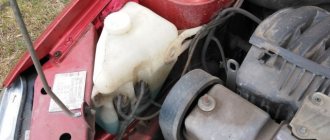
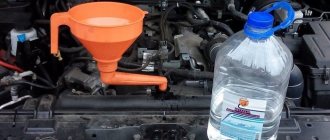
Recently, after a trip around the city, I noticed that the carpet on the right, passenger side was all wet. It was 35 degrees hot outside, there was no rain... Chozanah, I thought, and began to wonder where the liquid was on the rug. There may be several reasons: 1) Somewhere, something is not sealed and water got in from the outside - inside. But since I have viburnum and not granta, and there was no rain, this version can be excluded. 2) The stove was leaking. But this is bad. Changing the stove in a viburnum is like hemorrhoids. It’s easy to check: take a white napkin and pass the liquid through it; if the liquid is clear, then it’s not antifreeze, but if it’s green (red, yellow, or whatever antifreeze you have) then everything is bad and you’ll soon have to change the stove, and sometimes even brains that are located just under this very stove. In my case, it was water. 3) It’s hot outside, and since I love comfort, it’s natural that all my windows are closed, but the air conditioner is on. An air conditioner has a cold evaporator on which water condenses. Where does this water go?! Fortunately, it drains behind the engine compartment, and a rubber tube goes to the engine compartment, we look under the shelf, which is under the glove compartment, and see the following:
That's the problem.
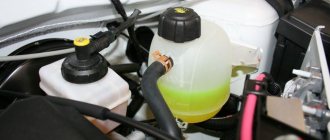
Naturally, the tube was immediately returned to its rightful place.
That's right.
And to prevent this from happening again, the tube was secured with a plastic clamp.
The problem is solved, nothing is leaking anymore. For those who have an air conditioner in their car, I recommend, for preventive purposes, to also secure the pipe with a clamp.
Clear downgrade problems
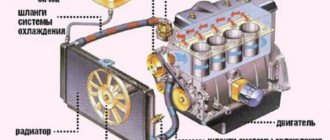
This is not entirely relevant to our question, but it’s worth mentioning. This needs to be checked first, and if you have not identified the reasons, then we will dig deeper. So, antifreeze may leak due to a leak in the system, let’s look at it point by point:
- Engine radiator leaked . Of course, this can be determined very quickly, just look at it and also look at the stains under the car; if it is leaky, there will be red, green or blue drops. Of course, you can try to solder or clamp the radiator tubes, but often the plastic component (sidewalls) is damaged, there is nothing you can do about it, you need to replace it.
- Heater radiator . Almost the same picture, only the interior heater is leaking, it is more difficult to diagnose, because the coolant will drip onto the seal (carpet) in the cabin. But the reasons for the determination are simple: if there is a smell of antifreeze in the cabin (sweet smell), but not outside. If the glass sweats even in dry weather, and there is an oily coating on the glass. Liquid leaving the tank means your heater radiator is covered, of course, if you remove the plastic (decorative) protection of the instrument panel, you will see that it is dripping somewhere. We do the same, either restore it, or if this is impossible, change it.
- Hoses . They wear out over time, because they expand each time (when the engine heats up) and contract (when it cools down), such work will sooner or later damage them, they will not be able to hold pressure and will rupture. Of course, there may be minimal damage, but it will leak constantly. It is useless to make hoses; it is better to replace them.
- Tubes _ The situation is the same as with hoses, they are metal and usually last a long time. But there are situations when they also occur.
- Thermostat and pump . These are two mechanisms that are designed to pump and regulate the flow of coolant; the housings are made of metal or plastic and they often leak, this happens from time to time. For replacement, they are practically not repaired.
- The cap of the expansion tank and the tank itself. The cap is a valve , after a certain mileage it also fails, if it does not hold pressure, then antifreeze from the expansion tank can splash out when warming up. The tank itself may also burst, because it is made of plastic; if the lid is faulty, it may rupture. For replacement.
These are obvious reasons, they are worth checking first - ALWAYS! It often happens that the driver searches and cannot find it, but antifreeze (antifreeze) goes into, say, the stove and then into the passenger compartment, which is quite difficult to immediately determine. Park the car in a dry area or in a garage, if possible, and observe, if there are stains the color of your coolant, then this is definitely a leak, look for it!
Reasons for the disappearance of liquid from the cooling system
There can be quite a few reasons why antifreeze disappears, the main ones being:
- leakage of the OS - the clamp is not tightened well, the pipe is torn, the radiator hoses have not been changed for a long time, so the rubber has become hard, etc.;
- The valve of the expansion tank plug does not work, because of this excessive pressure is created in the cooling system, antifreeze in the form of steam is expelled from the system;
- for various reasons, the engine constantly overheats, the antifreeze boils and also turns into steam;
- the head gasket is broken, coolant enters the oil sump or cylinders through a leaky seal;
- There is a crack in the block head.
Fixing leaks under the driver's feet — Lada Kalina Sedan, 1.6 l., 2006 on DRIVE2
Hi all. Some owners of viburnums have probably encountered such a problem as water in the cabin under the driver’s feet. I decided to share my method of solving this problem.
This problem happened to me after installing the bortovik. To splice the wire from the BC with the FLS wire, it was necessary to find a block behind the mounting block with the required wire. The problem was that the wires in the harness were tightly grouped and in order to splice the necessary ones, I had to slightly pull the harness towards myself. Apparently, after this manipulation, the rubber seal through which the harness passed into the cabin burst. The rubber band can also be torn when installing the alarm.
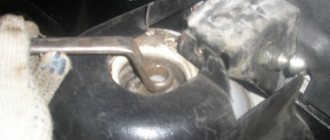
. After that, I began to notice that either after washing the car, or after rain, the carpet under the driver’s mat became like a sponge (if you pressed, water came out). It works like this: water flowing down the windshield exits through drainage holes in three places. One on the right under the cabin filter, the second in the middle, the third on the left. Under the hole on the left, in the wing, there is the same wiring harness through which water from the hole in a thin stream enters the cabin through a torn rubber seal.
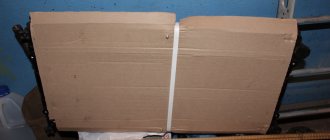
This is approximately where the wiring harness and rubber seal are located.
You can check by pouring a little water from a bottle into the hole and lifting up the carpet and sound insulation on the driver's side, observing how a trickle of water oozes through the wires in the corner. After reading the Kalina Club forum, I found similar problems, which were sometimes eliminated by generously covering the sealing gum with sealant. This procedure helped, but not for long. I decided to act radically I took a hose along the diameter of the hole, 30 cm long, and inserted a cut neck from a bottle for transmission oil into it (it turned out like a funnel, but with a flat head).
I installed this device and again checked for leaks.
Water no longer leaked into the cabin. PS: There have been good rains recently, everything is dry under the rug
Hidden problems
You have looked at everything and everyone, there are no leaks anywhere, all the hoses and clamps are in order, but the antifreeze or antifreeze goes away, “even if you crack”! The fact is that there are not only open leaks, but also so-called hidden ones, and they are much more dangerous.
A car engine is not a cast structure - there is a separate engine block and cylinder head. There is a gasket between these two parts, this is mandatory, it is high-temperature (can maintain high positive values), and it is also a sealing link. In the engine block, as well as in the cylinder head, there are channels through which antifreeze (antifreeze) passes, cooling the metal, thus the “entire engine” is at an operating temperature that does not exceed 90 - 100 degrees Celsius, without this fluid the engine would very quickly warmed up and it simply jammed.
So, the coolant also passes through the gasket, since it is an intermediate link (by the way, it has special channels). If the gasket is defective or poorly tightened, the tightness of the channels is broken and coolant can pass into the engine cylinders. That is, it will enter the combustion chamber, then through this chamber it will exit into the exhaust pipe, while the level of antifreeze (antifreeze) will decrease in the expansion tank.
What are the signs of such a breakdown?
- This is white and thick smoke from the exhaust pipe, it will really be like fog - we read about it here .
- The engine oil level will rise.
- The oil will be interspersed with antifreeze or antifreeze, that is, with bubbles.
- Coolant will leak out of the reservoir, and constantly.
In this case, it is 100% a gasket; we must change it. After all, sometimes antifreeze or antifreeze can get into the engine oil, and this is serious! Here the capital is just a stone's throw away.
- The oil mixes with the liquid and forms an incomprehensible “slurry”; it will begin to coagulate, which will clog all the channels - overheating of the engine is guaranteed.
- It will not be able to properly lubricate the engine cylinders, this will lead to wear of the piston rings.
- Also, this substance will clog all the channels on the crankshaft, which will also increase its wear; the liners in which it rotates can simply turn.
Obvious damage
Antifreeze is designed to cool a car engine. A liquid with many additives is used in warm and cold seasons. Most compounds allow you to operate the machine at temperatures below - 60 degrees. A complete lack of coolant in the system will lead to rapid overheating of the engine, it will jam, and the car will fail. It is very expensive to overhaul the most expensive element in a car, so you need to carefully monitor the technical condition of all elements . The most common breakdowns that can lead to a rapid noticeable loss of antifreeze levels are:
Antifreeze leak without visible smudges
Since coolant can leak from different places in the system, you need to know where and how to look for the problem area.
By visual inspection, you can identify areas of coolant leaks. The more it leaks, the easier it is to find the leak. The procedure should begin with the pipes, since on many cars they have free access. During the inspection, you need to carefully check each hose of the cooling system, especially if the elements have been changed a long time ago.
The pipes are checked by visual inspection
In hard-to-reach places, you can use a mirror to check. Damaged hoses must be replaced. If no leaks are found on them, they are still worth inspecting for preventive purposes. Additionally, the clamps are subjected to visual inspection. Sometimes it happens that a coolant leak is caused by a loose fastener. In this case, tightening the clamps more tightly allows you to get rid of the problem in question.
If the coolant leaves for no apparent reason, then most likely the fault is hidden, with antifreeze getting inside the engine.
The most likely cause of the leak is a blown head gasket or a broken seal between the cylinder head and the block due to engine overheating.
If the gasket is damaged, antifreeze enters the oil or combustion chamber
Antifreeze entering the cylinders may be accompanied by white smoke from the exhaust pipe, which is the result of coolant combustion. If the gasket is installed incorrectly or burns out, air bubbles can sometimes be observed in the expansion tank. It is impossible to operate a car with such a malfunction, since there is a high probability of damage to the head with subsequent expensive repairs. The malfunction is eliminated by replacing the seal on your own or at a car service center.
White exhaust indicates antifreeze has entered the combustion chamber of the engine.
If the reason lies in damage to the head, the assembly must be checked and ground on a special machine. Some car enthusiasts do the grinding on their own, but since the cylinder head is a responsible mechanism, this procedure is best carried out using specialized equipment in a service setting.
Troubleshooting methods
Auto repair technicians can quickly and accurately determine where the coolant goes. But sometimes the car owner simply has nowhere to go and needs to fix the breakdown on his own. In some cases this is possible:
- The pipes need replacing. If the breakdown makes itself felt on the road, the liquid can leave the system very quickly, so you can temporarily fix the crack with adhesive tape or tape.
- A crack in the expansion tank can be sealed. But this is another temporary measure that will prevent antifreeze from running at high speed.
- A stuck lid valve can be cleaned, this will help return the proper fluid level to the system. If cleaning does not produce results, then it is worth replacing the part with a new one.
Problems with the pump and radiator are very difficult to fix on your own. In rare cases, repair of important elements of the system is possible, but most often it is necessary to replace parts.
Have you encountered such an incomprehensible phenomenon, where does antifreeze go if it does not leak anywhere, because if so, then our post today will be devoted to this topic. And it doesn’t matter what kind of car you have, Hyundai Santa Fe or another, they all use a liquid called antifreeze in the winter season.
see also
Comments 18
he just went bad)))
Maybe the pump is leaking, the lower part of the radiator, the pipes, if there are cracks in everything then they can leak and of course the cylinder head gasket
What they write about the lid is correct. I also have a minimum. Only recently I noticed drips on the expansion barrel.
My radiator leaked in winter, there was a puddle under the car, but I couldn’t see any traces of where it was leaking from. 2 weeks later, only when the level began to drop quickly, did I notice where the leak was
One of the pipes is rubbing in the area of the generator belt. It drips onto the protection and then evaporates. So there are no stains under the car.
How to install exactly?
Inspection of pipes. It’s difficult to go to the service yourself. There is a lot of work there, 800 and the pipe itself.
Are there any oil stains on the surface of the antifreeze tank? Did you actually unscrew the cap from the filler neck? Have you looked at the dipstick?
From the filler neck of the antifreeze reservoir? Of course I unscrewed it and added antifreeze today. Screwed it back. I'll look at the spots tomorrow. What could this mean, if any?
No, the cap is on the oil filler neck. If there are oil stains on the antifreeze in the expansion tank and imulsion on the oil filler cap, then the gasket under the head has burned out, but not towards the cylinder, but into the oil channel.
Replace the cap on the antifreeze reservoir with a new one.
improper operation of the valve can lead to loss of antifreeze...
Antifreeze leak due to a broken head gasket
If the cylinder head gasket is broken, the antifreeze from the OS will also decrease, and the liquid does not always go into the oil sump; it can enter the cylinder, and then fly out of the muffler along with the exhaust gases. But in any case, with a broken cylinder head:
- the engine is adjusting, or one (two) cylinders are not working fully;
- craving worsens;
- detonation appears;
- the engine overheats.
If the gasket has just begun to “etch”, all these signs are almost unnoticeable, but the car still loses power to some extent, the engine heats up, and the coolant gradually leaves. The main signs of a broken gasket:
- thick white smoke from the muffler pipe on a warm internal combustion engine;
- cleanly washed spark plug electrodes of an idle cylinder;
- emulsion instead of engine oil;
- constant ejection of antifreeze from the expansion tank;
- presence of air bubbles in the coolant.
If you don’t have some experience, you shouldn’t undertake replacing the PGBC; there are many nuances here that you may not be aware of. The fact is that if the gasket is broken, the surface of the cylinder head can be deformed, the cylinder head in the area of the combustion chamber, the partition on the block between the cylinders can burn out, and often the piston rings “shrink” when overheated.
Only an experienced specialist can determine the condition of the engine after a gasket breakdown, and it is not always possible to “get away” with just replacing it; after the engine overheats, even major repairs may be required.
| Previous topic :: Next topic | |
| Author | Message |
| L'ier Inadequate. |
Registered: 07/12/2006 Messages: 7410
Today I topped it up again, looked at the spark plugs - they were dry, the engine had warmed up to 80 degrees, the antifreeze had not gone away yet, the radiator was cold, the engine was running either smoothly or as if it was adjusting (definitely cannot be called “troit”).
I changed the oil 2 months ago - Lukoil synthetic, on the dipstick and the cap - there is a little white emulsion, when warmed up, the dipstick is without deposits, there is an emulsion on the cap.
The smoke is normal, not white.
what thoughts still go into the block? or oil due to frost with emulsion? and what else to watch? remove the valve cover?
Added after 1 minute 20 seconds:
yes, and happy birthday to everyone! and coming!
Registered: 06/10/2009 Messages: 596
Registered: 10/06/2011 Messages: 101019 From: Tambov
Registered: 08/20/2009 Messages: 3377
How to find an antifreeze leak
Since coolant can leak from different places in the system, you need to know where and how to look for the problem area.
Visual inspection of pipes and clamps
By visual inspection, you can identify areas of coolant leaks. The more it leaks, the easier it is to find the leak. The procedure should begin with the pipes, since on many cars they have free access. During the inspection, you need to carefully check each hose of the cooling system, especially if the elements have been changed a long time ago.
In hard-to-reach places, you can use a mirror to check. Damaged hoses must be replaced. If no leaks are found on them, they are still worth inspecting for preventive purposes. Additionally, the clamps are subjected to visual inspection. Sometimes it happens that a coolant leak is caused by a loose fastener. In this case, tightening the clamps more tightly allows you to get rid of the problem in question.
Checking the expansion tank valve using pressure
The valve on the tank cap serves to regulate the pressure in the OS; when a certain level is reached, it should open and release excess air to the outside. The pressure may differ depending on the car model; usually the valve mechanism is activated at values from 1.0 to 1.5 kgf cm².
Using a pressure gauge and a pump, the pressure valve is checked both as part of the machine and on the removed expansion tank. The second option is preferable, since using the first method, you can accidentally fill the entire engine compartment with antifreeze. Let's look at how the operation of the expansion tank valve is checked using the example of a Chevrolet Lacetti:
- with the engine stopped, remove the cap from the tank, do it very slowly and carefully, wearing gloves so as not to burn your hand;
- partially drain the antifreeze from the cooling system;
- disconnect three hoses;
unscrew the two nuts with a 10mm wrench and remove the tank;
- We install plugs on two fittings, connect a hose from the pump to one of the outlets, and pump up the pressure. In operating condition, the valve should operate at about 1.2 atm, and the pressure gauge needle should not rise above the specified value.
If the valve mechanism of the expansion tank does not work, the pressure during pumping will rise higher and higher. It is not worth pumping more than 2 atm; it is better to replace the faulty part immediately; some car owners or repairmen manage to repair it.
How to replace coolant on a VAZ 1117-1119?
Note!
At engine operating temperature, the fluid heats up to 100 degrees - you can get burned. Sometimes you urgently need to cool the liquid - unscrew the cap of the expansion tank. Act carefully and smoothly, and completely remove the lid only if the hissing sound disappears, otherwise the air inside the tank will knock out the lid and the liquid will flow out in a column - everything around will get dirty, and you can get burned. It is best to work with a cold engine.
Remember! The liquid is highly toxic, pour it into a tightly closed container and throw it away not in a bucket, but in a landfill!
Merging
Drive the car into the inspection hole and ensure that it stands level. If this is not possible, park the car so that the front is higher than the rear.
Note! Securely secure the car using the handbrake, set it to speed, and place stones under the rear wheels. Remove the mudguard from it (the article will be useful for you: “Replacing the engine mudguard”) and, if present, the crankcase protection. If you are 100% sure that the liquid will not get on the mudguard and protection, then you can not remove them from the car!
Unscrew the nut securing the minus terminal to the battery (For more details, see the article: “Replacing the battery in a car”, point 1)
Note! After removing the terminal, remove the ignition module from the car by unscrewing the hex bolts (described in detail in the article: “Replacing the ignition module on a VAZ”!). Applies to 8 valve cars; for 16 valve cars we do not remove the module.
Unscrew the cap of the expansion tank and place some container under the drain plug of the cylinder block (indicated by the arrow). Remove it using a spanner and drain all the liquid from the block into a substitute container. Now repeat the steps for the radiator fluid; there is a plug on it that can be unscrewed by hand.
Note! Liquid from the drain hole will stain the cylinder block. Take a cloth and wipe dry the places where it got in!
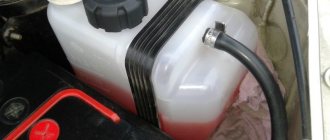
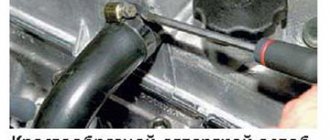
Close both plugs and move to the throttle assembly. You will find a hose that goes to drain the coolant (see photo). Loosen the clamp on the hose and disconnect it by hand from the throttle assembly fitting (the fitting is indicated by the arrow).
Note! This operation will help avoid air locks: air entering the pipes does not allow fluid to escape into the expansion tank; instead of the required fluid level, there will be air, which means the engine will overheat. By the way, because of the traffic jams, the stove heats very poorly!
Pouring
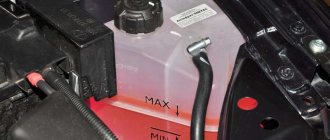
Start by yourself or ask an assistant to pour liquid into the expansion tank while holding the drain hose (we disconnected it from the throttle body). As soon as liquid begins to flow out of it, connect it to its place and tighten the fastening clamp thoroughly.
Note! Continue adding fluid until it reaches the MAX mark on the reservoir. Screw the tank cap tightly, the main thing is not to break the thread - we observe the measure everywhere. See the video below for more details, keep in mind that it’s not Kalina!
Reinstall the previously removed parts, connect the battery, get into the car, start it and wait until it warms up to operating temperature. When you hear the fan turn on, turn off the car and see how much fluid is in the tank. If necessary, bring the level to normal.
Note! Check to see if an air lock has formed - turn on the heater on a warm car and check what kind of air comes out of it. Cold - most likely a plug has formed, hot - everything is fine, you replaced the fluid correctly. Watch the color of the liquid. A quick change in color indicates a fake - we replace it urgently.
If a plug forms, squeeze the hoses of the cooling system (the photo shows the Kalina cooling system, you don’t need to touch each hose, just feel the thickest pipes) - as a rule, it helps. As a last resort, let the car cool down completely and unscrew the expansion tank cap, then start and let the car run for a few minutes (about 3-4 minutes). Plug it, tighten the plug and recheck the formation of air pockets in the cooling system.
Additional video
The video shows the process of replacing the fluid on a VAZ 2110. On Kalina, it’s basically the same, the shape of the radiator drain plug is different. The drain hose connecting to the throttle assembly is located closer to the front of the car on Kalina than on the 2110 model (closer to the rear).
Where does antifreeze go in viburnum?
The main problems, such as: engine overheating, a sharp increase in engine temperature, airing of the cooling system, are associated with a coolant leak. Coolant leakage can be determined by looking at the expansion tank; if the level is less than the minimum, it must be topped up to the maximum and this level must be monitored at certain intervals. If after a certain period of use of the car the level again drops below the minimum, then you have a leak problem. It is better to carry out all work on monitoring the coolant level on a cooled engine. Next, we will consider the main causes of coolant leakage.
The main causes of leakage and their elimination methods:
- Antifreeze or antifreeze escapes through the connections
(manifests itself during temperature changes). It is necessary to look at all connections of the cooling system, especially the upper and lower radiator pipes, as well as the coolant tank itself. It can be corrected by tightening the clamps, installing an additional clamp, or replacing the clamps. - The radiator heater is leaking.
To find a leak, you need to open the bottom cover with the grille on the driver's right leg side (or on the passenger side, near the left leg) and check the nozzle through which hot air is supplied from the stove.It is also worth looking at the pipes of the stove itself, to do this, stick your hand through the same “hole” towards the engine and feel for the connections of the pipes with the stove, there are 2 of them, if there is a leak there, then tighten the clamps in the same way. Also forcefully feel the floor covering on the driver's and front passenger's sides. If the heater radiator itself is leaking, then only replacement.
- The pump has failed. The antifreeze is gone, but there are no visible leaks.
To find out whether the problem is with the pump or not, you need to look under the timing belt casing; if it is dirty, then antifreeze has probably gotten on it. To accurately diagnose this problem, it is better to remove the timing belt cover (attached with three bolts on both sides of the 8-valve engine). Once you remove the cover, it will immediately be clear whether the problem is with the pump or not. If it is, then the inside of the casing will be covered in antifreeze, as will the side of the engine. The pump cannot be treated, it is replaced (price is around 500 rubles). If you are able to change the timing belt yourself, then you will be able to change the pump itself. Otherwise, only to the service. because there are some nuances. - It goes into the oil system. Signs: increased oil level, appearance of a light brown emulsion on the dipstick and oil plug. To fix it only by repair, in most cases the culprit is the gasket between the cylinder block and the valve mechanism.
- Goes into the cylinders .
When coolant enters the combustion chamber along with the fuel mixture. Signs: the appearance of steam from the exhaust pipe (exhaust - white smoke) and the smell of antifreeze there, possible engine tripping and the presence of antifreeze in the muffler. For correction, only repairs similar to point 4 are required. To reduce the loss of coolant into the cylinders, in order to get to the service center, it is advisable to unscrew the cap of the expansion tank (so that there is as little pressure in the system as possible).
Thank you very much for the information provided Shtirlic .
Lada Kalina Hatchback zhivchik › Logbook › Antifreeze goes “to the left”
Hi all! In general, comrades, to be honest, I’m already tired of adding antifreeze... But I’ll start from the very beginning...
Half a year ago I was driving a car one day and noticed that the temperature began to rise... and the fan wouldn’t turn on... I immediately turned the heater to maximum on 4 and drove to the nearest parking lot... I opened the hood, the antifreeze was boiling and slightly snotty through the hose at the expansion tank. Let's check the cooling fan chip, but it flew out... I looked, the connector was slightly melted.
As a result, I connected it in place, the fan started working and I went to auto parts and bought a new connector. I replaced everything and the car did not “boil” for the next month. However, in the winter I began to notice blue spots on the snow under the car, and under the hood I noticed that there were small smudges along the edges of the radiator. The antifreeze went out in small portions and added 100 ml once a week. Since I was not ready for a replacement in winter.
So I traveled until spring.
This week I encountered the fact that antifreeze began to “go to the left” in LITERS
! No matter how I check, the tank is empty... I add it after 3-4 days. I blamed everything on the radiator that needed to be changed... But yesterday I discovered that the fan was not working again, I double-checked everything, but it did not turn on.
I found a pattern for myself that when the stove is turned on at 4k and when the antifreeze is already boiling, the temperature at that moment is above 100 degrees, and the fan starts working... But this is not the case
! in this case, the antifreeze simply boils away... pours out through the expansion plug and in the end the antifreeze is at a minimum or the tank is empty! Well, the fan shouldn't come on so late! This has never happened before!
Source: https://oneplus-russia.ru/info/kuda-ukhodit-tosol-v-kaline/