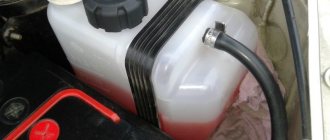
A car's expansion tank is an integral component of the cooling system. Its task is to compensate for the increasing volume of antifreeze or antifreeze at high temperatures and increased pressure in the cooling system. The design features of the cooling system dictate what shape the expansion tank has and what additional functions, in addition to collecting liquid, it has.
Why does antifreeze come through the lid?
If the engine overheats or the expansion tank swells, many inexperienced drivers immediately run to open the lid and are very surprised, and many are frightened, by the antifreeze leaking out under pressure.
We will immediately reassure you - this is normal. The fact is that when the serviceable reservoir cap is closed, a pressure equal to 1.5-2.0 atmospheres is created in the cooling system. Moreover, we all know from physics that the boiling point of any liquid is directly proportional to the surrounding pressure. That is, the higher the pressure, the higher the boiling point.
Therefore, pressure above atmospheric pressure in the cooling system is created specifically so that antifreeze boils not at 100C (1 atm.), but at 115C (1.5 atm.) and 120C (2 atm.).
After the engine is turned off and the lid is opened, the pressure equalization process occurs, the liquid flows from more to less, while it continues to expand, since the engine continues to gain temperature for some time, i.e. the point at which it begins to cool has not yet been passed.
If the antifreeze boils, it means the engine has overheated. In this situation, you do not need to open the lid right away, since the coolant may splash out on your hands and face under pressure - a burn is inevitable. Just in such a situation, when the tank cap is not working, the latter can swell.
Selecting repair methods and adhesives
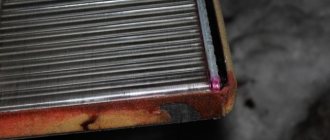
Radiators in trucks and cars are an important part that helps cool the mechanism and remove excess heat from the engine. Cool liquid circulates inside the device through pipes and hoses, and the convenient location of the upper part under the hood allows it to be blown with air.
Most cars are equipped with aluminum radiators. This material is ideal for this purpose - it is light, durable, not subject to corrosion, its thermal conductivity is high (it gives off heat and the parts will not overheat). Aluminum and plastic cooling batteries have replaced products made of brass and copper, which are much more expensive. But due to the chemical features, such tanks are much more difficult to repair, although nothing is impossible. The radiator can crack even from a small impact, and if it is made of plastic, even a large defect may appear.
The easiest way is to seal the crack with a suitable adhesive. But choosing glue is not easy - most compounds do not stick, others quickly peel off. This occurs due to regular changes in temperature and pressure in the cooling system.
How to seal a radiator, and what other method can be used at home? Here are the main ones:
- Soldering. Heat-resistant plastic, from which radiators are made, as well as aluminum parts, can be held together using a regular soldering iron.
- Repair by cold welding. The method is based on the use of special adhesives that melt the edges of the material and tightly seal the crack with a heat-resistant seam. Suitable if the radiator is plastic.
- Using adhesive sealant. Only very small cracks in plastic radiators can be sealed. Like other measures, this one is temporary.
An effective remedy for eliminating leaks is 3M DP8005 two-component adhesive adhesive. The composition contains acrylic, which can glue even the most complex types of plastic, for example, polypropylene. If the radiator bursts, this material will be ideal. The seam it creates is not destroyed by moisture, aggressive chemicals, or temperature changes. But the price of such a product is very high (up to 1,500 rubles), so you need to think about the feasibility of purchasing it compared to replacing the radiator.
Another glue is Hosch plastic welding glue. If the radiator is plastic, you can buy the product without hesitation. Pressure up to 12 atmospheres is not a problem for the seam after complete hardening, and any defects can be glued with this glue.
Hydrogen evolution case
When using aluminum radiators, it happens that water decomposes into hydrogen and oxygen components. This process is caused by the fact that the metal accumulates a static charge, and this is not good. During the production process of batteries, the inside of the device is coated with a protective layer. During operation or due to the negligence of production workers, the layer may be damaged. As a result, the radiator is very quickly destroyed by corrosion.
After two years of use, the radiator becomes unsuitable for further use. You can determine whether hydrogen is present in the system as follows: the constant appearance of plugs, when oxygen has long been displaced from the system and additional water has not been added, indicates that hydrogen is present in the system. You can verify the presence of gases by turning off the air release valves and monitoring using Mayevsky taps. This problem can only be eliminated by replacing the radiators.
Expansion tank in the heating system
Coolant boiling
If antifreeze (antifreeze) boils, make sure:
- Does the radiator fan work and when does it turn on? The sensor may be faulty;
- Is the thermostat working? The coolant constantly moves in a small circle, thereby not cooling;
- Is the pump working?
- Is the cooling system, including the radiator, clogged?
- Is the system airy?
- Is the valve on the lid working properly? Low pressure in the system can cause premature boiling of the antifreeze.
As for airiness, for example, in VAZ 2110, 2111, 2112, from the experience of their operation, the system practically does not become airborne due to its special design.
In other cars, when replacing the coolant, an air lock may end up in the stove and, over time, make itself felt by overheating the engine and burning out the cylinder head gasket
It is important to monitor the instrument readings
What to choose?
If you still need to replace the tank, you first need to choose what exactly you will replace the old tank with.
Today there are several decent options on the market that are perfect for your VAZ 2110.
Option
Peculiarities
Standard tank for "ten"
Factory version, which is optimal in terms of price and quality. Sometimes you can’t think of anything better than native parts
If you can find the perfect tank, you're in luck. The quality is up to par and it performs its functions perfectly. But finding such an option is extremely difficult. Plus the price is higher
Capacity from Priora
Many consider it an ideal choice for the VAZ 2110. It costs about 300 rubles. You can find it by catalog number 2170-1300060. The walls are thicker, which has a positive effect on reliability. Just keep in mind that there are two types:
If you choose to replace the tank from Priora, then you should take the version for a car without air conditioning.
Reasons for repair
In most passenger cars, the gas tank is located at the rear. The part is shifted to the right side in the lower part of the body. This arrangement is explained by the formation of the correct center of gravity.
The main disadvantage of this engineering solution is mechanical damage to the gas tank. Sharp stones can make a serious hole in the hull and then it will not be possible to do without repairs.
Also, don't forget about corrosion. European cars undergo special treatment, so rust begins to corrode their gas tanks after 7-10 years of operation. But with Chinese cars everything is different. Until recently, the lower part of the body was not processed at all.
The result of the lack of anti-corrosion treatment resulted in a shortened service life. Moreover, not only the gas tank, but also the entire body is susceptible to corrosion. As a result, after five years, most cars need serious repairs, and some simply cannot be restored.
With European and American cars everything is much simpler. Their gas tanks undergo special treatment, so repairs in most cases are needed due to mechanical damage.
Important! To avoid damaging the gas tank while driving, try to drive only on good roads. The crushed stone that often litters country roads can seriously damage your gas tank.
As corrosion occurs, cracks appear in the tank. Moreover, rust corrodes the part not only from the outside, but also from the inside. If this happens, the repair will become several times more complicated.
Important! From the outside the gas tank is exposed to moisture, from the inside there is water, which, although in small quantities, is always present. Despite the fact that European and American gas tanks are much more reliable than Chinese ones, even they require repairs after many years of use
The fact is that it is impossible to completely protect a part from rust.
Despite the fact that European and American gas tanks are much more reliable than Chinese ones, even they require repairs after many years of use. The fact is that it is impossible to completely protect a part from rust.
Luckily, finding out that your gas tank is having problems and needs repairs is fairly easy. There will always be a persistent smell of gasoline or diesel fuel in the cabin. Gasoline will also begin to be consumed faster. In the end, you can just look under the bottom and find a leak.
Purpose of expansion tank
The cooling systems of various cars contain from 5 to 20 or more liters of non-freezing liquid - antifreeze (antifreeze). During operation, the engine, and along with it the antifreeze, heats up from low temperatures in winter to high temperatures in summer.
During engine operation, a pressure of about 1 bar arises in the expansion tank
Since any liquid expands in volume when heated, excess is formed in the cooling circuit of the car, which needs to be directed somewhere. Antifreeze is an incompressible medium, so when it expands, it will create high pressure in the system, which can rupture the pipes and radiator honeycombs. Conversely, when cooled, the liquid will decrease in volume and create a vacuum (vacuum), which acts with the same force.
To ensure normal operation of the power unit cooling system and avoid pressure surges, an expansion tank is integrated into it. Its functions are as follows:
- absorb additional volume of antifreeze that expands when heated;
- release excess pressure through a plug with a built-in safety valve;
- release the fluid back into the system when the engine cools, preventing the formation of air locks.
Large expansion tanks are used on trucks
How to seal the expansion tank when it is depressurized
A car's expansion tank is an integral component of the cooling system. Its task is to compensate for the increasing volume of antifreeze or antifreeze at high temperatures and increased pressure in the cooling system. The design features of the cooling system dictate what shape the expansion tank has and what additional functions, in addition to collecting liquid, it has.
Gases in the expansion tank
The presence of gases in the expansion tank indicates that the cylinder head gasket has burned out. This is one of the main reasons why it can become bloated.
Burnout of the gasket could occur due to overheating of the engine, unless, of course, the time for its overhaul has arrived, since it is at 150 - 250 thousand km. mileage the service life of this gasket is calculated.
But there is an important point here - the reservoir will not expand if the valve in the roof is working properly, since excess pressure will still be released, but the engine will overheat. But, if the flow of gases is very strong, then the valve will not have time to release the pressure and the tank will eventually swell and even rupture.
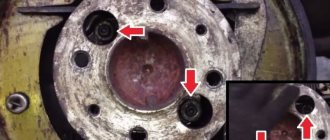
In order to detect the presence of gases in the cooling system, you must:
- Visually inspect the coolant in the barrel with the engine running and make sure there are bubbles or not. If there are bubbles, then the gasket is most likely broken.
- A more accurate method is to use a gas analyzer. The device will accurately indicate the presence of gases.
- Use balloons or similar (well, you get the idea). The ball is placed on the neck of the tank and tied tightly with threads. You need to start the engine when it is cold, before the heated coolant begins to expand greatly. If the product inflates quickly, it means that exhaust gases are entering the cooling system, this is only possible through the cylinder head gasket.
- Check engine compression. If the car's mileage is not very high, then the compression should be normal, since the cylinder-piston group has not yet worn out. But if the cylinder head gasket is broken, the compression meter will show readings below normal.
You can also check in the area of which cylinder the gasket is broken. To do this, you need to supply air under pressure into the cylinder through the spark plug hole, while the tank cap must be removed.
If the cylinder head gasket is broken, bubbles will be visible in the tanks and air hissing.
The pressure in the cooling system is checked using a 3 atmosphere pressure gauge. To do this, you need to make a tee and connect the device to it.
Start the car and observe the readings. Readings of more than 1.5 atmospheres should already be alarming; 2 – not every barrel can withstand it.
How to check the expansion tank
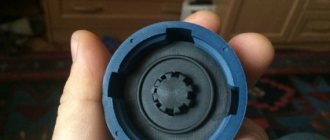
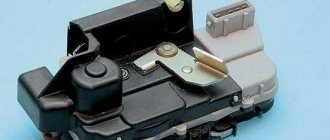
A fairly common cause of container breakdowns is the failure of the valve built into the lid.
If the element does not operate correctly, the engine cooling system begins to function incorrectly. In addition to the formation of air pockets, excessive pressure may occur, which leads to rupture of the container. As a result, you have to replace the tank with a new one. It is recommended to periodically check the serviceability of the valve to avoid damage to the engine. The expansion tank cap contains valves that must open at a certain air pressure.
To check the valves in the lid, you will need a pump and a pressure gauge. To do this, remove the hose from the thin upper fitting that goes to the cooling radiator, and put on the hose from the pump. As air is pumped in, you need to monitor the pressure gauge readings and evaluate the plug by ear. The tank valve designed to release air should open at a pressure of 1.1–1.5 bar. In this case, an increasing hiss is heard from the cork. In this case, the increase in pressure should stop.
If there is a need to lower the readings, then disassemble the plug and bite off the thick spring with pliers, adjusting the value to the desired pressure. It is recommended to change the reservoir cap every two years to maintain optimal pressure in the system.
Video: checking the pressure of the expansion tank
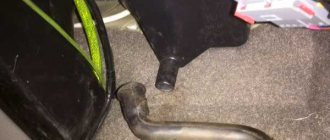
The appearance of cracks in the tank is indicated by the appearance of a coolant leak, and the presence of an unpleasant odor is possible, since antifreeze gets onto the hot exhaust manifold. If damage is detected in the housing, it is necessary to turn off the engine, wait until the coolant cools down, and then proceed to dismantle the element:
- loosen the container fasteners;
- unscrew the clamps and remove the hoses;
- dismantle the tank;
- drain antifreeze;
- find the problem area on the body.
In order to remove the expansion tank, you will need to unscrew the clamps and tighten the hoses
Failure of the tank leads to its depressurization, resulting in coolant leakage. The main reasons leading to such consequences:
- excessively high pressure in the cooling system;
- container with insufficient wall thickness (poor quality product);
- boiling antifreeze remains in the tank for a long time;
- shocks or other mechanical impacts.
If an antifreeze leak is detected, it is necessary to determine the place where it originated and repair or replace the vessel.
The expansion tank valve does not open
One of the reasons for increased pressure in the cooling system is a malfunction of the valve in the cap of the expansion tank: it simply jams (sours). As a rule, the valve is not repairable and must be replaced. Although there are car owners who use carburetor cleaning fluids to remove all deposits and return the part to functionality.
High pressure in the system can lead not only to rupture of the expansion tank, but also to damage to the heater radiator, which once again confirms the need for periodic checking of the valve. But the pressure can be not only high, but also low, which indicates insufficient tightness in the system. In this case, special equipment will be required, since finding the cause at home will be very problematic.
Why is there oil in the expansion tank?
Such a problem as the appearance of oil in the expansion tank is faced not only by owners of domestic cars, but also of foreign cars. The presence of the following factors in the vessel makes you think about possible problems with the motor:
- an emulsion was found on the walls of the neck of the tank, which occurs when coolant and oil combine;
- the presence of an oil film on the surface of the antifreeze;
- the appearance of an unpleasant odor and change in color of the liquid in the tank.
The presence of oil in the expansion tank (emulsion on the plug) indicates problems with the engine, which must be corrected as quickly as possible to avoid serious damage to the engine.
Seal up a burst washer reservoir on a car step by step
Let's take a closer look at two methods of repairing a burst washer reservoir - glue and glueless (soldering).
Method one - using two-component Hosch glue:
- Preparation. Both surfaces to be bonded should be cleaned of dirt using acetone.
- Applying glue. The liquid cyanoacrylate component is applied in a thin layer to the crack or hole. Welding granules from the second bottle are added on top and again covered with a small amount of glue for impregnation.
- Gluing. The glue sets almost instantly, so within a few minutes after applying the composition, the tank can be returned to its place and filled with windshield washer fluid.
Do not inhale the vapors generated during the reaction process.
VIDEO REVIEW
Method two - soldering:
- The surfaces to be joined must be degreased with acetone.
- Heat the soldering iron to maximum temperature.
- We apply the mesh to the seam so that the edges of the mesh extend to each side by at least 2-3 centimeters.
- We gradually heat the metal mesh, fusing it into the plastic.
- Smooth out the top layer of polyethylene so that the layer becomes monolithic.
- We check the tank for leaks and install it on the car.
When performing work, safety precautions should also be observed. Soldering may only be carried out in a well-ventilated area.
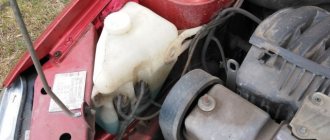
Place of the reservoir in the cooling system
A container to compensate for expanding antifreeze can be installed in different places, the location depends on the make of the car. The reservoir is attached to body parts - side members and the interior partition using a rubber clamp or a special bracket. As a rule, the tank is placed on the side where the upper radiator pipe for its connection is located.
Typically the container is installed closer to the radiator pipe
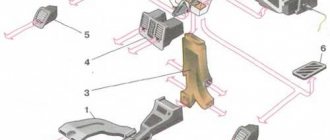
There are containers with 2 and 3 fittings. The latter are connected by three hoses to the following units:
- A thick pipe connected to the lower fitting of the vessel connects it to the main line of the cooling circuit - a small circle of liquid circulation that is always open. The antifreeze, which increases in volume, enters the tank through this hose.
- A thin tube running from the radiator to the upper fitting. Designed to discharge liquid and steam from the radiator directly.
- The second thin pipe, connected to the middle fitting, comes from the interior heater radiator. Its task is the same - to drain excess antifreeze and steam into the container.
Excess antifreeze from three units enters the reservoir with 3 fittings.
The expansion tank is the highest point of the engine cooling system. This is done so that the liquid from the tank can flow into the circuit according to the law of communicating vessels. When the antifreeze level in the container is 3-4 cm above the Min mark on the body, all pipes and units are filled with antifreeze. Including the highest of them - the throttle cooling circuit.
Remaining air from the system is removed through the throttle heating pipes
What is the best way to seal the washer reservoir?
The simplest, most affordable and effective way to eliminate cracks in the windshield washer reservoir is soldering using a soldering iron and a fine metal mesh.
Metal mesh is used as a reinforcing material. It is necessary to eliminate large cracks; if the damage is small, you can do without a mesh.
Metal mesh can be found at the car market; it is sold as a reinforcing base for repairing plastic bumpers in sheets measuring 15x11.5 cm. One such fragment costs about 100-150 rubles.
You can also seal a cracked washer reservoir using special glue.
Suitable for gluing various types of polyethylene and polypropylene, especially strong special adhesive for plastics DP 8005 3M.
This two-part acrylic-based structural adhesive is capable of bonding polymers without prior surface preparation.
The adhesive joint formed by DP 8005 3M glue is resistant to water, high humidity and aggressive solutions, so this composition can be used to repair the windshield washer fluid tank.
The only drawback of this glue is its high price (it costs about 1,300 rubles for a 38-gram package), but if you need to repair the tank of a rare foreign car, then such expenses can be justified.
- WEICON Easy-Mix for PE-PP is another effective two-component structural adhesive for bonding polyethylene and polypropylene. This special methyl acrylate based adhesive has high adhesion to low energy polymers (PE, PP and TPE). It glues quickly and, as they say, tightly, but it costs even more (about 3 thousand for 38 grams).
- A two-component adhesive-welding solution for polymers from the German company Hosch will help you repair a rare, expensive part.
This glue effectively seals holes and cracks in any plastic products. The adhesive seam remains elastic in cold weather and can withstand pressure up to 12 atmospheres.
In most cases, the joint is often stronger than the plastic being glued together. Hosch adhesive is supplied in a set of two complementary components - liquid cyanoacrylate ether and fine powder granules.
The welding powder contains metal oxides and catalysts that accelerate the setting of the adhesive joint and improve the degree of adhesion. The average cost of a set is 1500 rubles.
Effective means
Today there are many effective compounds on sale that are used to eliminate breakdowns of plastic car parts.
3M DP8005
This product is actively used for fixing different types of polyethylene and polypropylene. This glue is characterized by a high degree of strength. This structural adhesive is a two-component composition. With its help, it is possible to fix polymer compounds without preliminary preparation.
Glue is considered a modern alternative to common methods of mechanical joining or soldering damaged elements. As a result of using the substance, it is possible to obtain a seam that is characterized by resistance to water, high humidity and the action of aggressive substances. Therefore, it can be safely used to repair the expansion tank.
The only disadvantage of the composition is the high cost. However, if it is necessary to repair the tank of an expensive car, such costs are completely justified.
Hosch
To repair plastic car parts, it is permissible to use this two-component welding adhesive. It is produced by a German company. The substance is designed specifically for fixing polymers. With the help of this glue it is possible to seal holes and cracks in various plastic products. The seam remains elastic even in frosty weather. It is capable of withstanding pressure up to 12 atmospheres.
Typically, the connection area with such glue is stronger than plastic. The kit contains 2 components that complement each other. These include liquid cyanoacrylate ether and fine powder. The mixture contains metal oxides. It also includes catalysts that activate the setting of the adhesive joint and increase adhesive characteristics.
Sealing plastic parts of a car radiator
Most plastic repair products are two-component - ready-made compounds do not provide such powerful adhesion to the surface. How to properly seal damage to a radiator? Here is the technique step by step:
- Prepare both components for welding the seam on the cooling tank, as well as sandpaper, gloves, cotton swabs, and degreaser (acetone).
- Clean the area around the leak from dirt, dust, and grease using acetone.
- Mix the glue components as indicated in the instructions. Apply the product to the crack area. Some compounds are applied in a different way. First, you need to sprinkle the plastic with powder, and then cover it with liquid.
- If the hole is large, do the procedure in several stages until it is completely tightened.
- After 15 minutes, sand the seam until smooth with fine-grain sandpaper.
You can also glue the edges of the crack on the plastic using epoxy glue. The radiator is removed, the area is sanded, and degreased. Epoxy resin is poured over the damaged area and dried for a day. You should not rely on the durability of such a seam - it can last a couple of weeks at most, then you need to purchase a new car part.
How to solder plastic car radiator
Soldering an engine cooling radiator is considered a fairly simple task. However, not everyone can cope with it due to insufficient knowledge of how to solder a car radiator on their own. Most car owners prefer to take their car to a service station.
Surface preparation
Before gluing the plastic on the car radiator, you will need to thoroughly prepare the surface for this process. For this purpose, we will need to clean it from grease, dust and dirt. Lightly dampen a rag and very carefully wipe the areas of plastic around the resulting crack.
In order to achieve a better effect, it is recommended to use an alcohol solution
It is important that in no case should you overdo it. The fact is that too active mechanical impact on the damaged area or excessive pressure on it when cleaning can damage the heat exchanger even more.
Preparing the adhesive mixture
Now you need to worry about how to seal the crack on the car radiator. So, let's prepare the adhesive mixture. If you decide to use exclusively glue specially designed for such purposes, then its use will be as simple as possible.
A small amount of adhesive should be applied directly to the damaged area. When a part is missing a certain piece of the body or there is no gap between the two halves that are formed due to a crack, it is recommended to sprinkle the liquid base with the powder component of the glue.
So, if the crack itself is too deep or a sufficiently large part of the body is missing, gluing must be performed in several stages. You should apply glue to the damaged area two or three times, waiting until each layer is almost completely dry. When the resulting gap can be completely filled with dry gradulant, it is recommended to saturate it with a liquid composition. This way you can be completely confident that it will adhere perfectly to the surface of the spare part.
Cold welding
In addition, you can seal a car radiator using cold welding. Since it comes in the form of a fairly thick putty, it will be enough to apply it to the seam and wait until it cools completely
It is important that this same putty must be applied in a neat and even layer so that the seam is of the highest quality.
Cold welding must be used as:
- the main method of restoring performance;
- an additional means of securing the result obtained by soldering or gluing.
A layer of cold welding applied on top of the glue layer will allow you to preserve the quality of the auto part repair for a long time and extend the service life of the part.
Final stage
When the glue has completely hardened and all the main working steps have been completed, you need to carry out final surface treatment. It is necessary to ensure that the resulting seam becomes neat and smooth. For such purposes, the soldering area will need to be treated with fine-grained sandpaper, and ideally with a grinding machine.
In this way, you will be able to get rid of all minor defects that will not have the best effect on the further operation of the product. After this treatment has been completed, install the heat exchanger back in its place.
Looking for a leak
Loss of the sealed state of the heating system leads to a loss of pressure. By conducting a complete inspection of the heating device and pipe system, leaks can be detected. Leaks to the naked eye are determined by the accumulation of moisture at joints or holes with a characteristic white coating.
When inspecting, you should pay attention to the connecting elements, couplings at soldering points and direct connections to heating devices. A system with metal pipes may leak at longitudinal seams
Once a leak is discovered, it is worth taking care of its elimination. The joints are repacked, gaskets and gland seals are installed, with a thickness slightly greater than the previous one. If the pipeline is damaged, the damaged section must be replaced.
Tools and materials
To perform this repair operation, you cannot do without the necessary materials and tools.
Before soldering the car's expansion tank, you need to prepare:
- soldering iron with a flat tip, power 40 W;
- a piece of fine-mesh brass mesh;
- metal scissors.
A soldering iron can be used with a higher power, but then you will need to be careful when working so that the plastic material is not pushed through at the places where the metal mesh is soldered. The brass mesh can be removed from the car’s fuel line tube, which is located directly in the tank
This mesh is used in the car's power system as a filter. After leveling, it can be used as a reinforcing layer to eliminate expansion tank leaks
The brass mesh can be removed from the car's gas line tube, which is located directly in the tank. This mesh is used in the car's power system as a filter. After leveling, it can be used as a reinforcing layer to eliminate expansion tank leaks.
After the preparatory work has been completed and the location of the antifreeze leak has been determined, the tank is thoroughly dried to remove any remaining moisture.
How to solder a crack?
It is not recommended to use even high-quality glue for such car repairs yourself.
High humidity, temperature and significant pressure do not allow high-quality repair of the expansion tank using such substances.
It is much more reliable to eliminate tank leaks by soldering. Plastic easily melts even at a relatively low temperature, so you can use a regular soldering iron to perform the operation.
The soldering process is carried out in the following sequence:
- The tank is placed on a flat surface with the crack facing up.
- The soldering iron warms up to operating temperature.
- A metal mesh, which must be cut in advance so that its length and width are slightly larger than the crack, is applied to the damaged area.
- Using a soldering iron tip, the mesh is soldered into the plastic along the entire length of the crack.
Operating Instructions
For the repair procedure to be successful, it is important to choose the right method and follow a number of recommendations.
Sealing
Before starting the procedure, it is important to prepare everything you need. To do this you will need the following:
- soldering iron with a flat tip - its power should be 40 watts;
- a fragment of brass mesh with small cells;
- metal scissors.
It is permissible to use a more powerful soldering iron. But in this case, you should be careful when working. Otherwise, in the areas where the metal mesh is attached, there is a risk of a through hole appearing in the material.
It is permissible to remove the brass mesh from the car gas pipeline tube. It is located directly in the tank. This mesh is used in the vehicle's power system and plays the role of a filter. After leveling, it can be used as a reinforcing layer. This will help eliminate the tank leak. If you can’t find a brass mesh, you can use a steel one. This material is sold in construction stores and has an affordable price.
After completing the preparatory work and determining the area where the leak is located, the tank should be thoroughly dried. This will help get rid of any remaining moisture.
Soldering is considered the most reliable method for eliminating cracks. Plastic melts easily even at relatively low temperatures. Therefore, to carry out the manipulation it is permissible to use an ordinary soldering iron. To solder the tank, you should perform the following steps:
- Place the tank on a flat surface. Moreover, it is recommended to direct the crack upward.
- Heat the soldering iron to operating temperature.
- Cut the metal mesh so that its length and width are slightly larger than the damaged area. Apply the material to the damaged area.
- Using a soldering iron tip, solder the mesh into the plastic. This is recommended to be done along the entire length of the damage.
During the procedure, it is recommended to carefully melt the plastic directly into the crack. Otherwise, it will not be possible to properly deal with the damage. Metal mesh is considered an excellent reinforcing material. However, the patch can only withstand pressure if the plastic layer is uniform.
Sealing
To achieve good results using this method, you must use a two-component composition. To do this, do the following:
- Prepare surfaces. It is recommended to clean them from dirt. To do this you should use acetone.
- Apply glue. The liquid substance is applied in a thin layer to the damaged area. It is recommended to cover this area with welding granules from another bottle. Then cover the surface again with impregnation glue.
- Glue the parts together. The adhesive composition sets almost instantly. Within a few minutes after using the substance, the tank can be returned to its place and filled with liquid.
It is worth considering that the interaction of the liquid adhesive part and the welding granulate causes an exothermic reaction. It is accompanied by the release of steam and heat. Therefore, it is recommended to follow safety precautions.
Welding
Cold welding is considered an auxiliary method that does not provide long-lasting and reliable results. This method helps to achieve temporary fixation, which will ensure comfortable delivery of the vehicle to the service station. For cold welding to produce results, the surface must be cleaned first.
Application of epoxy glue
The use of such a substance is also considered a temporary method. It will not help fix the crack for a long time. To get a good result, the plastic is first cleaned of residual dust, grease, and contaminants.
The leak must be fixed immediately
If a fuel leak is detected in the area of the gas tank, you should stop using the vehicle for the safety of yourself and others. Repairs should be carried out on a removed and thoroughly washed container. Thus, it is possible to conduct a complete inspection of the product that was pierced and accurately determine the location of the problem area. Most often, these are longitudinal cracks or destruction of the weld connecting the elements of the fuel system, which are a consequence of mechanical influence from the outside.
Preparing a tank for repair includes a number of operations:
- Draining fuel. There is a drain neck at the base of the gas tank; by unscrewing the lock plug from it, you can drain the fuel;
- Washing the container. At home, caustic soda is used for washing, using it in proportion - two glasses per 10 liters of warm water. The mixture is poured into the tank and left for at least 5 minutes, after which the container is shaken and the liquid is drained. The procedure is repeated at least 3 times;
- Drying. This operation must be carried out very carefully. It can be done naturally, but it will take a lot of time. It is better to use an industrial hair dryer, thereby ensuring the effect of air blowing under pressure.
Liquids for filling into the tank
Today's cars, built with the widespread use of new technologies, are very demanding of all process fluids, including coolant. The list of requirements is as follows:
- the liquid must boil at a temperature not lower than 110 ° C;
- freezing threshold - from minus 20 to -60 ° C depending on environmental conditions;
- no foaming upon contact with the pump impeller, minimal viscosity;
- the liquid must contain non-aggressive additives that prevent the appearance of scale on metal parts;
- the chemical composition should not change for 3 years or 60 thousand kilometers.
Antifreeze is a purely domestic product, synthesized during the USSR
All of the above requirements are met by antifreeze or antifreeze, which is the same thing. The name antifreeze comes from the English word antifreeze, which means “non-freezing”. Antifreeze is a substance created on the same basis from ethylene glycol in the former USSR. The word consists of the abbreviation TOS (technology of organic synthesis) and the ending “ol”, inherent in the names of chemical preparations.
The base of antifreeze and antifreeze is the same - water + ethylene glycol in different ratios. Differences between products from different manufacturers may lie in the package of inhibitory additives, so it is not advisable to confuse liquids. There will be no fatal consequences, but some substances can neutralize the effect of others and the anti-freeze properties will deteriorate. In this case, the color of the liquid does not matter - it is just a dye.
You can use distilled water to fill the tank in the following situations:
- to dilute antifreeze concentrate to the desired freezing temperature;
- in case of an emergency - complete or partial loss of coolant en route;
- for the purpose of washing.
The color of antifreeze does not affect its properties; the additive package is important
Distilled (desalted) water does not meet the above requirements: it freezes at zero temperature and boils at 100 °C. Therefore, it is poured temporarily or as a solvent for antifreeze.
It is unacceptable to pour tap water saturated with salts into the expansion tank. An exception is the breakdown and loss of antifreeze on the way and the absence of a car shop nearby. Fix the leak, fill the cooling system with tap water and get to a garage or service station, then drain it immediately. Otherwise, deposits will form on the inner walls of the water jacket of the engine and other units, impairing heat transfer.
Membrane replacement process
When the membrane wears out, the following types of work should be performed:
- disconnect the tank and drain;
- release pressure using the nipple;
- There is a membrane in the place where the pipeline is connected. The membrane flange is dismantled. Afterwards the holder is released;
- the membrane is removed;
- The inner surface of the expansion tank is checked for dirt and rust. If necessary, flushing is carried out;
- you need to know that the membrane is sensitive to oils. So it is unacceptable to use them as anti-corrosion agents on the inside of the case.
Diagnosis of housing depressurization
If cracks occur in the tank housing, it is necessary to turn off the engine, wait until the coolant cools down completely, and only then proceed with the following actions:
- loosen the fasteners holding the plastic container;
- disconnect the pipes and hoses;
- dismantle the tank;
- drain the coolant;
- determine the location of the housing defect.
About malfunctions and tank repairs
During operation of the machine, the following breakdowns of the expansion tank may occur;
- contamination or failure of the bypass valve of the plug;
- rupture of the tank body;
- Antifreeze leaking from under the cap.
Most car enthusiasts, when a valve or body breaks down, simply replace the part with a new one. This is justified by the lack of time for repairs and the low cost of these spare parts. Although, if desired, the burst plastic of the tank can be soldered, and the lid can be disassembled and cleaned.
Leaks from under the cork occur when the seal is not tight or due to the design features of the container. For example, on VAZ 2110 cars, a stream from the upper small fitting connected to the radiator hits directly into the neck, causing a leak. The solution is to install a more advanced tank from Priora.
Video: tank body repair
A car's expansion tank is considered one of the most reliable parts. They often last the entire life of the car, especially on foreign cars. To avoid having to change the container ahead of time, it is recommended to periodically check the condition of the valve in the lid. If it is in order, then the plastic of the vessel will not burst from high pressure.
Home →
Maintenance and Repair → Repair →
How to clean the inside of the expansion tank
The expansion tank of the cooling system may become contaminated during operation, not only outside, but also inside. While cleaning the container from the outside is not that difficult, cleaning it from the inside is quite problematic. Contamination can be of various types: sediment, scale, oil, etc., as a result of which even the level of liquid in the vessel may not be visible. To eliminate contamination, first of all, the container must be removed from the car. Depending on the design, the housing may be separated by partitions, which complicates the cleaning process. You can try to remove dirt through the hole in the plug using available tools, for example, wrapping a rag around a wooden stick, sticking it inside and wiping off the dirt.
Sometimes it becomes necessary to clean the expansion tank as a result of its contamination. For these purposes, you can use both available means and materials, and special liquids.
Depending on the type of contamination, citric acid, washing powder, kerosene or white spirit can help. There is another option - a mixture of powder, gasoline and warm water, which is poured into the tank, the holes are closed and left for a day. The container needs to be shaken periodically. Some car enthusiasts pour a little sand into the vessel and clean it by shaking, but it is not always possible to achieve perfect cleanliness. If none of the above helps, they resort to the use of modern chemicals, the variety of which today will satisfy the needs of any car owner.
The expansion tank of the cooling system is a reliable part. However, there are times when problems arise with the container. To avoid having to resort to premature replacement of the tank, it is recommended to periodically check the cap for the functionality of the valves. If the part is in good working order, it will be possible to avoid rupture of the housing from high pressure.
Expansion tank cleaning products
To clean and wash the RB, car enthusiasts use various means - cleaners, solvents, citric acid, washing powder, etc.
If the level of contamination is so great that nothing helps, you can try the following.
- Fill the tank 15% with fine gravel.
- Fill the tank with warm water up to half and add dishwashing detergent.
- Shake the tank with both hands.
- Empty the tank and rinse it with water.
The tank should be clean.
You can use ready-made products, for example, DIMER washing concentrate.
In this case, cleaning is carried out as follows.
- Fill the tank 15% with DIMER concentrate.
- Shake the tank, tapping its body with your hands, and leave for 10 minutes.
- Fill the tank halfway with warm water.
- Use a long-handled brush to clean the inside walls of the tank.
- Pour out the solution and rinse the tank with warm water.
DIMER concentrate is quite effective in cleaning the expansion tank
There are many other ways to clean RB.
Video: flushing and cleaning the expansion tank
A serviceable and clean expansion tank is an important element of the engine cooling system.
Any malfunctions can be easily diagnosed and fixed with your own hands.
To do this, you just need to carefully follow the recommendations of specialists.
How to check the expansion tank cap
Washing a car engine at home
In some cases, it is worth checking the condition of the expansion tank cap of the engine cooling system yourself. However, we should not forget about the complexity of this operation, since the functioning of the element depends on the pressure inside the system.
It is not so easy to create the pressure necessary for testing in the makeshift conditions of your own garage. In this regard, if you suspect that the tank cap is faulty, it is easier to contact a car service center than to check its functionality yourself.
The car service center will diagnose the plug by subjecting the expansion tank cap to a certain pressure, pumped by special pumps. Thanks to this, it is possible to determine whether the lid valve opens and closes when the required values are reached, or whether the failed plug needs to be replaced.
However, you can independently check the functionality of the plug, although, of course, the results obtained will not be as accurate as when diagnosed at a car service center. If you are thinking about how to check the expansion tank cap, then below are instructions for you.
First of all, before starting the engine, you need to remove the cap from the expansion tank located in the engine compartment and carefully inspect it in good lighting. A serviceable plug should not have mechanical damage, such as chips, cracks, tears, abrasions, etc. Their presence will indicate a malfunction of the lid, which caused the appearance of characteristic symptoms.
If a visual inspection does not reveal any damage to the plug, it must be replaced, then start the engine and warm it up to operating temperature. Then you need to open the hood again and, wearing gloves so as not to get burned, begin to carefully unscrew the plug. This must be done in complete silence in order to hear the sounds that may arise during the process of unscrewing the plug.
If no sounds occur, then the plug is working. A whistling or hissing sound while unscrewing it will indicate that the lid valve does not work, despite the fairly high pressure inside the system. Excess pressure is contained by the cap because the non-functioning valve does not open.
Low pressure is checked in another way. With the plug tightly closed, the engine warms up to operating temperature, and then the condition of the thick hoses of the cooling system is checked. The failure of the expansion tank cap will be indicated by compressed hoses pressed inside. This situation occurs when the pressure inside the system drops below the required level.
You can use an alternative method to check the functionality of the plug, but it is not suitable for all cars, since cooling systems have design features and different access to hoses.
If it is not possible to inspect the hoses without dismantling individual elements of the system, you can try to do this in the following way. With the expansion tank cap open, it is necessary to strongly compress the hose and then tighten the plug. After this, the pinched hose is released. If the tube returns to its original volume, the valves are functioning normally.
If you discover a malfunction of the expansion tank cap valve, you will have to replace the failed element. That is, you will need to buy a plug identical to the one installed in the cooling system of your car and put it on the tank. If after this the system starts to work normally, it means that the problem was precisely the plug in the coolant tank.
DIY expansion tank repair
During operation, the expansion tank is constantly affected by deformation: the container contracts and expands due to temperature changes - this is its operating mode. At peak values, cracks appear on the walls of the tank. The problem can be solved in two ways: buy a new tank or repair the old one.
Expansion tank crack
The material used in the manufacturing process of expansion tanks does not react with any adhesives, regardless of brand. This suggests that it will not be possible to properly repair the tank by gluing it. Those car owners who decide to restore the capacity, as a rule, resort to the following methods:
- seal the cracks of the case using a metal mesh;
- epoxy resin, special sealant or cold welding are used.
Due to the constant exposure of the expansion tank to high pressure and temperature, cracks appear on the vessel over time
It is worth noting that cold welding and epoxy eliminate the problem only temporarily and you will still have to return to repairing or replacing the tank. Some car enthusiasts are wondering what and how to repair cracks in the plastic housing of the expansion tank? To carry out the procedure at home you should:
Some car enthusiasts are wondering what and how to repair cracks in the plastic housing of the expansion tank? To carry out the procedure at home you should:
- clean the housing at the crack site with a clean rag or napkin;
- degrease the area with solvent and then dry;
- cut a piece of brass mesh with small cells along the length of the damage;
- apply a strip to the repair site;
- Using a heated soldering iron, solder the mesh to the edges of the crack so that a reinforced layer is formed over the entire area of the mesh;
- grind the seam;
- Apply putty, a layer of primer and paint.
The most common and affordable way to restore an expansion tank is soldering using a fine metal mesh
For the procedure discussed, you will need a soldering iron with a minimum power of 40 W and a flat tip. You can restore the seal of the tank using a special red Done Deal sealant, which is intended for plastic. Before applying the substance, the body is thoroughly cleaned and degreased.
Useful video
Watch an interesting video where a car owner shows how to repair a crack using soldering:
And in this video, the driver demonstrates how he glues the tank using Done Deal 15-minute polyadhesive for plastics and what comes out of it:
Repairs on the road
Repairing an expansion tank with your own hands is not at all difficult, but many motorists are interested in the question: “How to seal the expansion tank on the road”?
If during travel, when it is not possible to apply the above method for repairing the tank, you can temporarily fix the leak using white silicone sealant. To perform this operation you must:
- dismantle the tank, empty it of antifreeze;
- Dry thoroughly and apply sealant to the crack on the inside of the container;
- After applying the sealant, it must be left in place for at least 4 hours, after which the part must be put back in place and movement continues.
Results
So, if you decide to restore a plastic tank yourself, then you should use the following repair methods:
- soldering with metal mesh;
- special sealant;
- cold welding or epoxy resin (temporary).
It will not be possible to restore the seal properly using glue!
Results
As you can see, it doesn’t matter where you end up. Gas tank repair can be carried out even in the field
For this, improvised means such as laundry soap or a plastic bottle are sufficient. Even simple glue can become a good sealant if you find an unnecessary rag.
Many modern vehicles have plastic elements in their design. There have been attempts to produce bodies entirely based on plastics, but due to globalization, automakers continue to stubbornly use metal as the basis for their production. But some automotive elements made of plastic are gradually replacing the usual metal products.