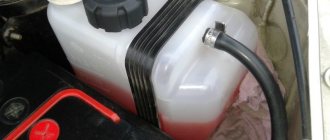
Refining the expansion tank cap on Kalina will help improve the cooling system. It is no secret that the normal functioning of the main components of the car depends on proper engine cooling. If the tank element in question does not perform its function correctly, pressure interruptions occur in the cooling system. Due to untimely bleeding of excess air, the pipes begin to leak. The hotter the power unit heats up, the higher the coolant temperature. Excess pressure from the sealed unit must exit through the expansion block and two-way valve.
After the system cools down, a similar process occurs, only with air being sucked inside. The tank cap should be periodically checked for scale, other formations and valve operation. If there is an excessive amount of various contaminants, the valve is deformed, does not perform its function and the system depressurizes.
Problems due to a faulty lid
Modifying the expansion tank cap on Kalina allows you to avoid malfunctions of the valve and freezing of the element in winter. Before considering options for modifying a part, you will need to find out the consequences of its malfunctions and how to check it.
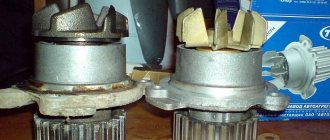
Severe clogging of the expansion tank valve leads to pressure buildup, leakage of pipes, depressurization of the system and the formation of air locks. All this affects the operation of the stove and cooling unit. Due to such fluctuations, breakdowns of the pump, thermostat and connecting elements occur.
The functionality of the lid valve can be checked as follows:
- Visually inspect for the presence of rust and other foreign deposits;
- When mechanically pressed, the valve characteristically whistles, signaling the release of air, and after releasing, the norm is to hear a hissing suction sound;
- To check the system for blockage, you need to remove the hose from the upper fitting and connect it to the pump or compressor;
- The injection of the air mixture on the pressure gauge readings should correspond to values from 1.1 to 1.5 kgf/sq.cm.
The final adjustment of the pressure will be made possible by upgrading the cover, which involves cutting off the thick spring of the part and adjusting it to the required air pressure.
Finalization of the new cover
Unfortunately, the quality of spare parts for domestic cars leaves much to be desired, and it is better to check the new cover on a stand. If the pressure does not hold or excess pressure is not released, you can trim the springs. To do this, the part is disassembled, the sealing rubber is pryed off and removed with a screwdriver. Then use a screwdriver to carefully remove the inner cover and remove the springs.
The large spring is trimmed by one turn, and the small spring by two turns. As a result, the exhaust valve will begin to open at a pressure of 1 atmosphere, and not 1.7 atmospheres. When checking, the inlet valve should bleed freely.
Shortening the plug spring
The first method of modernization
You can improve the expansion tank cap on the Lada Kalina using the method presented below. It is necessary to purchase a FEBI cover (02269)
. The price of the issue will be no more than 150 rubles. The standard Kalina cover should be disassembled and the valve mechanism removed from it. A similar procedure is carried out with the purchased part.
The original valve assembly is sawed down and removed along with the bead that helps center the spring. The Faby valve needs to be ground off no more than one millimeter. This manipulation will allow you to put him in a new place without any problems. The new valve is installed on the standard cover along with a rubber gasket. The part is screwed onto the neck of the expansion tank. The result is a frost-free lid, the production of which took no more than half an hour and quite reasonable financial costs.
What is an expansion tank cap
Any driver, even the most inexperienced, knows well why an expansion tank is needed in a car. Coolant is poured into it, and the remaining free volume is designed to compensate for the increase or decrease in the amount of expanded liquid.
Accordingly, the tank is closed with a lid. The cover is installed on the tank neck in the upper part. Many drivers do not attach much importance to the lid - after all, it is important to simply maintain the tightness of the tank, and what exactly to close it with does not matter.
The classic way to improve
To improve the expansion tank cap in this way, it is necessary to remove and disassemble the element under study. In this case, remove the rubber gasket and remove the inner part using a screwdriver or other suitable tool. The lid device itself consists of a housing, a pair of springs and a valve mechanism.
The essence of modifying the part is to trim both springs. The first element is shortened by 1 turn, the second copy by 2. After assembling in the reverse order, you need to check the efficiency of the modernized unit. As a result, the outlet part of the valve will open at a load of 1 bar (it is worth noting that the initial value was 1.7 bar.
).
Correctly performed modification will allow you to blow the lid freely with your mouth on the air inlet and outlet. If the process occurs without difficulty, it means that the part has been improved in terms of preventing the formation of air in the system and the flow of coolant through minimal gaps.
You can modernize the cover of the unit in question yourself, quickly, at minimal cost. The problem occurs not only on the car model in question, but also on other vehicles with similar characteristics.
Refinement of the expansion tank cap on Kalina significantly increases the working life of the cooling system and associated elements. In addition, the modification promotes normal operation of the valve in both modes and prevents freezing of the unit, even in severe frosts.
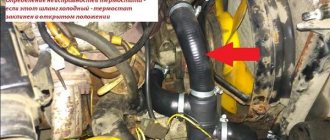
When the engine cools down, air is supplied through the steam exhaust hose from the expansion tank, this happens mainly in winter. And when the engine is started, air bubbles in the radiator of the stove and the heater does not heat well. The boiling on the stove got a little annoying, so I decided to get rid of it using a water seal on the steam exhaust hose. If in doubt, you can also read here www.lkforum.ru/showpost.p...?p=1158931&postcount=1455 here is also www.lkforum.ru/showpost.php?p=1256887&postcount=2
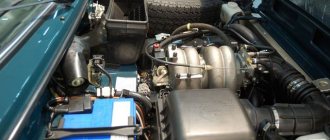
I took a bolt, cut off the threaded part as much as I needed, drilled it not straight through, and drilled it from the side.
We welded it with tubes (stainless steel), one long tube and one short.
I screwed a nut onto it and painted it for appearance.))
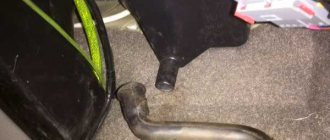
Now the expansion tank: I cut off the plug where the steam exhaust hose from the radiator is connected.
There is no need to drill anything, we cut the thread with an M12*1.75 tap.
And we tighten the water seal so that it does not let through, and we wind the fumka.
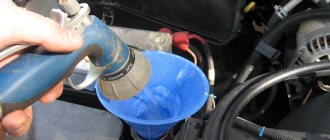
Now, instead of air, antifreeze is sucked in through a long tube and air does not enter the cooling system. —We drain the old antifreeze: We unscrew the cap on the radiator in the lower right corner, then open the cap of the expansion tank, and also unscrew the cap on the cylinder block, take out the top radiator hose of the interior heater and blow into it to expel the remaining liquid from the heater radiator. — We rinse: I tightened the cap on the radiator and began to pour distilled water into the cylinder block for flushing, when water came out of the heater hose, I put it in place and tightened it. We started the engine to run for a while so that a large circle opened and drove distilled water through the system (rinse) then I drained everything. — Fill in new antifreeze: Fill in the antifreeze in the same sequence as distilled water. We drive all the air out by placing the car on a hill in front and the left side of the car should be higher, and press on the gas until a large circle opens, it’s somewhere around 102-105 * C. This is the temperature when The thermostat is fully open and antifreeze begins to circulate through the radiator and expansion tank. We look at all the leaks, if there are any, we eliminate them (tighten the clamps). The water seal tube should not be long, it should reach the maximum mark on the expansion barrel, that is, it should be immersed in the coolant by 5-10 millimeters; if it is long, the system cannot expel air through it. I can’t promise that it will work for everyone, but if you do everything correctly, it will work. For me, it circulates through the water seal when the large circle opens. I’m happy as an elephant, the stove heats up perfectly. Thank you for visiting this page.
Design and principle of operation
Structurally, the lid is a locking element, which is equipped with two valves. The first valve serves to reduce pressure, the second - to supply atmospheric air and increase pressure in the tank. The principle of operation of the cover is associated with changes in the density of the coolant as it heats up and cools down.
When the engine starts running, the antifreeze heats up and its bulk density increases to 20-25%. Hot antifreeze warms up the air layer. The exhaust valve sensor is triggered, it opens, some of the air leaves the tank and the pressure returns to normal. The bleeding process is repeated periodically when the internal pressure of the system exceeds 1.1-1.5 atmospheres.
Cover device
After turning off the engine, the antifreeze cools down and the pressure in the cooling system drops. When it drops below a critical level, the intake valve opens and atmospheric air is supplied to the system. The pressure in the system equalizes and the inlet valve closes.
Symptoms of problems
There are a number of symptoms that indicate a malfunction of the cooling system; if at least one of them is detected, it is worth taking corrective action.
- When the engine is not started and has cooled down (more than 8 hours of inactivity), a residual pressure remains in the cooling lines (this can be understood when the rubber pipes are pressed, they will be hard).
- The release of coolant when the engine is running can be either a small amount or a significant column of steam.
- Coolant leakage from lines or radiators is accompanied by a decrease in the coolant level in the tank.
- When the engine is fully warmed up, cold air blows from the deflectors coming from the cabin heater. The effect may disappear when the crankshaft speed increases.
And if with the first three points everything is more or less clear, then with the last it’s not so simple. You can change radiators, thermostats and coolant as much as you like, but you still won’t achieve a positive result. The problem is the formation of an air lock that cannot be seen. The air in the lines prevents the normal removal of heat from highly heated parts, which can lead to serious damage to the power plant.
Refinement of the cooling system of the Lada Kalina car
Considering the fact that this problem is not uncommon for Kalina owners, we can assume that this is a miscalculation of Tolyatti engineers. The owner will have to correct this development inaccuracy.
- Drain the coolant.
- We dismantle and install the plug on the wide pipe, which is connected to the bottom of the expansion tank.
- We install a tee in the lower hose of the stove.
- We install a hose of suitable size, which is connected at one end to the tee, and at the other to the bottom of the expansion tank.
- We install a plug in the return line of the throttle valve heating, and in its place we install an additional hose.
- In the upper part of the expansion tank, you need to install an additional fitting, to which you need to attach a pipe for heating the throttle valve. There is also an option that does not require cutting in an additional fitting. To do this, you need to connect the new line to the upper pipe of the expansion tank using a tee.
- Fill the coolant a little above the maximum mark, start the engine and warm it up until the fan turns on.
- We expel air from the system, pushing through all the lines, and, if necessary, add coolant to the level.
This modification option will prevent the formation of an air lock, and if air gets in during scheduled repairs, removing it will not be difficult. After such a modernization, a slight negative effect is possible in the form of a long warm-up of the engine. But the undoubted advantages will be a well-heating stove and the absence of air locks.
“Planned breakdown” of the expansion tank. — Lada 2114, 1.6 l., 2007 on DRIVE2
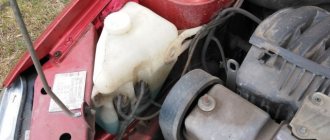
On the morning of April 15, there was no sign of a breakdown. I arrived at work, parked, got out, and looked from under the left wheel, “the little green light has gone”... (there were no doubts - mine... I lost my head). At the right moment, Mark-Antoniy was nearby and called for help =). I open the hood, thoughts: 1 - the lower pipe is not it, 2 - the thermostat - past 3 - the tank, it’s dry on top, closer to the left wing there is a stream and to the battery, then on protection and under the wheel. We removed the strap securing the tank, I touched the bottom, it was wet and cracked, no. and on the side there is (in the photo there is) clearly at the max mark) And before that I didn’t add a lot of antifreeze so that in the morning I wouldn’t see the light on the BSK =)
Culprit
so it's normal =)
and here it is(
so he's still in trouble (
Well, there’s not even anything to write here - VAZ
That's who was snotty in the cold)))
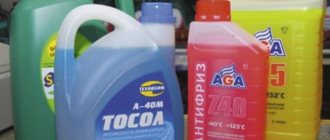
I bought a tank - 2 pieces in different places for 85 rubles. In the first place I took it without thinking, in the second I also took it for comparison. The first tank is poorly cast and soft (considering that the plug should hold 1.1 atm). The second one is harder and has less burr. But not ideal! I came home and found this
Cutting knife, arsonist =) big file and his little brother
Well, actually I bought it, finished it, installed it - AvtoVAZ. Buy - bought, began to remove the flash with a cutter and used files to level the surface of the necks (there were depressions, Mariana). I also smoothed out the remnants of the flash along the way - by burning))) The surface became better than from the store, but to be sure, a sealant was bought! Photos of the marriage tank "Sadko".
In the area of the inscriptions min max, the thin casting is pressed with your finger!
Reference hole
Entrails
Obloy
Obloy 2 return
Obloy 3 Final there is absolutely nothing to say about the hole (
I didn’t take any photos of the installation, I was afraid I wouldn’t have time. I went with a 20 cc syringe and a piece of a dropper to drain the antifreeze into one and a half racks))). I drained it, loosened the clamp, spilled the remaining antifreeze from the bottom, removed the barrel and carefully put it in the Dirt (it was everywhere - it’s Spring). I coated the new barrel at the junction with the lower pipe with sealant and waited 5-10 minutes. I connected the old pipe, removed the excess sealant with a cloth, put on a clamp (NORMA 15 rubles, the Internet says it’s good), tightened it with a screwdriver and then with a wrench. I waited 40-60 minutes for the sealant to set and poured in antifreeze from one and a half liters.
Result