On the Lada Granta, the cable-driven clutch is a fairly reliable element. However, the drive itself wears out quite actively during the operation of the vehicle, resulting in:
- Grant's clutch cable stretches and breaks (the problem is solved by replacing the clutch cable);
- the Grant clutch is also adjusted (the required pedal travel and the moment of “grabbing” the clutch are set);
It is important to take into account a number of nuances both when removing the old cable and when installing and subsequently adjusting the new cable. Read more in our article.
Clutch cable: how the drive works
Cars can be equipped with two types of clutch engagement and release drives:
- mechanical cable drive;
- lever hydraulic drive.
At the same time, cable clutch release is widely used on budget cars with front-wheel drive. This is exactly the clutch cable installed on the Grant by the manufacturer. This cable is responsible for connecting the pedal to the fork.
On a Lada Granta, the clutch in good condition operates with medium hardness, as the manufacturer tried to balance the settings. The clutch pedal of the Lada Granta cannot be called too light, there is a certain rigidity, but the clutch is not too tight either.
When the driver presses the clutch pedal, the fork moves. In turn, the fork retracts the clutch disc (the clutch disengages), the engine and transmission are disconnected, due to which the Lada Grant’s clutch “opens”, and you can change gears softly and smoothly.
When is it necessary to change the clutch cable?
As a rule, replacing the cable is necessary when it breaks or is stretched too much (adjusting the cable does not allow normal operation of the clutch).
In this case:
- the clutch pedal becomes tight;
- the pedal stroke changes;
- squeezing the clutch is also difficult;
- the clutch pedal falls to the floor;
As a result, gears are difficult to engage, and a crunching noise may appear in the gearbox when shifting. Please note that ignoring the problem, as well as active attempts to “stick” the gear with a crunch while driving and other efforts that the driver makes when trying to change gears with a faulty clutch, can cause severe wear of the synchronizers and other elements of the gearbox. This means that there is no need to delay replacing the cable.
Moreover, this procedure is not complicated and can be done with your own hands in a regular garage. The only caveat is that you have to work in the area of the pedal assembly, which is not entirely convenient (the fuse box and power steering are in the way).
What tools will you need?
If the Grant clutch pedal is too tight or, conversely, has completely failed, and the Grant clutch does not work properly, you will need to change the cable. By the way, a breakdown of the clutch fork will lead to exactly the same symptoms.
To replace the clutch cable you will need:
- open-end wrench at “8”, as well as at “10”;
- a knob (for the end cap) and a knob attachment “10”;
- a pair of Phillips screwdrivers (wide and medium), a flat screwdriver;
- ruler and caliper or ruler
It is also necessary to purchase a new clutch release cable for the Lada Granta and prepare a Litol type lubricant. You may also need a bushing for the clutch cable adjustment mechanism if this element is severely worn or damaged.
Eliminating clicks and squeaks in the clutch pedal
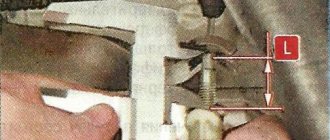
The clutch mechanism of the Lada Granta is equipped with a ratchet-type compensation mechanism that regulates the tension of the clutch cable. Clicks when the pedal is pressed indicate that the clutch cable is incorrectly adjusted during installation, or its adjustment has become “lost” during operation or repair of the machine. It’s easy to eliminate clicks - just adjust the Grant’s clutch cable. Once the distance between the extended cable guide and the clutch fork is set to within 27 mm, the clicking should stop.
Creaks when pressing the clutch pedal occur in different places. It can creak:
- plastic pedal bushing;
- clutch cable guide;
- clutch cable;
- gearbox input shaft.
Therefore, it is necessary to establish the source of the squeak and act depending on the identified cause.
- If the pedal bushing squeaks, you should lubricate it, and if this does not help, replace it.
- The creaking of the clutch cable guide is eliminated using a lubricant, for example, “Litol”. It must be applied to the contact point between the clutch fork and the plastic cable nut.
- You should try to lubricate a squeaking clutch cable by pouring a little oil inside the braid. If this does not help, the cable should be replaced with a new one.
- If the squeak comes from the gearbox, this indicates a lack of lubrication on the input shaft along which the pressure bearing moves under the influence of the clutch fork. The problem can be fixed without removing the gearbox. You need an aerosol can with graphite lubricant, equipped with a tube. To do this, you need to remove the engine protection (to get access from below) or dismantle the air filter (to allow access from above). Next, you need to remove the boot of the fork lever, insert a spray can into the hole and generously spray the shaft with graphite lubricant.
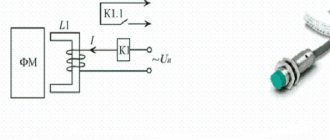
VAZ cars use a clutch cable with automatic adjustment. The machine itself is a separate unit, which is fixed near the pedals. Clicking or crackling noises when the machine operates can be considered normal. But if the pedal begins to sink and the clutch does not disengage completely, then the automatic system will no longer help - you need to forcibly reduce the length of the cable. A threaded tip is provided for these purposes. That is, clutch adjustment on the Lada Grant can be done manually. Let's look at all the steps in more detail.
How to remove the clutch cable of a Lada Granta
Having prepared the tools and the Grant clutch cable for replacement, you can proceed to the replacement. The initial step is to remove the old clutch cable. To do this, do the following:
- First, in the cabin under the dashboard, using a 8mm wrench, unscrew the nut securing the cable braid bracket to the pedal assembly bracket. Then, using a Phillips screwdriver, you need to pry the spring bracket and remove it from the groove of the clutch pedal finger.
- The next step is to remove the eyelet of the automatic cable length adjustment mechanism housing from the clutch pedal pin, after which you need to remove the upper part of the cable from the pedal assembly bracket.
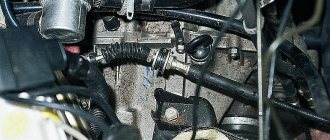
Now you need to move to the engine compartment, from where the cable is pulled forward, the cable lead is removed from the groove of the clutch release fork lever (for convenience, remove the air filter housing). - By rotating counterclockwise, the leash is unscrewed from the threaded end of the cable;
- Next, the protective rubber cover is removed from the tip of the cable, after which the tip of the cable sheath is removed from the hole in the bracket at the gearbox.
- Now, inside the car, the cable sealing cover is removed from the hole in the engine shield, after which you can pull the cable into the passenger compartment.
- After removing the cable, you need to check the general condition of the plastic bushing on the pedal pin. If the bushing is worn, it needs to be replaced. You should also lubricate your finger with Lithol.
Replacing the Grant clutch cable
Having completed the removal of the old cable and preparation, you can proceed to installing a new Grant clutch cable. Installation is carried out in the following order:
- a new cable is threaded through a hole in the shield from the passenger compartment and brought out into the engine compartment;
- then the sealing cover is installed in the hole of the shield;
- Next, you need to put the automatic cable length adjustment mechanism on the pedal pin, after which the mechanism is secured;
- Now you need to screw a plastic leash onto the threaded end of the cable (it is important to do this so that the end of the cable tip is flush with the end of the leash);
- After that, the leash is inserted into the groove of the clutch release fork lever.
Tips, tricks and useful repair videos
1. Follow general recommendations for transmission operation to increase service life.2.
Service life is 80-100 thousand pedal cycles, do not press or hold the clutch unnecessarily.3. Before installation, generously lubricate the new VP.4. Removing a manual transmission is a time-consuming operation (2 hours), so it is recommended to immediately troubleshoot the disk, fork, flywheel, and also replace the cable if necessary. 5. Do not purchase spare parts at the car market or other dubious retail outlets.6. Watch useful videos on repairing, replacing clutches and more! 1. Clutch Lada Granta and its possible malfunctions
2. Adjusting and replacing the clutch cable on a Lada Granta
3. Operations for adjusting the clutch cable Lada Granta
4. How to eliminate squeaks and clicks in the Granta clutch pedal
Lada Granta clutch and its possible malfunctions
The car has a clutch from the Lada Kalina model. The clutch is a flywheel on which a basket is attached. The basket constantly presses the clutch disc, and it is due to this that torque is transmitted to the gearbox from the engine. When you press the clutch pedal, a metal cable connected to the clutch fork is stretched. The petals of the basket are wrung out and stop pressing the disk towards the flywheel, while no torque is transmitted from the engine.
Here is a drawing for reference only, with the design of the Lada Granta clutch.
Clutch and its drive: 1 - metal clutch drive cable; 2 — cable sheath; 3 — lower tip of the cable sheath; 4 — protective cover; 5 - leash; b - fork lever; 7 — bearing guide sleeve; 8 — clutch release bearing; 9 — clutch casing; 10 — pressure spring; 11 — pressure (drive) clutch disc; 12 - flywheel; 13 — friction linings of the driven disk; 14 — driven disk; 15 — damper spring; 16 — torsional vibration damper; 17 — driven disk hub; 18 — spring; 19 — toothed cable tip; 20 — housing of the automatic cable length adjustment mechanism; 21 — spacer sleeve; 22 — cable sheath bracket; 23 — clutch housing; 24— gearbox input shaft
The clutch does not need adjustment throughout its entire service life.
Clutch malfunctions of Lada Granta
The table below shows possible clutch malfunctions of a Lada Granta car and methods for eliminating them. For more detailed information about the operations carried out to repair the machine’s clutch, see the individual articles in the category.
Adjusting and replacing the clutch cable on a Lada Granta
On a Lada Granta car, the clutch is disengaged and engaged by changing the position of the clutch paddles. The petals are pressed out using the clutch bearing, which is moved by the clutch fork. The clutch fork, which is actually a lever on an axle, is driven by a metal clutch cable. This article provides information on replacing and adjusting the clutch cable on a car.
Tools required to replace and adjust the clutch cable: 8 mm wrench, ruler, flat-head screwdriver
The process of replacing the clutch cable on a Lada Granta car
1. From the interior side, under the instrument panel (for clarity, the work is shown with the panel removed), unscrew the nut securing the clutch cable sheath stop to the pedal assembly bracket and remove the stop from the stud.
2. Using a screwdriver, remove the locking bracket and the plastic housing of the clutch wear compensation mechanism from the clutch pedal rod.
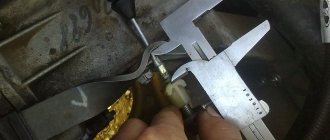
3. In the engine compartment, remove the clutch cable sheath seal from the hole in the partition between the passenger compartment and the engine compartment. 4. Pull the cable forward, that is, in the direction of movement of the car. Remove the cable from the recess on the clutch release fork (see picture below).
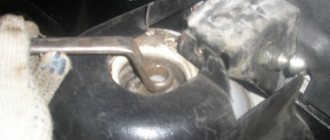
5. Unscrew the leash from the cable end, remove the guide sleeve of the cable sheath from the hole on the gearbox bracket (see figure below) and remove the cable from the car. Remove it from the hole in the partition.
Clutch drive adjustment
After installing the cable, it is necessary to adjust the clutch drive. To do this, the cable is pulled forward by the threaded end until it stops (you need to overcome the force of the clutch pedal spring). Next, the cable is held in an extended position.
The adjustment looks like this:
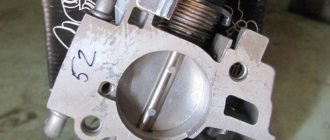
- Using a caliper, measure the distance from the end of the plastic guide to the clutch fork lever (the norm is 27 mm).
- If deviations are noticeable, you need to obtain the desired distance by rotating the leash.
We also recommend reading the article about why the clutch slips. From this article you will learn about the main causes of clutch slipping, as well as how to repair this problem. - When there is no load (the cable is released), it is necessary to ensure that the leash is adjacent to the fork lever without any gap.
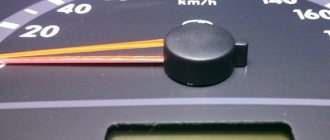
- Next, you need to press the clutch pedal 2-3 times for the automatic cable length adjustment mechanism to work. Then you need to measure the full travel of the clutch pedal, which should not exceed 146 mm.
Having completed the adjustment, you can replace the air filter housing. After installation, you can check the quality of the clutch and drive while driving. Please note that if the clutch on the Grant is selected incorrectly or is badly worn, there are problems with the gearbox, etc., replacing the drive cable will not solve the existing problems with the smoothness and clarity of gear shifting.
Malfunctions of the clutch mechanism in a car
The most common cause of a malfunction in the clutch system is the clutch disc, since it is the most actively functioning part here.
Possible problems with the clutch mechanism are presented below:
- Pressure plate and release bearing:
- breakage/curvature of the diaphragm spring of the pressure or release disk;
- twitching when the clutch operates;
- instability of the pressure plate.
- Clutch drive:
- hydraulic drive – lack of tightness of the system, malfunction of the working cylinder;
- systems with a cable - the cable lengthened and it broke;
- Manual transmission with electric drive - software disorder in control, breakdown of the actuator electric motor.
- Driven disk:
- friction linings are oily;
- friction adjustments are out of order/damaged;
- Damper springs are broken/deformed.
It is noteworthy that the problems arising in the clutch system cannot be considered insignificant. They usually modify quite quickly from “the car is acting a little strange” to “the car is not moving.” For this reason, it is necessary to immediately eliminate existing problems in the system.
You can determine if the clutch cable is faulty by paying attention to the traffic:
- the clutch pedal starts to bother you;
- the free play of the clutch pedal increases;
- no gear shift when the engine is on.
After diagnosing the vehicle for possible causes of the malfunction, repair work must be carried out. To do this, it’s time to contact a special service center or carry out repairs yourself. In the second case, you will need to first study the necessary information regarding this topic.
Before carrying out work, it is recommended to remove the air filter housing for greater convenience.
Recommendations
- As a rule, the clutch “disappears” when the clutch fork breaks or the cable breaks.
In such a situation, you can drive your car to the service center without using the clutch pedal. To do this, turn off the engine, engage first gear, then start with the gear engaged. To upshift, you need to re-gear, and to downshift, you need to wait until the engine speed drops to suitable values. We also recommend reading a separate article on how to drive without a clutch. In this article you will learn how to get to the repair site with a broken clutch. - Usually the cable threads break at the base of the pinch.
Some car enthusiasts attach the clutch cable lead to bearings to avoid bending it. The result is increased reliability and increased service life of the cable. When replacing the cable, the plastic insert is removed from the old cable and placed on the new cable. If this is not done, the plastic on the new cable will quickly break. - If the Grant clutch is being replaced, the gearbox or engine is being removed, experienced car enthusiasts recommend replacing the clutch cable if the cable has traveled more than 30-40 thousand km. Also on the Granta, clutch adjustment and inspection are necessary if even minor problems appear with the clutch pedal or difficulties with gear shifting.
Why did it happen so?
Perhaps the automatic requests do not belong to you, but to another user accessing the network from the same IP address as you. You need to enter the characters into the form once, after which we will remember you and be able to distinguish you from other users exiting from this IP. In this case, the page with the captcha will not bother you for quite a long time.
You may have add-ons installed in your browser that can make automatic search requests. In this case, we recommend that you disable them.
It is also possible that your computer is infected with a virus program that is using it to collect information. Maybe you should check your system for viruses.
If you have any problems or would like our support team, please use the feedback form.
How to replace the clutch on a Lada Granta?
- On the Lada Granta, the process should start from the engine compartment
- Under the hood, you need to remove the air filter and air duct so that they do not block access to the gearbox. However, you can remove anything, as long as it’s convenient for you.
- Now unscrew the starter from the engine
- Unscrew the clutch cable from the gearbox
- Now we remove the engine protection under the car
- Remove the clutch housing cover. Draining the oil from the gearbox
- Disconnect the front suspension arms from the steering knuckles, unscrew the torque rod
- Disconnect the reverse wire and speed sensor
- We take the CV joints out of the gearbox one by one. The main thing is that the differential gears do not become out of sync. To do this, insert special plugs into the differential.
- We unscrew the gearbox torque rod and the rocker. Before doing this, you need to mark the position of the adjusting bolts so that after the repair you do not have to adjust the rocker again
- If the ignition coil is in the way, remove it
- We place any strong and stable support under the gearbox.
- Unscrew the gearbox from the engine and remove it
- Now you can unscrew the clutch basket and driven disc
- We replace them with new ones, center the position using a special plastic device that fits onto the crankshaft and assemble everything in the reverse order. To make it easier to understand, watch the video on how to replace the clutch on a Lada Granta with your own hands.
- After assembly, we adjust the clutch cable so that the free play of the clutch pedal corresponds to those recommended by the manufacturer
- During this repair, you can replace the release bearing and lubricate the clutch fork. These parts are located on the gearbox itself.
The release bearing (VP) is a ball bearing that is installed in a special clutch with a spring and moves along the input shaft bushing. The part is used to press the clutch disc and remove the flywheel from engagement with the gearbox. The release bearing (Kalina VAZ 1118, Priora, Granta), like the clutch, periodically fails after a long mileage or improper operation and maintenance. If a clutch malfunction occurs, the gearbox will need to be removed for repairs, but there is a method in which the Kalina release bearing is replaced without dismantling the gearbox. Many VAZ 1118 owners often ask the question “How much does it cost to replace a release bearing on a Kalina?”, we can say with confidence that in a car service this repair will cost about 3,000 rubles. Replacing it yourself according to these instructions will take you 3-4 hours, so the choice is yours.
The article outlines a guide to replacing the clutch release bearing on a Lada Kalina with removing the gearbox, and also shows a method without removing it. Additionally, information is provided on the selection of spare parts, numbers, prices, and sizes. The material is accompanied by numerous photographs, as well as supporting videos, including on replacing the clutch on Kalina. This instruction is suitable for owners of Lada Priora, Lada Granta, VAZ 2110-2115 cars.