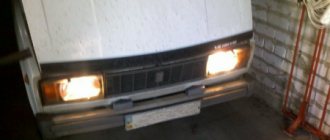
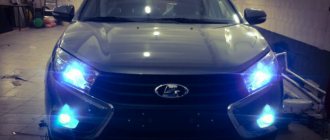
The other day it got warmer, and I decided to install xenon in the PTF myself
After reading a lot of information I still couldn’t find a worthy post on this add-on!
There were always some questions that didn’t have answers (that’s why I decided to write my report. In this post I’ll describe step by step how to install Xenon in the PTF yourself!
When choosing xenon, I chose Sho-me, the price is adequate, and there seem to be no bad reviews)
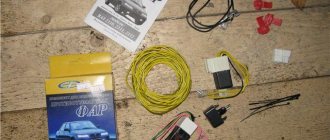
To install xenon you need to have the following:
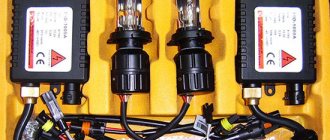
1. Xenon kit in my case is Sho-me - Infolight xenon lamps (left, right headlights) - 2 pcs. H3 5000K - Sho-me ignition units - 2 pcs.; — fastenings for ignition blocks — 2 pcs.; — a set of switching wires; — Plastic ties; — Self-tapping screws;
2. Screwdriver or drill
4. Drill 4 mm, or 4.5 mm, just in case, a couple of spare pieces! I threw away three drills while I was making the holes)
5. Self-tapping screws are included
6. Electrical tape for insulating contacts!
7. Silicone sealant
8. Plastic ties are included
9. Tool kit for removing the bumper
The first step is to remove the bumper:
A Chinese car will become more expensive than a Mazda if you persistently repair it
Xenon in fog lights , legality. Xenon fog lights, what's the fine? Is it possible to install xenon in fog lights? Today's article is dedicated to xenon in PTF.
Hello to all blog readers.
Recently, fog lights with gas-discharge xenon lamps (xenon) have appeared on many cars. Let's take a closer look at how legal this is, and is there any benefit to installing xenon in fog lights (ptf) yourself?
Let's start with the legality of xenon in PTF
If your car has PTF standard installed at the factory, then such xenon in the fog light is definitely legal, legal, and no one has the right to fine you or deprive you of your driver’s license. As a rule, such fog lights perform their functions perfectly, creating a flat and wide horizontal stream of light that spreads over the road, well illuminating the side of the road and the road for 10-20 meters in the fog. They mark the car well and do not blind oncoming drivers.
It is also possible by law to install xenon in the PTF, if they are structurally designed for xenon; the car’s fog lights have the corresponding markings - D, DC, DCR. The designation D indicates that the PTF allows the use of xenon lamps. If your car's fog lights are marked with the letter H, it means that only halogen bulbs can be used in these fog lights, and it is illegal to install xenon bulbs.
Which xenon is better
Firstly, you should understand that the most expensive xenon will not necessarily work the best .
The cost of well-advertised products includes the cost of advertising, so there is no point in overpaying. Also, in order not to overpay, you should select an ignition unit that matches the functions of your car. For example, if the car does not have a module installed that controls the voltage of the lamps, then there is no point in buying xenon with so-called “false lights”. This will save money and not lose quality.
Xenon in foglights
From all of the above, we can conclude that by installing xenon in fog lights, you will violate the xenon law only if they are not intended to use xenon lamps. PTFs are subject to the same requirements as headlights.
According to the List of faults and conditions under which the operation of vehicles is prohibited :
3.4. Light fixtures do not have lenses or use lenses and lamps that do not match the type of light fixture.
Therefore, if the design of the fog lights on a car does not provide for the installation of xenon bulbs, then the penalty for “collective farm” xenon in the PTF will be the same as for “collective farm” xenon in the headlights.
Let's sum it up
Fog lights are very effective in poor visibility conditions and have positive qualities that headlights do not have. Fog lights shine low, their light literally spreads along the road and provides excellent visibility in the area of the nearest 10-15 meters. Another positive distinctive quality of PTFs is that they provide a clear cut-off line, which seems to cut through the fog and allows the driver to better navigate the road and assess the distance to obstacles. But. If your car has xenon installed in the PTF, you will most likely be deprived of all of the above benefits! Bright, unregulated xenon in the fog lights shines anywhere - on birds, illuminates the side of the road, blinds oncoming cars, but not under your own wheels. Before installing xenon in fog lights, think carefully and take into account the above. If you don’t want to have problems with traffic police officers, don’t want to be deprived of your license, and you don’t give a damn about other road users, refrain from installing xenon in fog lights. If you really want to install xenon bulbs, then entrust this work to a professional who will not only select the right bulbs of the required power, but upon completion of the installation work will adjust the PTFs so that they do not blind other motorists and are as effective as possible for you.
That's all for me, thank you for your attention and see you again at Fara. If you have anything to add to the above, feel free to share your thoughts on this topic using the comment form. Take care of yourself and your car. Bye!
What is the responsibility for illegal xenon in fog lights?
According to the Code of Administrative Offenses of the Russian Federation Article 12.5
driving a vehicle in the presence of malfunctions or conditions under which the operation of vehicles is prohibited. Punishment for this violation under Part 3 of Article 12.5 entails deprivation of the right to drive vehicles for a period of 6 months to 1 year with confiscation of the specified instruments and accessories.
Agree, there is a very strict punishment for some kind of light bulbs installed in the bumper. But if the circumstances are successful, you can get away with a fine of 500 rubles under Article 12.5. Code of Administrative Offenses of the Russian Federation part, contact a lawyer on the blog.
How to install xenon yourself
There is no need to be afraid that you will not cope. The technology is simple and understandable. Briefly, the xenon connection diagram can be described as follows: we install light bulbs, ignition units and connect them using wires. (included)
Tools and consumables required for installation
Don't think that you need any special equipment for this. What every car enthusiast already has is enough:
open-end or combination wrenches;
Phillips screwdrivers PH;
double-sided tape (included).;
fasteners (included).
Having such a set in hand, you can safely begin the operation.
Rules to follow during installation
There are several of them, they are simple.
You need to work with clean and dry hands.
Be sure to remove the battery terminals.
You can lose your rights
If you put illegal, “collective farm” xenon in the PTF without the D marking, then according to the law, you may lose your rights. Although in practice it is very, very rare to punish for xenon in PTF. Because the use of “collective farm” xenon in PTF is more difficult to determine and prove. Fog lights, unlike low beam headlights, are not the main type of lighting.
If you are stopped by a traffic police inspector and demands to check the operation of the PTF (turn the fog lights on and off), then you can safely refuse. Tell them that the PTFs don't work. Do not turn on the fog lights, since PTF is not the main, but an additional type of lighting. You can drive a car with non-working PTF (tell me it’s just a dummy).
What is the difference between xenon and bi-xenon: main points
To a first approximation, the difference can be determined by the prefix “bi”, which changes the interpretation of the concept to “double xenon”.
This means that not only low beam, but also high beam will be produced in the same gas-discharge lamp. The main difference between xenon and bi-xenon lamps lies in their design. An electromagnetic element (solenoid) is built into the bulb of the double Xe light source, which controls the position of the inner bulb. By changing the latter, it becomes possible to adjust the focus of the glow from near to far.
Unlike the design of a double-action halogen lamp, which uses two filaments, a xenon light source generates illumination in different modes with the same arc, changing the geometry of the light spot only in an optical way.
The cost of bi-xenon lamps is slightly higher than conventional Xe light sources. This product is mainly in demand among owners whose cars are equipped with a halogen lamp with a combined low and high beam.
New order of the Ministry of Internal Affairs
Let me remind you that according to the Order of the Ministry of Internal Affairs of Russia dated December 22, 2014 N 1123, in force from January 27, 2015, “On the recognition as invalid of the regulatory legal acts of the Ministry of Internal Affairs of Russia and certain instructions of the regulatory legal acts of the Ministry of Internal Affairs of Russia,” the traffic police no longer issues a permit or conclusion for registration of changes into the design of the car.
Now motorists will not have the opportunity to make changes to the design of the car, no matter what part this change concerns. Those who converted their car before this order came into force and received a certificate before 2015 can drive.
How to connect?
Almost every motorist can install xenon on their own. You just need to follow the instructions and carefully observe safety precautions, since lighting the lamp requires a very high voltage, reaching a value of 23,000 V.
What will you need?
To connect xenon you need:
You may also need a cordless drill with a drill, ring or open-end wrenches.
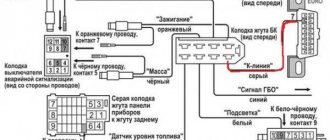
Connection diagram
Xenon installation is carried out according to the diagram shown in the figure:
In a simplified way, the procedure is as follows: in the engine compartment, the ignition unit and light bulbs are mounted in their places, after which they are connected with the supplied cables.
Step by Step Actions
Before starting work, you should turn off the power to the vehicle's on-board network by removing the terminal from the battery. Do not touch the surface of the lamp with your hands.
The area of accidental contact should be wiped with alcohol.
Xenon
To remove the old lamp, remove the cover from the back of the headlight.
The halogen light source is removed after disconnecting the wiring.
To perform this procedure, it is sometimes necessary to release the latch.
The xenon lamp is installed in place, the wiring is passed through the cover. It is better to remove the battery, as it will interfere with operation.
The cable from the power supply is connected to the installed lamp.
The wires coming from the lamps are passed through the holes made in the headlight covers. They are cut into the rubber plugs and drilled out if the lids are made of metal.
Then the ignition unit is installed. To prevent tension on the wiring, it is better to place it close to the headlights in a place where moisture and dirt do not penetrate. For additional protection, this unit should be wrapped with tape or tape.
The block can be secured with screws, clamps, or wide masking tape.
Then the wiring connection is made to prevent error indicated by different colored markings.
The xenon connection in the second headlight is carried out similarly to the described circuit.
If the car is designed with an on-board computer, the ignition unit should be connected via a relay that stabilizes the load on the network during the ignition and glow of the xenon light source.
Otherwise, the monitor will report an error.
Xenon in PTF
The fog lights are equipped with xenon lamps marked 4300 and 5000K. These color temperature indicators provide good visibility on wet asphalt and in thick fog. To connect xenon to the PTF, you often have to remove the front bumper.
To do this, the fasteners of the wheel arches and bumper are unscrewed.
Xenon light sources installed in the fog lights are connected to the ignition unit and the vehicle’s on-board network.
Bixenon
A design feature of bi-xenon lamps is the presence of an electromagnet. It allows you to form near and far beams of light. In addition to the lamps, ignition unit and connecting wires, the bi-xenon kit includes a controller.
Does it make sense to install xenon yourself in PTFs not intended for this?
Everyone decides for himself why he needs xenon in the PTF, for show-off or for the convenience and safety of trips in rain, snow, and fog. Installing it is easy, there are no difficulties. The main thing is to install a xenon bulb in a lensed PTF and adjust the limit of the luminous flux so that such light can be of real benefit. The efficiency of the PTF largely depends on high-quality adjustment.
If you put xenon in a regular PTF designed for a halogen light bulb, then the benefit from such fog lights will be minimal. They will shine brightly in different directions, blinding oncoming drivers and not performing their functions.
In fog, due to a strong defocused beam, the PTF will only get in the way. Try turning on your high beams in the fog and you'll see what I'm talking about. You turn on the high beams in the fog, and you can’t see anything at all, just a white veil in front of you, but when you switch to low beams, you can see better. Therefore, before installing xenon in the PTF, decide for yourself whether it makes any sense to “collectively farm” the PTF so that the car has a fighting appearance, for which, instead of being useful (lighting the road in fog, roadsides), you can get deprived of your license.
If you were stopped by a traffic police inspector on the road and drew up a protocol for using non-standard xenon in the PTF, then do not expect that everything will resolve itself. Look for a car lawyer who can help you re-qualify an article about deprivation of a driver’s license to an article about punishment with a fine of 500 rubles. You can contact a lawyer right now on the blog and talk about your problem.
That's all for today. Next time we will continue the conversation about xenon, and you will find out what the fine for xenon is.
Be happy! Take care of yourself and your loved ones!
The popularity of xenon gas-discharge bulbs for cars is due to their better efficiency compared to other lighting sources. It is possible to connect xenon both in a car service center and independently.
What is the difference between xenon and bi-xenon for cars
The main difference between xenon and bi-xenon is the operating mode. Xenon works only in one way - low beam, which is why it is not enough. This is especially noticeable when driving at night at high speed on a country road. Bi-xenon operates in two different modes: low beam and high beam.
Switching between low and high beam is carried out by changing the position of the arc. This is achieved by installing special movable electrodes in the lamp. They change their position on command given by a special regulatory component. The design of a xenon lamp involves fixing the arc. It is impossible to change the position.
When choosing between xenon and bi-xenon, the following points should be considered:
- difference in design;
- view of the headlights pre-installed in the vehicle.
In modern cars, bi-xenon is used more often
Vehicle headlights can be divided into two main types:
- when only one lamp is mounted, it operates in the near/far mode;
- Each glow mode has its own light source.
How to choose a good xenon kit?
The selection of a suitable xenon lighting source for a car should be based on two factors: the popularity and reliability of the manufacturer and the required brightness of the lamps.
What should a xenon kit consist of?
The complete set of gas-discharge bulbs for headlights or fog lights includes:
- lighting sources designed for a certain power and with specific markings;
- ignition device;
- a set of wires and elements for connecting and fixing lamps.
The ignition unit is a module designed to supply a certain amount of voltage required for activation to light sources. More expensive units have a more complex design, which allows them to control a larger number of processes. If the device is of high quality, it will be able to ensure long-term and uninterrupted operation of the light elements. This is due to the fact that when igniting the lamps, the basic technical parameters are observed within the required range.
Xenon marking
The marking of gas-discharge devices can be 5000K, 6000K, etc. This parameter determines the color temperature, that is, the brightness and shade of the light bulb. If the device marking is 4300K, then the light will be whiter and have a yellowish tint. The use of such sources is relevant in PTF and head optics. They are more effective when driving on wet roads.
Devices rated at 5000K have a white emission color. Their power is higher, and the light itself is more pleasant to perceive by the human eye. 6000K bulbs have a blue tint and, as a result of their low light output, are inferior in power to previous options. However, this type of device is more popular among our compatriots. As standard, when producing cars, companies install xenon lamps rated at 4200-5000K.
The AvtoGSM channel in the video unpacked and made a brief overview of the xenon equipment from the manufacturer Show-Mi.
Which xenon is better?
It is not a fact that an expensive set of gas-discharge light bulbs will function efficiently and effectively. When purchasing an ignition unit, it is also recommended to pay attention to the cost.
It is necessary to choose a device that matches the technical parameters of the machine. For example, if the car is not equipped with a module for monitoring the voltage of light bulbs, then it makes no sense to buy xenon with a “fake”. This will not affect the quality of his work in any way.
It is not advisable to purchase thin ignition units, called “slim”, if there is a lot of space in the engine compartment for installing a standard device. The cost of such “devices” is higher. And if the block is cheap, then, as a rule, it is made of low-quality materials, and the assembly also leaves much to be desired.
Most popular manufacturers
To ignite an electric arc, a voltage of about 25,000 volts must be applied to the electrodes. To maintain combustion, 50-80 Volts are sufficient. To ensure compliance with these operating conditions, a xenon ignition unit is required. When installing xenon for the first time, you need to purchase the entire kit - lamps, ignition unit and wires. The kit must be accompanied by instructions with a connection diagram. In the future, individual components can be purchased separately - as they fail.
Such well-known manufacturers of lighting products as Hella, Osram and Philips do not produce kits for self-installation of xenon. On sale you can only find lamps made by them or Chinese counterfeits.
Read also: How to unscrew a screw with broken threads
Among others, kits of the following brands are in demand among Russian car enthusiasts:
Each of these manufacturers produces xenon, as they say, in an assortment - with various lamps and modifications of ignition units.
Preparation for self-installation and connection of xenon in a car
Every driver can replace standard light bulbs and install xenon lights themselves. When performing installation, the main thing is to follow the manufacturer’s recommendations and follow the diagram.
In order not to damage the light bulbs, the bulb of the light source should not be touched with your fingers.
If this happens, then the surface with the imprint must be treated with a clean rag with alcohol. Before performing the task, be sure to disconnect the battery. When launched, gas-discharge light sources produce 23 thousand volts of voltage, which will be fatal to humans.
What may be required to connect?
To quickly install gas-discharge lighting sources, you will need:
- set of lamps;
- stationery knife or scissors;
- Phillips head screwdriver;
- plastic clamps;
- drill with 25 mm cutter;
- set of wrenches.
Xenon installation diagram
The installation and connection process is carried out as follows:
- First, old lighting sources are removed and new ones are installed in their place. To complete the task, the plastic protective cover installed on the optical instruments is dismantled. Electrical wiring is disconnected from halogen or incandescent lamps. Removing the device may require the release of a special retainer or clamp.
- The gas-discharge bulb is carefully removed from the protective bulb and mounted in the hole on the lantern. If a special clamp is used for fastening, it must be fixed. If there is a spring, the electrical circuit from the gas-discharge lamps must be pulled through this element. Afterwards, the wiring is routed through a plug into the engine compartment.
- Running an electrical circuit near the battery will be problematic. The battery usually blocks access to the flashlight, so it will have to be removed. After the lighting sources are installed, their contact elements are connected to the ignition unit.
- Then you need to make special holes in the plugs of the optical devices; the power line will be laid through them. If the protective casing is made of rubber, you must use scissors for installation. If the plug is made of metal, then you will have to drill a hole to pull the wire through it. A cutter is used for this; a 2.5 cm piece is best.
- After completing this task, a location for installing the ignition device is selected. It will be located next to optical instruments. It is important that the power supply circuit is not stretched.
- When installing the ignition unit, it is recommended to choose a place where the device will not be exposed to high temperatures, moisture, and dirt. These devices themselves are usually sealed, but it is better to take this rule into account. If there is no such place under the hood, then the device should be wrapped with tape or tape, this will partially increase its safety. The block is fixed using plastic clamps or tape.
Xenon connection diagram
More details on how to connect xenon:
- The lighting sources are connected to the ignition unit. Each electrical circuit has a specific color coding; detailed connection information is indicated in the diagram.
- The unit itself is then connected to the standard wiring system. To accomplish this task, one line from the device goes to the block where the old light source was connected.
- The second lamp is connected in the same way. First it is connected to the ignition unit, and then to the electrical wiring of the machine.
- Fixation of electrical circuits is carried out using plastic clamps. If the piece of wire is large, it is recommended to twist it into a ring.
Connection diagram for xenon to standard wiring
Safety precautions when installing xenon
During the installation of xenon, some difficulties may arise, so you should be prepared for complications:
- Work must be stopped immediately in cases where there is obvious damage to lamps, ignition units or wires.
- Before installation, you must wash your hands thoroughly, because greasy, oily or wet fingers can not only render the lamps unusable, but also increase the risk of electric shock.
- All wire connections must be carefully insulated with high-quality electrical tape, because contact with water can lead to a fire.
- It is not recommended to look at working xenon headlights for a long time, as there is a possibility of damaging your eyesight. This can only be done with tinted glasses.
- Before installation, be sure to degrease the lamp bulbs using a cloth and alcohol.
How to properly install and connect xenon to fog lights?
If xenon light sources were installed in the headlights, it is advisable to install them in the PTF. This will prevent you from spoiling the aesthetic appearance of the car.
Installation and Connection Precautions
Nuances that must be observed when installing gas-discharge devices in fog lights:
- If damage appears on the light sources during the task, you must stop working. This also applies to wiring defects, as well as ignition units.
- Before performing the task, the car owner must wash his hands, dry them and degrease them. Otherwise, the bulbs may be damaged and you may receive an electric shock.
- When connected, you should not look at the light sources for a long time without glasses.
- The joints are completely insulated using heat-shrinkable tubing or electrical tape. Otherwise, moisture may get into the wiring, which will lead to a short circuit or fire.
- Before mounting the light source bulbs, it is recommended to degrease them.
Algorithm for installing xenon lamps
In the PTF it is necessary to install devices designed for 4300K or 5000K; this option is more effective in fog and when driving on a wet road:
- Fog lights are usually located under the headlights. Therefore, installing them may require removing the bumper. Sometimes it is enough to unscrew the screws securing the front wheel arches.
- After access to the rear part of the PTF is gained, the optics are disconnected from the power supply circuit. Old light sources are being dismantled and new, gas-discharge ones are being installed.
- High-quality fixation of devices is carried out. They may be subject to vibration while driving, so the bulbs must be securely fastened. Otherwise it will cause them to break.
- Ignition units are installed. The best option would be to place them in the engine compartment or under the front bumper. We need to find free space for installation. It is recommended to choose a protected place where the unit will not be exposed to moisture and aggressive external environments. The devices are secured using clamps or tape. If the package includes special fasteners, then they are used.
We install xenon with our own hands
Do not neglect safety precautions when installing xenon, as you can not only damage the equipment, but also seriously injure yourself.
So make sure your hands are dry and oil-free. It is also forbidden to touch the xenon lamp bulb with your hands. In case of contact with it, it is necessary to degrease the surface with alcohol.
It is better to check the correct connection using the diagram, which will definitely be in the instructions. You can also use this xenon connection diagram:
Some difficulties arise when installing xenon lights yourself on cars with on-board computers.
If the xenon does not function correctly when igniting or during lighting, it is recommended to install a voltage relay. It will stabilize the load on the wiring at the moment when the headlights turn on.
This video explains how to install xenon lamps with your own hands. Lamps manufactured by IL-Trade, color temperature 4300K with H7 base.
How to replace xenon lamps with halogen ones yourself?
The disadvantages associated with the operation of xenon lead to the fact that many car owners decide to replace gas-discharge lamps with conventional ones. There are nuances in this process, especially if the light sources were installed regularly.
DIY lamp replacement procedure
Replacement is carried out after preparing a wrench and a screwdriver; sometimes electrical tape is required:
- The engine compartment is opened and the negative clamp is disconnected from the battery.
- Installed lighting sources are disconnected from the power supply circuit. The protective elements under which the screws are located are dismantled. They attach the optics to the car body, so they need to be unscrewed, but not completely, just loosened.
- The lights are dismantled. They can additionally be fixed using latches. When performing the task, it is important not to break the fastener. After this, the lighting device is dismantled from the seat.
- The ignition units for gas-discharge light bulbs are removed; for this, the fastenings on the modules are unscrewed.
- The power line is laid from the control unit, the device is mounted next to the steering wheel. If halogen bulbs were installed in cars, then there is no need to change the electrical circuits. But in the case of standard xenon, new cables will be required. This task is performed carefully so as not to damage the conductors.
- Optical devices are installed and connected to electrical circuits. Then the lighting flux is adjusted.
The MazdaGarage channel in its video, using the Xedos model as an example, showed how to remove xenon lighting sources from headlights.
Why are standard PTF and xenon incompatible?
The list of factors that make gas-discharge lamps and reflective PTFs incompatible is quite impressive.
- The correct focus of the headlight automatically changes, since the arc in the gas-discharge lamp is thicker than in the halogen lamp and is directed upward.
- Basically, for PTF, HB3, HB4 or HB11 lamps are used, at the end of which there is a cap that does not transmit light, blocking direct light. When installing xenon, the body of which is longer, the cap will need to be broken off. This causes blinding of oncoming drivers, since without a cap, the light of the xenon lamp is directed upward and forward, which is unacceptable for fog lights.
- The xenon in the standard PTF simply will not perform the “anti-fog” function - producing bright white light directed upward, the effect in the fog will be the same as from the headlights, i.e. a solid white “wall”.
- The fog lights are located low, and if the light from them is too bright, any unevenness on the road will cast a long shadow, forcing you to constantly slow down.
What to do if xenon headlights stop working?
If xenon bulbs stop functioning, the reasons may be as follows:
- damage to the contact on the connector for connecting to the power circuit;
- broken wiring;
- failure of the lighting source, the lamps cannot be restored;
- control module failure.
Why does the ignition unit break?
Reasons for failure of the ignition device:
- Lack of tightness on the module body, which leads to dirt and moisture getting inside the unit. The problem can be determined by disassembling the device and diagnosing its internal components. If dirt or water gets into the module, the lights will not light up or will begin to blink when turned on.
- Negative effects of corrosion. The solder joints of electronic components may oxidize, causing components to fall out of the solder. The problem is associated with assembly errors or regular exposure to moisture.
- The pulse signal from the controller has disappeared. There may be problems with the transistor elements, multiplier or transformer device.
How to repair a xenon ignition unit yourself?
Module repair is performed as follows:
- All electrical circuits are diagnosed for breaks or leaks. This refers to the wires that go to the module. The problem may be a pinched or damaged power line.
- The device is treated with an alcohol solution, this will remove rust and traces of condensation. You must act carefully so as not to damage the board. The sealant is removed from the back of the circuit and the contact elements are re-soldered with a soldering iron. Everything needs to be soldered, since leaky parts are difficult to visually identify.
- An opened ignition device is diagnosed on something that does not allow voltage to pass through. When diagnosing, there are no parts that light up nearby. The test is performed while the device is connected to a light source. The voltage of the multiplying element is 35 kV, so if the unit is not turned on, then it will not be touched until it is completely turned off.
- The next step will be to perform diagnostics on the transistor elements, there are a total of four on the board. A multimeter is used to check. If testing shows a device with a breakdown, it is soldered again. It is recommended to install 4N60 parts.
- Using a tester, it is not always possible to determine an element with a breakdown. It may be necessary to remove each transistor before the ignition device is activated. You can turn it on briefly, for a couple of seconds.
- If the transistor elements are intact, the resistor devices are checked. The burnt out part is replaced with a new one.
When assembling the block, it is not recommended to use silicone sealant.
After hardening, this product is as hard as possible. If the transient device needs to be replaced in the future, opening the module will be problematic.
Installation of bi-xenon lamps
Bi-xenon is the same lamp filled with an inert gas, only equipped with a special electromagnet. It controls the focus of the lamp, which allows you to create “low” and “high” light. A conventional xenon lamp constantly shines at full power, and the power of bi-xenon lenses is regulated using a solenoid (electromagnet).
The principle of installing bi-xenon with your own hands is approximately the same. It differs only in the presence of a voltage controller, which is connected to the lamp, battery and ignition unit. Its main function is to control and stabilize the voltage in the wiring.
We wrote above how to install xenon yourself. Now let’s just look at the connection diagram for bi-xenon lenses and look at some of the nuances.
- The high-voltage wires from the bi-xenon lamps are connected to the corresponding wires from the ignition unit.
- The controller is connected to the power connector of the ignition unit.
- The third wire on the lamp is the electromagnet connector, which controls the intensity of the light. It also connects to the controller.
- The connector from the controller is connected to the standard lamp power connector. It has 3 contacts.
- We connect the controller to the battery power, “+” and “-” respectively.
After installing new lamps, xenon or bi-xenon, be sure to adjust the headlights. Hardly anyone likes being blinded by the headlights of an oncoming car. Think about other drivers and they will think about you.
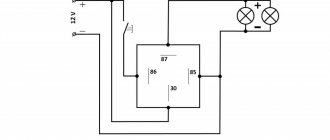
Connecting xenon via a load relay Skoda Octavia A5
This fact discourages many from installing xenon
, although there is a desire. But there is a way out! This is connecting xenon via a relay; by the way, this method is used on many cars, not just VAG.
The main reason why the VSM burns is the high current from the ignition unit, both during its constant operation and when the lamp itself is ignited. The connection method, as described in this article, removes this parasitic load and the comfort unit is not overloaded. BUT! It is necessary to extinguish the reverse currents from the relay coil when disconnecting! Using a bypass diode in the circuit!
I depicted in more detail where to connect what I could in the figure below. This circuit is used for one lamp. That is, when connecting, you will need two relays.
Connection diagram for xenon via a relay with a diode
This method of xenon operation is implemented using a switching plus. You can do the same thing only with the negative wire, as you like. It is advisable to install a diode in parallel with the relay coil to dampen current surges.
You can use any relay, but not less than 10A. 4 or 5 pin, 12 V, for example: 75377701
You can take the cheapest xenon, 55 W, from Ali, for example this one: