November 21, 2016 Lada.Online 247 510 21
Owners of LADA cars with an electronic gas pedal may encounter error P0504 (mismatch of brake pedal sensors). Along with it, malfunctions in the engine may appear (stalls, speed fluctuates, does not start, etc.). Most often the cause is the brake pedal position sensor (brake light sensor or frog).
The brake pedal position sensor and brake light switch are mounted in one housing. Most often, the cause of its malfunction is a broken spring. In this case, you can repair the sensor yourself by replacing the spring with a new one. Or replace the sensor with a new one.
Purpose of brake sensors
Imagine this situation: you rode an electric bike to some public event, met with friends, slowed down and started communicating with them, but you forgot to turn off your electrified iron horse. Here, at some point, one of your friends approached your device, who had never dealt with such equipment before and, for fun, decided to twist the gas handle, completely unaware of the consequences of these manipulations. Naturally, the two-wheeled product will start moving.
You also did not expect such a whim of fate, so you can either fall yourself or crash into a citizen who is serenely positioned in your path.
A similar situation can happen to a rider if he is stopped at a crossing, waiting for the right moment when he can cross, and someone accidentally, or maybe the cyclist himself, touches the pedal of the electric bike, which triggers the PAS sensor. The device will move onto the roadway, probably together with the rider, and the more power the unit has, the more unpredictable the outcome of the unexpected maneuver will be.
Just so that such extreme misunderstandings do not arise, sensors are mounted on the brake levers that allow, even with a weak impact on the brake control, to turn off the power supply to the power unit. This saves battery power and also prevents unnecessary overloading of the bicycle’s electric motor during braking.
Another purpose of brake sensors is to enable recuperation (if provided) on electrified bicycles and motorcycles with direct drive engines.
Well, next, we will discuss the types of brake sensors.
Error P0504 - the cause is the brake pedal position sensor
Owners of LADA cars with an electronic gas pedal may encounter error P0504 (mismatch of brake pedal sensors). Along with it, malfunctions in the engine may appear (stalls, speed fluctuates, does not start, etc.). Most often the cause is the brake pedal position sensor (brake light sensor or frog).
The brake pedal position sensor and brake light switch are mounted in one housing. Most often, the cause of its malfunction is a broken spring. In this case, you can repair the sensor yourself by replacing the spring with a new one. Or replace the sensor with a new one.
Push button sensor
This is the most common type of brake sensor today, designed in the form of a simple button that closes or opens two contacts when the brake is applied. It can be found in the handles that come in the same set with Bafang mid-drive.
Brake trigger included with the Bafang kit
In such a mechanism, when the lever is acted upon, two wires will be closed, reaching to the electric bike’s control unit. The same button is located inside the handle, but if we look closely at the sealed connector of the device under discussion, we will see that there are actually not two contacts, but one more. Where does the 3rd contact come from and what is its purpose?
The whole secret is that there is another type of brake sensors, which operates according to a three-wire circuit. The developers of the device used a three-pin connector for versatility, making it possible to connect others instead of these brake levers, those that operate on a three-wire circuit. We will consider them in the next section.
So, how can the push-button design please the owner of an electric bicycle? Obviously - due to its simplicity! But the disadvantage lies in the fact that the button, like any mechanical component, will gradually wear out and fail.
Some do-it-yourselfers assemble brake sensors based on microswitches, but these products generally cannot boast of a high degree of reliability and, moreover, they do not look very attractive.
Magnetic sensor
Many users may assume that the magnetic type sensor is equipped with a reed switch. For those who don’t know what a reed switch is, I’ll explain. This is an abbreviation for “sealed contact” - an electromechanical device consisting of a sealed bulb with a pair of contacts located in it. When this device is in a magnetic field, the contacts close, and when the field disappears, the contacts open.
Reed switch
So, the reed switch, like any mechanism, wears out and becomes unusable. It is for this reason that it was replaced by Hall sensors (HL). Such a sensor is activated when it is in a magnetic field. It has three pins: “+5V”, “GND” and signal. “+5V” and “GND” - power supply to the sensor, while the output signal comes from the signal one. The wires stretch from the DC to the control unit.
Hall Sensor
The advantage of DH is reliability! If the structure is assembled with high quality, it will last for a very long time. But the disadvantages include the need for another power cable to the sensor and the use of an additional element, the role of which is played by a magnet.
To activate the DC, a magnet must pass by it. This is where an interesting question arises: how to firmly fix the sensor and magnet on the brake lever, so that when the lever moves, the magnet moves over the sensor?
Here we have the most popular brake sensor on Aliexpress. In addition to the sensors themselves, the kit comes with magnets and high quality double-sided tape from.
So, the seller himself advises mounting the equipment in this way: we glue the sensor body to the brake trigger body, and the magnet, in turn, is glued to the handle itself.
The image shows this very variation of the installation
Looks good - doesn't it? But not everything is so rosy! Reviews from cyclists about this equipment are not entirely positive. In one case, the user installed a magnet not from this set, fixing it on a plate made of metal and pressing it to the handle using ties.
In another situation, the sensor and magnet were installed as prescribed by the manufacturer, but in addition they were reinforced with ties. However, if you pay attention to the gap between the magnet and the sensor, it turns out that such a circuit is unlikely to function adequately.
Nylon clamps are bad because they lose their elasticity along the way and eventually break. Naturally, this must be taken into account.
There is a company in Russia that produces e-bikes; specialists also develop and manufacture brake sensors for hydraulic brakes. This company is called Electronbikes. The DCs they produce are located inside a housing made of anodized aluminum, firmly fixed to the brake handle. The magnet is fixed to the rod by means of a transition element.
This is their brake sensor on the Avid Elixir 9 Trail. Anodic oxidation has not yet been carried out.
Screw-type connections give the device a fairly high degree of reliability, and after the anodizing procedure, when the assembly becomes black, such a product should look quite solid.
A couple more of their developments: Avid Elixir 1 (first image) and Hayes Nine (second image).
How to remove and install
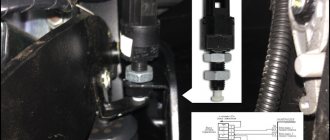
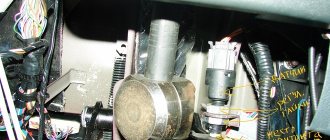
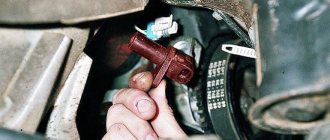
Disconnect the negative terminal of the battery. Move the driver's seat as far back as possible, lift the steering column up, and remove the carpet. The sensor is located near the brake pedal, to remove it you need to remove the block with wires (by snapping the latches), and then:
- (Priora, Kalina, Granta, Niva 4x4) loosen the lock nut and unscrew the sensor.
- (Largus, Vesta, XRAY) turn the sensor counterclockwise 90 degrees and remove it from the bracket.
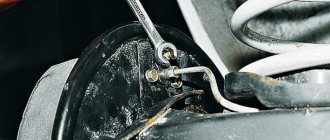
Installation of the brake pedal sensor is carried out in reverse order. Adjust it if necessary. We tighten the sensor until the pedal goes down. Then turn it out a little (counterclockwise 90 degrees) and secure with a lock nut. It should be so that when the brake pedal is released, the switch rod is completely “recessed”, and when the pedal is pressed, the rod should completely come out of the switch body. The process of removing and installing the sensor is also shown in the video:
Connection to control unit
The brake sensors mentioned in the topic are equipped with a sealed connector at the end of the wire, usually intended for joining with the integration cable (below in the photo). It is present in the Bafang mid-drive set.
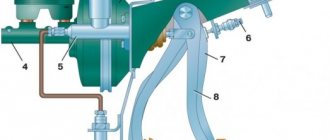
Using a cable, the brake control sensors are connected to a control unit located in the housing of the central power unit.
The option with an integration cable makes it possible to simplify repair work and maintenance. For example, if there is a need to replace the brake lever, accelerator handle or monitor, you can simply unplug the connector on the steering wheel, rather than pulling out the entire cable going to the control device.
If you purchase an inexpensive set with MK, most likely you will get Wuxing handles equipped with extended wires and leaky connectors at the end. Such a device will not have the best effect on the aesthetic component of the electric bike, due to the presence of a large amount of wiring, and you should not count on easy diagnostics and simplified repair measures during the operation of the vehicle.
So, let's make connections. The control unit has a pair of connectors for connecting brake sensors. It is not difficult to distinguish them - they are connected in parallel. If we take into account the integration cable, then this connection is located on the steering wheel, and not four wires go to the control device in the cable, but two.
However, what should we do if we do not have a two-wire system with a button sensor, but a three-wire system with a DC sensor? Where can I find the 3rd wire? In reality, there is nothing complicated here: the 3rd wire is the DC power supply - voltage +5 V. It can be safely taken from the DC power supply mounted on the accelerator handle. It is slightly different there, but it is also powered by +5 V.
We need to find the accelerator handle connector according to the instructions for the control device from the kit you purchased. Next, we look for a contact with a voltage of +5 V on it and solder in parallel the wire used as the missing contact on the brake sensor connectors.
How to check
Turn on the ignition and press the brake pedal, the brake lights should light up. After releasing the pedal they should go out. If the lamps do not light up, check the brake pedal sensor and the voltage supply from the battery to the wiring harness block.
(Largus, Vesta, XRAY) Move the rod lock to the right position using a screwdriver. We check the brake pedal sensor using a multimeter in ohmmeter mode. Circuit 3-4 should be closed (resistance value is close to zero), and circuit 1-2 should be open (resistance should tend to infinity). After pressing the rod, circuit 3-4 should open, and circuit 1-2 should close. Before installation, move the rod to the left position.
(Priora, Kalina, Granta, Niva 4x4) Circuit 1-4 should be closed, and circuit 2-3 should be open. After pressing the rod, circuit 2-3 will close, and circuit 1-4 will open.
Thus, the cause of error P0504 may be:
- faulty sensor or its wiring
- Brake pedal sensor is not adjusted
- it is necessary to reprogram the ECM (instruction No. 46-15 for Lada Granta and Kalina 2 with automatic transmission, site users can download it)
To download files you need to log in to the site.
By the way, the brake pedal position sensor can be repaired.
Keywords: lada xray sensors | Lada Vesta sensors | Lada Largus sensors | Lada Granta sensors | Lada Priora sensors | Lada Kalina sensors | 4x4 sensors | pedals lada xray | fret vesta pedals | fret largus pedals | fret pedals granta | Lada Priora pedals | fret Kalina pedals | 4x4 pedals | ECM Lada Vesta | ECM Lada XRAY | ECM Lada Largus | ECM Lada Granta | ECM Lada Kalina | ECM Lada Priora | ECM 4x4 | Niva sensors | Niva pedals | esud niva | AvtoVAZ order | universal article
+26
Share on social networks:
Found an error? Select it and press Ctrl+Enter..
Brake sensors for bicycles where replacing brake levers is not possible
As we already found out in the first section of the topic, brake sensors are built into the brake handles of an electric bicycle. They are activated when the trigger is pulled and send a signal to the control unit, which in turn stops the power supply to the motorized wheel.
However, an unpleasant situation arises here: when converting a traditional bicycle into an electric bike, replacing the handles is sometimes an impracticable technical maneuver. On a bicycle with a hefty price tag, the brake levers can be made in a single housing with the gear shifter. Unfortunately, replacing such products with modifications with sensors will not work. However, we are still resolving this issue.
For such bikes, sensors have been specially developed that are embedded in the brake cables. You will have to pay more money for such devices than for brake handles equipped with sensors. But sending a signal to the control unit is not their only function. These parts are also equipped with red LEDs, which are activated when braking, acting as a “stop”. Of course, such a glow is not very noticeable in the daytime, but in darkened conditions a single light manifests itself in all its glory.
Brake sensors mounted on the brake cables have a third wire. This is a little unusual, since standard handles equipped with brake sensors use a 2-wire system. So, when you select components for electrifying a bicycle using sensors in the brake cables, remember this, because you will need a control unit with the appropriate connector.