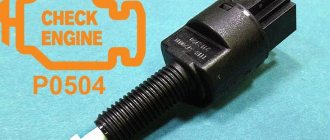
What are the reasons that cause sensor failure?
A detailed examination of the essence of the problem that arose, when error code 0504 appeared, will allow us to determine the list of reasons. This refers to the disassembly of the ill-fated sensor in the LADA Granta car. Three clips serve as an obstacle to this noble procedure, preventing the component from being easily disassembled. After overcoming this “barrier”, it becomes possible to observe the real reasons that caused the breakdown:
- deformation of the smaller (of 2) springs located on the rod;
- different heights of the contacts of the designated sensor;
- poor material (steel) used for the manufacture of terminals;
- presence of play on the floating contact element.
“Ringing” can be used as the initial stage of diagnosis. Each of the contacts must be subjected to this action separately, and then in pairs (“2nd” with “3rd”). The experience of LADA Granta owners indicates the presence of a dull tone during ringing, which confirms the malfunction of the contact group. Serviceable contacts are characterized by a distinct ringing “squeak”.
How to replace the sensor?
If you have received error code 0504, to perform this simple procedure you will need to provide access to the pedal bracket on the Lada Granta, on which our “ill-fated” sensor is actually present, or rather, above the pedal assembly. A well-carried out replacement will guarantee long-term operation.
- Remove the negative terminal from the battery terminal.
- We press out the plastic retainer (use a screwdriver).
- Next, remove the block with wires.
- Turn the sensor in a clockwise direction.
- We remove the faulty part.
We install the new component on a Lada Granta car in the reverse order. Don’t forget to first release the pedal to be able to insert the new product into its socket. We turn the component against the direction of the arrow until the corresponding click appears.
Adjusting the grant brake pedal sensor
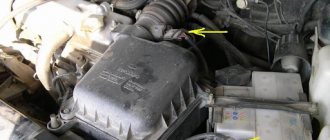
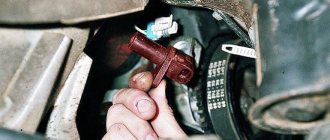
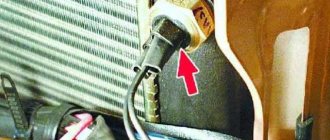
We will show you how to remove and replace the brake pedal sensor in a Lada Granta car. Carry out diagnostics for error P0504. It is located under the brake pedal, near the steering column. In order to remove the sensor, it is necessary to disconnect the wire block. In the picture you see two antennae on the sides:
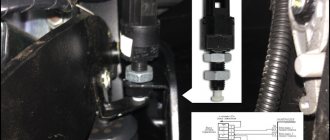
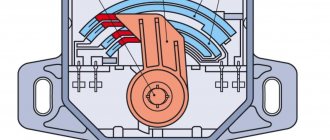
You need to press them and pull out the block with wires. Next, use a 19mm wrench, unscrew the locknut a little, then tighten it by hand. You can install a new sensor or diagnose and repair the old one. For convenience, its contacts are indicated by numbers. When it is in the free position, contacts 1 and 4 should be open, and contacts 2 and 3 should be closed. When we press the button, everything will be the other way around, contacts 1 and 4 will be closed, and 2 and 3 will be open. If this does not happen, then our button is faulty.
Installation occurs in the reverse order, adjust so that the pedal presses the button and releases it with a small stroke.
Video of removing and replacing the brake pedal sensor in Lada Granta, error P0504:
Backup video on how to remove and replace the brake pedal sensor in Lada Granta (error P0504):
If error P0504 indicates a malfunction of the brake pedal sensor, a check will light up on the panel; you can remove it using the on-board computer, which many Granta owners have installed, or simply disconnect the terminal from the battery for 20 seconds.
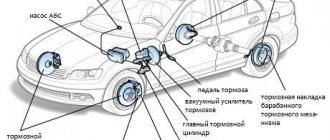
Problems that can arise with the brake pedal sensor in the Lada Granta have long ceased to be classified as news. It is this unpleasant circumstance that becomes the main reason for the appearance of error code “P0504”. This sensor can cause a lot of inconvenience to the owner, and mileage does not have any effect on its performance.
The price of the issue is equal to the amount of 180 rubles. for a new part. Why is a fee charged, and not a free replacement with the fact of repair indicated in the service book? The waiting period for spare parts to arrive is more than 4 days, since they are never in stock.
The annoying frequency of the “Check” symbol lighting up prompts the owner to go to a service center or make adjustments himself by tightening the corresponding bolts. This procedure aims to reduce the force of contact between the button and the pedal surface. If you “dig deeper,” then you can hardly get by with just one adjustment action, since the most common occurrence of error P0504 occurs when parking with the automatic transmission lever activated in position “D.”
The obvious symptom factor can be identified with the moment when the Lada Granta does not want to start from the key fob. As a temporary solution, you can apply short-term pressure on the brake pedal. The car will start, but error P0504 does not disappear from the ECU memory.
If such “inadequate” operation of the sensor occurs, then this jeopardizes the safety of machine operation. Many owners have noted the fact that the BC freezes, as a result of which the car begins to twitch or may even stall in the middle of traffic, and error P0504 is shown.
About alternative sensor options
Since domestic “devices” for the Lada Granta car are not able to prevent an unpleasant situation, it is possible to use other devices that act as analogues. Such a component could be a brake light switch from Volkswagen, or more precisely: “FACET 7.1126”. This switch is slightly more expensive than the “native” one (560 rubles) and has the following features:
- four contacts;
- threaded leg with a similar diameter of 12 mm.
To successfully install the indicated analogue, you will need to acquire an adapter for the terminals.
Owners of LADA cars with an electronic gas pedal may encounter error P0504 (mismatch of brake pedal sensors). Along with it, malfunctions in the engine may appear (stalls, speed fluctuates, does not start, etc.). Most often the cause is the brake pedal position sensor (brake light sensor or frog).
The brake pedal position sensor and brake light switch are mounted in one housing. Most often, the cause of its malfunction is a broken spring. In this case, you can repair the sensor yourself by replacing the spring with a new one. Or replace the sensor with a new one.
Removal and installation
Replacing the brake pedal sensor on Kalina is carried out using an adjustable wrench set to “19”. The sensor itself is located above the brake pedal under the steering column. Conventionally, the removal stages can be divided into 5 steps:
- Before starting electrical work, it is recommended to disconnect the negative wire (terminal) from the battery.
- Then you need to move into the car interior on the driver’s side. For ease of operation, it is advisable to move the driver's seat in the opposite direction from the dashboard.
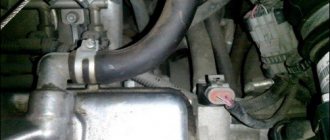
- Find the location of the sensor. Find a contact chip with wires. Press and hold the 2 plastic fasteners located on both sides of the chip. Pull the connector out of the sensor connector.
- Take the wrench in your hands and loosen the fastening nut. After which the sensor can be unscrewed freely.
- The installation process is similar to the removal procedure, except that you will need to make adjustments (tuning), the process of which is described in detail in the previous section.
Problems with the brake pedal sensor are far from new, which, in turn, is the main cause of error P0504. Regardless of the mileage, the Granta brake pedal sensor causes almost every third owner of the Lada Granta to suffer.
The cost of the issue is 180 rubles, which is exactly how much a new sensor costs. If the car is under warranty, the replacement is free. Why exactly 180 rubles, and not a free replacement with entry into the car’s service book? In all cases, the waiting period for spare parts is at least 4 days, since they are never available (the bitter experience of Granta owners).
The frightening frequency with which the Check on the car's BC lights up forces you to either go to a service station or carry out the adjustment yourself by tightening the adjusting bolts.
This measure is carried out in order to reduce the contact of its button with the brake pedal area. If you look even further, adjustment alone is not enough, since the most common manifestation of error P0504 is when parking on the brake with selector “D” on.
A clear manifestation of the problem can be considered those moments when the car does not start with the key fob and shows a problem in the brakes. A temporary, fairly short solution to the problem is to press the brake pedal hard, after which the car starts, but the error on the BC remains.
How to remove and install
Disconnect the negative terminal of the battery. Move the driver's seat as far back as possible, lift the steering column up, and remove the carpet. The sensor is located near the brake pedal, to remove it you need to remove the block with wires (by snapping the latches), and then:
- (Priora, Kalina, Granta, Niva 4x4) loosen the lock nut and unscrew the sensor.
- (Largus, Vesta, XRAY) turn the sensor counterclockwise 90 degrees and remove it from the bracket.
Installation of the brake pedal sensor is carried out in reverse order. Adjust it if necessary. We tighten the sensor until the pedal goes down. Then turn it out a little (counterclockwise 90 degrees) and secure with a lock nut. It should be so that when the brake pedal is released, the switch rod is completely “recessed”, and when the pedal is pressed, the rod should completely come out of the switch body. The process of removing and installing the sensor is also shown in the video:
Lada Priora Hatchback Strict SE Logbook Error P0504 Brake pedal sensor and its solution
Good evening everyone, nothing interesting happened to the car, and then bam, today it means I’m not touching anyone’s food, I didn’t pay attention to how often I pressed the brake, but suddenly the car begins to slow down to such an extent that it seems that it stalls while driving and then but after 1.5 seconds it starts, I couldn’t believe my eyes, at first I thought the gear was knocked out, when I press the gas at 40 km/h it just doesn’t go, so + besides, there are no revolutions at all! In a panic, I went and refueled (it was 5L at that time), I thought it was petrol, I refueled, I gave it a ***, I accelerated, like normal, I parked the car near the house, I started it an hour later, an error pops up, fortunately I have a friend Lyo with a cable and a program in next door, I rush to him. We do the diagnostics, and here’s the most interesting part:
Having read on the Internet that either the sensor is faulty ****, or the stoppers may burn out and because of this it is tripping, but the stoppers are all burning, the previous ones are intact. Someone also wrote that the sensor may be poorly adjusted, and it works too often when the brake is pressed. They cleared the error, now I’m driving and looking, so far everything is fine, so far there is no desire to change the sensor.
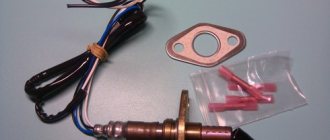
Today I went and bought a sensor, it costs 232 rubles, a little expensive IMHO) I installed it, it’s very easy to install, I unscrewed the nut and unscrewed the sensor itself, before of course disconnecting it from the power supply (which, by the way, only enters the sensor on one side, that is, by mistake you won't be able to connect it).
New, purchased
Old on the left, new on the right
The last photo shows that the spring of the old sensor has apparently stretched, because the limit switch no longer snaps off properly, but only moves halfway. I reassembled everything in the reverse order, adjusted it by eye
Then I cleared the error, and now everything is quiet, thank you all for your attention) And for those who will ever do this for the first time, there is no need to remove anything, I moved the seat all the way back, raised the steering wheel as high as possible, pulled out the rug (so as not to get dirty), took off the cover that covers the fuses (to let in more light) and lay right under the steering wheel, and everything is clearly visible there. I used the key for 19. The replacement took 10 minutes maximum
It became interesting, I disassembled the old sensor, everything is visible as is) The upper spring simply broke
All the best.
How to check
Turn on the ignition and press the brake pedal, the brake lights should light up. After releasing the pedal they should go out. If the lamps do not light up, check the brake pedal sensor and the voltage supply from the battery to the wiring harness block.
(Largus, Vesta, XRAY) Move the rod lock to the right position using a screwdriver. We check the brake pedal sensor using a multimeter in ohmmeter mode. Circuit 3-4 should be closed (resistance value is close to zero), and circuit 1-2 should be open (resistance should tend to infinity). After pressing the rod, circuit 3-4 should open, and circuit 1-2 should close. Before installation, move the rod to the left position.
(Priora, Kalina, Granta, Niva 4x4) Circuit 1-4 should be closed, and circuit 2-3 should be open. After pressing the rod, circuit 2-3 will close, and circuit 1-4 will open.
Hi all. Today we'll talk about the brake pedal sensor, or brake pedal position sensor to be precise. You will learn about the weak points of this device, as well as how to repair the brake pedal sensor or replace it on a Lada Granta.
Error in brake sensor signal on grant
Welcome to ChipTuner Forum.
Theme Options
wryip
anatoli
wryip
wryip
I didn’t adjust it on the grant, but maybe this instruction will be useful or you’ll find something similar when adjusting
Adjusting the brake pedal switches:
Connect the scanner, turn on the ignition. Check the parameters: the state of normally open switch 1 and the state of normally closed switch 2. When the brake pedal is pressed, the switches should move from the “NO” state to the “IS” state in the sequence: first No. 2 = IS, then No. 1 = IS. If, when the brake pedal is not pressed, switch 2 is in the “IS” state or when you lightly touch the pedal it goes into this state, then it is necessary to adjust the switch using the adjusting nut to the “NO” state, that is, “press” switch 2 to the pedal in order to eliminate possible “blinking” of the switch when the pedal plays when it is not pressed. Reset the error codes, turn on the ignition again, press the brake pedal 3-5 times and check for their presence. Please note that if there is an error due to an incorrect signal from the brake pedal position sensor, the malfunction lamp does not light up.
electromechanic
Fedorov
I didn’t adjust it on the grant, but maybe this instruction will be useful or you’ll find something similar when adjusting
Adjusting the brake pedal switches:
Connect the scanner, turn on the ignition. Check the parameters: the state of normally open switch 1 and the state of normally closed switch 2. When the brake pedal is pressed, the switches should move from the “NO” state to the “IS” state in the sequence: first No. 2 = IS, then No. 1 = IS. If, when the brake pedal is not pressed, switch 2 is in the “IS” state or when you lightly touch the pedal it goes into this state, then it is necessary to adjust the switch using the adjusting nut to the “NO” state, that is, “press” switch 2 to the pedal in order to eliminate possible “blinking” of the switch when the pedal plays when it is not pressed. Reset the error codes, turn on the ignition again, press the brake pedal 3-5 times and check for their presence. Please note that if there is an error due to an incorrect signal from the brake pedal position sensor, the malfunction lamp does not light up.
Source
Removing and repairing the brake pedal position sensor
1. To diagnose the problem, it is necessary to remove the brake pedal sensor. This is done using the key on “19”. Move the driver's seat back and find the desired sensor. Then loosen the nut, turn off the power and remove the brake pedal sensor.
2. Then we disassemble it. Disassembly is quite simple; the sensor consists of two parts and is held on by latches. There is a spring inside the sensor, which most often causes a malfunction.
3. Replacing a spring with a suitable size and number of turns in most cases solves the problem. Also look at the condition of the contacts; there should be no oxides on them, and they should not be burnt.
4. After repairing the brake pedal position sensor, assemble it in the reverse order. And we install it in place.
5. Next, you need to adjust the sensor; for this there are two nuts on it at the top and bottom. The top one adjusts the gap, which determines the correct stroke of the button. The challenge is to find the “sweet spot” and adjust the gap so that the button moves freely.
6. Now that the Grant brake pedal sensor has been repaired, installed and adjusted, you can check its operation, but before that you should reset the error.
7. Then we start the engine and let it run, it may take about 10-15 minutes, if during this time the ECU does not generate an error, then the repair was not in vain. If the error appears again, it means something is wrong with the sensor, or it is incorrectly adjusted. If after all the manipulations you still have not managed to solve the problem with error P0504, most likely you will have to buy a new brake pedal position sensor and install it.
“>
How to change the clutch sensor on a Priora
Well, the widespread computerization of cars has reached such a unit as the clutch. No, the electronic unit does not yet control the process itself, but it already controls this process. To do this, a sensor is installed under the clutch pedal to monitor the progress of the clutch.
Operating principle of the electronic engine control system (ECM)
In a modern car, all process control, except for the rotation of the steering wheel, and even then, is entrusted to the computer, or Electronic Control Unit (ECU). It contains a program with many different tables.
In general, the ECU receives data about the state of the car, speed, revolutions, and activated mechanisms from a large number of sensors.
Based on the results of these observations, the ECU, using these tables, includes certain ignition modes, fuel supply and other executive functions.
The role of the clutch sensor
It would seem, what does the clutch have to do with it? And here's what it has to do with it. When the clutch engages, the most sensible thing to do is to reduce the engine speed. But not to idle, but according to the speed of the car. This is not always available to the driver, especially a beginner. And here the computer will come to the rescue. Reacting to the signal from the clutch sensor, it can independently adjust the engine speed.
Important! In addition, in accordance with the Priora speed sensor, the ECU can obtain information about the serviceability of the clutch. https://www.youtube.com/embed/cqgcTyUkMqg
Summarizing the above, we can say that the presence of a sensor on the clutch allows:
- saves fuel;
- make driving easier;
- monitor the serviceability of the coupling;
- increase its service life.
Therefore, its serviceability is an important factor in the Priora control system.
Design and location of the Priora clutch sensor
In principle, this is the simplest switch. In the position when the clutch is disengaged and the pedal is not pressed, the sensor circuit is open. If you press the clutch drive, the limit switch of the sensor closes and the signal “clutch is on” is sent to the ECU.
It is located on the clutch pedal mounting assembly, where the very tip of this pedal is located opposite the sensor end switch.
Symptoms of this part being faulty
Since this element is connected to the ECU, it reacts to its failure first of all. That is, it gives peculiar signals that are reflected on the instrument panel and are noticeable in the behavior of the Priora when driving.
- turning on the “Check Anger” light;
- twitching when starting to move;
- a sharp drop or, conversely, an increase in speed when the clutch is engaged.
There can be three malfunctions in total: a breakdown of the sensor itself, a break or short circuit in its circuit, and incorrect adjustment of the position of the limit switch on the pedal.
Attention! Only Prioras, which have an electronic throttle, are equipped with such a device. Cars with a regular throttle cable do not have one.
It is also available for all-wheel drive VAZ. It must be remembered that these are two types of sensors, and they are not interchangeable!
In general, the “Check” warning lamp lights up in cases where the ECU has not received a signal within 2 seconds when starting from a stop or during four shifts on the move without a signal. Accordingly, the signs mentioned above appear.
And only after that remove it. This is a simple procedure. The clutch sensor is attached with only two self-tapping bolts, and it is not difficult to remove it with a short, shaped screwdriver. Well, then, on the spot, decide whether to start going to retail outlets in search of a new unit, or try to restore the old part. Well, put it in its place.
After finishing work on the Priora, do not forget to reset the ECU error memory.