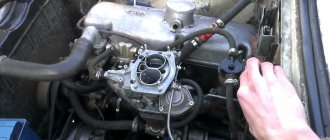
Let's start with the fact that modern cars have an injection power system. However, in the Russian Federation and a number of other countries, you can often find cars equipped with a carburetor. Such cars certainly include the common “classic” VAZ models, as well as front-wheel drive VAZ 2108, 2109, etc.
Taking into account the popularity of the VAZ 2108 carburetor, this model with an outdated dosing system still remains relevant. For this reason, many owners are interested in how to clean, adjust, as well as repair and adjust the VAZ 2108 carburetor. Let's look at the features of this dosing system in more detail.
Setting up the float chamber
This type of work allows you to adjust the optimal amount of gasoline in the float chamber. An incorrect level causes a decrease in power, uneven engine operation, and excessive fuel consumption.
- set of wrenches;
- thin probe (diameter 1 mm);
- pliers.
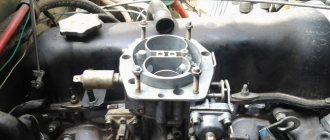
1. Remove the air filter and unscrew the carburetor cover.
2. Carefully remove the float chamber cover.
3. Check the condition and position of the floats. They should be parallel to the imprints of the side walls of the float bath on the gasket.
4. If they are displaced, we align them by bringing them together or spreading them apart.
5. Next, lay the lid horizontally with the floats up and use a feeler gauge to measure the distance from the bottom of the float to the gasket. It should be equal to 1 mm. If it is higher or lower, we continue further adjustment after installing the carburetor on the engine.
6. When fuel is pumped into the float chamber, its level should coincide with the red lines, as shown in the photo.
7. If the floats are set incorrectly, this level will be lower or higher. Simple adjustment is carried out by bending or bending the tongue of the floats, then closing the carburetor cover and pumping fuel.
For details on setting up the float chamber, see here
Setting up the launcher
- open-end wrench 7;
- open-end wrench 8;
- flat screwdriver;
- electronic tachometer or multimeter with its function.
1. Remove the air filter from the carburetor. Pull the “suction” towards you as far as it will go. Next, you will need an assistant to start the engine. At this time, you are watching the starter flap, which should open slightly after starting.
2. If this does not happen, it means that the starter is not adjusted.
3. We begin the adjustment. Warm up the engine, turn it off and connect the tachometer as follows.
4. Pull out the choke and start the engine. The suction valve must be completely closed.
5. Next, use a screwdriver to press on the edge of the damper, opening it 30 0 .
8. In this position, holding the bolt with a screwdriver, tighten the locknut.
The adjustment process can be seen in this video
Troubleshooting other problems
Among minor problems, the most common problems are idle speed. They are decided depending on the reason:
- The electric valve that opens the idle jet does not work. Check the voltage supply to it with the ignition on, and then unscrew the valve and watch how it retracts the needle. If this does not happen, replace the part.
- The idle jet is clogged. Again, unscrew the valve and blow through the calibrated hole.
- The rubber o-ring on the valve has become loose. As a result, air leaks occur, causing the engine to operate unstably. Replace the seal.
- The rubber ring sealing the idle channel is torn or weakened. It is put on a thin brass tube pressed into the carburetor body. To get to it, you need to remove the unit cover.
- The channels supplying the fuel mixture for idling are clogged. The issue is resolved by washing and purging, as described in the previous section.
Idle valve with jet
Advice. If the idle speed disappears due to the fault of the electric valve during a trip, you can organize the fuel supply directly. Unscrew the element, remove the jet and remove the valve needle. Put it in place and calmly continue your journey, and upon arrival, replace it.
Replacing the trigger diaphragm
When the car stalls during a cold start, you need to change the trigger diaphragm. Due to the breakthrough, it does not retract the air damper, causing the engine to “suffocate.” The unit is located on the right side (in the direction of travel), its square cover is held on by 4 screws. Unscrew them and change the diaphragm.
Replacing the accelerator pump diaphragm
When you feel a “failure” when you press the accelerator and accelerate the car, your actions should be as follows:
- Check the accelerator pump diaphragm, located under the cover on the left wall of the carburetor (in the direction of travel of the car). If it is torn, replace it.
- Remove the air filter housing and the top cover of the Solex. Underneath it, look for nozzles built into the fuel supply diffusers. Pry them off with a screwdriver, pull them out and blow them out. Replace the rubber ring if it is torn.
- Test how well the accelerator pump lever presses the diaphragm. If play is detected, change this lever.
The nozzles are removed using a screwdriver
The last malfunction lies in the electronic unit EPHH, which controls the operation of the electric valve. If the “eight” stalls when coasting in gear, then the reason is precisely this block. Changing it is not a problem; the price of this part is low.
Replacing the EPHH block
As a rule, after eliminating the listed problems, carburetor adjustment is not required. But if you notice a change in speed in one direction or another, then the settings can be slightly adjusted.
Diagnostics of VAZ 2108 carburetors - video
Idle setting
- flat screwdriver;
- electronic tachometer.
1. Start the engine, warm it up to operating temperature, and then turn it off. We press the “choke” all the way, opening the flap of the starter device as much as possible. We connect the tachometer using the same principle.
2. Start the engine, turn on all the lights and the heater fan at full power.
4. If in this way it was not possible to achieve the required speed, unscrew the quality screw to the maximum number of revolutions. Next, turn the quantity screw, setting the motor to 900 rpm. After this, use the quality screw to reduce the speed to 800 rpm.
Details in the video
Basic faults
Despite the fact that Solex is considered almost the most reliable carburetor, it also periodically fails. Main faults:
- The nozzle of the main dosing system becomes clogged;
- The idle jet in the solenoid valve is clogged;
- The carburetor body overheats and becomes deformed;
- The accelerator pump fails (cracks and ruptures of the diaphragm);
- The solenoid valve comes off the thread;
- The diffusers in the housing are loose.
Clogged jets can be removed by cleaning and purging. This is perhaps the simplest thing that can happen to a carburetor, and you won’t need to spend any special money or time on repairs.
Hull deformation is a more serious problem. In some cases, grinding the top surface helps to eliminate air leaks. But if the case is badly damaged, only replacement will help; no grinding will do.
You can check the condition of the diaphragm visually, and this is also not difficult, since the accelerator pump is located on the housing under a separate cover. Removing the cover, inspecting the pump diaphragm and, if necessary, replacing it is a task that even a non-specialist can do.
The solenoid valve has the property of “self-unscrewing”, which is why gasoline begins to be sucked under the thread, which means the mixture becomes over-rich. There are several reasons: the thread becomes loose, the rubber seal fails, or the valve was not initially turned all the way. If the valve itself is in order, you need to tighten it all the way. If you change the seal at the same time, you will have to tighten the valve with a wrench to make sure it fits in place.
One of the common options for tuning a carburetor is replacing or boring diffusers. This way you can achieve better filling of the cylinders with the fuel-air mixture, which means greater power output from the engine. At the same time, the diffusers themselves suffer from vibration and can periodically become loose in their seats. In this case, you will need to disassemble and calibrate the carburetor, sometimes with replacement of the diffusers themselves.
Design and operating principle
The carburetor supplies the engine with a fuel-air mixture in various modes. When starting from a “cold” state, the throttle valve is manually fully opened (the so-called “choke”), and the mixture entering the cylinders is completely enriched. After the engine warms up, the speed drops and the choke can be removed. Drivers remove it in different ways, but it is recommended to do it gradually.
The fuel in the carburetor is transferred to the float chambers from the diaphragm pump, and the needle valve controls the gasoline level. Through the chamber, the fuel passes into the channels of the body, where it enters the nozzles, and through them it goes into the first chamber. A fuel-air mixture is formed, which is supplied directly to the cylinders by the gas pedal. The second camera turns on only during sharp acceleration and operation at high speeds.
At idle, the IACV (idle speed solenoid valve) is turned on, while the engine runs stably and the car consumes much less fuel. However, on some devices it can be disabled; if it breaks down, the speed and consumption will only increase slightly, but the car will drive.
How does a G8 carburetor work?
Gasoline is supplied through a valve and filter to the float device (into a chamber with two sections). The required fuel level in this two-section device is maintained by the mentioned valve (it has a needle shape). From the described chamber, gasoline is directed through the carburetor fuel jets into the emulsion wells. In them, fuel is combined with air supplied through the corresponding jets. The resulting composition is then sent to diffusers.
When starting a cold engine, the fuel mixture must be enriched.
This is made possible thanks to the trigger mechanism. The driver controls it with the “choke” handle. When he pulls it all the way, the air damper rotates along the axis and closes it. In this case, the camera opens slightly (by one millimeter). After starting the engine, there is an increase in the amount of vacuum in the intake manifold, which is directed into the cavity of the trigger mechanism.
Its diaphragm, due to the resulting vacuum, slightly opens the air damper to the level of the starting gap (about 3.5 millimeters). When the driver retracts the “choke” handle, a decrease in starting gaps is noted. If you press the gas pedal with the handle extended, the flap of the second chamber closes, and the first one opens. Due to this scheme, driving on a cold engine becomes more comfortable (as there are no dips or jerks of the car).
The selection of fuel from the emulsion compartment (the so-called well) is carried out by the idle mechanism (idle speed). Gasoline is supplied through XX jets and is combined with air. This composition goes through a special hole under the throttle valve. Using two screws, the throttle opening at idle is controlled:
- when the damper of the second chamber is opened (partially), a mixture of fuel and air is sent into it through the hole;
- if the damper of the first chamber is opened, the flammable composition passes through the vertical gap.
Signs of a carburetor malfunction
It is a well-known fact: the quality of fuel in our country leaves much to be desired. As a result, the carburetor may become clogged with oils, solid particles, etc.
In this case, one or more signs may be observed:
- significantly increased fuel consumption;
- the engine does not start “cold”;
- loss of dynamics;
- "triple" of the engine.
You can restore functionality yourself. If unsuccessful, you can remove it and take it to a mechanic, who, with an experienced eye, will immediately identify the errors and adjust it “by eye,” after which the car will at least start.
This is interesting: Do-it-yourself dent repair without painting
First, you can try adjusting the carburetor without removing it from the car.
How to clean a 2108 carburetor with your own hands
As a rule, carburetor contamination is indicated by the fact that the engine is “troubling”, fuel consumption has increased, power has dropped, jerks and dips in movement have appeared, the engine is difficult to start, is unstable at idle, etc.
With such symptoms, some owners mistakenly believe that the metering device has failed and the solution becomes the need to buy a 2108 carburetor.
In fact, the carburetor has excellent maintainability, and the cause of malfunctions is often dirt rather than breakdowns. In the worst case, to restore the 2108 carburetor, you do not need to buy the complete device itself, but only a repair kit.
One way or another, at the initial stage it is necessary to clean the carburetor. It is also desirable to adjust the 2108 carburetor, adjust the 2109 carburetor, etc., but this will require certain skills. For beginners, it is better to turn to specialists or study separate material on this topic.
- As for cleaning the carburetor, this procedure can be performed independently in a regular garage. In practice, complete cleaning also involves removing the carburetor, but there is another way - cleaning the carburetor without removing it.
To clean, you need a special cleaner known as “carbicleaner”. In fact, it is an active cleaner in aerosol form that is offered by various manufacturers. The composition contains active substances that effectively remove contaminants in the carburetor.
To complete the procedure you will need:
- remove the air filter cover;
- Unscrew the plug holder on the carburetor;
- you can unscrew the solenoid valve;
- apply the cleaner through the nozzle into the channels of the jets and chambers;
- the throttle and air damper, as well as other elements, should be processed in parallel;
- Spray the product to clean the outside of the carburetor.
After application, wait 15 minutes for the dirt to soften. Next, start the engine, then pull out the choke and spray the cleaner into the air channels and carburetor chambers.
We also recommend reading the article on how to choose the best carburetor cleaner. From this article you will learn the best way to clean a car carburetor, as well as what to look for when choosing these cleaners.
It happens that the procedure needs to be repeated 2-3 times to obtain the desired result. In practice, after cleaning, engine response improves, the engine runs more stable at idle, jerks disappear during acceleration, there are no dips in transient conditions, etc.
If we talk about disassembling the carburetor for diagnostics and repairs, in general terms:
- The first to remove the solenoid valve is to remove the fuel nozzle;
- then the carburetor cover is removed;
- then the axis of the floats is squeezed out using a thin screwdriver, the floats are removed;
- Now the gasket is removed from under the cover and the needle valve is unscrewed;
- then you need to remove the trigger cover and diaphragm;
- the next step is to remove the fuel filter plug and the damper drive handle;
- then the accelerator pump and economizer are removed.
After removal, you can further disassemble individual elements, removing screws, springs and other parts from them (if necessary). The process is completed by removing the fuel jets, emulsion tubes and adjusting screws.
Afterwards, troubleshooting, cleaning, reassembly and preliminary adjustment are performed. Afterwards, the carburetor needs to be adjusted. As a result, the device is fully operational, and there is also a noticeable improvement in the stability and quality of engine operation.
Setup and adjustment
First of all, the engine warms up until the fan turns on. Next, adjust the speed by ear using the quantity screws. The operation should be smooth, with a sharp press on the gas pedal there should be no dips, and the speed should increase quickly and smoothly. The quality screw regulates the amount of exhaust gases. Ideally, no escaping gases should be visible from the exhaust pipe in the dry season (they will be, but not visible to the eye, if everything works correctly). Everything can also be done by looking at the tachometer readings. Unfortunately, many models of Soviet cars do not have it at all, so most often the adjustment will have to be done by ear.
For complete adjustment, cleaning and tuning, the carburetor is removed from the car. Procedure for removing the device from the car:
- the air filter and its housing are removed;
- all tubes and cables are disconnected;
If you are not sure that you will be able to put everything back, you can photograph all fastenings before disconnecting, for example, with a mobile phone camera.
Take care of the place where the work will be performed. It should be ventilated, free from various suspensions, the table should be wiped and covered with a cloth or old newspapers. It is better to have a carburetor diagram before your eyes. It is advisable to place small parts in various jars and boxes strictly in order. Prepare a container for solvent brand “646”. Buy a repair kit for your carburetor, it costs mere pennies.
- look at the floats. They must be parallel to each other. If there is any mechanical damage, replace it with new ones without hesitation. The needle valve should move freely in the seat, and the ball should not linger anywhere;
- We wipe the lid from the inevitable dirt and oil, for this we use a bath of solvent. You can leave it to “settle” for a while;
- the starting device is simply wiped, otherwise the correct operation of all kinds of bushings and levers can be disrupted;
- The jets and tubes are cleaned with a solvent and then blown out with compressed air. When flushing the jets, remember that it is highly not recommended to use rags, rags, etc., since the holes become clogged very easily;
- The body is cleaned in a similar way: throw it in a solvent and let it soak, then blow it out. If you notice any damage in the contact areas, you will have to replace it entirely;
- The next step is to inspect the accelerator pump. Likewise, jamming and subsidence are unacceptable, the ball must move without difficulty;
- The economizer should move easily and the diaphragm should not be damaged. If there are suspicions, we replace it with a new one from the repair kit;
- reassemble in reverse order. At the same time, we use new gaskets, rings, studs, and change the fuel filter. It is better to leave new jets until better times, if there were no questions about the previous ones, since there is a high probability of making a mistake, and defects in repair kits are common;
- We install the carburetor on the car, connect all the pipes and try to start. The first time it may not work, although this is a rare occurrence, it usually starts right away, however, it will work unstable. If the assembly order was followed, it does not matter;
- In order not to get lost, we tighten the quality and speed screws to the end.
In conclusion, we can say that the Solex carburetor is one of the best, if not the best, among all domestic products. With proper setup and timely maintenance, it will show excellent results throughout its entire service life.
Solex 21083 carburetor jet table
Also watch the video on setting up the Solex 21083
Disassembling and cleaning the unit
Adjusting the carburetor VAZ 2101
Considering that the amount of impurities in our gasoline is simply off scale, cleaning the VAZ 2107 carburetor turns into a necessary procedure. It can be carried out without dismantling and disassembling, or it can be done with complete disassembly of the device.
Cleaning without dismantling, video.
Many car owners periodically treat the carburetor with special cleaning agents (carbocleaners). These aerosols do a good job of removing deposits in gaps, unless, of course, they are perennial “growths.”
- The engine must be turned off and cool before starting work;
- Remove the air filter housing;
- Using a wrench, unscrew the idle speed solenoid valve on the carburetor;
- Use a carb cleaner to treat the carburetor: external surfaces, jet channels (through a thin tube), chambers, air dampers, etc., as far as you can get;
- Leave for 10 minutes for the aerosol to dissolve deposits;
- Run the engine for a couple of minutes. A stream of gasoline will wash away the residue;
- If necessary, repeat the procedure, first waiting until the engine cools down.
If such cleaning does not produce results after twice use, the carburetor will have to be removed and cleaned “like an adult”, with disassembly.
Cleaning with removal, video.
How to remove the carburetor is already clear. Now the sequence of its disassembly:
- Remove the top cover by unscrewing the five mounting screws;
- Unscrew the jets and remove the emulsion tubes;
- Remove the accelerator pump nozzle - unscrew it, pry it off with a screwdriver and remove it;
- Remove the seal located under the valve;
- Remove the diffusers from the chambers using pliers or carefully knock them out with the handle of a screwdriver;
- Unscrew and remove the accelerator pump screw;
- Unscrew the adapter system nozzle holder and remove the nozzle itself;
- Unscrew and remove the idle fuel jet;
- Remove the accelerator pump cover: unscrew the 4 screws in the corners, remove the cover and the pump itself (diaphragm, pusher, spring);
- Remove the return spring from the pneumatic drive lever, then the rod clamp, after which remove the spring from the throttle valve drive lever;
- Remove the pneumatic drive by unscrewing the fasteners;
- Unscrew the 2 screws that secure the lower part of the carburetor to the body, remove the lower part; Remove the economizer and economizer microswitch with bracket;
- Unscrew the screws for adjusting the quantity and quality of the mixture.
This completes the disassembly of the carburetor. After this, you can start cleaning. The parts and body of the carburetor, including the jets, can be washed with kerosene, the seats of the jets and the jets themselves can be blown out with a compressor. It is advisable not to clean the jets with wire; it can damage the holes and then the jet will have to be replaced.
When the layers are washed off the metal, you can inspect it for corrosion, wear and defects. All parts that show signs of wear must be replaced with new ones. The carburetor is assembled in the reverse order, then adjustments are made and you can put it in place.
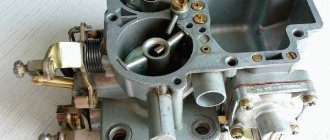
Lada 2106. › Logbook › Solex carburetor 083 (Pekar) a lot of literature. And Photos of works.
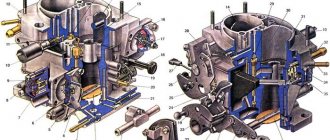
The figure shows a VAZ Solex 21083 carburetor.
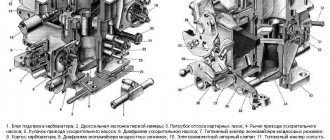
The design of the carburetor VAZ Solex 21083.
1. Carburetor heating unit 2. Throttle valve of the first chamber 3. Pipe for suction of crankcase gases 4. Accelerator pump drive lever 5. Accelerator pump drive cam 6. Accelerator pump diaphragm 7. Power mode economizer fuel nozzle 8. Pump housing 9. Economizer diaphragm power modes 10. Shut-off solenoid valve 11. Idle fuel jet 12. Carburetor cover 13. Main air jet of the first chamber 14. Air damper 15. Accelerator pump nozzles with fuel supply valve 16. Starter diaphragm 17. Starter adjustment screw 18. Adjusting screw for the amount of idle mixture 19. Locking lever of the second chamber 20. Pipe for supplying vacuum to the vacuum regulator of the ignition distributor 21. Adjusting screw for the quality of the idle mixture 22. Throttle valve control sector 23. Throttle valve drive lever 24. Adjusting screw for opening the throttle damper of the first chamber 25. Air damper control lever 26. Starter rod 27. Electrical wire of the limit switch of the forced idle economizer 28. Air damper lever 29. Main air jet of the second chamber 30. Emulsion tube 31. Sprayer of the main dosing system of the second chamber 32. Fuel supply pipe 33. Fuel drain pipe into the tank 34. Fuel filter 35. Needle valve 36. Second chamber throttle valve 37. Second chamber throttle lever 38. Second chamber main fuel jet 39. Second chamber throttle drive lever 40. Float
This is interesting: Device for repairing and adjusting the carburetor for 151C
Carburetor repair
Among the main reasons for carburetor failure is low-quality fuel: with a high content of metal additives or resins. Gradually the jets become clogged. If the engine loses idle speed, then in 90% of cases the problem was caused by dirt or gradual sediment. The presence of dips also indicates contamination of a component such as the accelerator pump. The VAZ 2108 carburetor systems need to be cleaned and then adjusted, which is what most car owners do with their own hands.
Cleaning
If the tool and accompanying means are prepared, you can proceed to action:
- you need to remove the air filter housing by disconnecting the gas outlet hose and unscrewing the four nuts on the studs;
- start the engine;
- spray the aerosol cleaner in all visible places, applying gas with the damper lever in the process;
- then you need to pull out the choke so that the needle on the tachometer is from 2500 to 3000 rpm;
- then the solenoid valve is unscrewed. It is necessary to spray a cleaner into its seat, with periodic gassing. It is also necessary to treat the hole with compressed air;
- then you should turn off the engine and install the valve in place;
- be sure to remove the carburetor cover by unscrewing the four screws with a slotted screwdriver;
- use a medical syringe to remove gasoline from the float chambers;
- instead of gasoline, pour a little acetone and leave for half an hour;
- then unscrew the jets, marking their placement locations;
- jets also need to be soaked in a separate container with acetone;
- after 30 minutes, remove the acetone from the float chambers and wipe off the soggy dirt;
- take out the jets, blow them out with compressed air, wipe them and screw them back in;
- disconnect the gasoline supply hose, remove the fitting and remove the fuel strainer;
- replace it with a new one and put the hose back;
- put the carb cap in place.
Pour gasoline into the float chamber and start the engine. After such cleaning, the engine is allowed to idle with minor interruptions, which will be eliminated later. If there are dips when you sharply press the gas, it means the accelerator pump is not performing its functions.
You need to do the following:
- remove the carburetor cover;
- remove the accelerator pump injector;
- soak it in acetone;
- unscrew the accelerator pump cover;
- spray carb cleaner into the opened channel;
- then blow out the hole with compressed air;
- replace the membrane;
- remove the soaked UN nozzle and blow it with compressed air;
- put everything back together.
Start the engine and press the accelerator lever. According to the instructions, the dips will most likely disappear.
Adjusting the carburetor VAZ 2108
Let's proceed to the second stage of work. To ensure the car has good dynamics, the carburetor of the VAZ 2108 should be adjusted. It will not be superfluous to check the spark plugs and high-voltage wires for defects, as they can make the setup process unclear.
The first thing to do is to establish the correct position of the choke and gas cables. To fix the first one, you should push the damper handle in the cabin all the way, and then tighten the cable into the mount on the carb lever. The throttle cable must be secured to the accelerator lever, possibly following the remaining traces. After we managed to adjust the cables, we proceed to the VAZ 2108 carburetor itself.
2 screws will help you adjust the fuel supply correctly:
- the first of them has a plastic handle for rotation with your fingers and a groove for a slotted screwdriver. It regulates the amount of fuel;
- the second is located in the sole of the carburetor at the end. It regulates the quality of the mixture, providing the necessary amount of air and gasoline for idling.
For reference! Both of these screws have almost no effect on the performance of the engine when driving, since 90% of the working mixture enters the intake manifold through diffusers, bypassing the idle system. Almost all VAZ 2108-09 have carburetors with this type of device. An exception could be the export versions of Samara.
The VAZ 2108 carburetor is adjusted after the engine has warmed up. Therefore, the engine must be started and allowed to run until operating temperature. Even if it’s intermittently. If the engine stalls all the time and refuses to work, then try turning the fuel quantity screw slightly. This should help.
| Carburetor models | ||||||
| OPTIONS | 2108 Cameras 1/2 | 21083 Cameras 1/2 | ||||
| Diffuser diameter | 21/23 | 21 23 | ||||
| Mixing chamber diameter | 32/32 | 32/32 | ||||
| Main fuel jet performance | 97,5/97,5 | 95/97.5 | ||||
| Main air jet performance | 165/125 | 165/125 | ||||
| The performance of the idle fuel jet and the transition system 2 chambers respectively | 39-44; 50 | 39-44; 50 | ||||
| The performance of the idle air jets and the transition system 2 chambers, respectively | 170/120 | 170/120 | ||||
| Produces fuel jet econostat 1 chamber and economiser 2 chambers | 60/40 | 60/40 | ||||
| Performance of the actuator jet of the main dosing system of chamber 1 | No | No | ||||
| Diameter of spray accelerator pump mm/100 | 35/40 | 35/40 | ||||
| Fuel supply by accelerator pump. cm3/10 strokes | 11,5 | 11,5 | ||||
| Starting gaps of air and throttle valves | 3,0/1,0 | 3,5/1,1 | ||||
Next, you can start setting up the carb, which should be done in the following sequence:
- Using a slotted screwdriver, gradually unscrew the quality screw until the engine speed begins to increase. After that, screw it back half a turn;
- then you should reduce the engine speed to 1000 by rotating the speed screw with a plastic handle counterclockwise;
- Next, you should return to the mixture quality screw and tighten it until the needle on the tachometer reaches 800-900 rpm. Ideal 850.
In the event that minor work was carried out on the VAZ 2108 power unit and some characteristics were lost on the Solex carburetor, then the mixture quality screw should not be touched. It is enough to adjust the engine speed to normal using the quantity screw.
For reference! Adjusting the VAZ 2108 carburetor with your own hands can become more professional and effective. To do this, it is possible to use a special device - a portable gas analyzer. It is often used in auto repair shops. It is enough to take exhaust gas readings during tuning. Normal: 1.5% CO at idle and 2% CO at 2,000 rpm.
Solex 21083 carburetor design
1 – driving lever, second drive chamber; 2 – screw adjusting the amount of mixture supplied for idle speed; 3 – sector for heating the carburetor; 4 – engine crankcase ventilation pipe; 5 – drive lever for the accelerator pump; 6 – solenoid shut-off valve; 7 – air damper lever; 8 – carburetor cover; 9 – special screw for fastening the liquid chamber; 10 – liquid chamber body; 11 – carburetor body; 12 – throttle valve lever of the second chamber; 13 – control lever block directly for the throttle valves; A - special marks for precise installation of the bimetallic spring of the starting device.
1 – axis for the float; 2 – needle valve; 3 – float; 4 – special gasket for the carburetor cover; 5 – starter cover; 6 – screw; 7 – trigger device diaphragm; 8 – special gasket; 9 – air damper lever; 10 – idle fuel jet; 11 – solenoid shut-off valve; 12 – pipe for supplying a combustible mixture; 13 – carburetor cover; 14 – fuel filter; 15 – housing assembly with drive levers of a semi-automatic starting device; 16 – screws for adjusting the air damper of the starting gap and slightly opening the first throttle chamber; 17 – special clamp for securing the bimetallic spring housing; 18 – liquid chamber; 19 – assembled housing with a bimetallic spring; 20 – bimetallic spring screen.
Solex 21083 carburetor diagram
1 – screw adjusting the amount of feed mixture for idle speed; 2 – electric wire of the limit switch economizer for forced idling; 3 – carburetor heating unit; 4 – diaphragm for the accelerator pump; 5 – accelerator pump cover; 6 – drive lever of the accelerator pump; 7 – accelerator pump drive cam; 8 – economizer cover for power modes; 9 – diaphragm for economizer of power modes; 10 – fuel jet for power mode economizer; 11 – power mode economizer valve; 12 – nozzles with a fuel mixture supply valve for the accelerator pump; 13 – sprayers of the main dosing systems; 14 – air main jets with emulsion tubes; 15 – fuel main jets; 16 – carburetor body; 17 – adjusting screw for the throttle valve; 18 – stopper for the adjusting screw; 19 – stopper cap; 20 – throttle valve of the second chamber; 21 – throttle valve axis of the second chamber; 22 – throttle valve rod for opening the first chamber; 23 – block with throttle valve control lever; 24 – return spring of the throttle valve of the first chamber; 25 – driven lever, drive of the throttle valve of the second chamber; 26 – driving lever, driving the throttle valve of the second chamber; 27 – spring of the throttle valve drive levers of the second chamber; 28 – throttle valve of the first chamber; 29 – return spring of the throttle valve of the second chamber; 30 – plug for the screw adjusting (composition) the quality of the idle mixture; 31 – axis of the throttle valve of the first chamber; 32 – screw adjusting the quality of the supplied idle mixture
The carburetor is equipped with two main metering systems, the second and first chambers, an idle system with a transition system of the first chamber. A transition system of the second chamber, an econostat, an economizer of power modes, a semi-automatic starting device and an accelerating diaphragm pump.
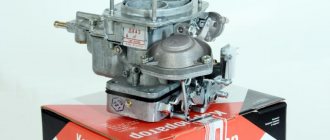
The Solex 21083 carburetor, the price of which is about 4,500 rubles ($150) and remains acceptable for motorists, has earned its recognition due to its excellent technical characteristics and efficiency. In addition, malfunctions of the Solex 21083 carburetor, which occur quite rarely, are easily fixable if you follow the instructions for eliminating them.
Some car enthusiasts prefer to modify the factory Solex 21083 carburetor to suit their preferences, increasing its power, and thereby the throttle response of their car. There are several options for properly tuning the Solex 21083 carburetor, so, if you wish, you can seriously improve the overall performance of your car.
Carburetor jets VAZ 2109
These system elements are presented in two types. They can be:
- air;
- fuel
In terms of their effect on the quality and composition of the fuel mixture, they are opposite:
- depletion of the mixture is fixed when the cross-sectional area of the air jet increases;
- enrichment is noted as the cross-section of the fuel nozzle increases.
Moreover, the level of their influence depends on the specific operating mode of Solex. The composition of the combustible mixture is regulated in direct proportion to any throttling modes by the cross-section of the fuel nozzle. But the impact of its “brother” is more noticeable with an increase in the throttle opening angle.
Due to these features of the VAZ 2109 carburetor jets, you should remember that:
- the fuel mixture curve must be changed using an air jet;
- The composition of the mixture according to the range of characteristics is changed by the fuel nozzle.