How to make kangarin with your own hands
How to make a kenguryatnik with your own hands, we consider the stages of work. Standard size kenguryatniks for SUVs can easily be found in any automobile market.
The most acceptable option is a protective grille made by the same manufacturer that made your car. However, factories do not produce guards for most small passenger cars. In this case, if you want to have this accessory, you will have to try and think about how to make a dog cage with your own hands.
The video shows how to make a kenguryatnik with your own hands:
The protective grille has a fairly simple design that can be easily recreated. To do this, you will need to use a small amount of specific equipment.
Most drivers now have a question about how to make a kanguryatnik so that it is reliable and performs its functions perfectly. The answer is very simple, follow the following instructions and securely fasten it to the side members.
So, first of all, understand that good protective grilles are assembled only from high-quality stainless pipes, and not from garbage. To connect them, careful welding must be performed. The durability of your product will also be affected by the quality of the paint that you apply to it after all the manipulations.
On some cars you can only install homemade guards
Whatever one may say, installing a kenguryatnik, even a homemade one, requires considerable financial expenditure. In addition, a considerable amount of time and effort must be spent on its production. If you are ready for this, then let's get started.
So, for a homemade protective grill, you need to purchase pipes of various diameters and special angles for welding. You can find a project for your car on the Internet. To give the required dimensions to the pipes, they will need to be sawed and bent. When making arcs, keep in mind that they must be symmetrical. Otherwise, you will not get the aesthetic beauty of the part.
Use a pipe with a diameter of 60 mm as the main frame. For small elements, take pipes with a diameter of 40 mm. Now connect all the small elements and the main frame, process the seams and sand them using a grinder.
After making the structure itself, it is necessary to give it an attractive appearance. To do this, the product must be well sanded and painted with high quality.
When choosing paint for a fence, it is important to pay attention to its characteristics. Experts recommend buying paint that prevents moisture from affecting the metal. It would also be nice if the paint could withstand sudden temperature changes and be resistant to mechanical stress
It would also be nice if the paint could withstand sudden temperature changes and be resistant to mechanical stress.
Now you have a completely finished protective product in your hands and you just need to figure out how to install a guard on your car.
Installing a protective grill
The video shows how to install kengurin with your own hands:
If you were able to make such a design yourself, then you will definitely figure out how to attach the guard to the front bumper of your car.
It should be noted that homemade protective grilles, which are attached to tow bars, bumper channels or pipes that serve as a support for it, will not save you in an accident, but will cause even greater damage to the structure. That's right - install the kangurin on the beam or threshold of the car.
How is the kenguryatnik attached in this case? Everything is very simple. When making a structure, it is necessary to drill a large number of holes in it or make it so that it fits as much as possible into the standard holes in the thresholds. The protective grille is screwed to the base with bolts that must be properly tightened.
Experts recommend checking the tightness of these bolts from time to time.
Be very responsible when installing this item. A guard is not an image or design accessory; it must first of all fulfill its main tasks of protecting the car. Remember, a homemade shelter must be made of high quality materials and installed in accordance with all the rules.
Do I need to register the power bumper?
It is absolutely necessary to register the power bumper, but such an “event” can only happen if the bumper is provided by the manufacturer as standard, but is simply missing from a certain car (for example, the previous owner removed it). Designing a power body kit will take a lot of time, since it will be necessary to act in stages:
- Primary examination (preparatory). The structure that will presumably be installed must undergo technical expertise and only in the organization that has a license to conduct similar activities.
- Collection of documents and their submission to traffic police departments. Documentary evidence of passing a technical examination of the design, an application from the owner of the car, a citizen’s passport from the owner and a vehicle vehicle registration certificate/license vehicle are required. It is imperative to present the vehicle for inspection by the technical department staff.
- Installation of a reinforced bumper. It is carried out only after receiving a positive decision on the application and can be carried out in licensed organizations (for example, in the one that conducted the preparatory technical examination) or without the help of others. You will definitely need to have on hand a declaration-statement about the changes made, which is filled out and issued by the organization or the owner of the car during self-installation.
Power bumper
- Secondary examination and technical inspection. In the first case, the procedure is carried out in the same organization that carried out the primary procedure and installed the kenguryat. The technical inspection is carried out in specialized centers.
To complete the design of the power body kit, all that remains is to pay the municipal fee for obtaining a new vehicle passport (800 rubles) and present a package of documents to the traffic police.
- conclusion of a preparatory technical examination of the design regarding the ability to make changes;
- passport and its copy;
- vehicle registration certificate;
- PTS and its copy;
- technical examination protocol;
- diagnostic card, which was issued on the technical inspection Friday;
- receipt of payment of state duty;
- a copy of certificates of conformity, notarized, for spare parts and components that were used to re-equip the car, but only in this case if they do not have an approval mark for use;
- the vehicle itself for inspection to ensure compliance with the requirements of the Technical Regulations of the Customs Union.
If the guard is not included in the vehicle's configuration, then its registration is impossible. The refusal will be received at the first or second step of the process.
Also interesting: Winches for Chevrolet Niva
How to make a kenguryatnik with your own hands
Kengurin is not difficult to make, its design is very simple and can be made in a garage, you just need to have the desire, a head on your shoulders and skilled hands.
The question of where to get drawings, for example, for a “ten” or an ATV, is not difficult to solve. Firstly, to “spy” on a similar vehicle with a homemade kangaroo. Home-grown craftsmen are proud of their creation, will be flattered by the attention and will willingly share all the subtleties. And secondly, what prevents you from turning on your own imagination and sketching out a drawing, “thinking it over” with a friend or a neighbor in the garage. As usual, one head is good, two are better, and three even more so.
Types of hanging structures
Kenguryatniks are divided into two categories:
Frontal modifications are the most popular among motorists; rear designs are less in demand. Experts say that car owners needlessly neglect the installation of rear structures. The vehicle body is susceptible to damage to the same extent; not only the front, but also the rear part suffers from mechanical stress. Do not neglect the installation of the rear hinged structure.
There is another classification of kenguryatniks in accordance with their purpose:
Using classic hinged structures, they protect the front of the machine from significant damage that occurs when colliding with various obstacles. Fans of fast off-road driving equip the classic mounted structure with additional cables. They are placed on the sides of the windshield. Cables protect against large branches.
Protective grilles are installed on lighting fixtures. This type of guard protects the headlights from contact with small stones flying from under the wheels.
Power bumpers provide complete protection of the bumper and vehicle body. They are made from metals that are highly durable. Owners of SUVs on which such guards are installed insure themselves against the possibility of damage to the body.
Materials for making the system
How are things going with the Russian auto industry? For a long time, experts and representatives of the State Duma have been unable to agree on whether to allow the installation of such a tuning element on personal cars.
By decision of parliamentarians, since September of this year, Russian car owners have been obliged to remove metal pipes from their bumpers. The reason for this decision was the increased risk of injury, as well as accidents on the roads.
A traffic cop's attempt to draw up a protocol for the kenguryatnik and the winch.
The technical regulations allowed protective grilles for bumpers only subject to their certification and installation recommendations from the car manufacturer. This document is still valid today.
Experts do not advise installing a kanguryatnik on a car that is not intended for such tuning. In addition, various ready-made power kits for the Chevrolet Niva are now sold. Before buying a kenguryatnik, be sure to make sure that it is certified, otherwise problems may arise during maintenance.
If you are a craftsman and are good at using a pipe bender and welding, you can make the protection yourself with your own hands, but in this case, you will have to remove it before each maintenance, otherwise there is a risk of not being able to undergo maintenance.
If the grille weighs no more than a kilogram and is necessary to protect the headlights from various objects, you can use a similar design. But this regulation raises some questions.
Who will weigh and check the characteristics of metal structures? But there is no point in arguing with a document prohibiting the installation of such an element as a kenguryatnik on the Niva.
Tags: 250, 4matic, benz, gla, mercedes, price
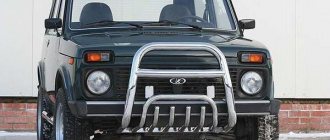
Lada 4×4 3D “Blue Midnight” › Logbook › “Kenguryatnik”
I really wanted a kenguryatnik!
I'm looking at different options, but the ones I like the most are:
All three of them are similar, and now I want a similar one with headlight protection...
Cheaper option:
I like this one less, but it’s also good in my opinion.
Actually, the main question is that I don’t know how they are attached, maybe using welding, a grinder and materials, I could weld the kenguryatnik myself?! Nivovody, tell/explain to someone who doesn’t know how to attach it? Which one is better to look for? Can I do it myself? Those. What if the cops don't bother you too much if you work on collective farms?
By the way, from a legal point of view, the kenguryatnik is completely legal in the field!
Kenguryatnik - on class G cars (all-wheel drive cars...etc., the law contains a large list of requirements for weight and ground clearance,
the Niva meets the requirements
) The installation of structures extending beyond the front bumper is ALLOWED.
Technical regulations prohibit the installation of reinforced bumpers or bumpers on passenger cars: “It is prohibited to install on vehicles of categories M1 and N1, including off-road vehicles (category G - off-road vehicles used for transporting passengers and having, in addition to the driver’s seat, no more eight seats, meeting a number of requirements for the presence of axle(s), differentials, locking or their equivalents, etc., protruding parts of the structure attached to the bumper or other elements of the front of the vehicle, made of steel or other materials with similar characteristics." The new edition proposes to exclude category G.
The installation of reinforced bumpers on off-road passenger vehicles weighing no more than two tons (SUVs) is permitted.
Strictly speaking, a car can be checked for compliance with the requirements of technical regulations only during the certification of the car and the issuance of a PTS or at a technical inspection. A maintenance coupon is your indulgence on the road, the traffic police DOES NOT HAVE THE RIGHT to interfere with technical condition checks.
Returning to the questions about the kenguryatnik, does anyone have diagrams of the kenguryatnik along with a power bumper? And if without a power one, then which one is better to look for?
Source
What you need for work
If you decide to install a kenguryatnik on a UAZ 469 with your own hands, you will first need to take into account all the legal requirements that are listed above. It must be remembered that such a bumper will have to be covered with soft elastic material, otherwise the structure will be forced to be dismantled.
In addition, we should not forget about the certification of the kenguryatnik. You need to be prepared for the fact that during a technical inspection of a car, traffic police officers will repeatedly have questions about the installation of this accessory. Therefore, if a scheduled inspection of cars in the city is planned, it is better to remove the kengurin for a while.
Power bumper for Patriot
It is desirable that such a bumper be manufactured in a factory in compliance with all GOSTs and have a certificate. If you nevertheless decide to make and install kengurin on the UAZ 469 with your own hands, stock up on the necessary tools and materials.
The part of the L-shaped mount that will be installed under the car should have a small platform.
In order to get a truly exclusive accessory, you need to use only high-quality materials. It is recommended to use only stainless steel pipes, and the paint should be waterproof. In this case, all efforts and efforts will be fully justified.
Of course, any polished metal structure, welded from pipes and repeating the beautiful contours (lines) of the front of the car, and called a kenguryatnik (or kengurin), improves the appearance of the car, especially handsome jeeps, and attracts attention. Moreover, when installing it on an SUV and when traveling through a forest or mountainous area, this design will add not only beauty to the car, but will also perform protective functions. Of course, a well-made kengurin is a beautiful and useful thing, especially outside the city, but the price of most finished products from some tuning studios can reach up to $1000, or even more. It all depends on the material, quality and complexity of the design, and ultimately on the appearance. In this article we will look at what types of kenguryatniks there are and how to make a decent-looking kenguryatniki with your own hands, in the conditions of an ordinary garage.
The main stages of making kangurin
First you need to make an approximate calculation of the length of the pipes, for this:
- the dimensions of the front part of the car are measured with a tape measure;
- the results obtained (width, height from the bottom of the bumper to the hood) are noted on the drawing;
- the pipe flow rate for internal jumpers is calculated.
In any case, pipes must be purchased with a reserve.
According to the obtained dimensions, the pipes are cut with a grinder and joined together with a minimum gap (˂ 1 mm). For this it is better to use a trimmer. By the way, they can cut pipes instead of an angle grinder.
Next, you need to check that all parts are identical so that the right and left parts of the structure are symmetrical.
According to the drawing, measurements are taken and the places where all elements should be welded are marked with a marker. First, they are simply “grabbed” by welding, the seams are ground, symmetry is checked again, and then they are finally welded.
When the kenguryatnik is ready, it is bolted, usually to the side members or cross beam.
How to install a kenguryatnik on a Niva?
Does it make sense to install a kenguryatnik on the Niva? The kenguryatnik is a reinforced metal frame that is attached to the front of the car from the hood and below. Its main purpose is to protect the car from mechanical damage. But you need to remember that the Niva is an SUV that is used in harsh conditions, including off-road driving and traveling through bushes. And in such cases the guard protects the headlights and hood quite well from damage.
Installation of a kenguryatnik on Niva-2121
Installation of the kenguryatnik on the VAZ-2121 is simple. Installation is carried out on a platform, preferably with a pneumatic lift.
It should also be mentioned that the VAZ-2121 kenguryatniks come in different sizes.
Installation of a kenguryatka conditionally consists of several stages:
If, in addition to the front one, you also plan to install a rear guard, then you should make sure that the fastenings are not covered with corrosion. Otherwise, you will have to completely clean it, boil all the brackets and only then install it.
To install the rear guard, you can also use those variations that adhere to the bumper. By the way, they also protect the car’s rear lights and license plates (you don’t have to worry about losing them when driving through tall vegetation, for example).
Read news about the new field
- razdatka Niva
- Suspension lift in the field yourself
- Platform for installing a winch in the standard bumper of a VAZ-2121 (Niva), pa-2121, price 4990 rubles. Buy
- Chassis, front suspension, device, Design, operation, description, device, car repair Niva VAZ 2121, engine, assembly, disassembly, transmission, gearbox
- Chevrolet Niva power steering
- Installation and repair of the VAZ 2121 Niva transfer case
- Niva all-terrain vehicle on low-pressure tires: photo and description of the design
- Disassembly and assembly of the Niva 2121, VAZ 2131 engine
Read news about the new Niva
- Installing an alternator belt and air conditioner on a Chevrolet Niva
- Amphibious all-terrain vehicle Pacher
- How to bleed ABS brakes, step by step diagram
- Volkswagen Tiguan OFFROAD – photo, price of equipment and review of characteristics of the new Volkswagen Tiguan Offroad 2019/2020
- How to increase Niva's cross-country ability