Carburetor cleaning |
Carburetor cleaning
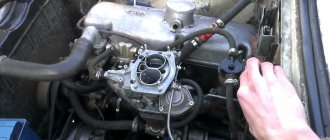
As you know, the VAZ-21213 was equipped with either a Solex 21073-1107010 or Ozone carburetor. Both of them require periodic cleaning. The first one seems to be technically more advanced, advanced and gentle. Ozone is for mud climbers. I also have a Niva for dirt, but with Solex, and I will only change it to an injector if it comes to that. Recently, my carburetor began to act up in the classic way for a VAZ Solex - it stopped running on the first chamber, and only when the throttle was fully pressed. Those. when the second chamber opened. The reason for this phenomenon is discussed in Nail Poroshin’s video “The Eternal Solex Carburetor,” and how I solved it is discussed below.
Cleaning the carburetor. Preparation
First of all, in the field, when I touch the carburetor with my hands at all, I first photograph it from all sides in working condition. So that later, if something doesn’t start or doesn’t work, you can always look at a photo of your working carburetor. I photograph it from all sides. So that everything can be seen in detail, where which pipes are, what is screwed on and how. Life experience forced me, it was funny not to go because of sheer nonsense.
True, when you can’t leave a couple of times due to nonsense, you very quickly take a book or the Internet, and start wondering how this Solex works. Usually it helps. Learning is light, without it with a carburetor there is darkness.
Under the hood is relatively clean for a dirty all-terrain vehicle. Electrical tape on the pipe shows which way is up. Having prepared for the subsequent easy and relaxed assembly, I remove the carburetor.
Oh yes, we’ll take a photo of this place too.
So, cleaning the Solex carburetor
The method is simple, accessible to everyone. The only thing needed is a compressor. This wonderful tool is available in almost every service. If you remove the carburetor and ask them to poke it, they won’t charge much for it. Indeed, spraying a couple of times with a blow gun cannot be expensive.
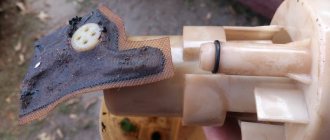
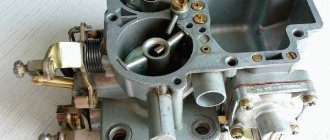
I was luckier, I have my own compressor, an HVLP gun, I used it to paint the fields, and again it helps out. In general, I’m talking about the topic, you don’t need a lot of brains here, knowledge of the structure of the carburetor is desirable, but also not necessary. We remove the top cover of the removed carb, and the gasoline must be drained from it. We take out the jets, elephant or spout. In general, we take out what is taken out.
And then the simplest part. These two parts of the carburetor, and the jets with the spray gun, are flushed with 6-8 atmospheres. We stupidly blow into each hole several times. We rejoice at the flying dirt and protect our eyes from the remnants of flying gasoline. This simple procedure transformed my carburetor. The engine started running smoothly and made quite a rustling noise. Pressing the gas pleases with pleasant traction. It’s clear that he’ll quit again soon, maybe in a month, maybe in six months. Depends on wet weather and temperature. In cold weather, dirt does not fly around like clothes under the hood. And don’t listen to the “acetone people.” Instead of looking for the cause and eliminating it, they engage in shamanic soaking. Drive them in the neck. A good carburetor specialist will not suggest this. All my mud climbers have been riding without any acetone for years.
cariolis.ru
Carburetor VAZ 2106: repair, cleaning
The carburetor is an important component of a car engine.
The operation of all engine components depends on its settings, for example, fuel consumption, stable engine operation. Malfunctions such as “the engine does not start” or does not start well, a very lean or rich mixture indicates that the problem is in the carburetor itself. It is best to try to fix the problem without removing it, but if this is not possible or it needs cleaning, then the following tips will help you.
VAZ 21213 | Disassembling the carburetor on a car
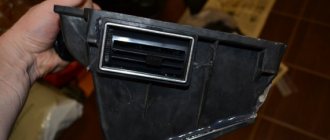
| To eliminate a specific malfunction, as a rule, only partial disassembly of the carburetor is required; in this case, individual operations can be skipped. Remove the air filter housing (see Removing the air filter housing ). We remove the solenoid valve, fuel filter, disconnect the limit switch connector (see Removing and checking the solenoid valve , Removing the carburetor fuel filter , Checking the forced idle economizer limit switch ).
...and remove the hose from the carburetor fitting.
When installing the cover, align the hole on its mating plane with the hole on the edge of the diaphragm (shown by arrows) and the adapter sleeve of the vacuum supply channel on the starting device body.
Slightly pull out the choke control handle so that the cable comes out of the bushing.
Subsequent disassembly of the cover is described at the end of the section.
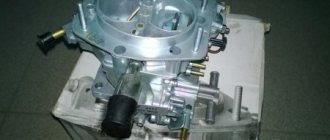
With the carburetor removed, the main fuel jets can simply be shaken out of the wells by turning the housing over.
For clarity, further operations are shown with the carburetor removed.
...disconnect the wire from the limit switch.
...and take it out along with the rubber sealing ring. Sometimes this requires drilling out the edge of the carburetor body and using a wire hook. |
automn.ru
Emergency preventive cleaning
The procedure for emergency preventive cleaning of the engine requires a little more effort. It should be used when you feel there is a real possibility that the vehicle’s components will soon fail. For example, if you filled up with fuel at an unfamiliar gas station and gradually the engine began to experience interruptions, power dropped noticeably, and fuel consumption increased. If this trouble happened in an open field, and you risk not getting to the garage, but you have an aerosol can with carburetor cleaner in the trunk, it’s time to clean it yourself.
The brands ABRO, Mannol, Hi-Gear, Kerry, VERYLUBE are relatively well known on the market. The following are actively entering the market: VELV. As with additives, you should beware of counterfeits.
Unlike using additives, this operation only cleans the carburetor and does not affect the rest of the fuel system.
VAZ 21213 | Cleaning the carburetor
Cleaning the carburetor
| Replacing the carburetor fuel filter |
| |
automn.ru
Carburetor malfunctions
These include:
- the presence of interruptions during operation of the power unit, both at idle and when accelerating the vehicle;
- uneven increase in vehicle dynamics;
- “ragged” operation of the gasoline engine and loss of power parameters.
The above points can be directly related to contamination of this product, so the question arises of how to clean the VAZ 2106 carburetor if the ignition system has been tested before.
How to clean a carburetor on a field 21213 - Treatment of joints
The content of the article:
Niva 21213 carburetor. How to clean?
For Niva lovers! This section of the auto forum is intended to discuss a variety of models that are produced under the Niva brand (Niva 2121, Niva 2129, Niva 2131, Chevrolet Niva). Here you will find detailed reviews about these models.
Everyone knows that the quality of our gasoline leaves much to be desired! Somehow the traction on my car has disappeared(((I’m sinning with the carburetor! There is an idea to clean it completely! Who has already done such a procedure - tell me how best to do this, where to start and how to finish? Merzkij Messages: 5 Registered: February 17, 2013 , 14:35 Reputation: 0
To clean it well, it will take a lot of time, you need to completely remove it, disassemble it in detail and wash it in gasoline, all the parts need to be washed well, then you need to blow out all the jets and all the holes with a compressor, wait until it dries well and you can put it on the car, that’s how everything...=)
PrizracniyGonshik Posts: 15 Registered: 05 Mar 2013, 13:06 Reputation: 0
Cleaning it is not a problem, as with any carburetor car... The most important thing is to rinse everything thoroughly, then use a compressor to thoroughly blow out all the jets and holes, everything that is unnecessary will fly out =)) Wash only with gasoline, and nothing else...
Shurik Messages: 21 Registered: Mar 10, 2013, 07:37 pm Reputation: 0
Yes, I agree, gasoline and only gasoline will help you) it’s called what we fill it with and clean it))) So I think you won’t have any difficulty disassembling it - blowing and rinsing is also not such an abstruse job. Once done, we put it back and fill it with normal gasoline.
hiler Messages: 9 Registered: May 20, 2013, 12:29 Reputation: 0
Return to Club - Niva forum
- 5 9841
- 0 1411
- 4 5769
- 2 1642
- 3 1585
Who's at the conference now?
This forum is currently viewed by: no registered users and guests: 4
autonew.biz
Adjusting the carburetor on a VAZ Niva car
Created several decades ago, Niva is still popular among domestic and even foreign motorists. This SUV is in demand due to its unpretentiousness, maintainability and good cross-country ability, which can be the envy of many modern cars of the same class. But proper and uninterrupted operation of even such a durable vehicle can only be ensured with proper and timely maintenance and repair. Therefore, if you are not going to spend money on the services of service station specialists, it is advisable to at least superficially understand the design features of your car. For example, self-adjustment of the carburetor on a VAZ Niva car will allow you to optimize engine performance and reduce consumption at minimal cost.
The VAZ-2121 has become popular due to its cross-country ability, technical reliability and ease of operation and maintenance.
This article will focus on setting up the carburetor on the VAZ-2121 and VAZ-21213 models, as the most prominent representatives of domestic classic SUVs. Niva 21213 replaced its predecessor in 1994, having undergone a number of design changes. First of all, the model acquired a new engine, on which the manufacturer installed a different carburetor. The Niva 2121 used an Ozone carburetor, and owners of the next generation of the SUV were offered a more modern unit called Solex. However, many farmers did not appreciate the innovation due to its increased requirements for the quality of gasoline and often resorted to installing the unit from the previous model themselves. You will learn further about how to set up the carburetor on Niva 21213.
How to adjust the carburetor on a VAZ Niva car
How does the Ozone carburetor work on the Niva 21213 and 2121, as well as other classic cars of the VAZ family? From the fuel tank, gasoline enters the float chamber in the appropriate quantity. Next, passing through the nozzle, the atomizer in the diffuser, the fuel is mixed with air. After this, depending on the degree of opening of the throttle valve, a certain amount of the air-fuel mixture is supplied through the intake manifold to the engine cylinder.
Adjustment of the Niva 21213 carburetor is resorted to in cases where it has been repaired, disassembled/cleaned, and when starting the engine is difficult or its operation is unstable. Some types of adjustments can be made without removing the unit from the machine, but in some cases, for example, when you need to adjust the starting device, dismantling is indispensable.
Throttle Actuator Settings
The main goal of adjusting the VAZ-21213 carburetor by adjusting its drive is to ensure the optimal throttle position for the extreme positions of the gas pedal. So, when the pedal is pressed all the way, the throttle should open completely and, conversely, as soon as you release the gas, it should close. This is achieved by setting the required rod length. To perform the adjustment correctly, follow the steps below:
- Disconnect the drive rod from the bracket located on the cylinder head valve cover.
- Using a key set to “8”, loosen the lock nut and, by tightening/unscrewing the rod end, set the optimal throttle position.
- Now all that remains is to tighten the locknut and install the rod in its place.
Upon completion of the adjustment operations, it is necessary to make sure that the position of the damper actually corresponds to the position of the accelerator pedal. If the desired result is not achieved, repeat the described operations.
Carburetor adjustment begins with adjusting the throttle position
Setting the optimal fuel level in the float chamber
If during maintenance and repair the float or needle valve was replaced, the VAZ-21213 carburetor must be adjusted without fail. Read the step-by-step guide and you can make the necessary settings yourself:
- To adjust, remove the carburetor cover and place it in a horizontal position so that the floats are on top.
- You will need a caliper to measure the distance between the cap gasket and the highest point of each float. The manufacturer's documentation indicates that the optimal distance is 34–35 millimeters. If deviations are found after measurements, set the optimal position. To do this, bend or bend the tongue.
- If, after carrying out control measurements, the obtained values correspond to the norm, you can replace the carburetor cover. But during the process, be careful not to allow the floats to come into contact with the walls of the chamber. If necessary, bend the levers without disrupting the level adjustment height.
This is how the fuel level in the float chamber should be adjusted.
Self-adjustment of the starting device
After disassembly and repairs have been carried out with the replacement of the dampers, it is necessary to adjust the VAZ-2121 carburetor, which involves adjusting the starting device. And also this type of adjustment may be necessary if the engine does not start. To do this, the unit will have to be removed from the intake manifold. Prepare a standard set of tools and follow the procedure described below:
- After dismantling the carburetor, you should immediately check how the dampers work. Turn the choke lever counterclockwise until it stops - in this position the damper should close completely.
- At the same time, the throttle valve must be slightly open. In this case, the gap formed between it and the chamber wall should be 1.1 mm. This is the starting gap - it is this that is adjusted when setting up the starting device. You can measure the gap using a wire of the appropriate diameter.
- Use an "8" wrench to turn the adjusting screw located on the throttle lever. This way you will set the required starting gap.
- In addition, with the choke completely closed, press the trigger rod all the way. This will lead to an increase in the starting gap to 3 mm.
- If there are deviations from the norm, additional adjustments will have to be made. To do this, loosen the locknut of the adjusting screw located on the starter housing. Turn this screw until the desired clearance is achieved. After completing the adjustment, be sure to tighten the locknut.
In order to correctly configure the starter, be careful and strictly follow the sequence of actions described in the manual.
How to adjust idle speed on a Niva with your own hands
Upon completion of cleaning, repair, or in order to adjust the idle speed, it is necessary to adjust the Niva 2121 carburetor, during which you will need a gas analyzer - it is used to monitor the content of carbon monoxide (CO) in the exhaust gases. After you have prepared everything you need, including a standard set of tools, read the instructions and start setting up:
- First of all, before carrying out adjustment operations, warm up the engine and turn on current consumers (for example, headlights).
- If the engine is warm, you need to turn it off, then connect the gas analyzer to the exhaust pipe. Restart the engine.
- Take a screwdriver and, turning the mixture amount screw, set the crankshaft speed to 800–850 rpm. Speed control is carried out using a tachometer.
- Next, using the same screwdriver, you need to turn the mixture quality screw. Based on the gas analyzer data, set the CO content in the exhaust gases within 2.5–3%. Often, after the final adjustment, the engine speed deviates from the norm. You need to make adjustments using the quantity screw.
The blue arrow is the quantity screw, the red arrow is the quality screw.
After properly adjusting the carburetor, your car’s engine will develop the necessary power and operate steadily at idle speed. This will ensure optimal fuel consumption. If, after completing the adjustment, dips are observed at any speed, and starting the engine itself is difficult, then most likely there is a malfunction in the carburetor systems. In this regard, diagnostics and appropriate repairs may be required.
CarExtra.ru
Which carburetor is better to install on Niva 21213
The domestic auto industry, after more than fifty years, continues to firmly hold a leading position in the car markets. The VAZ family has a very reasonable price and is quite easy to maintain.
Huge demand has appeared for the Soviet SUV VAZ-21213, as well as its analogues. This type of VAZ car has achieved enormous success in world motorsport, setting unattainable records. This type of car is very actively exported to European countries and beyond.
Car owners who do not have much experience in servicing this type of car quite often encounter various problems associated with the operation and repair of the Niva. One of these common problems is carburetor repair and replacement.
Many drivers do not know which model is better to choose, how they differ from each other and what to follow when choosing one or the other.
Adjusting the carburetor VAZ 2106
To adjust the carburetor, you will need to perform the following steps:
- Turn the fuel mixture quality screw until the maximum number of revolutions is reached. In the initial position it is turned out 2-3 turns.
- Next, turn out the screw that regulates the flow of the fuel-air mixture, as well as the quality screw by 2-3 turns. Then rotate the first screw to reach a speed of 850 - 900 rpm. This can be checked either with a tachometer or on the dashboard of the car.
Removal and washing
Before cleaning the carburetor on a VAZ 2109, you cannot do without removing and disassembling it, and to remove and then disassemble the carburetor, use the repair instructions included with your car. Here I will briefly summarize the whole process:
- Unscrew the fasteners and remove the air filter cover, then the filter itself, then the filter housing
- After this, remove the carburetor cover; to do this, remove all the fastening screws.
- We take the float out of the chamber
- We remove the sealing gasket, check its safety, if necessary, replace it
- Then unscrew the main air jets from the housing
- We remove all the jets and their emulsion tubes from the body
- Using a screwdriver, remove the retaining plate of the main fuel jet plugs
- We turn out the plugs, while paying special attention to the appearance of the copper sealing washers; if they are deformed, then they need to be replaced
- We unscrew and shake out the main fuel nozzles from the body of the device, but carefully - when performing this operation, you should remember both the markings and the place where the nozzles were installed, so that when screwing them back in you do not confuse them.
- We unscrew the fuel filter and soak it in acetone for a short time, then blow it with compressed air before replacing it
- We fill the float chamber with gasoline and use a tire pump to blow out all the emulsion channels
- When you perform this operation, gasoline will begin to come out of all channels along with various contaminants.
- This operation is repeated several times if necessary, the float chamber is again filled with gasoline and the channels are blown out again
- When performing this operation, you should take all possible measures to prevent splashing, spilling and running off gasoline anywhere.
- Rinse all the jets with acetone, then clean them with a nylon line or a pointed match (toothpick) and blow them with compressed air.
- Under no circumstances should the jets be cleaned using wire or another metal object!
- You should also be extremely careful so that God forbid you lose springs, screws, and other rather small parts.
- Having disassembled the carburetor, we carefully clean every part
- Wear gloves if you value your hands
- Remember that you should isolate all rubber or plastic parts from the cleaner, otherwise it may deform them
- After disassembling the carburetor, we collect all its metal parts in a glass jar or metal box and fill them with cleaner, then let them stand, only stir occasionally
- Then we rinse with a stream of water and clean the parts using an old toothbrush or toothpicks
- Do not even try to pick anything in any holes inside the carburetor or in the valves.
- Because air and fuel are supplied through these holes, they are very important for stable engine operation.
- Such holes should be cleaned with an aerosol or compressed air.
- If you think that not everything was cleaned the first time, then you can reuse the liquid cleaner
- The most economical car enthusiasts use the cleaner several times, keeping the liquid in a tightly closed container.
- Know that washing the VAZ 2109 carburetor does not require you to necessarily remove tarry deposits and deposits from crankcase gases from the neck of the device, which are also located on the walls of the diffusers covering the surfaces of all throttle valves, because the formation of carbon deposits in these places does not have any effect on carburetor operation
- And the utmost attention should be paid to removing those deposits that have formed in the channels and openings of the idle speed system, as well as the transition and main metering systems.
- Since the cleanliness of these channels with holes significantly affects the smooth operation of the carburetor and engine
- After cleaning the carburetor, you need to thoroughly dry it and reassemble it according to the attached photo instructions in the repair manual.
- Then the carburetor you cleaned still needs to be installed in the car and adjusted
This is interesting: Remove a dent without painting
That's all with washing, additionally watch the video material on this issue.
Repair cleaning
It makes sense to carry out further manipulations with the unit if two conditions are met simultaneously. Firstly, you are sure that the problem unit is the carburetor of your nine. Secondly, emergency preventive cleaning was carried out, but did not give the desired results. In this case, proceed to a total repair cleaning of the carburetor of your VAZ 2109.
Work order.
- Remove the air filter cover and the filter itself.
- Disconnect the throttle valve actuator and every single connection.
- Unscrew the mounting screws. Remove the faulty unit from the engine.
- Place the unit in a thick plastic bag. To reduce solvent consumption, wrap the package with the unit with tape, leaving the filler neck free. Place the bag in a plastic bucket in case of leakage.
- Fill the carburetor with acetone. Rock it from side to side so that the solvent penetrates the nozzles, jets, transition channels and dispenser wells.
- Leave the unit for 3 hours. Drain off the acetone. Pour in fresh and leave for another 3 hours. Finally drain off the solvent.
After cleaning, dry it with a stream of compressed air, if possible. Otherwise, leave it in a warm, dry place for a day. Return the unit to its place, connect the pipes, connect the throttle valve drive. Install the air filter with cover.
When there is no positive result, the next level of intervention in the device is cleaning and disassembly. If you have to disassemble a unit for the first time in your life, don’t do it. At the very least, do not do the work yourself, relying solely on the repair instructions. You need such a fantastic amount of luck for a self-disassembled and reassembled unit to work properly that, perhaps, it is easier to win a new Mercedes in “6 out of 45”. It's time to turn to professionals for car service.
If a total repair cleaning with immersion solved the problem, proceed to normal operation of the “nine”. Don't forget to add additives. Fuel up at reputable gas stations.