Choice of window regulators
Turn the block over and carefully install the block Ш1 of the harness that was prepared earlier into the desired connector. The simplest and cheapest kit includes only an electric motor with a gearbox.
But the quality of workmanship and resource are very high.
Its design is similar to that of the windshield wiper gearmotor.
If the power supply circuit is broken, you need to find a place and then restore it.
Turn the block over and carefully install the block Ш1 of the harness that was prepared earlier into the desired connector. There are 2 wires coming from the closer and they are constantly closed in it.
Now, in order to close the window, you have to reinsert the key into the ignition... I think you are all familiar with this situation.
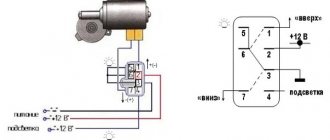
They are considered the most suitable and are the most reliable. If voltage is applied to the winding, then contact 30 is disconnected from contact 88 and connected to the contact how to connect a VAZ window lifter
Read additionally: Who does the energy passport of an enterprise?
Manual window lifters
If the window lift cable breaks, after 10 seconds the microcontroller will move on to raising the next window. Wiring diagram for power windows.
Here you can download the archive with the board in lay format.
It is ideal to install 2 door closers on each door, as is standard on foreign cars - then the AUTO mode will be on 2 doors at once in parallel, and not alternately. The circuit was provided by Ya. The test can be performed using a multimeter or a regular 12-volt light bulb.
Power contacts are always marked as 30 output, 87 input when control is applied to the winding and 88 normally closed input. On the latest Pandora November and newer, the circuit is correct, so there is no need to swap the wires from the buttons and motors! Thanks to the correct design and operation of automatic window lifters, it is possible to control the front window lifters in two opposite directions. But on domestic cars they are more often installed in the cigarette lighter area or near the handbrake.
Articulating-lever systems. Do you have any questions? To do this, you can use a special silicone spray.
Having prepared all these tools, you can begin installing the drives on the car. Only after this can the glass be fixed.
In principle, there is nothing special to connect there. But on domestic cars they are more often installed in the cigarette lighter area or near the handbrake. It allows you to see how to connect electric windows to the vehicle's on-board network.
It must be moved to a comfortable position that would allow any position of the glass to be fixed without any problems. To summarize, we can say that in the first case, the qualifications of the work are minimal, and it can be done by yourself, without having specific knowledge, while working with an electrician requires a specialist who needs to be paid. All that remains is to install the glass, as well as the button for the window lifting mechanism, securing them with sealant in a specially made connector in the door trim. Do-it-yourself Electric Window Lifter (ESP), diagram and what you need
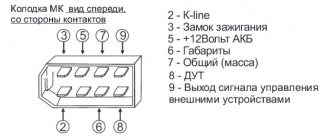
Diagram of window regulators on a VAZ-2107
On the automotive goods market for old mechanical VAZ models there are sets of electric windows from different manufacturers, the most popular of which are “GRANAT” and “FORWARD” rack-and-pinion type. The window lifter rack is a housing in which the glass movement device is located - a toothed chain drive. A stationary electric motor is already attached to the rack, driving the entire mechanism to work.
To connect power windows, you need to determine the place where you will get the power from. In the VAZ-2107, this is most conveniently done from the cigarette lighter. If this option is not suitable, then the electrical wiring will have to be done from the battery.
Serial connection - diagram
We connect the output of additional button 1 in the driver's door to input 6, and output 7 to input 3 of the main button on the passenger door. We cut the wires in the block connecting contacts 5-6 and 6-3. The minus of contact 5 now goes only to the backlight, and contacts 6 and 3 now take output from additional buttons 1 and 7 of the driver's door.
When using trigger buttons, connect all ESP motors only through a relay. When using a conventional door closer, relays are also needed, since they are not in the long-press closer block and all the current flows through the buttons and wires from them.
Wiring diagram for the VAZ 2110 window lifter button
Diagram for connecting electric windows on a VAZ-2110
Electric windows are very convenient devices that are controlled by a special button and make it possible to lower or raise the side windows without rotating the previously used handles. Unfortunately, this option is provided only in some modifications of the VAZ-2110 car. Therefore, in this article we will tell you how to install it yourself and ensure maximum comfort in controlling the side windows.
Removing the decorative door trim of a VAZ 2110
Before directly repairing the window regulator, you will need to remove the decorative door trim, for which it is recommended to follow the following sequence of actions:
- 1. Unscrew the lower door pocket, held in place by three self-tapping screws, and remove it from the grooves;
- 2. If a speaker is attached behind the panel, unscrew it too and disconnect the power terminal block;
- 3. The VAZ door handle is secured with two self-tapping screws hidden under a removable trim;
- 4. Unscrew the door latch. Now the plastic decorative trim of the VAZ door is held in place only by latches around the perimeter, which we consistently undermine.
At this point, the first stage of door disassembly can be considered completed.
Electric windows for the “ten”
When VAZ-2110 cars began to be produced, electric windows were not included in the configuration. They were installed very rarely, mainly at the request of the buyer directly at the car dealership. Most car enthusiasts try to save on repairs, so instead of contacting specialized centers for car repairs, they carry out maintenance on their own.
Today there are a lot of kits in stores for installing electric windows on a VAZ car. The simplest and cheapest kit includes only an electric motor with a gearbox. With such a kit you can replace the electric window regulator of a VAZ-2110, but it is better to purchase complete kits.
How to disassemble the door of a VAZ-2114?
To get to the window lifting mechanism, you need to remove the door trim. In addition, if you plan to replace it with an electric lift, then you need to dismantle the opening limiter, since a bundle of wires will need to be inserted into the door. To remove the casing:
- Unscrew the three screws from below that hold the plastic pocket of the trim.
- Remove the two bolts holding the inner handle. To gain access to the bolts, you need to remove the round plugs using a thin flat-head screwdriver.
- Remove the plastic trim from the door lock handle. To do this, you need to pry it up with a screwdriver and, moving it a little to the side, pull it out of its recess.
- Unscrew the lock button.
- Remove the trim. This is done as follows. A flat pry bar or a powerful screwdriver is inserted into the gap between the trim and the door frame. It should fit between the door clip and the door frame. Then you need to squeeze out the clip, not the casing. Otherwise, the clip fastening can be broken, and during subsequent installation the casing will not sit tightly in place. There are 8 clips installed around the entire perimeter of the door. They need to be pulled out one by one.
After releasing the door trim, there is no need to rush to remove it. If it is a door with an electric drive, then it is connected by a bundle of wires going to the window lift button, the pinout of which consists of seven contacts covered by a plastic connector. To disconnect it, you need to press the latch with a small screwdriver and pull out the part into which the wires go.
Read also: Insurance company Zurich reviews
P O P U L A R N O E:
- Simple automatic charger
For those who don’t have time to “bother” with all the nuances of charging a car battery, monitoring the charging current, turning it off in time so as not to overcharge, etc., we can recommend a simple car battery charging scheme with automatic shutdown when the battery is fully charged. This circuit uses one low-power transistor to determine the voltage on the battery.
Read more…
Sound turn signal
In order not to forget to turn off the turn or handbrake lever, I suggest adding a simple device to your car - a signaling device. The sound alarm is assembled on a common and inexpensive K155LA3 microcircuit. The signaling device is connected to the turn signal or handbrake warning lamp. Read more…
How to show engine temperature in Renault and Driving Eco2 in MediaNav?
On the drive2 website you can find not a single activation of various functions in MediaNav, and in other blocks too.
Owners of gasoline versions of Renault cars equipped with standard autostart and MediaNav are luckier - from the factory they have a BIC 283468105R unit installed in their car, which switches two car buses: CAN1 and CAN2, transmitting on-board computer data and ambient temperature to the MediaNav screen.
Read more…
Popularity: 34,033 views.
Design features of window lifters "Tens"
What is the electric window circuit in the VAZ 2110, for what reasons does the engine or the SP control unit not work, how to replace it and how to connect the device? First, let's look at the design features of the joint venture, which may vary depending on which specific doors they are used in.
Despite these differences, joint ventures for the most part consist of identical elements; let’s look at the example of electrical systems:
- Gear motor or drive. Taking into account the electrical circuit, this device provides the signal necessary to raise the glass.
- Grooves. These constituent elements are located on the inner surface of the door frame. The main purpose of the grooves is to hold the glass in a certain position and prevent it from tilting.
- Rails. Rails are used as guide elements used to move glass. These components are installed in the door body.
- Lifting mechanism with gears.
- Seal. The rubber seal allows you to limit the movement of the glass up or down.
- Wiring. Its diagram may differ depending on the type of joint venture, but in any case, it is through wiring that signals are transmitted from the control unit to the gear motor.
- The control unit itself has buttons that transmit an impulse about the need to open or close the glass.
Separately, it is necessary to say about the drives - depending on the type of joint venture, the drives can be different:
- Mechanical type devices. Mechanical devices are structurally composed of ordinary elements, several gears and a handle. In order to move the glass to a certain position, the driver or passenger will have to turn this handle clockwise or counterclockwise. A load will be placed on the drive shaft, which will allow the glass to be raised or lowered.
- The drive can also be electric. An electrical device has a more complex structure compared to a mechanical one. The design of such a joint venture includes a gearbox, drum, control module, etc. As mentioned above, an electrical circuit is used to connect all components, which must always be in working order. Once connected, the system is controlled using the buttons on the unit.
It should be noted that the joint ventures themselves can be subdivided according to the types of the lifting mechanism itself. Cable mechanisms were the first to be used, but over time, due to multiple disadvantages, such as slow operation and low service life, they were replaced by rack and pinion mechanisms. Unlike cable ones, rack and pinion ones work much faster, but louder, and their service life is much longer due to the reliability of the design (the video was shot by Artem Aver).
Installation procedure for glass lifting devices
With such a kit you can replace the electric window regulator of a VAZ, but it is better to purchase complete kits.
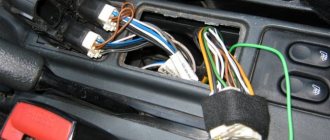
In general, all work can be divided into several main stages: Carefully, trying not to damage, remove the front door trim. Otherwise, the entire operation will not be possible. In principle, that's all. Don't pay attention to the orange wire in the photo - it's a mass for heating the mirrors.
Depending on which company produced the product in question, it can be installed in the car door as standard, or, if it does not fit in size or other technical characteristics, it can be altered without unnecessary problems.
Attach the glass frame with bolts. The speed of glass movement is very slow; if it freezes, the cable may break and the motor may fail.
It is advisable that the device be in a folded state, because, otherwise, it will be difficult to install and connect the window regulator to the on-board network of the car. If you haven’t decided which ESP for VAZ to buy and at what price, then you can read tests and reviews of electric windows, or read reviews from car owners who have already installed ESP in their cars.
Power window lifter.
You can use a button from Kalina, it is more beautiful and a little more expensive than from a VAZ. Their cost is low, so the purchase will not hit your pocket hard.
Then you don't have to read further. After some time, after a lot of walking, it was finally decided to buy the first car I liked and finally go home.
The performance of this component can be determined by replacing the problematic relay for testing with a guaranteed working one. It starts with disconnecting the battery. Very often there is a break between the body pillar and the door. Connect the wiring harness blocks in accordance with the connection diagram. The new VAZ window lifter does not work
VAZ 2114 window lift diagram: we understand the intricacies
Sometimes electric window lifts can fail, causing serious inconvenience. In order to repair them, you will need a diagram of the VAZ 2114 window lifters. In today’s article we will present this diagram and also tell you how to install electric window lifters instead of mechanical ones yourself.
Types of window lifters
Electric window lifters used in modern domestic (and not only) cars can be divided into 3 main categories:
- Cable ones are the most affordable, but they are also weak and slow. Their only advantage is maintainability - if the motor fails, it can be purchased separately and installed in place of the broken one.
- Rack and pinion ones are faster and quite reliable, but require regular inspection and lubrication to achieve a long service life.
- Lever-hinged ones are the most modern. They are distinguished by durability, low maintenance requirements, and a combination of high operating speed and high power. Even frozen glass can be moved without much effort.
For obvious reasons, when replacing window regulators, your choice should be the latter option.
According to reviews from many owners of domestic cars, the most successful electric windows for them are the model called “Granat”.
VAZ 2114 window lift diagram: installation
If the machine is equipped with mechanical lifts as standard, then replacing them with electric ones will not be difficult.
This procedure is performed in the following order:
- disconnect the terminals from the battery;
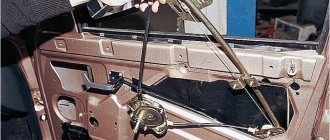
- remove the door trim;
- Unscrew the fasteners connecting the window regulator to the door glass;
- unscrew the nuts holding the lift rods (trapezium) - two middle nuts, one lower and one upper;
- unscrew the 3 nuts securing the lift in the area of its handle;
- Having brought the lower pin of the guide into the technological hole of the door, remove the entire mechanism of the manual window lifter;
- install a new electric lift mechanism inside the door through the same hole through which the old mechanical lift was removed;
- insert a pair of pins into the holes above which the middle nuts of the mechanical lift were located, and use them to secure the new mechanism;
- by connecting and turning off the power to the window regulator (this can be done directly from the battery using a pair of wires), align its mount for the glass with the mount on the glass;
- Connect both fasteners using bolts.
After the lift mechanism is installed and connected to the driven glass, it is recommended to lubricate all its moving parts using solid lubricant (for example, CV joint-4).
At this point, the installation of the mechanical part of the device is completely completed. Now let's talk about how to connect the VAZ 2114 power windows to the on-board network.
Selecting window regulators for installation on a VAZ-2110
If you want to install electric windows on your car, you will first need to choose the most reliable device that will serve for many years without causing any problems. On the modern market you can find the following options:
- traditional cable structures, which are relatively easy to install, but differ from others by not having a very long service life, wear out quickly;
- strip devices that are not very convenient to use;
- rack and pinion window lifters, which are deservedly recognized as the most suitable and reliable in operation.
When choosing devices suitable for your car, pay attention to factors such as:
- the speed of raising and lowering the glass, which largely depends on the gear motor installed on the car;
- the ability to use the device in the cold season;
- noise level during product operation.
Taking into account all these factors, you will be able to choose window lifters that will not only work flawlessly, but also will not create any problems in specific operating conditions.
What to look for when purchasing
Of course, 20 years ago this type of electric windows on the VAZ-2110 would have been the ultimate dream for any motorist. But today, when much better mechanisms can be found on store shelves for quite modest funds, you should not give your preference to cable-operated windows. It is impossible to even imagine how much a VAZ-2110 in this configuration cost in the late 90s. Perhaps this was the first car after the famous 600 Mercedes.
When purchasing, you need to pay attention to the complete set of window lifters. It is advisable to purchase those that have electric motors, all wiring, buttons, plugs, fasteners, and rubber cuffs. Using cuffs, electrical wiring is pulled from the doors to the body pillars.
Electrical faults
Electric window diagram
The VAZ 2110 window lifter circuit includes a control relay, a safety block, a power circuit and a push-button mechanism. In order to localize a fault in the power circuit, we need to check the presence of voltage at the power supply terminals of the electric motor.
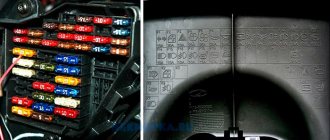
If the window lifting mechanism does not work at all, the electrical winding of the drive motor or control relay is most likely burnt out. Due to the electrical overload, it is also likely that the fuse in the car will blow (see the VAZ 2110 power window diagram to determine its number). VAZ power windows may also not work due to a faulty button. In this case, the lift functions, but behaves incorrectly.
The process of directly disassembling the door and removing the glass lifting mechanism from it will not take more than 10-20 minutes. of your time and is extremely easy to implement. First, remove the decorative door trim.
Removing the door trim
How to install and connect power windows on a VAZ-2110
The most preferred devices are rack type, so we will describe the installation process as an example. The connection diagram for the window regulator on a VAZ-2110 car is as follows:
- remove the negative terminal from the car battery to stop the supply of voltage to the on-board power supply network;
- we take the wires that come standard with rack-and-pinion window lifts and make a kind of harness out of them that makes connection easy;
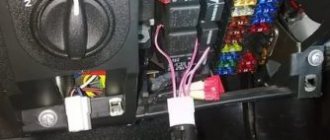
- remove the car mounting block, which will require unscrewing the self-tapping screw that secures the special latch;
- turn the block over and carefully install block Ш1 of the pre-prepared wiring harness into the corresponding connector;
- dismantle the door trim;
- we pull the wires to the electric window drive. To do this, you will need to carefully pass them through the holes in the door itself and the body pillar on the desired side.
After this, buttons or keys are installed that will be used to control the power windows. Depending on your desire, they can be attached either to the door trim of a VAZ-2110 car, or to an existing control panel. In the first case, you will need to use an additional wire, which will allow you to equip the key backlight.
Repair, operation and replacement of window regulators on Lada Samara cars
Don’t know how to replace the window regulator of a VAZ 2114? Our article describes what types of these devices exist, the main causes of breakdowns and much more. The recommendations are suitable for repairing almost any car belonging to the Lada Samara family, if the windows do not work on it.
The window regulator of the VAZ 2115, VAZ 2114 and other models of cars in this series can be of two main types. The mechanisms on the VAZ 2115 or 2114 do not have any fundamental differences from other models of the family.
The first of them is collapsible. They consist of two parts, a motor and a trapezoid, which are connected with fine thread bolts. If necessary, you can replace one of these parts while leaving the other. Previously, this was the most profitable option, since repairing a window regulator was much cheaper. Most often the trapeze had to be removed and replaced.
But in recent years it has been quite difficult to find high-quality trapeze on sale. Almost everything that is in stores lasts a month or two, and then again requires replacement. Therefore, collapsible device models are no longer so popular.
The second option is non-separable models. They are solid and do not allow the replacement of individual parts. On the other hand, a new non-removable factory window regulator for the VAZ 2113 and other models can last up to 3-5 years without requiring replacement. And with adequate use, even longer.
In addition to these types, devices are also distinguished by their operating principle. These are mechanical and electric windows of the VAZ 2114 and other models. The latter are also divided into lever, cable and rack and pinion. Their main difference is how the impulse of movement from the engine is transmitted to the plate holding the glass. This can be done by cable, lever or using a rack system.
1. Lever mechanism 2. Cable mechanism 3. Rack and pinion mechanism
Common faults
One of the most common malfunctions is gear wear. Usually plastic is used, which wears out quickly over time. A symptom of this problem is a rumble and crackling sound that is heard when the glass is raised or lowered.
Also, the automatic switch on the power windows may burn out, which is why the inclusion will not work. Also, problems may arise with the rear doors. They either stop working altogether or respond to pressing a key from the main unit, but not on the doors themselves. Check current continuity.
The electric motor may also fail. To fix it, you will need to check the voltage in it and the wiring. Mechanical damage to the guides may also occur.
Removal instructions
If you don’t know how to remove the window lifter handle, don’t despair, it’s easy to do. Before removing the mechanism, you need to remove the trim from the door. Then be sure to disconnect the wire block and the power window connector. Then remove the three nuts that secure the mechanism to the door. Next are two bolts that secure the lift and the glass itself.
Then, lift the glass to the very top and fix it, you can use a screwdriver or ask someone to hold it. But it’s better to pull it out, because otherwise there is a risk that the glass may break.
To completely remove the mechanism, you need to additionally remove the door handle. To do this, unscrew its two screws and push the handle inside the door. Then, you will need to disconnect the rubber holder that holds the rod on the handle. Once you're done with this, you can pull out the handle, and then the window regulator itself through the same hole. Now you know how to remove the window handle and the entire mechanism.
Installation Features
The connection diagram is the opposite of the above method of removing the device and, in general, has no special nuances. If you have completed the removal operation, then installing the VAZ 2114 electric windows will not be a problem.
The only nuance that you should not forget about is the window lifter guides. Before completing the connection, it is better to lubricate them - then the mechanism will last longer.
Source: https://avtozam.com/vaz/2114/remont-i-zamena-steklopodemnikov/
FakeHeader
To be honest, I didn’t manage to start making money right away, until I understood all the mechanics of options, I lost about rubles, but as it turned out, it was a precious experience.
Conclusion: In order for the power windows to work without an ignition key, you need to jumper contacts 30 and 87 of relay K5 as in the figure below.
Often, power windows are installed only on the front doors.
Preparing for the installation of electric windows Before starting work, you must purchase all the elements for repair. How to do this is shown in the photo report. After this, be sure to clean the inside of the door so that there is no dust and dirt there. Let's move on to practice: I will not impose on you any specific method of making a jumper; I will describe only the most common ones. You can choose any of these methods that seems most simple and convenient to you.
We recommend: Electrolaboratory is
Replace the fuse with a new one. The sequence of actions is as follows: Remove the glass seal while the work is being performed.
Then I cut off the sides on two buttons, respectively, one on the left side and the other on the right. Next, install the power window in the door through the upper technological hole. The electric motor itself is part of a gearmotor, which also includes a worm gearbox.
Stories from our readers
Preparing for the installation of electric windows Before starting work, you must purchase all the elements for repair. Hi all! It starts with disconnecting the battery. Diagram of electric windows of a VAZ Electric windows are used to raise and lower the door windows and are installed on a part.
Remove the window lift mechanism through the door window. Connecting electrical equipment Now, in order for the power windows to work correctly, you need to connect them. We insert the black wire into socket 1 of the button connector. Black and white - into socket 7. Installing buttons from Granta on 2110 (the simplest diagram)
Removing window regulators
Having talked about malfunctions and the principles for eliminating them, we will now figure out how to remove the window regulator of a VAZ 2114 (after all, without dismantling it, it will simply not be possible to inspect and repair the mechanism).
Despite the fact that manual and electrified lifts have completely different designs, they are installed according to the same principle inside the door technological cavity of the car.
Their removal should be carried out as follows:
- Remove the door trim.
- Raise or vice versa - lower the glass so that the fastening bolts of the glass frame appear in the upper hole of the door.
- Unscrew the two mounting bolts securing the glass in the frame.
- Lift the glass as high as possible with your hands and secure it with plastic or wooden wedges.
- Lower the lift slider to its lowest position.
- Unscrew the 4 nuts securing the guide (for the rear door, unscrew the 2 nuts securing the guide).
- Unscrew the 3 nuts securing the window lift mechanism (for the rear door, also unscrew the 3 nuts holding the window lift).
- Remove the window regulator through the technological opening in the door.
Installing a new device is done in exactly the same way, but in reverse order.
Also, to extend the life of lifts (both electric and manual), when replacing or repairing them, all joints and moving elements should be lubricated with CV joint grease or similar.
In conclusion, I would like to add that an important key to the long service life of lifts is their periodic inspection and maintenance.
So, if you have to exert considerable effort when opening/closing a window with a manual window lifter, or if the electric lifter begins to close the windows with great difficulty and creaking, then you do not need to wait for them to completely break down - you should dismantle these devices, tighten the fasteners and lubricate all moving parts.
Scheme for any number of buttons and doors
Here you can place any number of buttons in parallel and simultaneously press them in different directions - a short circuit is impossible from the circuit design. In a situation where we press the up button on the main button, and the down button on the backup button, it will simply stop, since both power lines will have the same potential. The advantage of the circuit is that the power switching is in one place, there are no losses in the harnesses and on the buttons, there is a minimum of “pulling” of wires - 2 in total per channel + ground.
see also
Comments 8
This diagram is complete crap, tested on my VAZ 2115, it works fine, only the right driver's door window regulator doesn't really work, then it gets jammed, then the power disappears; it's easier for each window regulator to have its own power supply and its own button
Thank you very much for your very useful and insightful comment. The presented factory diagram clearly shows that each window regulator receives its power through its own button from the mounting block. The scheme is quite simple. So it’s even interesting what is to blame for the circuit, that “the right one doesn’t really work, then it jams or the power disappears.” And how “each window regulator has its own power supply and its own button” will solve your problem. Maybe we should look for the reason in the poor contact of the connectors and the closing mechanism of the window regulator (by the way, this is not uncommon, the mechanism with a cable is often covered)?
tell me x1 is + with ChY? There is NO photo of the block in the new mounting block (2114) from which to take + to the ESP, otherwise I can’t find anything (
This scheme turns out to be 3 buttons! But the window regulators come with wiring for 2 buttons. Separately, you can find the wiring for exactly 3 buttons, otherwise I just have a problem with them now... At first the problem I had was that the left glass closes and opens well (quickly), but the right one does not work well. I still don’t understand why (Then I decided that the place where they are installed is not suitable (where there should be heated seats, in the middle), I decided to move them to the doors, but with 3 buttons. The whole execution turned out perfect, but when all the buttons on the right door are connected, it doesn’t work! He said that because of the wiring, supposedly it is designed for 2 and not 3 buttons. It’s hot outside, below 30, and I’m driving around with a fan). Have you or someone you know encountered this?!
Has anyone tried connecting according to this diagram?, the second button on the top in the connection is questionable!
Diagram from the ABC book. To be honest, I didn’t look closely at first (I have standard ones), but now I see for myself that the numbering of contacts on the “2” button, which is at the top, frankly speaking, is “left”. Apparently, the “inside” of the button should be mirrored there. If you “unfold” it, then everything falls into place. In general, everything is as always. Even a diagram from a primer needs to be modified with a file. “Reflected”, I post it.
Read also: Geely emgrand ec7 brake pads
Yesterday I installed the power windows using this diagram, everything works, the diagram has been checked, everything works))))
VAZ-2114 is a car in which a window regulator malfunction is a common occurrence. This is one of those troubles that does not interfere with driving, but pretty much spoils the nervous system of a car enthusiast. The inability to ventilate the air in the cabin or reduce the temperature in the summer often reduces the composure that is so necessary for a person behind the wheel.
Electric lift
An electric lift for single rolling out of wheel pairs is used with a lifting capacity of 27 pg with a platform lifting speed of 0-3 m/min.
The ESPL electric hoist is a unification of previously produced separately locomotive and electric locomotive hoists of the EPE and EPOYA types.
| Lifting soil from a deep trench using a bucket. |
The lifting is carried out by an electric lift, which moves horizontally along with the raised tub along an I-beam mounted on tubular trestles. The goats move along the trench on rails laid on logs thrown over the trench.
The weighed carrier is loaded by electric lift into apparatus 4 for steaming. Steaming is intended to increase the pore diameter of the carrier in order to prevent it from cracking when impregnated with acid. The loaded steaming apparatus is hermetically sealed and heated with hot air to 155 C. Then the carrier in apparatus 4 is heated to 190 - 200 C due to the heat of live steam passed through the apparatus and released into the atmosphere. At this pressure, the carrier is steamed for 1 - 2 days; Condensate and steam are drained in small quantities.
In oil fields, such electric motors are used on electric hoists.
The supply base of Raiselkhoztehnika has access railway tracks, gantry cranes, electric hoists, containers and other technological equipment. Warehouses for storing material and technical equipment are fully mechanized.
A unit in which the winch is driven by an electric motor is called an electric hoist.
Lumpy limestone is loaded into the furnace shaft 4 through the loading hole 6 using a trolley raised by an electric lift. The furnace shaft is laid out from two layers: the outer one in the form of brickwork 5 made of red brick and the inner one made of refractory bricks. Inside the furnace there is a core made of refractory bricks, due to which the limestone in the combustion zone is located in the annular space in the upper part of the core 3, in a layer about 800 mm thick.
Lumpy limestone is loaded into the furnace shaft 4 through the unloading hole 6 using a trolley raised by an electric lift.
To transport thermal insulation materials vertically, the following mechanisms are used: electric winches, electric hoists, pulley blocks, elevators, mortar pumps, transport and insulation machines, pneumatic pumps, tractors with booms, telescopic towers, cement guns and others.
| Mixing process mode. |
Film-forming substances, plasticizers and highly volatile solvents are supplied to the loading platform using an electric lift from the general plant warehouse or from an intermediate warehouse located in close proximity to the workshop building and intended for daily storage of raw materials.
When mechanizing the lifting of heat-insulating materials and products, various models of stationary and portable electric lifts, which are installed free-standing and secured to walls or metal structures of buildings, should be widely used.
Traction electric motors, complete with a wheel pair, are rolled out from under the diesel locomotive onto a ramp ditch using an electric lift. Before rolling out, disconnect the air duct and current-carrying cables from the electric motor and release the brake rods. When rolling out the outer wheel pairs of the cart, additionally remove the ends of the sand pipes, disconnect the speedometer drive, and support the ends of the cart frame with stands.
Connecting electrical equipment
Now, in order for the power windows to work correctly, you need to connect them. If you are not confident in your abilities, then seek help from an experienced electrician. If you are confident in yourself, you can begin installation. To do this, choose a place to install control buttons. It is advisable to place them where there is easy access to them for both the driver and the passenger. Therefore, the best places for installation are the niche under the handbrake, as well as in the beard of the front panel.
After installing the buttons, it is necessary to lay wires from them to the power source through the VAZ-2110 fuse box. It has several backup sockets with which you can connect power windows. Wires are routed from the electric motors in the doors to the body pillar, and from there to the control buttons. It is imperative to use electromagnetic relays to save buttons from switching high current.
Features of connecting power windows
Unlike conventional mechanical devices, power windows are not equipped with traditional gear reducers, but with a special drum. The shaft of a DC electric motor is inserted into its hole located in the center. In this case, the motor is only a component of the gearmotor, on which, as we found out earlier, the speed and quality of raising and lowering the windows depends.
Before installing a new power window, you must select the correct device based on its technical characteristics, and also make sure that the product is in a fully folded state. Otherwise, you are unlikely to be able to install the product efficiently and ensure its flawless operation after connecting it to the vehicle’s on-board network.
Wiring diagram for the VAZ 2110 power window button. You have probably noticed that on almost all foreign cars the power window buttons are duplicated on each car door. To connect additional ESP buttons in the doors, you need to run an additional three wires into each door.
To install one duplicate button in the door you will need:
- 2x contact (plastic connector) block male + female 1 pair
- Large male terminals 2 pcs.
- Mom large 2 pcs.
- Mom little 7pcs
- Earth 1pc.
- Power window button 1 pc.
- Button installation cup 1 pc.
- Power window button connector 1 pc.
- Wire diameter 0.75 4 met.
- Door pistons 7pcs
- If your ESP buttons have been moved to the doors. then the insert into the harness for additional the button will look like this
The idea is that we need to run 3 wires into each door:
- Ground (Ground, in theory, can be taken into the doors, but there is not always good contact there, so it is better to run a separate ground wire)
- +12V “after ignition” (with power window relay at ChYa)
- Button illumination (take it from the cigarette lighter, since it is in the middle between the doors.)
Disconnect the negative terminal from the battery.
We look for +12V on the ESP relay (black and white wire) to it and screw both of our red +12V
Then we climb through the door. There are 2 wires going to the ESP motor - gray and blue, through a connector. Unplug the connector:
We take 2 wires (I have black and black and white), of such length that we can reach from the original chip with the blue and gray wire going into the corrugated door to our future button. We crimp 2 large male terminals onto them and insert them into the connector. We put it on the chip with blue and gray going into the corrugated door, so that the black comes from the gray, and the black and white comes from the blue:
Insert the wires into the button connector:
- Red +12V
- Black mass
- White backlight
- Black with gray wire chips
- Black and white with blue wire chips
- We crimp with small “mothers” and insert the ESP buttons into the connector.
We do it according to the scheme:
- Red +12V to slot 2
- Black ground - in slot 5
- White backlight - in slot 4
- The black wire from the gray wire of the chip goes into slot 6
- Black and white from the blue wire chips - into slot 3 (THREE).
Do not mix up the button connector sockets! That's not all, we need two more short wires, through which we will now connect our button to the ESP motor, like we'll do it as before. For beauty, we take the same colors of wires that were attached to the original chip going into the corrugated door, i.e. black and black and white. It will be like a continuation of the original wires, and in the middle of them is our button. We insert the black wire into socket 1 of the button connector. Black and white - into socket 7. We crimp the other ends of these wires with large “mothers” and put the purchased connector on them so that when putting this connector on the dangling chip going to the ESP motor:
- The black wire went to the gray ESP motor chips
- Black and white - to the blue wire of the ESP motor chip.
In principle, that's all. Don't pay attention to the orange wire in the photo - it's a mass for heating the mirrors.
You can use the button from Kalina. it is more beautiful and a little more expensive than the VAZ 2110.
Electric windows are used to raise and lower door windows and are installed on some cars. These VAZ 2110 cars have a plug in the door trim instead of a window lifter handle, and there are corresponding illuminated switches on the floor tunnel lining.
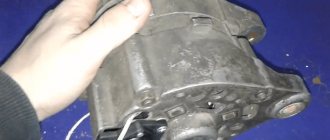
In the window lift mechanism, instead of a gear reducer, only a drum is installed, into the hole of which the output shaft of the VAZ 2111 gear motor is inserted. The gear motor consists of a worm gear and a DC electric motor with excitation from permanent magnets. The direction of rotation of the shaft depends on the direction of the current in the armature winding. To protect against overloads, a built-in thermobimetallic fuse is used. The faulty gear motor is replaced.
Voltage is supplied to the switches only when the ignition is on through a relay of type 904.3747-10 located at the rear of the VAZ 2112 mounting block.
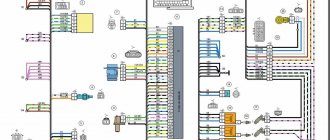
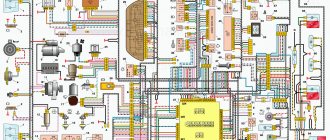
Wiring diagram for power windows
1 – mounting block 2 – ignition switch 3 – power window switch of the right front door 4 – power window switch of the right rear door 5 – power window motor of the right front door 6 – power window motor of the right rear door 7 – power window motor of the left rear door 8 – power window motor of the left front door 9 – power window switch of the left rear door 10 – power window switch of the left front door 11 – power window relay A – to power sources B – to instrument lighting switch C – conventional numbering of plugs in power window blocks
Diagnostics of electrical equipment of the Lada 2110 car. Instructions for troubleshooting the lighting system. Repair of the generator and starter of the Lada 2111. Diagram of the Lada 2112 car. Power window lifter. Electrical circuit diagrams for a VAZ 2111, VAZ 2112, VAZ 2110 car
Didn't find the information you are looking for? on our forum.