During operation, the car is exposed to the environment. High humidity, salt reagents, temperature conditions and particles of asphalt coating lead to damage to the body:
- rust;
- abrasions;
- scratches
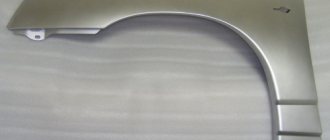
Due to their size and location, the sills are the most vulnerable part of the car. Outside and inside them, the metal loses its paint and protection, and therefore rot and holes are likely to appear. Further depletion of the coating leads to the complete replacement of a certain part of the underbody of the car. Preventing rust and corrosion is one of the components of car care. Mud flaps and linings partially preserve the body coverage. Complete protection of thresholds is achieved by treatment with anti-corrosion components.
The first time the application of special compounds is carried out at service stations. When processing thresholds inside and out with your own hands, you not only extend the life of the car, but also improve the driver’s outlook and technical training. Preliminary preparation and purchase of equipment is carried out.
U-Pol Raptor for the car - heavy artillery against external aggressors
Despite all its visual appeal, gloss, shine and excellent technical characteristics, auto enamel used by the modern automotive industry is not suitable for trucks, pickups and SUVs, which are often operated in quite extreme conditions. The usual coating on such cars is quickly damaged, the body becomes covered with abrasions and scratches, which not only spoil the exterior, but, over time, contribute to the development of corrosion and destruction of the metal. In order to reduce regular visits to a car service center to eliminate defects, there is an effective method - painting a car with raptor.
How to treat sills after welding - All about Lada Granta
For a car with high mileage, corrosion of the bottom is a common thing. Mechanical damage, high humidity, and deicing agents destroy iron over time. The metal turns to dust. Driving such a car is dangerous, the car needs repairs.
It is not profitable to contact a service station; the technicians may overcharge you. Having a welding machine, it is easy to weld the underbody of a car in the garage. It is important to take into account some nuances and adhere to technology.
It is more convenient to carry out the work together; a partner will help fix the patch before tackling.
How to treat the bottom after welding
Before applying corrosion protection, primers are first used. They are applied to clean surfaces according to the instructions and dried. The primer ensures reliable adhesion of steel to anti-corrosion. Manufacturers offer various compositions:
- Tectyl is produced in three modifications: a) classic creates an organic microfilm; b) Tectyl zinc provides an additional zinc coating that protects the metal from the action of salts; c) Tectyl NT zinc is intended for intensive use in urban environments;
- Movil is an economical product that has proven itself for half a century;
- bitumen mastic is produced on a rubber, polymer, mineral-shale and polymer basis;
- Dinitrol based on polymer rubber.
After welding the car body parts, the sound insulation must be restored. To cover the bottom, Prim anti-noise with micro-rubber crumbs is convenient. The composition is diluted with water and simultaneously acts as noise insulation and anticorrosive.
Useful tips
To repair the underbody of a car with your own hands, experts recommend using semi-automatic machines. The additive is supplied at a fixed speed, the burner provides uniform heating. The seam is of high quality and even. When working with electrodes, an inverter with additional functions that support constant operation is convenient. They reduce the risk of electrode sticking.
Before cutting a sheet of metal, the exact dimensions of the defect zone are determined. The patch must be suitable in size and adhere to the geometry. To deform, the sheet is not heated for a long time - the strength characteristics of the alloys decrease and they become friable.
Movements of the hand with the holder or attachment should be uniform, without jerking. Large sections are connected with a continuous seam, leaving gaps of up to 3 cm. Such connections better withstand dynamic loads and increase the strength parameters of the body. Such connections require a durable insulating coating.
Mastic prevents moisture from getting into microscopic gaps.
Corrosion activity at the weld joint
Welding materials - electrodes, welding wire - are made of special alloys. Their materials are selected in such a way that the seam can withstand temperature deformations in relation to various alloys. After welding, the structure of the seam and the welded edges represent a corrosive area due to the influence of several factors:
- During the welding process, intense heat initiates oxidation processes;
- The welded joint has quite significant local stresses, provoking corrosion processes through the mechanism of corrosion under mechanical load;
- The joint and seam have a large number of microdefects in the structure;
- After welding, flux residues may be retained in irregularities and on the surface of the metal, which, in combination with water or moisture, create a corrosive environment through the mechanism of acid corrosion;
- The heterogeneity of metal compounds leads to corrosion through an electrochemical mechanism.
Treatment of weld seams after the welding process
To create a reliable and durable welded joint, the seam needs to be treated and protected. It is best to perform these operations immediately after welding and cooling. Corrosion processes initiate very quickly. Long after welding, it becomes more difficult to stop the oxidation processes.
To reduce internal stresses in the metal and the weld structure, the products are annealed. Due to the manufacturing technology of various products and structures, this is not always possible. Annealing significantly reduces local stresses, but this process has different effects on strength indicators. In addition, it is not always possible to heat the connection to the required temperatures.
Cleaning and grinding the seam mechanically removes excess inclusions and eliminates a large number of irregularities. However, grinding reduces strength by reducing the average cross-section of the weld. Therefore, grinding is carried out in compliance with the restrictions on the final shape of the seam and with the removal of a minimum amount of metal.
After stripping and grinding, the seam is treated with special compounds to remove oxidation products and flux residues. Most formulations use phosphoric acid as the main component. It has good dissolving ability against oxidation products. In addition, this acid, when interacting with iron, forms a stable passivation layer.
After treatment with a passivating compound, a protective compound is applied to the seam and adjacent edges. Before applying the composition, the entire surface must be degreased and thoroughly dried.
Modern protective products often contain a rust converting agent. These compounds can be applied to corroded metal after loose materials have been removed.
However, in the case of processing welds, it is better to remove all corrosion products as much as possible. This is due to the fact that the transforming component does not always interact effectively with scale and iron hydroxide located in microcracks.
In these cases, the corrosion process will continue even after the protective coating is applied.
Application of the protective composition is carried out in accordance with the manufacturer's instructions. The prescribed thickness of the material should be observed with the edges flush with the plane of the surface of the product so that the polymer does not ride up during operation.
The result of protecting a welded joint depends not only on the quality of the material used. The most significant contribution to the reliability of protection is made by the preparatory process. With high-quality preparation and the use of modern polymer compositions as protection, welded joints do not corrode for up to 30-50 years.
Attention! Our company produces anti-corrosion protection for pipelines of any complexity.
Treatment of thresholds after welding
We continue the story about how to digest rapids with your own hands.
In the first part, you learned how to replace old thresholds with new ones, how to properly remove old thresholds and weld new ones. Of course, there were some surprises, but we dealt with them all and now move on to the second part, in which you will learn how to properly process the thresholds after overcooking.
We noted traces of bitumen on the rapids. Therefore, you will need to go over them in a hairy circle and remove everything along the seam.
After this, take a degreaser and wipe the entire threshold with a well-moistened rag to remove any remaining bitumen. Next, we rub the entire threshold with sandpaper P240, fill it with a line to put putty.
Once again we go through the degreaser. After this, mix the putty, take a little on a spatula and push it into the seam.
After the first light layer has been applied, the second can be applied more thickly. In the summer, it is not recommended to stir a lot of putty, because, most likely, you will end up throwing away most of it.
After that, we tighten everything and remove the excess along the edge. We leave the putty to harden, after which you will need to go through the 80th and it is important not to forget to wash the spatula with solvent after each application.
The thresholds are puttied and sanded; if small pores remain, no need to worry, they will close. It can be seen that the paint was slightly damaged during welding, so we need to put the “fur coat” higher, up to the top edge. To do this, we lay the paper along the edge, after which it will need to be lifted.
4 ways to repair rotten sills for drivers with any income
https://oldbusclub.ru/
Body repairs are very expensive, and all because this work requires not only expensive materials, but also fairly highly qualified service workers. Let's look at several options for how to solve the problem with rotten thresholds, starting with the most budget-friendly method.
Automotive online magazine NEauto
Option – “Sophisticated outbid”
If you don’t have any money at all, but you don’t want to drive with sills that are rusted through, then you can use your favorite outbid method. To do this, we need a cylinder with polyurethane foam and a cylinder with anti-gravel.
All you need to do is fill the holes in the thresholds with foam from a balloon and wait for the excess to come out and harden. Then, using a knife, cut off the excess and smooth it out until smooth.
Next, we apply anti-gravel to the threshold, and you can drive further or put it up for sale.
https://www.drive2.ru/
Option – “Patch”
With a basic set of tools and a small amount of money, you can repair the thresholds in a slightly better way - by applying a patch to the rotten place. We will need: automotive putty, fiberglass, epoxy resin, sandpaper and anti-gravel.
First of all, we clean off all the rust from the threshold with sandpaper. Then, using epoxy resin, we glue fiberglass to the threshold to hide the through holes.
When the patch has dried, you need to apply a small amount of putty to it to smooth out the transition from the patch to the threshold, after which we cover the threshold with anti-gravel.
Packaging and equipment
This coloring agent is supplied for sale in packaging containing:
- four bottles (each 750 ml) with the main substance;
- hardener (1 l);
- anti-gravel gun designed to work with raptor;
- instructions with detailed recommendations for use;
- quality passport.
Sets may be black or off-white in color. Moreover, the latter can be transformed into any desired shade without much difficulty. To paint in different colors, 10% of the coloring pigment is added to the base.
Working with the bottom
You can start processing with anything, this will not particularly affect the result, for example, you can process the bottom first. For treatment, any anti-corrosion agents available on the local market are used. This could be Movil or more modern auto chemical goods. It is better to consult with experienced specialists about certain products. They are familiar with all the new products and will be able to suggest the specific features of a particular product.
When processing the bottom, special attention should be paid to welds and hard-to-reach places. Corrosion often begins to act precisely there, since water and dirt are constantly retained in these areas of the body, which contribute to the rotting of the metal.
Do-it-yourself anti-corrosion treatment of car thresholds
Re-processing of car thresholds is carried out independently; for this you will need: an anti-corrosion agent (Otrix, Rand, Novol, Car System, Roberlo, etc.), rust remover, sandpaper or a metal brush, a respirator and gloves
When buying an anti-corrosion agent, you should pay attention to all the little things: purpose, shelf life, application features
In the future, it is important to strictly adhere to the instructions on the packaging.
First, thoroughly wash the car from dirt and dry it. Try to provide access to all processing areas; if working with the bottom, the machine should be installed on a platform. Remove rust using sandpaper or a wire brush. Now treat the surface with a rust remover and let it dry thoroughly.
Let's start processing the purchased product. Apply it evenly to the car sills and other parts that require protection with this composition. All you have to do is dry the car for 24 hours
It is important to remember that you should not work near fire or heating devices, since, basically, all of the above products are highly flammable. In addition, in order not to harm your health, it is recommended to work with gloves and a respirator.
Why exactly thresholds?
Coating exterior body elements with anti-gravel and other agents with an anti-corrosion effect has long proven to be highly effective. But before you do the processing yourself, you need to clarify some points.
Thresholds are an important part of the body. They require increased protection because they are located in the lower part of the car body. Because of this, they are actively affected by various factors in the form of temperature changes, reagents on winter roads, low temperatures, intense heat, high humidity, etc. Small stones, sand, pieces of crushed stone and gravel fly from the road. They cause microdamage, destroy the paint layer, and minimize the work of factory anti-corrosion treatment.
All this leads to the fact that it is on the thresholds that the first pockets of corrosion most often appear, gradually turning into large red rust spots.
I think it’s not worth reminding once again why rust is dangerous and what consequences it can lead to.
It is important to understand that you need to fight corrosion not after it actually appears. Timely prevention and high-quality metal preservation will protect against rust and prevent it from appearing on the body of your car.
There is a huge list of products intended for anti-corrosion treatment. The choice is huge, so everyone will find an option according to their wallet and needs. Some products are priced very high, others belong to the budget category. But they are all called anti-gravel for thresholds. Most often they are produced in special cans and metal containers. Moreover, preference should be given to spray cans. Mastics require a more complex and lengthy application procedure.
But regardless of the release form of the chosen product, anti-gravel must be applied correctly, following a certain sequence. You will decide for yourself what to blow out, cover or fill with on the thresholds in your car.
This is interesting: Wheel paint – protection or decoration?
Signs and causes of corrosion
Corrosion is one of the main causes of car body damage. The resistance of iron to corrosion is determined by its composition, that is, the presence or absence of alloying impurities in the metal.
Thus, the body material of Honda and Toyota cars has good anti-corrosion properties, and on the body of an Opel, traces of rust can appear even in a dry room.
Another cause of body damage is exposure to moisture from the atmosphere.
When operating a car in regions with a dry climate, the body is not in danger of rusting, but in the subtropics, on the contrary, the metal is most susceptible to corrosion.
Photo gallery: body damage due to corrosion
The paintwork of the body can also be damaged when driving on bad roads.
Sand, small gravel and stones hit the underbody and sills of the car, causing chips.
Moreover, the metal is negatively affected by the reagents used to treat roads in winter.
Various moldings and spoilers also contribute to the accumulation of dirt and moisture on the body, leading to the appearance of pockets of corrosion.
Signs of corrosion
First of all, corrosion manifests itself in places of scratches, chips and other minor damage to the body.
It does not pose a great danger if the problem is corrected in a timely manner.
The first sign of corrosion on the outside of the body is swelling of the paintwork (paintwork).
It usually occurs in places where the paintwork has poor adhesion to the metal and in areas with chips and microcracks.
When moisture gets under the paint layer, it peels off. A cavity is formed into which oxygen enters.
Washing the car in cold weather with warm water often leads to similar results.
Such areas are sanded down to bare metal, covered with a layer of primer and painted.
One of the main signs of corrosion on the body is swelling of the paintwork.
Corrosion can also appear in hard-to-reach places with poor ventilation, such as wheel arches, front fender pockets near headlights, lower parts of doors, interior floors, and sills.
Rust occurs as a result of the accumulation of moisture, dirt, sand, and the lack of ventilation aggravates the situation.
Depending on the nature of the damage, there are several repair options - welding, tinning, or epoxy putty.
Such work is quite labor-intensive and will require significant financial expenses.
It is worth noting that corrosion spreads more strongly in winter with irregular washing due to exposure to salt and other road reagents.
Keeping the car in a warm garage will not avoid this for the following reasons:
- In the heat, condensation accumulates on the body and in hard-to-reach places.
- When moisture evaporates in a warm room, corrosion accelerates.
Therefore, in winter it is recommended to keep the car under a canopy in the open air.
Outdoors under a canopy the likelihood of corrosion is minimized
Types of corrosion
The following types of corrosion are distinguished:
- electrochemical is the most common. Metal oxidation begins when moisture gets on the body. This corrosion develops most intensively in hard-to-reach, unprotected places with poor protection, where moisture and dirt accumulate;
- atmospheric is divided into the following types: dry - the metal is destroyed as a result of a chemical process in the absence of moisture. The surface quickly becomes dull (oxidized), and its destruction begins;
- damp - the cause is a thin layer of moisture. The higher the humidity, the faster the metal oxidizes. The areas of the body that are most susceptible to rust are those with damaged paintwork (cracks, crevices;
- wet - appears as a result of fog, rain, etc. The thickness of the wet film can be 1 mm.
With electrochemical corrosion, metal oxidation occurs as a result of moisture entering the body
Why is this necessary?
We have already discussed with you the tuning of the Chevrolet Niva, where I suggested installing thresholds and a body kit as a solution for external modifications. But he didn’t tell anything in detail about them. It's time to fix it. In addition, the installation of such elements is becoming increasingly popular. They allow you to enhance the visual effect, as well as provide more important protective properties.
No one forces you to do or install anything with your own hands. This is a solution for those who do not like the standard appearance of the Niva and want to make some changes. If in doubt, go to the virtual 3D tuning program, try on different thresholds and other elements on the car to understand how it might look in reality.
What Nivas do you know? I can remember the following:
- Chevrolet Niva;
- VAZ 2121;
- 21213;
- 3131;
- 21214;
- Urban.
These are all good cars that could benefit from additional sill installation.
They have several main functions:
- Protecting the car from stones and other objects flying out from under the wheels. It is because of them that scratches appear, then chips and the process of corrosion of the exposed metal begins;
- Protection against collisions with other vehicles;
- Additional protection and assistance in overcoming difficult areas and obstacles on the road;
- A component that makes it easier for children or people who find it difficult to immediately get into the car without a step to get into the car;
- A tuning element aimed at improving external body characteristics.
Protecting the thresholds with appropriate elements is considered a competent, although not mandatory, solution for the Niva.
If you decide to install a lift kit for your Niva, or you are going to additionally install a power bumper, it would be logical to complete all this tuning by installing thresholds for the appropriate protective purpose.
What do you need to have to process thresholds yourself?
For anti-corrosion treatment of thresholds you will need:
- anti-corrosion composition;
- rust modifier;
- wire brush and abrasive;
- water;
- degreaser;
- rags;
- masking tape;
- protective equipment due to the toxicity of fumes (gloves, respirator, clothing that completely covers the skin, goggles).
Before starting work, be sure to read the instructions and fulfill all requirements. If it is not possible to carry out work in a warm garage or box, move it to the summer. In winter and autumn, such treatment is carried out in a warm room. Be sure to wash and dry the car before the procedure.
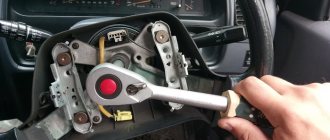
How to treat the thresholds after welding?
Good afternoon, dear readers and guests of the blog. Today in this article we will talk about treating car thresholds with your own hands to protect against rust. All car enthusiasts have encountered the problem of rusty thresholds. It is relevant for any car operating on the roads of the country.
Anti-corrosion treatment of car thresholds can solve the problem of rust. If you let the corrosion process take its course, then in a few years you will have to completely change the thresholds of the car. It is easier to prevent rust than to subsequently deal with its destructive effects.
In the article you can see a short video on how to process car thresholds with your own hands. It can be used to perform anti-corrosion treatment in real time. It is enough to have a smartphone or tablet at hand.
At the end of the article you will find an interesting and fascinating video . Shows the destructive effect of rust on a car.
Do-it-yourself anti-corrosion treatment of car thresholds
Car thresholds need protection, since they are located in the lower part of the car and are subject to the negative effects of external factors (temperature changes, salt reagents, negative temperatures, high humidity).
Often small stones, sand, crushed stone and gravel can leave minor damage on the outside of the threshold. They often become hotbeds of future corrosion processes.
This will definitely interest you. How to refill the air conditioner with your own hands?
The choice of anti-corrosion treatment for car thresholds is wide and varied. You can find cheap or expensive products. All of them received the general name “anti-gravel for thresholds”. Can be sold in cans or metal cans.
If it is not possible to use a lift to process the thresholds, then it is better to postpone the work to the summer. During the summer months, you can drive onto the overpass and work outdoors. It is impossible to carry out work on threshold treatment in winter or autumn.
1.Preparation of materials and workwear
- work clothes that cover all areas of the skin;
- latex gloves;
- protective glasses;
- respirator;
- metal brush;
- sandpaper;
- pure water;
- means for anti-corrosion treatment of thresholds;
- White Spirit for degreasing
- rust converter;
- rags;
- construction hairdryer
2.Preparing the car
- dismantle the protection;
- thorough car washing with emphasis on sills;
- drying the car;
- access to a lift or overpass;
- removing all rust spots on the thresholds using sandpaper or a special disc;
- treatment of thresholds with a rust converter;
- degreasing thresholds;
- drying thresholds;
- using masking tape to protect areas adjacent to thresholds;
3.Applying anti-gravel to the thresholds
- the can of anti-gravel should be shaken vigorously for at least 2-3 seconds before use;
- you need to keep the can at a distance of 15-20 centimeters from the surface of the threshold;
- ensure uniform application of the protective agent;
- between layers it is necessary to maintain a time of about 5-7 minutes;
- the optimal number of anti-gravel layers is at least 3;
- to speed up the drying of the anti-corrosion agent, you can use a hair dryer;
- removing masking tape;
- installation in place of protection;
- use the car no earlier than 2 hours after treatment.
This will definitely interest you. What pressure should be in the tires?
There is nothing complicated about treating rust thresholds. You need to prepare and follow the sequence of actions. There is no need to rush, as the quality of the work will suffer.
Anti-corrosion treatment of car thresholds using mastic
This method of treating car thresholds with your own hands is less popular. This is explained by the complexity of the process and the large amount of time spent.
To protect thresholds, you can purchase “Anticor bitumen”. It is a cold applied mastic. Produced by mixing rubber and resins. It is affordable and can be easily found on sale.
The preparatory stage of the car is the same as in the case of using anti-gravel. The bottom of the car must be thoroughly washed, dried and free of rust. After this, you can begin applying anti-corrosion mastic.
Before using “Anticor bitumen” it is better to warm it up a little. This will increase its fluidity and adhesion level. The mastic is applied with an ordinary paint brush. No need to skimp on mastic. The thickness of the layer directly affects the effectiveness and durability of threshold protection against corrosion.
After applying the mastic, you need to wait for the anti-corrosion material to dry naturally. Using a hair dryer to dry your hair will have the opposite effect. On average, 2 hours is enough. After this time, you can put the protection in place and use the car.
Types of anti-gravel for car thresholds
The number of anti-corrosion treatment agents for car sills is large. By and large, they are not much different from each other.
1.Use period
- permanent protection;
- temporary protection;
This will definitely interest you. Proper polishing of a car with your own hands
2.Packaging
- aerosol can ready for use;
- aerosol can for a special gun;
- metal cans;
- plastic containers.
3.Color
- transparent;
- white;
- black;
- gray;
- color.
4.Additional effects
- containing a rust converter;
- anti-corrosion substances;
- increased adhesion;
- enhanced strength.
Choosing a product for treating car thresholds with your own hands
Despite the abundance of various means of protecting thresholds from corrosion, many car enthusiasts are wondering: how to treat thresholds? We will give a complete and comprehensive answer to this question. It will help the car enthusiast make the right choice.
1. Anti-corrosion spray BODY-950, capacity 400 ml
Anti-gravel, created on the basis of special resins. Has high adhesion and is resistant to damage. Application requires the use of a special gun. Dries quickly. Cost 4-6$.
Anti-gravel aerosol ELTRANS, capacity from 400 to 1000 ml
Inexpensive but effective remedy. Does not require the use of a special gun. Consumption of one layer is 400 grams per 1 m². It is recommended to apply in 2-3 layers. Cost for 400 ml. 2-3$.
How to treat thresholds after welding
For a car with high mileage, corrosion of the bottom is a common thing. Mechanical damage, high humidity, and deicing agents destroy iron over time. The metal turns to dust. Driving such a car is dangerous, the car needs repairs.
It is not profitable to contact a service station; the technicians may overcharge you. Having a welding machine, it is easy to weld the underbody of a car in the garage. It is important to take into account some nuances and adhere to technology.
It is more convenient to carry out the work together; a partner will help fix the patch before tackling.
Tools and materials
To weld the bottom, in addition to welding equipment, you will need consumables. When choosing which metal to cook with, you need to consider two points:
- thin steel is more difficult to weld; experience is needed to choose a temperature regime that eliminates the risk of burns;
- Thick iron is more difficult to process.
The patches are made of metal with a thickness of 1 to 2 mm - these are the optimal parameters.
What you will need when working:
- welding machine, when working with manual arc welding you will need thin electrodes, maximum size 1.6 mm; for a semi-automatic machine you need copper wire and carbon dioxide;
- grinder with cutting and grinding attachments;
- gas welding plus carbide, oxygen for cleaning rust from hard-to-reach places;
- regular or electric metal shears, they are used to cut out patches;
- electric drill;
- a hammer, used to tap the bottom of the car to identify defects;
- a chisel or hammer drill to remove sound insulation;
- screwdriver or screwdriver.
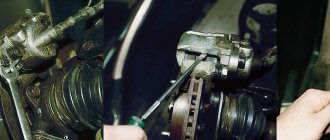
The bottom is viewed on an overpass or in an inspection hole in good lighting. The metal is tapped with a hammer to test its strength. A lift will be needed to provide access to the damaged areas.
https://www..com/watch?v=Ge1Tedca6lM
You will need a rust converter, soundproofing coatings; anti-corrosion compounds; primer for metal; solvent or other degreasing compound.
Unexpected expenses
It is necessary to provide for the purchase of spare parts. Their necessity is determined after inspecting the car. During repair work, dilapidated elements of the machine are replaced:
- rotten and bent sills, they are removed first, and during installation they control the geometry of the body;
- floor spars;
- floor panels, they are mounted from below;
- brake and fuel pipes stuck to the metal.
Sometimes other elements of the machine require replacement. It is better not to purchase spare parts for future use; they may not be needed.
Preparatory work
When the iron is rotten in several places, it is easier to digest the entire bottom. In some cases, replacement is more profitable than installing a large number of metal patches.
Repairing the underbody of a car with your own hands begins with the preparatory stage. Areas with large defects are cut out, small ones - just cleaned of rust.
When it is difficult to reach with a grinding wheel mounted on an angle grinder, turn on gas welding.
The seam areas on the machine and patches are coated with a rust converter, then cleaned to a shine. After this it is degreased. The patches are adjusted to the bottom configuration using heat, the metal is easier to deform, or special bending devices.
Welding process
Before hot work, for safety reasons, the gas tank must be dismantled. The patch is first grabbed at 3-4 points, then completely scalded. Small defects are filled with short seams up to 3 cm long. Welding the bottom is difficult to do alone. When a partner holds the patch, the repair speeds up.
How to apply Gravitex correctly
Its service life and efficiency depend on the correct application of the composition to the car body. Application technologies will differ depending on whether there is damage (chips, cracks, scratches) on the surface being treated or not.
How to apply non-paintable Gravitex to a surface without chipping
In order to treat a perfectly flat car surface with Gravitex, you will need the product itself, a degreaser, clean rags, masking tape and film (or paper) to protect the area that is not intended to be treated.
Please note: If the surface is not chipped, the best option would be to apply unpainted Gravitex to it, which is initially body-colored or colorless. The process of applying Gravitex will take place as follows: The process of applying Gravitex will be as follows:
The process of applying Gravitex will be as follows:
Prepare the surface on which the product will be applied. To do this, remove any dirt from it and dry it thoroughly. Make sure that there are no chemical deposits left on the surface from detergents, and that there are no grains of sand or dirt; Degrease the surface by applying a degreaser using a rag; The area that will not be treated with Gravitex is covered with masking tape, film (or paper); Next, Gravitex is applied in an even layer. Depending on the chosen composition option (aerosol or liquid), the details of the application technology will differ
It is important to apply it in a thin, even layer; After applying one layer, wait until the composition dries and apply a second layer; Next, wait until Gravitex dries, then remove the protective materials.
Important: It is recommended to operate a car to which Gravitex has been applied no earlier than 24 hours later.
How to apply paintable Gravitex to a chipped surface
It is much more difficult to apply the product to a body that has defects. In this case, you should choose paintable Gravitex, which will need to be painted over after application.
Please note: It is ideal to use a computer paint selection method to match the color as closely as possible to the body color. To apply Gravitex to a chipped surface, you will need more tools: sandpaper, putty, primer, body anti-corrosion treatment, paint, rags, masking tape and film (or paper). To apply Gravitex to a chipped surface, you will need more tools: sandpaper, putty, primer, body anti-corrosion treatment, paint, rags, masking tape and film (or paper)
To apply Gravitex to a chipped surface, you will need more tools: sandpaper, putty, primer, body anti-corrosion treatment, paint, rags, masking tape and film (or paper).
The Gravitex application process is as follows:
- First you need to clean the surface from dirt and dust;
- Next, use masking tape and paper to cover the body parts to be painted;
- With the help of sandpaper, body elements that have defects are polished - dents, chips, scratches, areas with corrosion, and so on;
- The surface is degreased;
- Using putty, existing dents are repaired;
- An anti-corrosion agent is applied to defective body elements;
- The primer is applied, after which you need to wait for it to dry;
- Next, the grinding stage goes through again to level the surface, after which the surface is degreased;
- Next begins the stage of applying Gravitex. The product is applied in one even layer, after which you need to wait for it to dry and apply a second layer;
- Leave the car for 24 hours for the Gravitex to dry completely;
- The final stage is applying paint.
After applying the paint, it is also important to let the car “dry”. Depending on the type of paint applied, this may take different times, follow the instructions for the paint
Rescue of damaged thresholds
There is no way to get by with half measures here. If the threshold begins to rust, you will have to approach its treatment with all responsibility. And there will be several such approaches.
- The car is again thoroughly washed and dried. By the way, touchless washing is perfect for our tasks;
- All traces of rust are carefully removed. You can use ordinary fine sandpaper for this (if small areas are affected), or you can use a special attachment for a drill or grinder;
- The surface is coated with a rust converter and left alone for the time specified in the instructions (usually about an hour);
- The threshold is wiped dry with a clean rag, removing all sorts of debris and foam into which the rust has turned;
- The stripping area is degreased
; There’s no need to get too fancy here – regular gasoline will do. But those who wish can also use white spirit; - A primer is applied to the surface; It’s more convenient to take it in a spray bottle - this way it lays down in a more even and thin layer, and it dries faster. It is advisable to make at least two layers of primer, with it drying in between;
- Gravitex is applied over the primer. Manufacturer - at your choice. By the way, many of them declare that gravitex is divided into paintable and not. Our auto mechanics say that there is no difference - all types are subject to painting. But you can buy one that is painted. Gravitex takes longer to dry than primer – up to a day. You cannot use the car during this time.
Corrosion control methods
If a driver finds rusty sills on his car, what should he do first? Let's look at this further:
- Conduct an inspection to determine the extent of damage.
- Buy suitable car anti-corrosion agent, anti-gravel agent, tools and materials for repairs.
- Choose a method of repair and further protection of the threshold from destruction.
Drivers have several ways to repair and protect the threshold. Among the most productive and economical are threshold priming and anti-gravel treatment. It is necessary to monitor the condition of the threshold regularly, external inspections of the body are carried out every month, and full diagnostics on a pit or lift are performed once every 12 months.
The maximum service life of bitumen mastic, which remains the most reliable material for treating external surfaces, is 12-18 months, provided there is no mechanical damage.
Padding
Using a primer with a high zinc content cannot completely protect the threshold from rust. The material does not have 100% insulating properties. The layer between the paintwork and the metal of the threshold has a hygroscopicity of 4-8%. This means that moisture still penetrates through the material.
Priming remains a reliable method when used in conjunction with paraffin anti-corrosion agents and rust inhibitors. The main rules when applying primer:
- The metal must be cleaned until white and degreased.
- The primer is applied to a dry surface.
- Bitumen mastic is applied to a completely dry primer.
It is recommended to begin work on protecting the threshold by inspecting the lower edge of the door.
Lamination
Lamination is considered a fairly reliable means of stopping corrosion of car thresholds, but only if the rust source is completely preserved. When making repairs on their own, drivers cannot always completely remove primary rust from a part. When there is no serious damage, there is no need to cook the threshold, but there is no way to clean noticeable rust. In this case, corrosion inhibitors are used, liquid anticorrosion agents, which, after drying, create a durable, hermetically sealed film.
Lamination is the installation of a transparent film on the outer part of the threshold. An armored vinyl or polyurethane film can be used; there is an option to spray the laminate with an aerosol. The film will not only protect the metal from destruction, but will also protect the paintwork from small chips when hit by gravel, and will give the car a well-groomed appearance. Removing the film takes up to 30 minutes.
External processing
External protection of thresholds involves the use of anti-gravel and anti-corrosion compounds and the installation of overlays. The process should begin with removing the old paintwork and stripping the metal. If there are no traces of rust, the body is sanded with emery.
For external treatment, dense anticorrosives and bitumen mastics are used, which are resistant to temperature changes and retain minimal elasticity in their inner layer. The reliability of the anticorrosive protective layer depends primarily on the quality of the preparatory work. The best mastics for external panels:
- LIQUI MOLY Wachs;
- Body 930;
- Dinitrol 479;
- Tectyl Bodysafe.
Dense compositions have minimal thickness and tightness, and do not allow rust to form under the primer layer.
Internal processing
For internal treatment of the threshold, which is structurally a hollow box, paraffin and oil anticorrosives are used, they are sprayed with an aerosol or poured into the internal pocket through technological holes.
During repairs, it is recommended to carry out simultaneous internal treatment of the wheel arches. The parts are located nearby and when one of them rots, corrosion quickly spreads to the other. The best anticorrosion agents based on oil and paraffin for internal cavities:
- Dinitrol ML;
- Tectyl ML;
- LIQUI MOLY;
- VELV Movil-5E.
Oil compositions are intended to preserve and remove the first pockets of rust; the service life of the composition is up to 1 year.
Processing stages
It is important to understand that this problem can affect everyone. Yes, on expensive cars, the factory anti-corrosion treatment is of better quality and therefore lasts longer
But when the car is in difficult conditions, constantly in contact with strong reagents, abrasives in the form of sand or gravel, even the most reliable anti-corrosive agent will not withstand it for long. Especially on the rapids. Among the most vulnerable cars are the following:
- Niva Chevrolet;
- Daewoo Nexia;
- Daewoo Matiz;
- Chevrolet Lanos;
- VAZ 2110;
- Nissan Premiere;
- UAZ Patriot;
- Ravon R4;
- Chevrolet Lacetti;
- Mitsubishi Galant;
- BMW E34;
- Hyundai Accent;
- Lada Vesta;
- VAZ 2114, etc.
I think there is no point in listing further. It is much more important to understand the correct sequence of activities.
In total, 3 stages can be distinguished. Namely:
- preparation for the process;
- vehicle preparation;
- application.
Actually, it is in this sequence that we will analyze the question.
Tools and materials
Please note that any anti-gravel is a very harmful composition for human health. Therefore, you should not allow it to come into contact with the skin, mucous membranes, and especially the nasal and oral cavities. You should arm yourself not only with tools and materials, but also with protective equipment.
As a result, your set should consist of:
- work clothes;
- gloves and glasses;
- safety shoes;
- respirator;
- brushes for metal processing;
- sandpaper;
- clean water;
- anticorrosive;
- degreaser (ordinary White Spirit will do);
- rust converter;
- rags;
- construction hair dryer.
Although you can make anticorrosive yourself, I advise you to use high-quality and proven products.
Preparing the machine
The next step is to prepare the car. You can watch the video and at the same time plan your further actions, visually learning the subtleties and nuances.
Having treated the thresholds first, I recommend that you subsequently think about protecting the body from chips and scratches in order to maximize the service life of the anti-corrosion agent.
Preparing a car involves performing the following tasks:
- dismantling protection;
- washing the car and especially the thresholds;
- thoroughly dry the machine;
- installing a car on an overpass or lift;
- removing all existing traces of corrosion with sandpaper or a polishing disc;
- applying a rust converter;
- degreasing;
- re-drying;
- covering with masking tape areas that are located near the thresholds, but will not be treated.
Preparation is of utmost importance for the final result of anti-corrosion treatment.
It is especially important to get rid of any existing rust and any drops of water. A hair dryer or some kind of heater, for example, will help here
Anti-gravel treatment
And now the final stage. No less responsible and important. The complexity of application largely depends on the form of release you buy. Spray cans are more expensive, but much more convenient and effective at an excellent level.
The essence of the procedure is as follows:
- Shake the can thoroughly before use;
- Holding the container approximately 15-20 centimeters from the threshold, begin spraying;
- The product should be applied as evenly as possible;
- Depending on the product and manufacturer, the interval between layers should be at least 5 minutes;
- For best results, it is recommended to apply at least 3 layers of high-quality anti-gravel;
- To speed up drying, use a hair dryer;
- Remove the masking tape;
- Put the protection in place;
- Leave the car in a dry, ventilated garage for at least 2-3 hours.
In the case of mastic, you will have to spend more effort and time. This is a much dirtier method of anti-corrosion treatment, since the substance is applied with a brush. In principle, the procedure will be similar.
The thicker the layer of mastic, the more effectively the anticorrosive agent will work. Therefore, there is no need to particularly regret the remedy. After applying the first layer, be sure to wait for it to dry completely. Moreover, a hair dryer is unlikely to help in this case. Heating has the opposite effect, that is, the mastic again takes on a liquid flowing form. You can dry it simply by blowing air at room temperature.
Usually one layer of mastic dries in 2-3 hours. To apply at least 2-3 layers, you will have to spend quite a lot of time. But mastics in cans are much cheaper than cans of anti-gravel. It's up to you to choose.
That's all I have
Thank you for your attention! Don’t forget to subscribe, leave comments, ask relevant questions and wait for new materials on our website! https://www.youtube.com/embed/AaNH32_E2xw
How to effectively protect car sills from corrosion? (Photo and video)
Many motorists believe that it is important to protect the outer part of the body from rust, for example with an anti-gravel coating, but the reality is that, basically, the sills rust from the inside. And no matter how well they are treated on the outside, without proper treatment, they will rot to holes in a few years
External processing.
As was written in the introduction, external processing is not as important as internal treatment, but nevertheless, it is the external part of the threshold that determines the appearance of the car. And in order to improve it, many motorists install plastic body kits. The appearance is supposedly better and the chips are not visible. Colleagues are a huge mistake. A non-standard body kit harms the threshold more than the lack of paint!
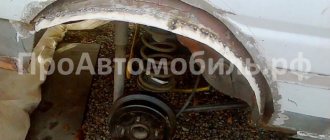
See what happens under the plastic door sills:
The fact is that dust inevitably accumulates under the linings; naturally, in our climate, the dust collects water and does not dry out most of the time, and with every change in temperature or driving over uneven surfaces, the dust collected under the lining strips off the paint! The result is that the threshold rots not only from the inside, but also from the outside.
We agreed - we will remove the non-standard sill trims...
The thresholds themselves, over time, lose their paint due to the abrasive effect of road dirt. We already have a separate article on our website about how to paint thresholds; we won’t repeat it.
To reduce the abrasive effect of road dirt, be sure to install mud flaps on the front wheels. With mudguards, the paint on the thresholds and arches will last several years longer, and most importantly, the amount of water getting inside the threshold will be reduced.
The author of the article had a case - a Volga 3102, which had been used all its life in Volgograd, but had lived for one winter in St. Petersburg, and by coincidence, the Volga was without one front mudguard, came to overcook the threshold, so - the threshold and the box on the side without the mudguard were ROTTEN, while while the threshold on the other side did not even require overcooking of the lining, although it had damage from impact and chipped paint.
We agreed - we will definitely install mudguards on the front wheels.
To summarize, on the outside:
- removing non-standard linings
- Be sure to restore the factory paintwork
- Be sure to install mudguards
Internal processing.
The network is full of recommendations on materials for treating hidden cavities, from pushsal, mining and Movil to modern corrosion inhibitors, we will also give our recommendations, but before treating the threshold, it must be washed! This is done very simply - the plugs are removed from both sides and the threshold is washed with plenty of water. Here's a video using an example of a 124 Mercedes:
But we shook out so much sand when we were digesting the thresholds on the Mazda 3 2007:
We agreed - before treating anything hidden from the cavity for rust, be sure to wash the threshold and dry it for several days.
Mining is the cheapest option.
The tradition of pouring waste into the thresholds dates back to the times of the USSR, and indeed, 2-3 liters of waste into the threshold at each oil change extends its life by 5-10 years!
They write online that you can’t pour mining, it will accelerate corrosion, etc. - nonsense! Working out helps, the author of the article was a 1993 Volga. which had factory thresholds in 2021 because it was spilled with drainage at every oil change. Think about it - the most rotting Volga (31029) had its original thresholds 25 years after production, only thanks to development!
Extraction perfectly impregnates rust and blocks the access of air to the metal, respectively, the rate of decay slows down significantly.
The myth that working out accelerates corrosion, and if you pour oil into the sills, then only fresh oil, was started by marketers (you have to sell anti-corrosion compounds)…
The development is not without its drawbacks:
- It is harmful to health because... It is unknown what it is made of, and what additives were used in it, and what it washed out of the engine!
- The waste sometimes has a rather foul odor, which takes a long time to dissipate.
- Cavities need to be drained at least once a season.
For those interested, crude oil is an excellent substitute for waste, is much less harmful to health, and is much less easily washed off with water, but it is quite difficult to get.
Movil and pushsalo are a cheap option.
Both were developed a long time ago. Pussalo has been used for more than 200 years to preserve guns and shells, and Movil (Moscow - Vilnius) was developed as an anti-corrosion agent in the early 70s.
Both are petroleum derivatives: pushsalo - thickened petroleum oil, Movil - a mixture of lithol, motor oil, drying oil, kerosene and corrosion inhibitors. Both anticorrosives have the same principle of action - to limit the access of oxygen to the treated surface.
If Movil is relatively liquid, and like a waste product, it wets the rust (albeit worse). That gun lard, at normal temperatures, can be cut with a knife and it is only applied hot, which is not always possible in anti-corrosion treatment, so using it to protect thresholds is nonsense, but covering the bottom for preservation, on top of mastic, for a long period of parking is quite option.
Movil is an expensive alternative to mining. Because it smells just as bad and has just as bad an effect on the health of those who smell it.
Movil also needs to be updated periodically because Over time it dries out and cracks.
Modern anti-corrosion agents...
Naturally, over time, manufacturers have improved anti-corrosion agents, and in addition to the “collective farm methods” given above, there are quite modern compositions:
Most of them are analogues of Movil, but differ in drying speed and corrosion inhibitors. The most important advantage is that they can be applied less frequently, and they are more expensive to purchase, but they also require updating less often. Agree - most people drive a car for 2-3 years and it is much more profitable to carry out anti-corrosion treatment once with high-quality materials than to update the Movil every year for money.
We agreed - the protection of hidden cavities consists of 2 stages:
- Washing the threshold from dirt from the inside
- Treatment with anti-corrosion compound.
That's all for me today. If you still have questions about how to protect car sills from corrosion, or if you want to tell us about your experience of using anti-corrosion compounds, write comments.
How to properly treat from the inside
In general, the entire threshold processing process can be divided into two large categories: internal and external processing. We will discuss both problems and provide a detailed algorithm of actions. Let's start with a less obvious option - processing the threshold from the inside. This will require not only patience and professionalism, but also appropriate equipment.
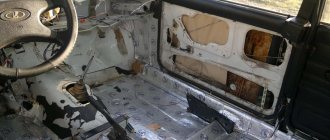
- My car. Do not skip this step; it is easy to miss traces of mechanical damage on a contaminated surface.
- We remove the protective elements and internal parts of the thresholds. At the same step, it is important to wash the sills; more than a kilogram of sand can be washed out of old cars.
- Complete drying. All that remains is to wait before applying the anti-corrosion compound. You cannot rush, otherwise the work will be done in vain.
- Application of anti-corrosion compound. Here the choice is yours; we will talk in more detail about choosing a product below.
It is fashionable to write entire volumes of scientific reports about the choice of composition for processing. Conventionally, we can divide them into factory standard and amateur methods. The latter are in no way inferior to, and sometimes even superior to, expensive analogues. It is important to consider several points here. First of all, we need a viscous, viscous, but liquid composition that fits tightly to the threshold and ensures its protection for a long time. The composition must resist corrosion well and not be washed off by moisture. We will just give one example from each category.
Proven amateur remedies include candles and diesel fuel. Yes, yes, you heard right, just ordinary initialed candles. Buy about 10 - 15 large pieces and put them in a metal bucket or pan. Now we need a gas burner, you already guessed what for. Melt the candles to a liquid state, add diesel fuel and the composition is ready. Viscous paraffin adheres well to the surface. Diesel fuel prevents the mixture from quickly hardening and copes well with rust.
Professional compositions are “Movil” and “Dinitrol”. The second composition is much more expensive than Movil, but in essence they are very similar. It is difficult to determine the difference in price, but the first time you use it, the long drying process of a more budget product catches your eye.
In general, we would strongly recommend having the work done at a service center if you are not confident in the ability to properly process the car's sills from the inside on your own. If we are talking about a reliable service station, then the craftsmen know the weak points of each car and have an idea of how to properly gain access to the inside of the threshold. Sometimes a technician can give a recommendation that will not only save money, but also extend the life of your car: replace the threshold.
Classification
Depending on the chemical composition and specific application, anti-corrosion agents for cars are divided into several categories. Before deciding which anticorrosive agent is best for a car, you should carefully study what the instructions say about its features.
When deciding which anti-corrosion agent is best, first of all keep in mind that the products differ in different parameters, one of which is the place of their application
Based on their chemical composition, such products are divided into the following categories:
- bitumen mastics - they are made from synthetic resins, they are designed to protect the surface of the machine from external mechanical influences, and thus ensure the preservation of metal surfaces. The thickness of bitumen mastic application is 250–400 micrometers;
- substances based on polyvinyl chloride and rubber - they are the most durable and reliable. This category is usually used in factory conditions;
- liquid plastic - it is recommended to use it as an additional means, since it is not characterized by reliability and durability;
- non-drying oil compositions - they remain in a liquid state throughout their entire service life. They are characterized by good filling properties, preserving all pores and cracks in the material.
- paraffin and wax compounds - form an elastic film that protects the surface from rust formation. Shown high resistance to strong temperature changes.
Usually made on the basis of oil or paraffin. Are in a liquid state
Nuances of choosing purchased processing products
When choosing anti-corrosion body protection products, the characteristics of the product are strictly checked: purpose, shelf life, interaction with auxiliary materials, indications for application. The product is supplied in cans or metal cans, depending on the composition and method of application to the cavities of the car.
The chemical composition of both expensive and more economical anticorrosive agents is aggressive and dangerous to the human body. Therefore, the use of rubber gloves and closed clothing is mandatory.
The range of corrosion inhibitors is very wide. They differ in application methods, composition components, environmental resistance, drying time, and price indicators. Alternative options for anti-gravel are:
- Used technical oil. Used in older car models. It has a strong unpleasant odor and low environmental friendliness.
- Movil. Anti-corrosion inhibitor of liquid structure. Named after two cities (Moscow and Vilnius). Created in the middle of the last century as the main means of overcoming rust in car components. The composition includes oils, kerosene, drying oil and a small percentage of specific additives.
- Special mastics based on rubber. The composition contains certain types of resins. They are distinguished by increased viscosity, labor-intensive application process, and increased temperature requirements for use.
Anticorrosion agents in convenient spray cans are the best option in terms of efficiency and cost-effectiveness. During their production, advanced technological developments of the chemical industry are accumulated.
The main means for combating metal corrosion are made on the basis of oil and its products. To enhance the effect, derivatives from the chemical industry are introduced.
Repair technology for fixed thresholds
Before starting repairs, the car must be raised. If metal retraction or dent repair using welding is used, it is necessary to disconnect the negative terminal from the battery and drain the fuel.
Leveling a dent using a reverse hammer or plotter in steps:
- Remove the interior floor covering.
- Using a grinder, cut off part of the paintwork and clean out the dent with sandpaper.
- Spot weld rings or hooks onto the surface of the dent.
- Using a hood, carefully straighten the metal.
- Clean the weld areas and prime the surface. Automotive putty is applied if the surface of the part remains uneven after drawing: the putty hides blemishes.
- Treat the surface with anti-gravel protection.
- Apply auto enamel.
You can level out the dent using a steel hook and a straightening hammer. A corner is cut in the center of the dent, a hook is inserted into the hole, and the metal is straightened with muscular effort. After stretching, the tenderloin area is cooked.
Repairing a part with corrosive wear using epoxy resin:
- Use sandpaper to remove old paint and primer and bring the metal to a shine.
- Treat the part with a rust converter and let it dry.
- Degrease the surface.
- Mix epoxy glue with hardener, add aluminum powder to the composition.
- Impregnate a fiberglass patch with epoxy resin and apply it to the area to be restored. Apply as many layers of fiberglass as needed to seal the corrosion hole.
- Roll with a roller, expelling air and leveling the surface.
- Epoxy resin dries in 24 hours. After complete drying, clean the surface with sandpaper, treat with primer, and putty.
- Treat the surface with anti-corrosion agent and paint at the final stage.
Such repairs can only be used as a temporary measure: repairs with epoxy and fiberglass will extend the life of the part by a maximum of 6 months. Afterwards, the driver will need a full replacement of the body element or repair by welding.
How to weld a car completely removing rust
Vote
The car body is an important part of the vehicle, like other components or parts.
The body is at risk, being a buffer in contact with the external environment - the inevitable mechanical impact of surrounding objects, other vehicles and objects in road accidents is guaranteed to lead to breakdowns and disruption of the shape of parts and loss of external attractive appearance. Don’t forget about the aggressive influence of the environment - moisture, dirt and salt cause corrosion spots and cracks. In all of the above cases, car body repair is required.
Requirements for welding a car body
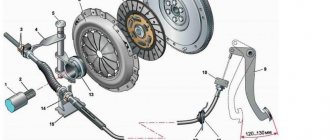
Welding a car body is a labor-intensive process, be it arc, spot or other type of welding. In any case, it requires a high-quality welding machine for automotive body work and a highly qualified welder - only this combination guarantees a satisfactory result.
Lack of proper experience and a good welding machine does not allow you to achieve an accurate and thin seam. Body welding work should be carried out in a specially equipped room, where there is a connection point to the network with the appropriate parameters of frequency, voltage and current, a gas source, etc.
Welding a car body with your own hands is possible only in simple cases and for body repairs in places where the aesthetics of the seam is not so important.
A professional approach to body processing in an equipped service station allows you to obtain a weld seam with the necessary criteria:
- the type of seam is selected depending on the location of the damage;.
- taking into account the characteristics of the metal, the type of welding is selected;
- welding repair method - gas, manual arc, semi-automatic, laser - is selected individually in each case.
Indeed, there is no universal option; car elements after repair are exposed to different forces and are made of different materials.
Spot welding is used in the vast majority of cases for repairing wings and sills, while an overlap connection will be optimal for elements under high load.
If it is necessary to partially replace a part, then it is reasonable to use a butt joint, for example, when patching holes on the bottom of a car.
Timely car diagnostics allows you to identify damage at an early stage, which makes it possible to solve the problem without serious financial costs.
Features of repair and replacement of thresholds at service stations
VAZ-2110 owners most often repair the sills of their cars with their own hands. Based on the cost of the car, repairing thresholds at a service station is impractical.
For those owners who are thinking about repairs at the station, we can give approximate prices for these services :
- Removing the threshold – from 500 rubles.
- Installation of a new threshold – from 6,000 rubles.
- Painting the threshold - from 1,000 rubles.
- Materials – depending on quality, from 900 rubles.
- Threshold repair, which consists of welding holes - from 1,000 rubles.
Replacing thresholds at a service station is quite an expensive procedure.
https://www.youtube.com/watch?v=Ge1Tedca6lM
In total, it turns out that repairing or replacing the threshold will cost from 6 to 9,000 rubles . This amount will most likely have to be multiplied by two, since thresholds are usually changed on both sides. The total is 12–18,000 rubles . Given the price of a VAZ car in the amount of 60–90,000 rubles, carrying out this procedure at a service station is very expensive.
Most owners of domestic cars prefer to carry out repairs themselves, which helps to significantly save money.
What type of welding should I use to weld the body?
As stated above, the choice of which welding and which materials are suitable for welding a car body should be done by professionals, as well as which apparatus to choose to implement the process.
The car body is made of low-alloy steels with a small titanium content or carbon steels with a carbon content in the range of 0.08 - 0.14%, and such steel, with an average thickness of about 0.8 mm, is excellent for stamping and is resistant to strong tension.
As for the types of welding repairs, the specialist chooses from the following range:
- manual arc welding using a multi-station welding rectifier of the “VDM 1202” type or its equivalent with electrodes with a diameter of 1.6 mm of the UONI 13/45 brand, the weld position is lower;
- gas welding of a car body is performed with a gas torch with an acetylene-oxygen flame and filler wire with a diameter of 0.8 mm, brand Sv-08G2S;
- semi-automatic welding of a car body is also in high demand - it will require a carbon dioxide cylinder and wire with a diameter of 0.8 mm of the Sv-08G2S brand. However, you can weld semi-automatically and without gas, using cored wire or flux-cored wire.
Repairing a rotten car threshold
If corrosive wear of more than 40% is observed, it is recommended to use partial or complete replacement of the part. Re-welding of thresholds is more often used on non-removable elements; removable fairings are replaced in 80% of cases with new ones. The cost of removable parts does not exceed the cost of repair. Depending on the extent of the damage, drivers choose one of the following options:
- Partial replacement of a rotten section without replacing the amplifier. The rotten part is cut out or knocked out, and a metal patch is installed.
- Complete element replacement. It is used if corrosion has destroyed the threshold amplifier, electric welding is used.
- Redecoration with fiberglass. Used only as a temporary measure. More often than not, unscrupulous owners hide rotten body parts in such a cheap way before selling them.
Is it possible to weld a car body with a welding inverter?
The inverter body welding machine with high frequency electric current is used to weld bumpers, additional frames, rear and front winches, bull bars and even fog lights if the customer wanted to place them on the roof of the vehicle.
The basic advantage of welding a car body with an inverter is high speed - the work will be completed in the shortest possible time.
The inverter has been actively used in the process of creating welds on a vehicle since Soviet times, however, only in areas of the body that do not make any claims to the aesthetic appearance. The resulting seams are reliable and durable, but only on metal with a thickness of over 3 mm.
To obtain a high-quality seam with an inverter, it is important to carry out the procedure in a clean room - moisture and dust entering the housing will inevitably affect the quality of the seam.
Semi-automatic body welding
Which device to choose for underbody repair? A semi-automatic welding machine for body work is optimal for making patches on rust-affected areas of the body.
Semi-automatic body welding is performed using a special wire and has deservedly received the title of the most universal means of body repair today. This method allows you to connect metal sheets with a thickness of 0.8-6 mm.
Regarding the types of work performed using a semi-automatic machine, it is important to note the following:
- reliable connections on the side members;
- patches in place of corroding metal;
- restoration of the shape using a welding machine in place of ordinary dents.
In addition to connecting the parts, during the welding of the parts, the contact point gets rid of oxygen, and the car body gradually melts, but since semi-automatic welding of the car body is carried out under the control of the operator, the iron does not burn.
The best anti-corrosion agents for the underbody
Anticorrosive for the underbody of a car primarily protects the metal surface from electrolytes. It must be elastic, durable and withstand climatic conditions. Most often, bitumen mastic is purchased, which protects against mechanical stress and does not collapse when colliding with obstacles. Corrosion-inhibiting materials are also commercially available.
Runway
The products in this line include a polymer mixture that reliably protects the coating. The bottom becomes resistant to any mechanical damage and rust. You can buy such an anticorrosive agent inexpensively at any car dealership. Particularly popular is galvanic coating, which contains zinc. A chemical reaction with a mechanical surface forms a strong, gray film. The material is also used when priming the body before painting. This is a good option for cold winters and long frosts.
Advantages
- Low price;
- Effectively protects against corrosion;
- Protects for three years;
- Dries instantly;
- Sold in any stores.
Flaws
- Poor insulation from noise;
- Low quality aerosols come across.
The composition is often purchased in northern cities. Buyers are attracted by the affordable price and acceptable quality of the product.
Valvoline
Tectyl Bodysafe is considered the best product of this company. This anti-corrosion agent contains zinc, which can withstand harsh operating conditions. The composition of medium viscosity is packaged in buckets with a capacity of 1 and 5 liters. The product is easy to apply and penetrates into crevices without problems. According to customer reviews, the anticorrosive agent is durable and is not afraid of sudden temperature changes. It also has good inhibitory properties. Even with prolonged exposure to salt and subzero temperatures, the coating remains durable.
Advantages
- High-quality penetration into microcracks;
- Frost resistance;
- Does not collapse when exposed to salt;
- Durable coating;
- Large selection of goods.
Flaws
- High price;
- Low sound insulation.
Since the product has poor protection against stone impacts, it is recommended to double treat the underbody of the car with an anti-corrosive agent. A thoroughly dried surface is required for uniform application.
Additional measures
Even after you’ve figured out how to treat the outside of your car’s sills against corrosion, and done all the necessary manipulations, you shouldn’t stop there. It is better to immediately take actions that will help Gravitex keep the thresholds in working condition longer. To do this, used oil is poured inside them. Some motorists advise mixing it with the same Movil.
However, others point out that such a mixture has a persistent and not very pleasant smell for a very long time - up to a month. Clean working does not give such an effect, and successfully prevents the penetration of moisture into the threshold.
Good afternoon. From today's article you will learn how to protect car sills from corrosion. Traditionally for our site, the article contains a large number of photos and video materials...
Many motorists believe that it is important to protect the outer part of the body from rust, for example with an anti-gravel coating, but the reality is that, basically, the sills rust from the inside. And no matter how well they are treated on the outside, without proper treatment, they will rot to holes in a few years.
Protection of visible surfaces
After treating the internal cavities, you can apply anticorrosive to visible areas of the body. This applies to:
- engine compartment;
- spars;
- arches;
- the inside of the luggage compartment.
Care should be taken to ensure that the anti-corrosion agent does not come into contact with the rubber seals and glass parts of the car. If contact with these elements does not cause any particular harm, other than sticking of the doors and hood, then it will be extremely difficult to clean the stained glass from some products. Therefore, before processing, parts are usually protected in the same way as the interior.