Good afternoon. In today's article I will tell you step by step how to remove bugs from a car body with your own hands. This article will also be useful for those who decide to turn to professional painters to understand what and how much it costs.
What is a bug on a car?
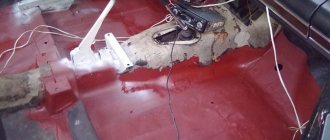
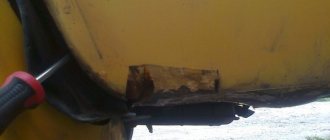
Everything is extremely simple - a car, in most cases, is made of iron, which has the unpleasant property of rusting. Any, even microscopic damage to the paint to the metal (it doesn’t matter - a chip, a microcrack or something else) can lead to a situation where the rust does not come out, as in the picture:
And for paint like this:
This is how a bug turns out. It is useless to paint or polish it, it will still appear again, and if you do not remove it in time, a HOLE may rot, and welding work will be required!
I’ll warn you right away – it won’t be possible to do this inexpensively! According to the mind, such details are completely repainted, with a complete dissection of the “bugs and cobwebs,” but the reality is that sometimes you can get by with “a little blood.”
Removing rust
There are many methods by which you can remove traces of rust from a car with your own hands.
Before getting rid of corrosion, the paint at the defect site is stripped down to bare metal. Having determined the type and severity of the damage, they decide how to deal with the rust found on the car body. On a note!
Corrosion can occur under the paint, so it may not be immediately noticed. Oxidation can be recognized by bubbles or peeling paint.
Mechanical methods
A rusty car can last for a long time if the damage to the body is not critical. You need to clean the metal well, and then you can touch up the rusty spots on the car yourself. Various devices are used to remove rust.
Means that can be used to remove rust from the metal of an old car:
- Drill and grinder. Various attachments and grinding wheels are used. It is recommended to treat ingrained rust on the car body with a wire nozzle - it best cleans out pockets of corrosion. With its help, it is possible to remove rust particles from the largest recesses. But it takes a long time to clean the surface, since it mostly slides over the top layer of rust rather than removing it.
- Sandblasting machine. This is the most effective and fastest way to remove rust from a car body. The cleaning process is carried out using compressed air and abrasive particles. To work, you will need a compressor and an abrasive (or special soda). This type of treatment does not remove rust in remote recesses. Sandblasting only removes visible damage well. Therefore, after treatment, the body is cleaned - the remaining corrosion is removed, for example, using phosphoric acid.
Repairing rust areas on a car is also carried out using grinding wheels mounted on an orbital sander. The disadvantage of this method is the inability to remove rust that has become deeply ingrained.
To clean a rusty car with a sanding machine, you need to stock up on P80 and P1 sandpaper, solvent, putty, anti-corrosion primer, hardener and spray paint.
Mechanical cleaning procedure:
- Clean the metal with any tool - sandblaster, grinder, etc.
- Treat defective areas with a converter. This product removes corrosion residues and protects the treated areas from destruction. Apply one layer of the compound and wipe the surface to be treated with a rag.
- Apply 3-4 layers of putty. After each layer, as soon as it dries, sand the area with a sander. The surface of the body after sanding must be perfectly smooth.
- Cover areas that do not need to be painted. Use masking tape, film or regular newspapers for this.
- Paint the areas to be treated with anti-corrosion primer in 2 or 3 layers. One layer dries in 25 minutes.
- Apply the paint according to the same principle as the primer - 2-3 layers, allowing each to dry. Treat the transition areas from new paint to old with polish.
On a note!
The primer is chosen taking into account the color of the car. If the body is white, dark primer is not suitable.
Anti-corrosion agents
The chemical method is based on the use of special products to remove rust from the car body. By removing it, they protect the surface from subsequent damage.
Means that you can use to treat rust on a car body yourself:
- Antirzhavin. Removes mineral contamination and dissolves corrosive deposits.
- Phosphamite. Anti-corrosion converter for quick and effective removal of rust on car arches, bodywork and other metal parts. It is used to perform primary metal processing and prepare it for painting.
- Ortamet. Removes rust and prepares metal for further processing. Dries in no more than half an hour. Apply by roller, brush, dipping or spray.
All work with chemicals is carried out in special equipment. Elements that will not be processed are covered.
Chemical treatment procedure:
- Cover the areas to be treated with film and secure it with tape.
- Use acid to remove rust.
- Sand the dried metal with sandpaper until the surface becomes completely smooth.
- Next, the steps are the same as for mechanical rust removal - priming and painting, treating the borders with polish.
Two days after painting, the car can be washed and polished.
MOTIP › Blog › Targeting bugs: fighting corrosion before frost sets in
Corrosion is hardly an unpleasant problem. This scourge can affect any paintwork and quickly ruin all your efforts to keep your car in perfect condition. There are many reasons for the appearance of so-called bugs on the body. This includes the aggressive effects of road chemicals in winter; and small but deep chips into which moisture has entered; and poorly carried out previous repairs. The result is rust, which poses a real threat to the integrity of your car's paintwork. At the same time, it is necessary to remove body defects before the onset of winter, because high humidity and temperature changes during the cold season will not only not stop corrosion, but will also worsen the problem. How to deal with bugs on your own - we decided to look into our material.
What are bugs on the body, and what is their danger?
Many car enthusiasts have heard words such as “bugs on the body.” At their core, these are small pockets of corrosion, which nevertheless must be removed from the paintwork. After all, rust has the unpleasant property of spreading quickly, especially if the car is in conditions of high humidity.
The cause of the development of a corrosion center can be a small chip, scratch or any other damage to the paintwork. In winter, humidity, constant temperature changes, as well as chemical reagents slowly but surely do their job - a small defect quickly turns into a large area affected by rust. The appearance of bugs on the paintwork may also indicate poor quality previous body work. After all, corrosion that has not been completely removed will continue its destructive work under newly applied coatings, and soon a fresh layer of paint and varnish will swell under the overgrown rust. If no action is taken, the affected area will increase in size and welding work or replacement of the damaged body part will soon be needed.
Based on the above reasons, it is better to start fighting corrosion from the moment it is detected on the body. We must try to quickly localize the source of rust and limit its spread, otherwise, as we have already said, the natural processes of iron oxidation will continue to develop and invade nearby areas. Certain parts of the body are more susceptible to bugs than others - fender arches, sills, and window frames. It is necessary to carefully inspect these elements and, if signs of corrosion appear, immediately begin to combat it.
Anti-bug technology
In order to thoroughly deal with the source of corrosion, you need to contact car service specialists. But it costs a lot of money, because body work is the most expensive. Therefore, if we are talking about eliminating one small bug, many people want to try to cope with this task on their own. Everything is possible if you follow the technology and do not forget about the main principle: corrosion and damaged varnish and paint must be removed entirely. If you do a little work in this direction, rust will show itself again, but on a larger scale.
First of all, the car is thoroughly washed from dirt using a special car shampoo, special attention is paid to the damaged area. Then the corroded area is cleaned with coarse abrasive paper (you can use a grinder or a drill with a metal brush). After this, the prepared area is treated with a rust converter primer. A good choice for carrying out such work would be, for example, the PRESTO rust converter primer. This composition must be applied even if it seems to you that you have completely removed the corrosion. The fact is that rust particles invisible to the eye could remain in the structure of the paintwork. The product, thanks to its special formula, helps eliminate corrosion without residue, and most importantly, prevent its reappearance by converting rust into a homogeneous organometallic compound. In addition, the converting primer creates a base for painting, after which the treated area can be puttyed or coated with any type of paint.
After the work is completed, the area to be treated is covered with paint and varnish. You don't have to buy a whole can of paint to paint a small area. There are small bottles with a thin brush that are convenient to use for this type of painting work. For example, Motip acrylic enamel in 12 ml bottles with a brush is perfect for local touch-up of the body after removing bugs and treating these areas with a converting primer. It’s easy to choose the right color using a convenient selection system or a color fan. By the way, it is always useful to have such a bottle in stock. It’s better to touch up a small chip right away, without waiting for corrosion to bloom on the damaged area of the paintwork.
Finally, the body is polished to hide the traces of your work as much as possible. Of course, we must understand that this will not be possible to do fully. As we have already said, an ideal result can only be obtained by a good master in a specialized car service center.
It is always better to prevent corrosion than to try to get rid of it. Therefore, clean the body well and carefully inspect for the appearance of pockets of rust. Well, don’t forget about anti-corrosion treatment!
Source
Guarantee – protection or trick?
How to remove saffron milk caps from a car body with your own hands?
a simple step-by-step method The manufacturer's guarantee against through corrosion does not reflect the real quality of anti-corrosion protection. In addition, it would be necessary to clarify what the manufacturer’s guarantee is for. A real guarantee implies protection “against through corrosion from the inside,” i.e. no corrosion under the original paint, undamaged as a result of an accident or exposure to an aggressive environment.
In addition, the warranty usually covers sills, fenders, doors, hood, etc., i.e. for local parts that will not require large financial costs and a lot of time for dismantling and restoration. Only some manufacturers are ready to make an exception. For example, Jeep explicitly states that it will only cover the cost of repair and replacement of any rusted items if the corrosion is not caused by external damage.
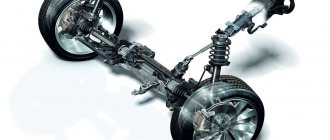
Mercedes Vito
Read more: 10 tips for protecting your car from theft
Vehicle prevention and protection
Proper maintenance is the best way to protect your machine from corrosion. First of all, do not neglect regular car washing using wax. Thus, the treatment will protect the body from aggressive environmental influences, creating a kind of demarcation film.
We should not forget the importance of inspecting the car for the presence of “painful” lesions. Anti-corrosion treatment of the car's underbody, fender liners and mudguards will also extend the life of the paintwork.
Protecting a car from rust is much easier than getting rid of it. But if it was not possible to avoid the red bugs, then you should immediately begin to eliminate them, otherwise corrosion will eat the metal, making a through hole in the body.
Source
Features of the mechanical method
How to straighten a dent with your own hands: top 10 effective and simple ways to remove a car body defect
There is a fairly solid list of videos available on the Internet in which skilled craftsmen and novice car enthusiasts tell and show how you can deal with saffron milk caps yourself in a white, black, silver, etc. car. Moreover, they claim that this can be done quickly and extremely effectively.
Here it is important not to confuse the effective method and advice of a skilled master with a banal advertisement for another supposedly miraculous remedy. No one denies the fact that excellent rust converters exist, but sometimes outright bullshit is advertised, which is of no use at all
You should not rely on the magical properties of expensive auto chemicals with an unclear composition and promises to give the perfect result. It is better to give preference to the old proven method of the mechanical type. He is the one who shows himself at his best.
The method of removing saffron milk caps using the most common AA battery is also gaining popularity. I also heard about this method, but I don’t really trust it. You can experiment, but be careful.
We are returning to the mechanical method.
He does not promise to do everything quickly, but focuses on quality
You will need to take a set consisting of:
You can roughly estimate how much such a set costs. And feel free to multiply it several times to get the cost of work at a car service center.
Step-by-step removal
In such a matter, it is important not to rush and not skip any of the required steps. Approach the task as responsibly as possible
Step-by-step removal of rust traces and restoration of paintwork looks something like this:
- First, the damaged areas are cleaned. A sandblaster, sander, grinder or regular sandpaper will do. But sandpaper is used in extreme cases, when there are no other options;
- Carefully, consistently and gradually remove pockets of rust, avoiding strong temperature changes when working with power tools;
- The treated surfaces are then coated with a converter to seal the result. Refer to the manufacturer's instructions;
- Remove any remaining corrosion using a solvent. This will completely degrease and clean the surfaces;
- A layer of putty is applied to level out any existing irregularities and depressions. A total of 2-3 layers are required;
- When the putty has completely hardened, the surface is sanded and leveled;
- The procedure ends with priming, applying paint and treating with colorless varnish.
If you do everything according to the instructions, be careful and take your time, the result will pleasantly surprise you. Otherwise, it’s easier to immediately contact a car service center.
Restoring the damaged area
So, we successfully coped with the removal of rust. Now it is necessary to immediately begin anti-corrosion treatment of the prepared area, otherwise within a few days new traces of corrosion will begin to appear on the surface. We begin the work by wiping the metal with a degreaser. To do this, simply soak rags in the liquid and then wipe the stripped metal with them.
Next, you need to apply anti-corrosion primer to the surface. It will not only protect the metal from corrosion, but also improve adhesion between the base and the putty or paint material. The primer is applied using a sprayer or a regular brush. After the first layer has dried, apply a second layer and then a third. Read more about using primer in the manufacturer's instructions. The fact is that different primers have their own nuances that must be taken into account when applying them. Thus, treat all areas that have been cleaned from corrosion with a primer.
Anti-corrosion primer allows you to stop the process of corrosion development. Therefore, if necessary, after applying it you can take a break from working, but you still shouldn’t delay it too much.
After this, you need to seal the holes, if, of course, there are any. Use fiberglass putty to fill a small hole. Apply it with a spatula as you would on a regular solid surface. Due to its fairly thick consistency and the presence of fiberglass in the structure, it will not fall into the hole.
When everything has been tried, chemical compounds go into battle
If the hole is larger, 2–3 cm in diameter, you can glue masking tape to the back of the metal. If the hole area is large, i.e. more than 3–4 cm in diameter, it can be covered with fiberglass, which is glued with polyester resin. To do this, first cut out a patch from fiberglass so that it overlaps the undamaged metal by 5–10 centimeters. Then mix the resin with the hardener, as a rule, the latter is added in an amount of 3% of the amount of resin.
Keep in mind that the resin has a "live life" of about 10 minutes before it hardens and sets. Therefore, immediately after mixing, apply it with a brush to the prepared surface and attach a fiberglass patch to this area. Coat the surface of the patch with resin so that it is completely saturated with it. After the resin has hardened, it must be sanded with sandpaper to remove all large irregularities.
If the damage to the body is minor, you don’t even need to putty the surface; it’s enough to apply several layers of primer, after which you can start painting.
Then apply a thin layer of finishing or universal putty to the surface, trying to smooth it out as carefully as possible. After drying, sand the coating with zero-grit sandpaper. Next, the surface must be thoroughly cleaned of dust. To prevent stains from appearing under the paint and to ensure that the paint itself adheres well, apply another layer of primer to the surface. After hardening, the soil must be sanded using “zero” sandpaper, previously soaked in water.
After this, the prepared surface needs to be painted. To repair a small area, you can use spray paint. If you need to touch up a very small area, you can use a repair pencil with paint or paint in small tubes, which is sold with a brush, like women's nail polish. At this point, the repair of the car body is actually completed. The only thing is that you can apply varnish over the paint and then polish it.
Exotic and esoteric in the world of bugs for wiretapping
Removing rust from a car body before painting
Well, the basic principles are clear - but just in case your interest (and paranoia) only flared up from them, we’ll mention a couple more interesting devices.
First, these are directional microphones. Strictly speaking, these are not bugs, but they can have a similar effect. A directional microphone can be simply acoustic, with a parabolic resonator - such a technologically advanced “ear” is available to anyone who wants, for example, to enjoy the singing of birds without being disturbed by their approach. Of course, walls protect you from it - but if you decide to discuss business plans with colleagues in nature, you better remember this device.
Parabolic microphone - the cost of pleasure is only 30-40 dollars
In principle, a laser microphone can be compared with a directional microphone - it also needs a direct “hearing line” to the object, which can be quite long. But a laser microphone, on the contrary, allows you to eavesdrop on what is being said in a closed room. An invisible laser beam reads the vibrations of window glass (and according to some anecdotal evidence, it can also read them from a glass on a table) and reconstructs sound from them.
But don’t rush to stress: laser microphones are really expensive, tens of thousands of dollars, and require a very professional operator. And if the intelligence services decide to get to you, they already have enough tools.
But if you are really attracted to expensive toys, pay attention to a thing called a nonlinear junction detector. It emits high-frequency radio waves, which, having encountered any semiconductor electronics on its way, return reflected in a special, harmonized way
This allows you to detect even electronics that are not connected to a power source, including flash drives and SIM cards. But, firstly, due to such high sensitivity, the device is prone to false alarms, and secondly, the price of such devices is measured in thousands of dollars.
Economy class inspection non-linear locator - only 260 thousand rubles, and it’s yours
Finally, if you think that you might have missed something, and you think that your worries are justified, then use jamming. You can jam the sound recording using expensive ultrasonic white noise generators, or you can simply whisper in a place where there are enough additional sound sources (however, there are, again, expensive sound recording devices whose manufacturers praise their noise-canceling abilities).
There are plenty of wireless network jammers and GPS trackers on the market - and the latter come with an additional function of simulating immobility. This can, for example, be used by drivers who are being monitored by their employers to leave the route under the guise of parking.
Advanced Ultrasonic Noise Generator for Record Jamming, $900 at Amazon
But the video camera cannot be drowned out by darkness - although infrared illumination does not turn night into day, it still allows you to see in the dark. But it is by its light that hidden cameras become even easier to detect.
A portable mobile phone jammer in an ironic form factor - as they say, for important negotiations
However, there are enough companies on the market that provide inspection services of this kind. If such dangers seriously concern you, contact them and sign a permanent contract. Regular checks are an additional plus to the security system.
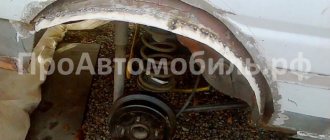
Where and why does rust appear?
Before removing rust from a car body, you need to know where corrosion is occurring. As a rule, these are areas that are most often exposed to moisture and constantly receive microdamage. These can be car fenders, inner parts of wheel arches, sills and the underbody of the vehicle. If plaque appears on the surface of the engine, it means that the hood has a weak seal; rust on the power unit will lead to unstable operation of the engine and its subsequent failure.
It is detrimental for a car to receive various microdamages to the body. A scratch or dent on the fender causes rust, which subsequently spreads to undamaged areas. The bottom, sills, and inner parts of the wheel arches are constantly subject to minor damage. They are caused by small stones that fly out from under the wheels of a car while driving. Due to the fact that these areas are exposed to air and moisture, corrosion occurs and develops.
Experts recommend dealing with the problem correctly. The most effective and efficient method for removing corrosion from a car body with your own hands is a chemical method of cleaning the metal surfaces of a car from rust.
Common Questions
What is the best way to remove paint from metal? The easiest way is to use special chemicals designed to remove paint; they can be either organic or alkaline based. When working with such chemicals, it is necessary to use a respirator, but they make the process of removing paint quick and easy.
Can putty be applied to bare metal without a primer? No, first, when processing metal, a primer is used, which covers invisible cracks and imperfections in the metal surface, cementing its structure; after drying, putty should be applied to level the surface and achieve smoothness of the body, since its viscous structure does not make it possible to properly repair cracks and chips invisible to the eye on metal.
Why is it better to use a vinyl stripping wheel? This device allows you to deeply clean a layer of paint in a short period of time, while you can adjust the hardness of such circles, because they have different degrees of it. A vinyl wheel is used on a grinding machine, which gives the advantage of speed of work and its mechanization, allowing you to save effort when restoring a car.
When the first signs of “bugs” appear on the body, you should immediately begin to fight them, because in the early stages corrosion develops slowly and does not cover large areas of metal. There are several options for dealing with this problem that do not require contacting specialists or visiting a service station, allowing you to significantly save money, but requiring time and certain skills.
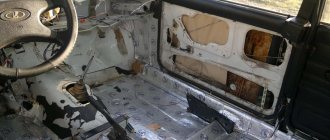
Communities › VAZ: Repair and Modification › Blog › Removing bugs using an airbrush
From the moment of purchase there were bugs on my car, I had been planning to remove them for a long time - at first I had thoughts of cleaning it, filling it and painting it with a brush, but my good friend suggested the idea of painting it with an airbrush, for which I thank him very much. On Avito, for 400 rubles, I bought a JAS 1113 airbrush with a 0.3 mm nozzle.
Next, I’ll tell you point by point what I did:
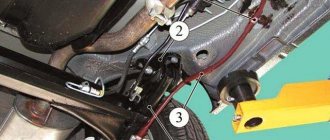
1) We clean off the rust with a drill with the attachments shown in the photo (sold at any hardware store, I bought it from FIT)
3) Next, the metal outside was treated with a rust converter. After applying the converter, you need to wait an average of half an hour until a chemical reaction occurs with the rust residues. After treatment with the converter, you can putty, but the film formed by it is better to wipe off with 646 solvent. Then I putty it with Novol putty and sanded it with 100-grit sandpaper. I used Novol Finish putty on it and sanded it with 220 grit sandpaper. Next, we repeat the operations with the finishing putty as many times as necessary to create a perfectly flat surface, and at the end we go over everything with finer-grained sandpaper.
4) The next step was to slightly mat the surface around the “wound” with 2000-grit sandpaper on a wet one and primed everything with Novol primer with filler. The pressure on the compressor was set between two and three atmospheres.
5) Next (a day later, while the paint was drying) the soil was treated with the same 2000-grit sandpaper on a wet and...
6) Now the main stage is applying paint and varnish. Before application, the surface around the primer was matted. Next, overlapping the ground by 1 cm, apply the base (the base color of our car) in 3 layers. Next, again with an overlap of 1-2 cm, but already from the border with the new base, apply varnish in 2 layers. Now all that remains is to wait a day until the surface can be sanded and polished.
7) The next step was to treat the painted surface and the transition of the varnish to the old paint with 2000-grit sandpaper and polished everything with Ferlica G3 coarse polish. For polishing I used a polishing machine. For those who do not have one, I advise you to use a thin microfiber cloth, be sure not to
folded in several layers, otherwise the polish will be absorbed into these layers and not go to the body. It is also convenient to use such a block when polishing.
I was pleased with the result