Feeding
In nature, aquatic inhabitants eat larvae, phytoplankton, and insects.
In the aquarium, they can be fed with any dry food. But for a bright and rich color, experts recommend feeding them with bloodworms, tubifex, and daphnia. When choosing food, it is worth considering that the fish’s mouth is small and it will not be able to swallow too much food. The following foods should be present in the rasbora diet:
- small insect larvae or chopped bloodworms;
- vegetable flakes, ground to a powder;
- artificial dry food that needs to be finely crushed;
- zooplankton.
Feed the fish twice a day in small portions.
Attention: with an incorrect diet, the rasbora begins to lose its bright color and various diseases appear.
How to determine the degree of damage to thresholds
Before deciding whether you really need to replace the thresholds or whether you can get by with cosmetic repairs of the car, you must:
- Raise the car using a lift or place it on an overpass.
- After this, a visual inspection of the damaged areas is carried out, namely, where corrosion began to appear. The paint in these places peels off exactly until it reaches the point where it adheres to the car body.
- You should be prepared for the fact that replacing thresholds will entail additional costs required for painting work.
- It is not always necessary to make a complete replacement; sometimes it is enough to do this with just a small damaged area, and your car will serve faithfully for a single year.
As a rule, minor damage occurs when the threshold receives impacts from any foreign objects, as a result of which peeling of the paintwork begins and, accordingly, the further appearance of rust.
Practical installation recommendations
Before you begin repairing the car, you must remove the battery, as welding work will be carried out. The preparatory stage includes disassembling the side of the machine from which the threshold will be replaced. The following operations are performed:
- rugs are removed;
- sound insulation is removed;
- seat belts are disconnected;
- seats are removed;
- the door is removed;
- plastic panels are unscrewed;
- lockers are removed;
- the rear wheels are unscrewed;
- The front fender is removed.
Design features: description
Today on a car you can find two design options for thresholds: removable and non-removable. The factory equipment of 2110 involves the installation of non-removable parts that fit into the side of the body and provide the necessary structural rigidity.
For a permanent threshold, rolled or black steel with a thickness of at least 0.9 mm is used. The part is welded to the bottom, preventing the central part of the car from twisting during a frontal impact. This is also an element of passive safety.
Removable sills protect the underbody of the car from mechanical damage, prevent the rapid spread of corrosion and improve the overall appearance of the car. They are installed from inside the cabin, attached to the bottom with self-tapping screws. Rolled iron is used in production and the part is chrome plated.
To further protect both removable and non-removable parts, plastic door sills, steel moldings, aluminum fairings, and body kits are used.
Structurally, the non-removable element is a box welded from several elements:
- Amplifier. The part is spot welded to the sidewall and bears the main force load from vibrations.
- Connector. The lower part of the threshold. May consist of one continuous or several parts.
- External part. It is located directly under the door and is painted at the final stage of repair.
- Inner part. Visible from inside the car after installation.
Official VAZ dealers offer original repair kits for body repairs. The parts correspond to the dimensions and are suitable for the thickness of the metal. But, like factory elements, they do not undergo the galvanizing process. After reinstallation, all parts must be carefully treated with anti-corrosion compounds, in some cases, if the element is changed, partially puttied.
This is interesting: Replacing the muffler on Lada Kalina - photo, video
Plastic
Plastic thresholds for the VAZ 2110 are produced by several licensed manufacturers. The most famous and popular:
- RS Tolyatti. The cost of the plastic kit is 1600 rubles. When replacing, a steel reinforcement is required, which is not included in the kit. Parts are made from impact-resistant, lightweight ABS plastic, element thickness 3 mm. The parts are installed on the load threshold or base using self-tapping screws or auto glue, are not painted, and are easily adjusted to body dimensions.
- LLC M-version. The company produces tuning sills and body kits for the VAZ 2110/12 line. Parts are made of carbon fiber, can withstand loads of up to 300 kg, and are resistant to chips. The elements must be painted after installation, the cost is 4,700 rubles, the amplifier is not included in the kit.
Features of repair of VAZ 2110 thresholds
Before repair, a complete diagnosis of the bottom is necessary. On the overpass, the metal of the bottom is tapped, and the quality of the jacks is checked using a screwdriver or an awl. Replacing the VAZ 2110 thresholds has some features; it is carried out either at a service station or independently. Rules for self-repair:
- The car is installed on a flat surface at a height, which is convenient: you don’t have to bend down to the ground during welding and cutting.
- The internal element is treated with anticorrosive. It is recommended to use an oil or paraffin composition for interior work in the cabin and bitumen mastic for external metal processing.
- A rotten threshold must be completely replaced. If you need to get rid of rust, a solvent is used. After cleaning the element with a grinder, it is necessary to treat the surface with a composition that removes rust. All work is carried out wearing gloves and safety glasses.
What affects the cost
The location of the repair is a major factor in the cost of replacement. If you carry out repairs yourself, drivers only spend money on purchasing the necessary material and parts. Tools are often either rented or already present in the garage.
When repairing at a service station, the work is expensive, and this is justified. The design of the threshold, despite its simplicity, requires great skill and care when replacing. If you are not confident in your skills as a welder, straightener and tinsmith, it is better to entrust the replacement of thresholds to a specialist.
Costs for replacing VAZ 2110 thresholds
The work of replacing thresholds involves the use of both welding and abrasive tools. Carrying out painting, puttying and other work. In other words, this is an enterprise that should last at least several days with fairly good labor productivity. The easiest way to work is with a semi-automatic welding machine, with which anyone can learn how to weld.
If you don’t have it, then you probably shouldn’t run to the store. You can always contact your friends or a specialized workshop. After all, the unit costs approximately more than 15 thousand rubles. For a full repair of a VAZ 2110 at a service station, you will be asked for approximately 3 thousand rubles. And, as you understand, it will last for ten years. Let's estimate how much all the necessary materials cost to carry out the repairs yourself.
From the tool you will need:
- welding unit (the most convenient and simplest option would be semi-automatic welding);
- Bulgarian;
- grinding tool;
- electric drill;
- locksmith tool.
By the way, we do not specifically indicate the prices for the tool, since buying it solely to repair the thresholds of a VAZ 2110 is truly pointless. Now let's similarly determine the necessary materials:
- carriage for an angle grinder, about 300 rubles;
- several cutting discs for the grinder, because you will have to cut a lot of metal (about 300 rubles);
- cleaning wheels, we also buy several pieces and give 150 rubles;
- thresholds for the right and left parts of the car with amplifiers. Only 2000 rubles.
- associated costs (for example, a VAZ repair kit for a rotten bottom or rear wing), approximately 1000 rubles;
- jar of mastic, 200 rubles;
- soil, 200 rubles;
- other expenses for small materials and spare parts (brushes, solvent, drills, etc.), 300 rubles.
Having carried out a simple calculation, let's determine the material benefits of self-repair. Let's put aside the cost of the sills, wings and bottom. It turns out that you, one way or another, spend about 1,500 rubles on materials. Thus, the savings, taking into account the cost of repairing VAZ 2110 thresholds at a service station, will be about 1,500 rubles. In terms of time costs - several days (at least two or even three).
Body restoration
The final stage of work. Finishing and painting
After completing the welding work, all that remains is to process the seams with a cleaning disk and roll the lower part of the VAZ 2110 threshold (clamp it onto the connector). You can take a few breaths, then it will be easier. From the outside, treat the car with a primer. Inside the cabin, the bottom is initially treated with mastic, then a layer of polyethylene is laid down, then back with mastic, sound insulation and carpet.
All that remains is to collect all the other parts in their places and you can hit the road again. Be prepared that the total scope of work may take at least three to four days. As you understand, having certain skills and tools will allow you to save a considerable amount of money, but it also takes a lot of time, so it’s up to you to decide whether it’s advisable to restore the VAZ 2110 thresholds yourself.
Welding work
Welding will be required both to replace the entire floor and during repairs, when the rotten part of the bottom is cut out and a patch is welded. The iron for the patch is cut out in advance; the size of the patch should be 2 cm larger than the hole around the perimeter. There is an option to use the original part of the bottom instead of a patch, which is sold separately.
Replacement of car underbody elements
After the car interior is cleared, a full inspection of the underbody is carried out. In some cases, you can limit yourself to a partial replacement—boil only the corroded areas. Rotting of the floor begins from the thresholds of the car; these elements are inspected first. Replacing the body also begins with reinstalling the thresholds.
The bottom of the VAZ 2110 consists of the main elements:
- support platform;
- bottom panels;
- threshold extension;
- side member amplifier;
- crossbars;
- connectors.
It is necessary to check the condition of the panels under the driver's feet, side member reinforcements, jacks or support platforms. If the overall condition of the bottom is satisfactory, you can limit yourself to installing a patch on the damaged area or replacing the bottom element from the repair kit:
- A drill is used to drill the spot welding points with which the element is installed on the structure.
- The element is cut out with a grinder.
- A metal patch is cut out.
- The bottom is sanded and a patch is welded.
- Welding seams are cut off with a grinder and cleaned.
- The element is primed, sanded, and treated with anticorrosive.
You can assess the condition of the body in a pit by tapping the bottom with a hammer from the outside, prying up the layer of old anticorrosive with an awl.
Replacing the entire bottom
In 90% of cases, drivers cannot use partial cutting of floor elements. Supporting panel components, such as amplifiers, can rot after 3 years if not properly maintained. Large through holes are the reason it is necessary to replace the entire bottom of the 2110.
Before this type of work, it is necessary to completely dismantle the exhaust system of the car.
Replacing the bottom with a solid panel is carried out simultaneously with replacing the thresholds, and the thresholds are installed first. When replacing a solid floor with a factory repair kit, it is necessary to install a bracket under the handbrake hummock and studs, which are not included in the part:
- Using a drill, drill out the spot welding areas.
- Use a chisel or grinder to cut out the bottom.
- Insert a new element from below, digest, grabbing in increments of 3-4 cm.
- Clean the weld seams with a grinder.
When is repair required?
The first copies of the tenth family had a characteristic feature - the paintwork on the windshield frame peeled off at the top, starting from under the seal. Then this disease was overcome by changing technology, but the weaknesses remained.
Already on five- to seven-year-old cars, corrosion on the sills is very likely, and ten-year-old cars necessarily require monitoring of the bottom, arches, and side members.
Rotten thresholds
They accelerate the appearance of rust and through corrosion, damage in road accidents followed by incomplete or unqualified repairs, difficult operating conditions on bad roads in winter and in bad weather, storage in conditions of high humidity.
Regular anti-corrosion treatment done at a service center or with your own hands will help extend the life of body parts; it is especially necessary for the hidden cavities of the sills and side members, this power “skeleton” of the car.
The bottom is corroded on both sides. From below he is attacked by dirt and water from the road. If the anti-gravel coating is damaged, the first spots appear literally within a year; after 2–3 years, with intensive use, corrosion becomes through.
Through corrosion of the bottom
In the cabin there is a carpet on the floor, under which there are layers of vibration-insulating and noise-absorbing materials. If water or snow gets into the bottom trough, for example from shoes, the coating gets wet and does not dry well. Increased constant humidity leads to corrosion of the bottom from the inside of the cabin and the need for repairs. To prevent this, use rubber mats with sides, and make sure that no water gets into the interior during rain or when washing.
Corrosion due to moisture under soundproofing material
A rotten bottom is revealed when viewed from below; under a layer of putty or anti-gravel, the holes may not be visually noticeable, but light blows with a hammer or pricks with an awl will immediately reveal the defect. Corrosion most often appears along the sills and in the driver's and front passenger's feet.
In the cabin, poor condition of the bottom will be indicated by sagging of the floor under your feet under load, in extreme cases, the breakdown or impossibility of fixing the driver's seat. And, of course, there is a frequently encountered situation when, when lifting a car on a jack, the special thrust pads for the jack break due to corrosion.
How to determine the scale of restoration work on thresholds
So:
- Before you find out whether the thresholds on a VAZ 2110 need to be replaced or whether it is enough to carry out cosmetic repairs to the body in the form of straightening or painting, the car must be installed on an overpass or raised on a lift.
- Then they quickly inspect the places of corrosion, dents, where the paint is peeling off, which flakes off until it reaches a strong adhesion to the car body.
- The areas that need to be replaced and where there are still “live” parts are determined. Replacing the threshold in a VAZ 2110 also means additional costs for painting work. Sometimes it is enough to replace only a small section of the threshold and the VAZ 2110 will look like new, and the car body will serve for many more years. This option is possible if the threshold receives a mechanical shock, when the paintwork is damaged and rust occurs. In this case, it is 15 centimeters longer than the corrosion area, there must be a new threshold along the direction of the car, and 30 centimeters longer in the direction of the trunk.
Replacement of thresholds of a VAZ 2110 car
First of all, it is necessary to clearly determine the size of the areas to be restored. If the excess is cut off, then patches will need to be welded onto the uncovered areas, but this is unsightly, and sometimes it will not allow you to close the door.
Worn section of the threshold
The threshold consists of three main parts: the outer panel, the connector and the amplifier. They are connected to each other by spot welding. The instructions suggest the following procedure on how to replace the thresholds on a VAZ 2110:
- The front and rear doors are removed.
- The aluminum threshold located under the door seals and the lower part of the door seals are removed, and the mats are partially raised for ease of work.
- Rotten thresholds are removed. Initially, the area located near the front door is dismantled, then near the rear and lastly in the area of the B pillar.
- Old thresholds are removed using fine drilling or a grinder. In the first case, the locations of spot welding are marked, then these areas are carefully drilled.
- If you are completely replacing the threshold of a VAZ 2110 with your own hands, then the holes are drilled in the rear, on the side where the reinforcement for installing the jack is located, and in the front where the old connector will be stored.
- When dismantling the outer panel, it is necessary to leave small areas on the side of the front and rear wings, approximately 50 millimeters of the old panel, to which the new outer part of the panel will be butt welded.
- On the front side of the wing, you need to leave a small part of the connector.
- The threshold amplifier is removed.
- After removing the old threshold, the remaining metal is cleaned of rust, if necessary, the amplifier is adjusted to install the jack, rotten areas on the bottom of the body are cut out, and the places where welding will be performed are cleaned of rust and old paint.
- Replacing the threshold on a VAZ 2110 starts with the connector. At the rear it must be placed overlapped on the subframe reinforcement; at the front it must be placed end-to-end with the old section of the connector.
- The purlin is welded.
- The amplifier is shortened, a cutout is made on it, which is located in the area where the rack is located, otherwise, during installation, the old piece of the amplifier left behind will interfere with it.
- The edge of the lower amplifier and connector is aligned.
- The lower part of the amplifier is welded to the connector, starting from the middle to the edges.
- Weld points are cleaned.
- The outer threshold panel is pre-adjusted as accurately as possible.
- Final adjustment of the threshold dimensions on site. You need to start from the top, leaving minimal gaps.
- The welding areas are cleared of soil intended for transporting the part.
- Holes for welding are drilled in the lower part of the outer panel.
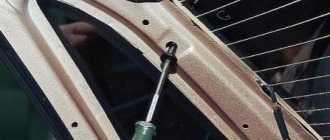
- The outer panel is hung and secured at the top with screws or clamps, as shown in the photo.
Hanging outer panel
- Through previously drilled holes, the lower part of the panel is welded to the amplifier, and a connector is welded to the bottom of the body.
- Metal is welded at the top of the threshold.
- The patches are welded on the bottom side.
- Welded seams are cleaned, puttied, checked for leaks, and painted.
You can watch the video in detail on how to replace the thresholds and bottom of a VAZ 2110. Timely replacement of the thresholds of a VAZ 2110 increases the service life of the car body and improves its appearance. You can also find out on our resource how to replace door sill covers.
The sequence of actions for replacing the threshold box
- It is necessary to place the car on a level surface; a level garage floor, boards, etc. will do. This is very important, because when repairing rotten cars, the gaps of doors and other elements can slip away.
- By marking the positions of the hinges on the pillars, you can remove the doors, as they interfere with the removal and installation of the threshold.
- If the car is rotten and you are afraid that the body will “fold”, you need to fix the original position. This can be done by inserting guy wires into the door opening, guy wires from the projection of the rear sofa and in the A-pillar, placing a block about 1 m long and pressing it lightly with a jack. Thanks to these simple manipulations, you will keep the gaps of all doors in their old position.
- Experienced people on my favorite body forum divided the replacement of thresholds into two options: correct and not quite correct. Proper repair involves replacing both fenders and sills. At worst, the threshold and the hams of the wings. This is necessary because the threshold is welded to the front pillar and to the rear arch far under the wings, and replacing the threshold without dismantling the wings remains problematic, if not impossible. But if everything is in more or less normal condition, then you can resort to the second method - welding the amplifier and butt welding the threshold trim.
- Also, before sawing the threshold, it is necessary to inspect the condition of the inside of the threshold with the noise insulation removed; if it is rotten, then it is necessary to weld a curved piece of metal that needs to be used to connect the inside of the threshold with the floor panels.
- After you have fixed the car body, you can begin to dismantle the old threshold. This can be done as you prefer, starting from the front or the back. It is better to brighten the weld spots, use a chisel less, because the edge is deformed, which is then quite difficult to straighten. For additional rigidity of the boxes, you can leave a strip from the old amplifier and lining in the area of the rubber seal, or one of them, this makes it easier to weld the new threshold and increases its rigidity.
- The threshold consists of three parts - an amplifier, a connector, and a threshold cover. When replacing thresholds, the connector is often not a standard one, but is made from a suitable piece of tin a little wider than the standard one.
- After dismantling the threshold, it is necessary to clean the edges from rust and old welding residues.
- VERY IMPORTANT! Thresholds must be replaced as quickly as possible, within reasonable limits, of course. That is, you should not cut off the threshold and leave the car for 2-3 days, it may lose its geometry.
- If the hinges of your doors are in order, but the upper corners of the doors touch the pillars, then this can be fixed. It is necessary, with the doors open, to use a jack and an extension to rest against the ledge of the rear sofa and the upper curtain of the door. Then grab this distance with a pipe from inside the rack. Try on the door if you need to add or remove. After welding the thresholds, the pipes can be cut off.
- The new threshold is welded in the following sequence - amplifier-plate-connector. After cleaning all the surfaces that will be welded, you can begin welding the threshold amplifier. It must be cooked semi-automatically in a carbon dioxide environment through drilled holes with a diameter of 5-6mm. To make it easier to install the amplifier in the area of the B-pillar, provided that the old amplifier is more or less intact, you can leave a piece of the old one and weld the new amplifier to it. In the lower part, a threshold connector is also welded through drilled holes. The CONNECTOR is welded at this step only to the amplifier! It is welded to the floor last.
- Attention! Trying on the threshold overlay is carried out only with the doors installed! Otherwise you might miss :)
- After welding the threshold amplifier, it is necessary to clean the welding points and weld the trim through the drilled holes in the threshold trim. The pad is welded to the rack in several ways, depending on what is more convenient, the main thing is that the connection is strong.
- Lastly, the connector is welded. There's a little trick here. The connector is welded to the floor panel; this can be done from a hole or through holes drilled in the floor panel. In order not to catch scale on your head, you can drill holes in the floor and, pressing the connector from below with a jack, weld it through the holes.
Do-it-yourself replacement of VAZ 2110 thresholds video
Do-it-yourself replacement of VAZ 2110 thresholds video Cars produced at the Volzhsky Automobile Plant (VAZ brand) could never boast of an anti-corrosion body coating. We will not understand why this happens now, but due to non-compliance with technology, corrosion quickly spreads on the metal, especially in places where dirt and moisture accumulate. Most often these places are rapids. If you don’t start coping with this automotive “disease” of VAZ 2110 cars, and all other models of this plant, then in just a few years, the thresholds will turn into dust. It is worth knowing that when purchasing a car from the AvtoVAZ plant, you must immediately treat all accessible and inaccessible areas of the body with anticorrosive.
But if rust has already eaten through the thresholds, then they urgently need to be changed. Otherwise, the car body will lose the necessary rigidity. How the thresholds change on VAZ 2110 cars is shown in the video. By following a certain sequence of work, you can do this repair yourself in the garage. This is not to say that this repair is easy to do, but with a minimum of the necessary tools and skillful hands, this repair can be carried out independently. You just need to perform the operations sequentially.
You may also be interested in such similar and interesting topics (tags) as:
Repairing car thresholds with your own hands video
Repairing car thresholds with your own hands video: material in the form of a video will help you better understand and understand the process of repairing car thresholds with your own hands. As modern practice shows, the 2110 model does not shine with the quality of the metal used to make the body. The metal is subject to severe corrosion, in principle, like everything else...
Do-it-yourself VAZ 2110 gearbox repair video
Do-it-yourself VAZ 2110 gearbox repair video VAZ-2110 (Lada 110) is a Russian small-class car, a four-door front-wheel drive sedan produced by the Volzhsky Automobile Plant. Produced at AvtoVAZ from 1995 to 2007. Currently, third-party manufacturers based on cars of the LADA-110 family have created and produced cars from...
DIY car body repair video
Do-it-yourself car body repair video Carrying out work to restore the body even without affecting the chassis is a very expensive operation. Therefore, most car owners seek to reduce these costs by performing some of the work on their own. Do-it-yourself car body repair is a profitable undertaking, provided you have…
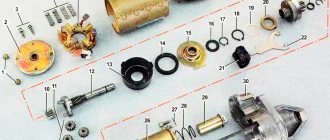
DIY VAZ 2107 starter repair video
Do-it-yourself VAZ 2107 starter repair video Starters used by the manufacturer for installation on a VAZ 2107 can be of different types and differ slightly in design. However, the principle of their operation, of course, does not change. This mechanism generates direct current and creates the torque necessary to rotate the crankshaft.
DIY VAZ 2109 starter repair video
The VAZ (2109) “starter” very often fails, but the good thing about our cars is that in the case of repairs and maintenance, all repair work is done easier than in foreign cars. So, let’s disassemble the trigger mechanism, yes, you can do this yourself without contacting various service stations. Let's start the analysis. The principles of starters in domestic foreign cars are almost...
Do-it-yourself VAZ 2114 headlight adjustment video
Adjusting the headlights of a VAZ 2114 with your own hands video When faced with the fact that the headlights of your car have begun to provide insufficient illumination, do not rush to adjust them. First of all, wash them and check for various types of damage. If everything is in order, and even after cleaning the headlights, the light in the dark is not enough for you - drive the car to...
Replacing steering rods VAZ 2107 video
Replacing steering rods of a VAZ 2107 video During the operation of a car, parts of the suspension and other systems are subjected to significant loads, which leads to their wear and failure. On the VAZ 2107 model, wear forms in the tie rod ends, and knocking noises appear when driving on a bad road. Ignoring them is fraught with destruction of the unit and...
How to remove the stove on a VAZ 2107 video
Malfunctions in the heating system of a car are a fairly common practice. At the same time, it is difficult to ignore malfunctions of this nature, especially in the cold season. Let's figure out how to remove the stove to carry out the necessary repairs using the example of a VAZ 2107 car.
Replacing jet rods VAZ 2107 video
Has the stove stopped working in your VAZ 2107? We'll show you how to fix this problem! In principle, you have two options - either replacing the stove completely, or repairing it. If in cold weather the heater motor in your car begins to make whistling sounds, you can, of course, lubricate it. Yes, for a while, this will help, but not for long, because the motors...
Let's summarize
To replace VAZ 2110 thresholds with your own hands, you need to have many specific tools and skills. If you are not ready to learn bodywork and invest money in tools, trust the replacement of the threshold to professionals. The price of replacing a threshold with painting and anti-corrosion treatment is from 7,000 to 12,000 rubles.
The four-door front-wheel drive sedan VAZ 2110 was produced for 13 years. AvtoVAZ stopped producing the model in 2005. Thanks to the large number of components, it is easy for drivers to maintain and repair the body and chassis.
The price of thresholds for the VAZ 2110 from official dealers starts from 1,700 rubles. per set. Tuning body kit parts cost up to 6,000 rubles.
Important points
- All work on replacing thresholds should be carried out with the machine installed on a level surface, without distortions.
- Before welding the top edge of the new thresholds, you should definitely try hanging the doors on the car yourself. There are often cases when doors after welding either close with difficulty or do not close at all. And this can happen due to one slight misalignment of the thresholds, which is not always possible to notice with the naked eye.
- You should never skimp on anti-corrosion treatment of thresholds. If it is not carried out, all the work done will go down the drain in a few years.
- It is best to clean thresholds from rust and dirt using a solvent. When working with it, you need to follow safety rules: use gloves, wear safety glasses (this is especially important if you have to work on the bottom of the car while standing under an overpass - drops of solvent can easily get into your eyes), and apply the solvent itself only with a paint brush.
- Before welding the thresholds, a series of holes with a diameter of at least 3 mm should be drilled in the areas of metal to which the threshold is planned to be attached. This will greatly facilitate the spot welding process, and the threshold will be held more firmly.
The main thing when replacing thresholds is accuracy and attention
It is very important to cut out all rusty and damaged metal from both the underbody and the sills. If even one small area of rust remains, the destruction of the structure will begin again
And, of course, anti-corrosion treatment when replacing thresholds is mandatory
If even one small area of rust remains, the destruction of the structure will begin again. And, of course, anti-corrosion treatment when replacing thresholds is mandatory.
The VAZ body of the tenth family is not of high quality; it is also highly susceptible to corrosion, like other AvtoVAZ models. If the body was not treated with anticorrosive, and the car was operated in harsh conditions for metal, then after 8-10 years the rust will be through. Let's look at how you can repair VAZ thresholds yourself.
In this photo report we will be repairing a 10-year-old “ten”. Her right threshold was completely rotten, resulting in holes appearing in the bottom. To repair VAZ thresholds yourself, you will need:
- — wheels for grinder, 3 pieces, 150 rub.
- — cleaning disk, 2 pcs. 60 rub.
- — carriage for an angle grinder, 1 pc. (it should be hard and well compressed), 300 rub.
- - thresholds for VAZ 2110. In this case, a kit was required (connectors and amplifier (1000 rubles)) only for the right side.
- — a rear wing repair kit may be required (this is the part that goes from the threshold to the wing).
- — right side of the bottom of a VAZ 2108 for patches, 500 rubles.
- — mastic 2 kg. 130 rub.
- — 2 pcs brushes, 60 rub.
- — primer, about 200 rubles.
- — solvent 646, 50 rub.
Total: about 2500 rubles. Necessary tools:
- — a set of auto tools.
- - Bulgarian.
- — semi-automatic welding machine 220V
- - drill
Preparation for replacing VAZ thresholds
We disconnect the battery and begin to disassemble the right side of the car (remove the rear wheel and locker, front fender, front and rear doors, seals, seats, side trims of the interior, seat belt, remove carpets and sound insulation): Then we cut off the rotten pieces of the bottom using a grinder. This will be the threshold and part of the bottom of the connector. At the top, the condition of the metal is better, so it was decided to partially leave it. The preparatory stage ends with stripping it down to metal with a carriage brush. By the way, be sure to cover the glass inside with some cardboard so that after using the grinder you don’t have to change them (it will be sandblasted and there will be black dots that cannot be removed).
Do-it-yourself VAZ threshold repair
Using a semi-automatic welding machine, we weld the connector (after cleaning the welding points). We work with an angle grinder only with glasses, do not forget about the fire hazard, be sure to prepare and place several buckets of water nearby. We weld the amplifier to the purchased threshold. Then we coat the internal parts with mastic, allowing it to flow in all directions. We weld it to the connector. In the second photo you can see the wing repair kit.
Now you need to clean all the seams with a grout disk. It’s inconvenient to cook from below, so it didn’t turn out very well (holes and small bolts and nuts). On the inside, where the nuts are, there are drops of welding to make the fastening more durable. We roll it at the bottom (i.e. we clamp the threshold onto the connector), there is a special bend on the threshold at the bottom for this. Next are the patches on the bottom, here is one of them:
The remaining holes in the bottom were patched in the same way. They cleaned the bottom as much as possible and coated it with mastic. They laid the oilcloth, tore the usual bags, put mastic, Shumka, etc. on top. That is, we perform reverse assembly. We coat the outside with primer, this is how it turned out after the repair: Replacing the VAZ thresholds with your own hands took 2 full days of time (remember that this is only the right side of the car).
If you decide to leave the replacement of VAZ 2110 thresholds to specialists, then it is worth considering that the price of work for one side is up to 5,000 rubles (that is, 2 times more expensive than when you carry out body repairs yourself).
How to determine the degree of damage to thresholds
Before deciding whether you really need to replace the thresholds or whether you can get by with cosmetic repairs of the car, you must:
- Raise the car using a lift or place it on an overpass.
- After this, a visual inspection of the damaged areas is carried out, namely, where corrosion began to appear. The paint in these places peels off exactly until it reaches the point where it adheres to the car body.
- You should be prepared for the fact that replacing thresholds will entail additional costs required for painting work.
- It is not always necessary to make a complete replacement; sometimes it is enough to do this with just a small damaged area, and your car will serve faithfully for a single year.
As a rule, minor damage occurs when the threshold receives impacts from any foreign objects, as a result of which peeling of the paintwork begins and, accordingly, the further appearance of rust.
Causes of corrosion
The manufacturer does not pay enough attention to the anti-corrosion treatment of these machines (as well as sound insulation). This is evidenced by numerous reviews from owners. But if you can still put up with the noise in the cabin, then you can’t put up with the holes in the floor.
It's uncomfortable and unsafe. Accordingly, the question arises about repairing or replacing the bottom of a VAZ-2110. Experts identify several factors that significantly accelerate its wear:
- Weather. Metal rusts upon any contact with water, even if it was painted and treated at the factory. But rain is not the most destructive factor. More aggressive towards metal are the salt reagents that our road services use to sprinkle the asphalt in winter. If you don't frequently wash the underside of your car with high pressure, the salt will remain in the most hidden places. Further, rust will form in these areas, and after a year - through holes.
- Road accident. Even with a minor accident, the base layer of enamel and primer separates from the metal. If the painting was done by unqualified craftsmen, after 1-1.5 years rusty marks will form in the same place. The same problems occur if the surface was not properly prepared for painting and was poorly cleaned.
- Clogged drainage. Often, repairs to the underbody of a VAZ-2110 are required due to clogged drainage holes. Water eventually gets into the cabin and trunk. It has nowhere to go - it is absorbed into the factory carpet and soft soundproofing material. In addition to corrosion, it can cause a characteristic smell of mold and rot. Water also forms when using unsealed mats. Textile products are very popular now. But not every model retains moisture, which is why it is absorbed into the carpet and then onto the metal.
Thus, the bottom of the VAZ-2110 is exposed to negative effects from both sides. Plus, it is very difficult to find the source of the problem. Not everyone has a hole in their garage, and no one will disassemble the interior in order to identify “bugs.” They ride until the floor is soft like jelly.
Car threshold repair
Let’s immediately talk about removable thresholds; their service life is shorter than others. Therefore, they can be replaced simply and quickly. Thresholds with mechanical damage or when they are completely worn out need to be replaced.
Dents on the thresholds can be smoothed out. To do this, you need to remove the sills by unscrewing all the bolts that attach them to the body. Advice: in order not to disturb the shape of the body, place some supports under it.
In case of partial damage, it is not necessary to change the thresholds. To restore them, putty is used, after which the thresholds are painted and installed back on the car. This will save you money.