Wheel arches of a car often cause trouble; they are classified as risk elements. This is most likely due to the fact that these elements are exposed to precipitation, that is, they are exposed to rain, snow, moisture and chemicals. All these phenomena can be found on the highway. On the road you can also find crushed stones or small stones that fly from under the wheels of a car. As a result of such mechanical, chemical and physical damage, corrosion appears on the arch of the car, leading to the destruction of the car. The rear arch of the car is most susceptible to impact.
If minor damage occurs as a result of driving, it can be easily removed. However, serious damage may also occur, which will lead to serious violations, including complete replacement of the car’s wheel arches. You can replace the arch at a service station or yourself at home.
DIY car arch repair
Regular use of the car renders the body unusable. Repair work is carried out in special centers using modern technology.
Wheel arches of a car often cause trouble; they are classified as risk elements. This is most likely due to the fact that these elements are exposed to precipitation, that is, they are exposed to rain, snow, moisture and chemicals. All these phenomena can be found on the highway. On the road you can also find crushed stones or small stones that fly from under the wheels of a car. As a result of such mechanical, chemical and physical damage, corrosion appears on the arch of the car, leading to the destruction of the car. The rear arch of the car is most susceptible to impact.
If minor damage occurs as a result of driving, it can be easily removed. However, serious damage may also occur, which will lead to serious violations, including complete replacement of the car’s wheel arches. You can replace the arch at a service station or yourself at home.
What to do after signs of corrosion appear?
Typically, traces of rust appear in the form of brown dots, popularly called “saffron caps.”
The appearance of such elements indicates that the process of influence of external factors on the metal has already begun. As soon as you notice this effect, you need to immediately get down to business. You should contact a body shop or paint shop with a good rating among motorists. Usually these specialists will find the best way to solve the problem. When working independently, you should do the following:
- carefully examine the area of damage to understand at what stage the corrosive attack is, this will help plan further actions and get better results;
- prepare a tool for performing basic body work, it’s worth mentioning right away that you won’t be able to do the painting at home, you will need very expensive equipment;
- get different types of sandpaper, rust converter, solvent, rags, and also reserve 1-2 hours of time (costs depend on the amount of damage);
- clean the area of damage so that no rust remains; this is done with sandpaper and constant watering; a certain area of the paintwork will also be affected;
- Use a rust converter to treat the area to remove any rust, then refinish with a primer (can be used in a spray can).
Having prepared the spot for painting, it is best to contact specialists with a good spray booth and professional equipment. If appearance doesn’t matter to you, you can paint it at home using a small garage compressor and an inexpensive spray bottle. Of course, in the latter case, the paint spot will be very different from the color of the entire car. The quality of work also depends on the quality of paint selection.
Wheel arch repair methods
When doing DIY repairs, two main methods are usually used:
You can putty only when the arch is not completely rotten. In this situation, you can simply remove the rust and clean the area with putty. However, this cannot always be done. If you have holes as a result of rust, simple putty will not help. In this situation, it will not be possible to cope without a welding machine.
Puttying
So, you can putty only if there is minor damage to the wheel arch.
To putty, you must perform the following algorithm of actions:
- We wash and dry the car;
- We remove all rust from clean metal, only after that we grind the metal;
- We treat the surface of the cleaned metal using a special solution. Reactive primer can be used as a solution. After application, allow the surface to dry completely;
- Acrylic filler is applied to the dried surface. The putty cannot be applied to acidic soil;
- After all the acrylic has dried, it is necessary to apply putty in an even layer. The putty must dry completely;
- After the putty has completely dried, it must be thoroughly sanded. This is necessary so that the surface of the wheel arch looks smooth, which will definitely not be noticeable;
- Areas that need to be repaired must be painted over. This will not only help hide the damage, but also prevent new damage from occurring.
Welding
Welding should be resorted to only when it is no longer possible to cope with conventional putty. Most often this happens when more than simple damage appears in the wheel arch, but holes form. Of course, you can guess that for such a method you must have a welding machine with you; you definitely won’t be able to cope without it.
So, to repair a wheel arch using the welding method, you need to perform the following algorithm of actions:
- First, thoroughly wash and dry the damaged area;
- We remove the affected areas using a grinder;
- Align and clean the edges of the arch;
- We align the patches and create the required shape from them;
- We prepare patches for the inner and outer parts of the arch;
- It is necessary to weld the inner part first, and then only the outer part;
- We grind the weld seams;
- We derive the geometry using putty;
- We sand the dried putty;
- Apply acrylic primer;
- Let's paint it over.
Applying a patch with a soldering iron
The second method is no less popular among motorists - using a soldering iron.
Just as in the first case, the area where the patch is applied should be thoroughly cleaned of rust. You can cut a patch from an ordinary aluminum tin can.
The quality of the repair can be increased by applying a layer of a compound with anti-corrosion properties to the edges of the hole and the surface of the patch.
After this, use a soldering iron to walk along the edges of the patch. The seam should be uniform and not very thick.
It is possible that the patch will protrude beyond the edges of the body. In this case, you should trim it with a hammer.
When finished, coat the patch with a ball of primer. This step is considered necessary in order to avoid further development of corrosion. The primer is applied in 2-3 layers at intervals of 3-4 minutes.
You can speed up the drying time of the primer by using infrared heating.
Wheel arch replacement
If you understand that the arch cannot be restored, you need to urgently change it. You can replace the arch yourself. Performing this procedure is not at all difficult.
In order to replace the wheel arch, you need to perform the following algorithm of actions:
- We order an arch of the required size and shape from a turner. The material can be used from a light alloy, for example aluminum;
- Raise the car using a jack. You only need to lift on one side, from which you are going to install the wheel arch;
- Remove the wheel;
- Remove the arch from the suspension, floor, partition and trunk;
- We clean the entire surface of unnecessary materials. As a result, you should be left with pure metal;
- We try on the new wheel arch and mark the place where the replacement will be cut;
- After the cut, we install a new wheel arch. We fasten the arch using a welding machine. You need to weld first in the center, only then can you move to the edges;
- We sand the weld seams and apply a primer;
- We derive the geometry using putty;
- Grind the surface of the putty;
- Apply acrylic primer;
- Let's paint it over.
Welding a new wing arch
Having adjusted the new part to a size slightly larger than the cut out part of the wing, I place the fresh part behind the old part of the wing and grab it. In order not to overheat the wing, I place points 10 cm apart from each other. When I’ve done it once, I let the wing cool a little and start putting intermediate points so that I get a distance between the points of 5 cm. I do this again so that I get approximately 2.5 cm between the points. If the welding areas are overheated, the metal will twist and either be squeezed out, or a depression will form, and this will be a problem area. Even if all this is leveled with putty, the putty will burst after a while and there will be a crappy crack in the paint along the entire seam.
DIY car arch repair without welding
Regular use of the car renders the body unusable. Repair work is carried out in special centers using modern technology. The cost of such restoration is calculated based on the area of the damaged area and the method of its restoration. Welding work is used to eliminate complex defects on the surface of the vehicle body.
To eliminate minor defects, non-welding work is used. They allow you to eliminate minor damage to a metal surface. The welding method of fixation is used to fasten load-bearing elements. The cost of such work is an order of magnitude higher than that without welding installation.
Types of repairs without welding
Experts say that independently eliminating defects on the surface of the body and paintwork is considered not a professional repair. Not every car enthusiast has a clear understanding of restoration techniques and the choice of consumables.
There are several methods of weldless installation.
These include:
- puttying the paintwork. A similar method is used to eliminate chips and cracks. This material allows you to create a smooth base for applying automotive paint. After prolonged grinding, the surface acquires a uniform shine;
- use of fiberglass and synthetic glue. This material is used to repair major damage. Epoxy resin and fiberglass are evenly distributed over the deformation areas. When exposed to high temperatures, they fill large cracks and chips. A similar restoration method is used to restore the bumper;
- soldering. Installation involves using a metal tab, which is tightly attached to the damaged body part. A high-power electric soldering iron creates the required temperature, which connects damaged elements to each other. The boundaries are cleaned with sandpaper, thereby creating a perfectly even coating for applying the paint and varnish composition;
- rivets. This restoration method is used to restore the underbody of a car. Metal rivets secure iron parts to each other. The advantages of this method are its endurance and durability.
Putty technique
To eliminate minor damage, use paint putty. This material evenly fills voids and helps to quickly level the surface for further painting.
The following compositions are used for work:
- fine-grained. It contains fine particles. This composition dries quickly after application and creates a dense base;
- medium grain Painting putty is used to restore the bumper and underbody of a car. The composition contains medium-sized particles. They penetrate into the crack cavity and fill the internal voids;
- coarse-grained. The composition is used to fill the boundaries of the weld. Thanks to this putty, it is possible to create a smooth transition between the load-bearing parts.
The recovery technology takes place in several stages:
- The damaged area is removed using a grinder.
- Next, an anti-corrosion compound is applied. It prevents corrosion after restoration.
- After this, they proceed to applying the putty mixture. Listen to each layer for 5 - 10 hours from the moment of application.
- The final step is to use sandpaper. It will smooth out the boundaries of the layers.
Technique using fiberglass and synthetic glue
Large areas of damage are repaired with fiberglass. This material is distinguished by its strength and endurance to further use. Epoxy resin is used to firmly fix this material. When heated, it is evenly distributed over the finishing material.
The damaged area is pre-coated with epoxy glue. Then several layers of fiberglass are applied. Each element should overlap the previous one by 3 cm. Using an electric soldering iron, glue the material to the damaged surface.
Soldering technique
Using a powerful electric soldering iron, parts are soldered to each other. The problem area is pre-treated to remove dirt and dust. The boundaries of defects are cleaned with sandpaper. After soldering, the protruding elements are removed with a hammer.
To get a smooth surface, use putty. It is applied in several layers and thoroughly sanded to an even base.
- The disadvantages of this restoration are:
- high cost of solder;
- short operation.
The metal patch should tightly cover the problem area.
Fiberglass and mesh
To repair more extensive damage, an aluminum patch mesh is used. A piece slightly larger than the hole is cut out of it and attached with masking tape. Next, sealing holes in the car body without welding is carried out in the following sequence:
- a thin layer of fiberglass putty is applied without touching the tape;
- after drying, the tape is removed;
- subsequent layers of putty are applied after the previous one has dried;
- the surface of the car is treated with sandpaper or a grinding machine until smooth;
- To strengthen the mesh, several layers of putty are applied to the back of the body.
Long-term auto patches are made from fiberglass and epoxy resin. Several overlays are cut from it, the first of which should cover the hole with a margin of 2 cm. The size of each subsequent piece is made larger than the previous one. The last overlay should cover all the metal stripped during the preparation process.
Replacing car arches with your own hands
The wheel arches of a car are risk elements. This is due to the fact that they are constantly exposed to atmospheric factors: rain, snow, moisture, chemically active components that are often present on the highway. And also crushed stones and small stones flying from under the wheels of cars. As a result, pockets of corrosion arise, which lead to the destruction of this part of the car . The rear arches of the car, consisting of an inner part and an outer wing, are especially affected in this regard.
Making fenders from sculptural plasticine
- The working surface must first be protected with masking tape.
- Soften the sculptural plasticine and spread it on the body element. The material is first rubbed into a thin layer of masking tape. The volume of the arch is given by larger pieces. Giving the arches a symmetrical shape is the most difficult work in this process.
- Epoxy resin and layers of fiberglass are applied to the arches.
- The resulting expansion matrices must be removed from the body after complete drying. The inner surface of a homemade fender must be cleaned of plasticine.
- The parts are adjusted to size and attached to the wheel arches using self-tapping screws.
- Now you can perform final grinding of the manufactured elements and apply a paint coating to them.
Today, it is quite popular and common among motorists to install wide-profile tires on their car wheels. This trend is explained by the fact that tuning of this kind improves the driving properties of the car. But if the width of the wheel rims increases excessively, it is recommended to widen the wheel arches of the car. Wheel arch extensions are a tuning element.
You can make them yourself at home, or contact specialized automotive services that perform car tuning. In addition to improving driving properties and cross-country ability, widening the arches protects the body from dust, dirt and stones, and also improves the appearance of the car. This article will provide step-by-step instructions for making wheel arch extensions with your own hands, which is a less expensive way of tuning a car than going to specialized car dealerships for this.
Puttying
So, if we are talking about minor damage, the putty method is used. Step by step it looks like this:
- It is necessary to thoroughly wash and dry the car.
- Remove all bare metal rust from the damaged areas and sand them thoroughly.
- Treat areas with reactive primer and allow the surface to dry.
Car rear arch putty
- Place acrylic filler on top of the reactive layer - under no circumstances should putty be applied to acidic primer.
- After the acrylic has dried, apply putty and wait for it to dry.
- Thoroughly sand the dried putty, gradually reducing the grain size of the abrasive. Thus, level the surface, preparing it for painting.
- Paint those areas of the car that have been repaired.
Welding method
If the surface is so corroded that puttying is not possible, you will need welding. Obviously, to carry out work of this kind with your own hands, you must have a welding machine and have the appropriate skills to handle it . So, repair by welding looks like this:
Rear arch repair using welding
Replacing a car wheel arch with your own hands
If the surface of your car's wheel arches is hopelessly corroded by rust and cannot be repaired, you will need a replacement - this operation will not be difficult to perform on your own.
Let's consider step by step how to replace the wheel arches of a car with your own hands:
- We order the production of a new arch from any turner. The material you can choose is some light alloy like aluminum.
Replacing a car arch with your own hands
At this point we can consider the work completed if you have the skills to handle a welding machine . It won't cause you any particular difficulties.
The arch is welded over the wing with an overlap
Sequencing
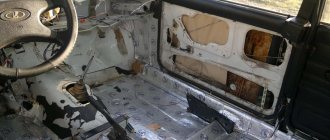
How to make sound insulation for a car with your own hands: doors, arches, floor, hood, trunk
To perform liquid sound insulation, do the following:
- We lift the car on a lift (ideal option)
- We remove the wheels from it, and we thoroughly wash the entire area of the bottom of the car, including the cavities of the wheel arches (it is best to use a soap solution to thoroughly degrease the surface)
- After this, we apply liquid rubber from the outside onto any open surfaces in one, two or three layers (it all depends on the technology prescribed by the product instructions written by the liquid rubber manufacturer)
- After processing, you just have to wait until the applied layer dries - and you can, after screwing the wheels back, roll out of the box
- It will immediately become clear to you that your efforts and money have not been spent in vain.
Wheel arch treated with liquid sound insulation
- The problem of sound insulation of a car cannot be completely solved in this way, but in this way it is quite possible to raise the level of sound insulation of your domestic car to the level of a good foreign car
- As shown by tests, videos of which you can easily find on the Internet, this method of processing wheel arches and underbody reduces the overall noise level in the cabin by approximately 3-5 decibels
- This difference is what distinguishes domestic and European standards
- Please note that this is an extremely simple and affordable technology, suggesting that you can easily treat the bottom surface, and even the most inconvenient and hard-to-reach areas of the wheel arches, with liquid sound insulation yourself.
Advantages of the method
This sound insulation has several more positive qualities that the liquid rubber itself already possesses, used for sound insulation of the underbody and wheel arches of the car:
- The first, already described above and even shown in the photo - it easily covers the most inaccessible areas, in order to soundproof them, previously we had to literally disassemble the entire car, piece by piece.
- Even the surface of the “tunnel”, that is, the arch in the bottom of the car (precisely the one in which the driveshaft is located) - one of the most problematic and very noisy places - can easily be treated with liquid noise insulation
- It is recommended to treat the partition that separates the passenger compartment from the engine compartment (also a problem area) with such rubber
- By the way, access to the tip of the “rubber control” there is also easy
- Another advantage is that liquid rubber will weigh three or even four times less than a similar, traditional sound-insulating layer
- It turns out that if previously, in the name of comfort, you had to put up with the fact that the “dead” weight of the car increased by 50 kilos or more, in relation to the passport data
- Full liquid sound insulation of all wheel arches, and sound insulation of the bottom, including all other problem areas, will add at most 20 kilograms of weight
- In our case, extra kilograms mean extra liters of gasoline consumed, and a drop in engine traction
- In addition, one of the main advantages of liquid sound insulation used for the underbody of the car and wheel arches (these are the most problematic areas)
- Liquid rubber, which is applied to the painted surface, begins to act as a protective layer, protecting against chips that occur from flying stones from under the wheels.
- Even a small piece of gravel that hits the underbody coating can strip paint and expose metal.
- From there the inevitable process of corrosion will begin.
- Liquid rubber, which by its properties has a certain elasticity, in such cases, simply shock-absorbs and does not damage the protective layer, paint and primer, since it completely covers their surfaces from the outside
- This is an important factor that any motorist will really appreciate from the first years of operation of the car, the bottom and arches of which were treated with liquid sound insulation
The price of such insulation is affordable for everyone, we have everything, success in processing the car!