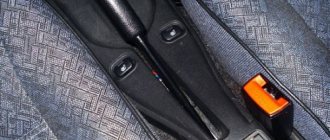
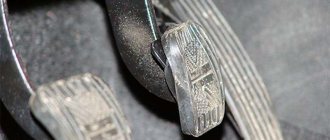
The parking brake (hand brake) is also popularly called the “handbrake”. It is a permanent brake, which is used when parking on a slope, when parking a car, and is also used by masters to perform complex stunts. The hand brake blocks any spontaneous movement of the vehicle. The parking brake is activated using a special lever mounted on the dashboard with the gearbox. The handbrake is a fairly important and irreplaceable thing, but not all drivers use it. The fact is that if the car is put in gear, it will not roll away. However, if the slope is quite steep, then the box will no longer help. In general, most novice drivers cannot imagine driving normally without a handbrake. More on this later in the article.
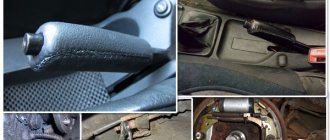
Handbrake device
Drive lever (1), lever pawl rod (2), rod spring (3), lever button (4), front cable axle (5), M6x14 bolt (6), spring washer 6 (7), drive rod (8) , lock washer 6 (9), protective cover (10), cable equalizer (11), washer 8 (12), M8 nut (13), low M8 nut (14), lever axis (15), washer 10 (16) , cotter pin 2x20 (17), right lever (18), left lever (19), right expansion bar (20), left expansion bar (21), M6 nut (22), lock washer 6 (23), cable bracket (24 ).
Design
Many people mistakenly believe that the handbrake is a simple lever located near the gearbox, on the right hand of the driver. In fact, it is a whole system of elements that are connected to each other.
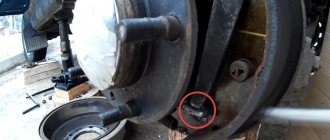
When the hand brake fails, in 90% of cases the culprit is a cable or a pair of cables that go to the rear brake pads from the equalizer.
To determine the reasons for the failure of the handbrake, it is necessary to understand the circuit diagram of the device and its components.
Handbrake diagram
The device includes a number of structural elements. Namely:
Causes of handbrake malfunction
Breakage of the handbrake is not such a rare occurrence, where cable stretching is not an exceptional problem. It happens that the handbrake on a VAZ 2114, 2115, 2113 does not hold even after tightening. We will examine the most common causes of this phenomenon in more detail.
The handbrake has an unpretentious device, but it also sometimes breaks down. There are several reasons for this:
- Drum wear.
- Deformation or rupture of the cable.
- Worn brake pads.
Any elements of the parking brake system may also be subject to mechanical damage or wear. The problem in such cases is diagnosed by eye or at a service station. In addition, the handbrake will not work if the cable falls off the lever. In this case, you can use any high-quality sealant that can prevent slipping, or simply tighten the parking brake cable.
Search results for the query: “replacing the parking brake cable for a VAZ 2115”
Many people are interested in how to replace the parking brake cable on VAZ 2114 and 2115. Due to the technical features of this unit, it fails quite quickly. If such a malfunction occurs, you will not be able to pass a technical inspection, which will add certain difficulties to the operation of the car. It will also be significantly more difficult to stop on an incline. It’s one thing if you had to stop at a traffic light or a crossing, in which case you can take off the brakes. If you have to park your car for a longer period, problems may arise. The car may roll away without your participation, and all damage caused to other people's property will have to be paid out of your own pocket. Therefore, it is better to monitor the condition of the handbrake in a timely manner. Also, the handbrake can help in case of complete failure of the service brake. This happens quite rarely on modern cars, but it still happens sometimes. In this case, you can stop the uncontrollable car only with the handbrake.
Do-it-yourself handbrake tensioning (step-by-step work)
- First of all, you should put the gear lever in first gear.
- Next, you need to count the number of clicks of the handbrake. If less than two, loosen the cable tension; if more than five, on the contrary, increase the tension.
- Then release the handbrake completely.
- Now we take two keys for 13 and climb under the car.
- To lengthen the cable, it is necessary to unscrew the lock nut; accordingly, to reduce it, the lock nut should be tightened.
- We find the muffler and remove the muffler and manifold mounts, which will greatly simplify the process.
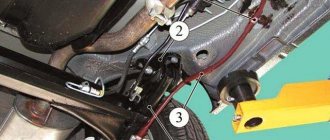
- Next we find the cable equalizer, as well as the nut and locknut.
- Using the first wrench, we loosen the locknut, and using the second, we hold it to prevent twisting.
- We adjust and systematically check the progress. An acceptable number of clicks is from two to five.
- When the required result is obtained, it is necessary to jack up the rear of the vehicle so that the wheels hang. Next, we check whether the brake pads are interfering with rotation.
- Now we raise the lever, after which the wheels should be firmly in place.
- Tighten the locknut.
Some craftsmen manage to tighten the parking brake without loosening the muffler mounts. At the same time, they use the notorious homemade keys. As a result of the fact that tensioning is carried out quite often, such devices are very relevant.
Replacing the parking brake lever cable on a VAZ-2115 car
True, one adjustment of an element of the brake system is not always enough; in this situation, the car enthusiast should know how to correctly change the parking brake cable on a VAZ-2115. The cost of this part varies between 200–1000 rubles. The difference in price is due to the manufacturer and place of purchase of the part. If you entrust the work to the service center employees, then, on top of everything else, you will have to pay approximately 400–1000 rubles for the work.
If it was not possible to tighten the cable and you need to replace this unit, you should prepare a 10-size wrench, two of the same 13-size tools, a screwdriver and a WD-40 mount.
Just as in the case of adjusting the cable, it is advisable to place the car on an inspection pit or overpass to replace the part. Then you need to lower the parking brake lever to the lower position and clean all the existing nuts, not forgetting about the leveling bar.
It will be better if two people replace the lever cable on a VAZ-2115 car, which will make the process simpler and faster. The locknut, like the adjusting nut, must be loosened and removed from the rod.
After this, you should begin removing the wheels themselves. First you need to loosen the bolts, then raise the rear of the car using a jack. It should be remembered that you can begin to remove the rear wheels only after aligning their supports.
The next step is to remove the brake drums using a hammer and a wooden spacer. The car owner needs to get rid of the locking pins that are on the pads.
The cable tip is attached to the rear brake shoe lever, which means the shoe is immediately removed, and then the tip itself. Next, you need to unscrew the fastening bolt and disconnect its sheath from the cable. As a result of this manipulation, the vehicle owner will be able to pull the cable directly out of the holes in the brake flaps, after which it will be possible to remove the sheath.
By following the instructions provided step by step, the car owner will be able to replace the used cable or lubricate it if necessary. It is worth noting that further installation of the new part is carried out in the reverse order. Upon completion of the procedure, it is important not to forget about the subsequent adjustment of the lever tension, which will determine comfortable use in the future.
Pro Tips
If you do not want to waste your time and energy on mastering a fairly simple handbrake design and tightening the handbrake yourself, you can contact a car service center. The price of the issue is at least 400 rubles, depending on the region of the country, but the event is not a one-time event. After a certain time, you will need to adjust the handbrake cable again, for which you will have to go to a car service center again. It is worth noting that the cost of the procedure will increase with each new visit.
After a tightening, it often happens that a strong cracking sound appears. It is possible that a cable or two cables were not installed correctly during tightening. Make sure that the cable does not catch on the fasteners or anything else. You can unscrew the bolts that hold the cable and see what condition they are in. If there are signs of rubbing, it is necessary to lay the cable correctly. In addition, the cable may crack because it is overtightened (even when the parking brake clicks fall within the required interval).
You have to tighten the handbrake quite often. This is due to the design of the parking brake. In addition, you will have to adjust the parking brake when replacing brake pads, repairing the handbrake, repairing the cable, and replacing the rear brake cylinder.
Replacement
It is not difficult to independently replace the VAZ-2114 parking brake cable.
To replace you need the following tool:
- key to “10”;
- two keys to “13”;
- a large screwdriver and WD-40 for smooth fastening.
Replacement is carried out on an inspection hole or overpass.
- The handbrake must be lowered all the way down.
- All parking brake nuts need to be cleaned. Don't forget about the leveling bar.
- The locknut must be loosened and removed from the rod. The same is done with the adjusting nut.
- Now they begin to remove the wheels. First loosen the wheel bolts. The rear part is lifted with a jack. Don't forget about the supports! Once they are aligned, you can remove the rear wheels.
- Remove the brake drums using a hammer and a wooden spacer. You need to knock the locking pins off the pads.
- The end of the parking brake cable of a VAZ-2114 car is attached to the rear brake shoe lever. First you need to remove the block, and then the cable end.
- Unscrew the fastening bolt and disconnect the cable sheath.
- A cable is pulled out from the holes in the brake flaps on each side.
Replacing the handbrake cable on VAZ 2114 and 2115 Routine repairs
Many people are interested in how to replace the parking brake cable on VAZ 2114 and 2115. Due to the technical features of this unit, it fails quite quickly. If such a malfunction occurs, you will not be able to pass a technical inspection, which will add certain difficulties to the operation of the car. It will also be significantly more difficult to stop on an incline. It’s one thing if you had to stop at a traffic light or a crossing, in which case you can take off the brakes. If you have to park your car for a longer period, problems may arise. The car may roll away without your participation, and all damage caused to other people's property will have to be paid out of your own pocket. Therefore, it is better to monitor the condition of the handbrake in a timely manner. Also, the handbrake can help in case of complete failure of the service brake. This happens quite rarely on modern cars, but it still happens sometimes. In this case, you can stop the uncontrollable car only with the handbrake. Diagnostics
Replacing the handbrake cable on VAZ 2114 and 2115
is carried out in the event of an obvious malfunction. To avoid problems, you should know all the possible signs of problems with the handbrake. The easiest way to diagnose is to try to turn the rear wheel with the handbrake raised. To do this, hang the rear wheel on a jack. We raise the handbrake and try to spin the wheel. If it rotates freely, then the cable may have broken or stretched. To clarify the diagnosis, ask someone to press the brake pedal. The wheel should not spin; if it continues to spin, the brake pads are most likely worn out. Sometimes drivers simplify the diagnosis, put the car on the handbrake, and try to push it away. The evaluation principle is exactly the same. The check should be carried out in the following cases:
- We noticed that the handbrake began to hold worse or does not hold at all;
- The drums began to warm up. The reason is that the pads are not fully pressed;
- When raising/lowering the lever, the cable does not react quite correctly. This is due to a worn cable getting stuck, which reduces work efficiency;
- A cable break or wear on its sheath has been noticed.
It is better to examine the last point in more detail. Shell wear is detected by visual inspection, most often during routine maintenance. A break always happens unexpectedly. This usually happens when the handbrake is raised to the top position. At the same time, you will hear a sharp sound, and the lever can be moved without any effort.
To work on replacing this structural element, you will need a standard set of keys. It is most convenient to make the replacement on an overpass or inspection pit. Preparation for work consists of washing the bottom. This will remove any excess dirt that may be interfering with your work. It is also recommended to pre-treat threaded connections with WD-40 or any other liquid wrench. Before the procedure itself, it is recommended to remove the muffler from its mounts; it will interfere with operation. Replacement is carried out in the following order:
- You should start by loosening the handbrake adjusting nut;
- The locknut is unscrewed and removed from the rod;
- Hanging out the back of the car. Be sure to place supports under it;
- Remove the wheels;
- The brake drums are dismantled. This is a rather tricky task. In addition to the guides, they are held in place by pads. They are knocked out with a hammer. To avoid damaging the drum, blows are applied through a wooden spacer;
- Remove the pads;
- The cable tip is removed;
- The screw securing the handbrake cable to the suspension is unscrewed;
- We take out the cable from the brake shield;
- Remove the cable from the fastenings on the body.
Currently reading The engine stalls when you press the gas pedal main...
Are winter tires allowed in summer?
Then the work is repeated on another wheel. After this, you can begin work on installing a new cable. To do this, all actions are performed in reverse order.
After replacement, it is necessary to adjust this element of the brake system. In general, the manufacturer recommends adjusting the cable tension every 20,000 kilometers. To work you will need 2 keys for 13. Make adjustments in the following order:
- Hanging out the back of the car. You can do without this, for example, drive a car onto an overpass, but then it will be more difficult to check the result;
- One key is used to keep the adjusting mechanism from turning. Others tighten the cable. Sometimes the nuts may rust, in which case they will need to be treated with a liquid wrench;
- Let's check the result. After 4 clicks, the wheels should lock securely. This is where you will appreciate the convenience of hanging wheels. To check, it will be enough to simply try to spin the wheel. When working on an overpass, you will have to push the machine or place it on an incline.