Installation procedure for glass lifting devices
Installation of the lifting device is quite simple.
It starts with disconnecting the battery. After this, use a curved screwdriver to unscrew 3 screws, unfasten the door trim latches and remove the door pocket. Using a thin screwdriver, pry off the handle (latch) of the window lifter - the tip of the tool is inserted into the recess between the latch and the socket. The handle itself is removed. At the next stage, the car door opening handle is dismantled. To do this, use a screwdriver to pry the handle cover and remove it. Now use a screwdriver to remove the 2 fastening screws that were hidden by the cover plate. After this, the handle can be removed without much difficulty. Using a screwdriver, you can also remove the power window button, which serves to lock the door.
After removing 6 pistons, the trim covering the car mirror adjustment mechanism is also removed. As a result, it remains easy to dismantle the door trim. Armed with a 10mm wrench, unscrew the 2 bolts that hold the auto glass clips. Next, 2 nuts securing the lifting mechanism, nuts of the upper and lower fastenings, and 3 nuts securing the lifting mechanism are unscrewed in sequence.
Upon completion of the described stage, it is time to remove the lower guide pin of the lifting device from the door panel. To facilitate and simplify such an operation, the upper pin of the guide must be bent using a screwdriver. Now the entire lifting mechanism can be safely removed through the resulting opening in the door frame.
In order to quickly, efficiently and without problems install a new electric window regulator in the door, you must first make sure that it is in the fully folded position. Otherwise, the entire operation will not be possible.
However, as already mentioned at the beginning, replacing an inoperative device with a new one is most often not particularly necessary. If the contractor can accurately determine the reason why the window regulator refuses to function normally, it can be repaired quite easily.
Replacing the window regulator
Which mirrors are suitable for the VAZ 2114: we understand the intricacies of the choice
If the window regulator of the VAZ-2114 does not work, it can be replaced with a new one. To do this you need to do the following:
- Using a 10 mm wrench, unscrew the three nuts that hold the glass guide.
- Using a size 8 wrench, unscrew the three nuts that secure the electric motor or manual drive gearbox.
- Disconnect the glass mounting bracket from the glass holder. To do this, you need to unscrew the two 8mm bolts on the bracket.
After this, you can pull the window regulator out of the door. The glass must remain raised. Otherwise it will be impossible to remove the mechanism.
The new lift is installed in the reverse order. However, there is no need to rush to tighten the glass mounting bracket. First you need to make sure that the glass is in the correct position in the guides and moves clearly in them.
How to remove the window regulator on a Priora
If the window regulator does not work, the malfunction can be caused by two reasons - problems in the electrical or mechanical parts. In some cases, the part can be repaired, but in others, all that remains is to remove the non-working window regulator and replace it with a new device. What are the features of electrical and mechanical malfunctions of Lada Priora windows? How to properly replace the mechanism? Let's look at these questions in more detail.
Mechanical problems
Failures in the mechanical part can be detected without ignition. Below are the main malfunctions of this type:
- Recession of the shield.
- Worn gear bearing.
- Worn teeth on the gear of the device.
- The window regulator is jammed due to oxidation of the moving elements.
- Damage to the cable mechanism. During operation, stretching or damage to integrity is possible, which in the future often leads to the cable slipping off the guide rollers.
Electrical faults
In a situation where the window regulator on a Lada Priora car does not work, the cause may be a malfunction in the electrical part, namely:
- Fuse F31 has blown. This is where you should start checking in the event of a mechanism failure. The fuse link is located in the power control mounting block. If an element burns out due to a short circuit, replace it. At the same time, make sure that the wiring is intact.
- Faulty motor brushes of the electric drive (they may stick or freeze). A similar problem is possible if the graphite brushes overheat. As a result, the plastic socket in which they are installed melts. The shields “stick” to the hole and stop moving.
- The voltage at the input to the electric motor has disappeared. If the window regulator does not work, one of the reasons is a break in the supply circuit. Look for such a breakdown of the Priora in the control unit or in the relay. It will be useful to clean the contact group.
Video: Repair of the front door window regulator on the Lada Priora
If the video does not show, refresh the page or style=”color:#CC3333″>click here
Source
We install power windows on a VAZ 2109
How to tighten the handbrake on a VAZ 2114: we understand the intricacies
Not all VAZ 2109 cars are equipped from the factory with electric windows (ESP). And if at a time when the serial production of the “nine” was just beginning, electric windows were more of a luxury for the domestic car enthusiast, today “oars” on the car doors are the exception rather than the rule. Fortunately, the domestic industry produces electric windows for Russian cars that were not originally equipped with them, including the VAZ 2109. These are the electric windows we will install on our Lada Samara with our own hands.
Replacement cost
Wiring diagram for power windows. installation of electric windows
Replacing VAZ-2114 window regulators is cheaper than installing electric mechanisms to replace manual ones. If, in order to simply change the window regulator, you need to disassemble the door trim, dismantle the old mechanism and install a new one, then to install an electric version instead of a manual one, you need to partially disassemble the instrument panel, select a power source and run the wiring from it inside the door. This work requires the intervention of an electrician. Because power cannot be taken from anywhere: the source must match the power of the electric drive, and in the event of a short circuit, the fuses must protect the main wiring of the car. In addition, the power windows must operate when the ignition switch is on.
To summarize, we can say that in the first case, the qualifications of the work are minimal, and it can be done by yourself, without having specific knowledge, while working with an electrician requires a specialist who needs to be paid.
The price of a VAZ-2114 window lifter ranges from 2.5 thousand to 3.5 thousand rubles, depending on the design and manufacturer. But as was said earlier: the lever and rack and pinion options are preferable. If you buy a device for only one side, then the left front window regulator will be more expensive, since it is more in demand.
Read US on VKontakte
Wiring diagram of power windows Lada Priora
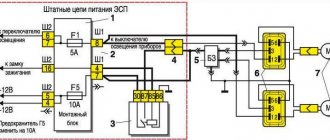
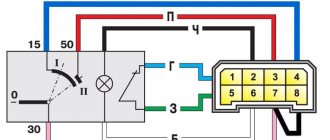
Left front door wiring harness diagram : 1 - block to the rear wiring harness; 2 - to the speaker; 3 — window lift electric motor; 4 — switch block; 5 — door lock; 6 — rear view mirror;
Wiring harness diagram for the right front door : 1 - block to the rear wiring harness; 2 - to the speaker; 3 — electric window lift motor; 4 — switch block; 5 — door lock; 6 — rear view mirror; 7 — block to the rear wiring harness;
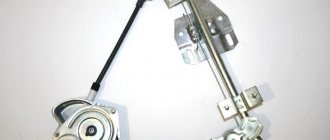
Lever window lift
One type of window lifting mechanism for the VAZ-2114, which, unfortunately, does not come from the factory, is a lever window lifter. These products are manufactured by Ningbo Stone.
These devices have proven themselves to be reliable and unpretentious mechanisms. Unlike cable window lifts, they have a greater lifting force. Glass frozen in winter is not a problem for them. They can handle them easily, while cable lifts experience significant stress on both the mechanism and the electrics.
One small disadvantage of the lever mechanism is that the speed of raising the glass is not the same. The higher the glass, the smaller it is. This is due to the geometry of the lifting mechanism. A good example would be scissors. If you take them by the rings and move the ends apart as much as possible, and then bring the rings closer to each other, it becomes clear that the height of the cutting ends changes faster when the rings are moved apart as much as possible. Conversely, the rate of ascent decreases as the rings move closer together.
It is this circumstance that allows this mechanism to create significant force. As we know from physics lessons, when you lose in distance traveled, you gain in strength. The same thing happens here: at the top of the range of motion, the distance traveled decreases and the lifting force increases.
The mechanism is driven by an electric motor and is connected as standard to the VAZ-2114 window lift circuit.
Troubleshooting electrical problems
During the operation of the vehicle, problems may arise due to malfunctions of electrical components.
- at the operation of the power unit, preventing it from developing its rated power;
- on the operation of devices, not allowing control of engine systems and other components;
- on the operation of lighting devices and comfort mechanisms (heating systems, interior lighting, window lifts, etc.)
Ignition system malfunctions
The main signs of a malfunctioning ignition system are:
- Difficulties in engine operation when accelerating the car;
- Loss of engine power during operation;
- Unstable or erratic idle;
- Malfunction of one or more cylinders.
Do-it-yourself troubleshooting should begin by checking sparking.
- Turn on the ignition;
- Remove the wire tip from the spark plug of the first cylinder;
- We bring it to the metal part of the motor at a distance of 4-5 mm;
- Turn on the starter;
- Let's see if a spark jumps between the wires;
- Similarly, we check the wires from spark plugs 2, 3 and 4 of cylinders.
Advice: If the spark discharge was stable in all cases, then the reason for the interruption in engine operation lies in the spark plugs. If there was no spark, the cause of the failure should be sought in the primary circuit from the generator to the ignition coil.
The search starts with:
- Directly ignition coils;
- Ignition module;
- ECU - on cars with VAZ-11183-1000260 engine
To check the ignition coil, you need to use a tester, with which you should measure the resistance of the primary and secondary windings.
Checking the performance of the ignition coil with an ohmmeter
Advice: If the readings obtained do not correspond to the data given in the car's passport, then the coil must be replaced. The probable cause of coil failure is a breakdown in the winding.
The ignition module is also checked using a tester. To do this, measure the resistance at its paired high-voltage terminals of the ignition module. The resistance should correspond to 5.4 kOhm.
The cause of module failure may be increased resistance between the terminals
Advice: if the cause of engine interruptions lies in the ignition module, then it needs to be replaced. The asking price is no more than 1000 rubles.
Sensor malfunctions
The injection engine is equipped with a fairly large number of sensors. And their failures and breakdowns can also lead to unstable operation of the power unit or control devices.
Tip: Underhood wiring can also cause the engine to run rough. Before using radical methods, you can try moving the connectors and terminal blocks. If operation returns to normal, the pad should be replaced with a new one.
Terminal block of the mass air flow sensor (MAF)
Most sensors are analyzed by the scan tool and if there is a problem, the CHECK ENGINE light will illuminate on the instrument panel.
However, some such as:
- Mass air flow sensor;
- Idle speed sensor;
do not have such functions. This means that their failure and malfunction can be found out only after inspection. Diagnostics of such sensors responsible for engine operation can be carried out by disconnecting them.
CHECK ENGINE lamp on the instrument panel
Tip: If after removing the wire from the sensor the engine operation does not change, then the sensor is faulty. It should be replaced with a new one.
DPKV installation location
If the engine does not start at all, then the most likely cause of the failure is a breakdown of the crankshaft position sensor.
Without it, the ECM cannot determine the engine operating phases and, accordingly, will not give a signal:
- Fuel injectors about the start and cycle of operation;
- The ignition module knows when the discharge is applied to the spark plugs;
- Throttle valve drive about opening angle, etc.
Conclusions: as you can see, the VAZ 2114 has absorbed not only the best from its predecessor, but also inherited some problems with the electrical part. But if you know the principles of operation, troubleshooting will not turn into an unsolvable task. On the contrary, having visual diagrams in front of you, you can easily eliminate the cause of the interruptions and can continue to use the car.
Installation of electric windows on a VAZ
The procedure is performed in the following sequence:
- temporarily remove the glass seal located on the inside of the door;
- remove the glass, and then dismantle the window regulator fastening mechanism;
- we install devices that will operate from an electric drive;
- connect the negative terminal to the battery and check the operation of the new window regulator;
- We install the glass in place and trim the door.
Unlike conventional mechanical devices, power windows are not equipped with traditional gear reducers, but with a special drum. The shaft of a DC electric motor is inserted into its hole located in the center. In this case, the motor is only a component of the gearmotor, on which, as we found out earlier, the speed and quality of raising and lowering the windows depends.
Installation of the lifting device is quite simple. It starts with disconnecting the battery. After this, use a curved screwdriver to unscrew 3 screws, unfasten the door trim latches and remove the door pocket. Using a thin screwdriver, pry off the handle (latch) of the window lifter - the tip of the tool is inserted into the recess between the latch and the socket.
The handle itself is removed. At the next stage, the car door opening handle is dismantled. To do this, use a screwdriver to pry the handle cover and remove it. Now use a screwdriver to remove the 2 fastening screws that were hidden by the cover plate. After this, the handle can be removed without much difficulty. Using a screwdriver, you can also remove the power window button, which serves to lock the door.
After removing 6 pistons, the trim covering the car mirror adjustment mechanism is also removed. As a result, it remains easy to dismantle the door trim. Armed with a 10mm wrench, unscrew the 2 bolts that hold the auto glass clips. Next, 2 nuts securing the lifting mechanism, nuts of the upper and lower fastenings, and 3 nuts securing the lifting mechanism are unscrewed in sequence.
Upon completion of the described stage, it is time to remove the lower guide pin of the lifting device from the door panel. To facilitate and simplify such an operation, the upper pin of the guide must be bent using a screwdriver. Now the entire lifting mechanism can be safely removed through the resulting opening in the door frame.
VAZ-2114 is a car in which a window regulator malfunction is a common occurrence. This is one of those troubles that does not interfere with driving, but pretty much spoils the nervous system of a car enthusiast. The inability to ventilate the air in the cabin or reduce the temperature in the summer often reduces the composure that is so necessary for a person behind the wheel.
Reasons for poor performance
There are not so many reasons why the VAZ-2114 window regulator does not work well. Conventionally, they can be divided into mechanical and electrical. Let's consider the main ones:
- Glass distortion. Often the reason for poor performance is not the window lifting mechanism itself, but a violation of the position of the glass relative to its guides. This can happen either due to the bracket fastening being unscrewed, or the damp rubber fixing the glass in the holder has ceased to perform its functions. This option occurs much less frequently.
- Contamination of the guide rubbers. The glass moves inside the grooves formed by the rubber bands. These grooves tend to become clogged with dirt. It, like an abrasive, increases the friction force, which creates resistance to glass movement.
- The window lift mechanism is dirty. During operation, drivers do not realize that maintenance is also necessary inside the doors. This is especially true for the cable mechanism. Over the years, not only does contamination occur, but also the lubricant of the mechanism and cables dry out, which increases the friction force. The front left window regulator fails faster due to more frequent use.
- The next reason is wear of the plastic teeth of the mechanism drive. In this case, when you press the control button, you can hear the electric motor running, but the glass does not move.
- Broken cables. This occurs due to attempts to open frozen windows. With repeated loads exceeding the rated ones, the cables begin to delaminate and gradually fail.
Electrical reasons can be reduced to either a short circuit or loss of contact in the VAZ-2114 power window circuit.
Why does the Priora window lifter not work?
Window lifter failure may occur due to a malfunction of the following systems:
The window lift motor has its own wear life; if it is exceeded, the mechanism fails, and the motor itself must be replaced.
If everything is fine with the motor, but the lifts still do not work, then the cause of the breakdown may be an electrical circuit or damaged wires.
"Priors" window lifter block
The car's safety unit contains a component responsible for the car's window regulators. If it fails, the mechanism stops functioning.
The Priora window control buttons can also cause a malfunction. This mainly occurs due to oxidation of the button contacts.
Situations also arise when the functioning of the Priora windows is quite unstable. For example, they can only work when the ignition is on or they work partially. It may be that the front ones function normally, but the rear windows on the Priora do not work. Then, most likely, the problem lies in the car's electronics.
We install power windows on a VAZ 2109
Not all VAZ 2109 cars are equipped from the factory with electric windows (ESP). And if at a time when the serial production of the “nine” was just beginning, electric windows were more of a luxury for the domestic car enthusiast, today “oars” on the car doors are the exception rather than the rule. Fortunately, the domestic industry produces electric windows for Russian cars that were not originally equipped with them, including the VAZ 2109. These are the electric windows we will install on our Lada Samara with our own hands.
Manual window lifters
The glass lifting devices on the front and rear doors are similar. The difference is only in the sizes and proportions of the parts, while the operating principle is the same.
The main part is the guide in which the bracket that fixes the glass moves. The guide has fastening bolts at the top and bottom. With their help, it is installed in its position on the door. On the upper and lower edges of the guide there are rollers rigidly fixed along which the cables run that drive the glass mounting bracket.
Another part of the window regulator is the mechanism that operates the cable. It consists of a roller and a gearbox, which is rotated either by a handle or by an electric motor (if the VAZ-2114 window regulator has an electrical circuit).
To ensure that the cables are constantly lubricated and not subject to contamination, they are placed in rigid steel jackets that connect a system of three rollers together.
There are two threaded holes on the top of the glass bracket. The bolts that secure the glass holder are screwed into them.
Why doesn't the power window work on the Lada Priora? How to remove and install a new window regulator?
If the window regulator does not work, the malfunction can be caused by two reasons - problems in the electrical or mechanical parts. In some cases, the part can be repaired, but in others, all that remains is to remove the non-working window regulator and replace it with a new device. What are the features of electrical and mechanical malfunctions of Lada Priora windows? How to properly replace the mechanism? Let's look at these questions in more detail.
Mechanical problems
Failures in the mechanical part can be detected without ignition. Below are the main malfunctions of this type:
- Recession of the shield.
- Worn gear bearing.
- Worn teeth on the gear of the device.
- The window regulator is jammed due to oxidation of the moving elements.
- Damage to the cable mechanism. During operation, stretching or damage to integrity is possible, which in the future often leads to the cable slipping off the guide rollers.
Electrical faults
In a situation where the window regulator on a Lada Priora car does not work, the cause may be a malfunction in the electrical part, namely:
- Fuse F31 has blown. This is where you should start checking in the event of a mechanism failure. The fuse link is located in the power control mounting block. If an element burns out due to a short circuit, replace it. At the same time, make sure that the wiring is intact.
- Faulty motor brushes of the electric drive (they may stick or freeze). A similar problem is possible if the graphite brushes overheat. As a result, the plastic socket in which they are installed melts. The shields “stick” to the hole and stop moving.
- The voltage at the input to the electric motor has disappeared. If the window regulator does not work, one of the reasons is a break in the supply circuit. Look for such a breakdown of the Priora in the control unit or in the relay. It will be useful to clean the contact group.
At the end of the article, watch a selection of videos.
If the mechanism itself breaks down, it needs to be replaced.
Features of power windows on the Lada Priora
Like many other cars, the Lada Priora has sliding windows on the front and rear doors. They are moved up and down using power windows, which are controlled using a button on the door. The driver of the car controls the movement of all windows, and the passenger controls only his own.
Manual window lifters
If the window lift cable breaks, after 10 seconds the microcontroller will move on to raising the next window. Wiring diagram for power windows.
Here you can download the archive with the board in lay format.
It is ideal to install 2 door closers on each door, as is standard on foreign cars - then the AUTO mode will be on 2 doors at once in parallel, and not alternately. The circuit was provided by Ya. The test can be performed using a multimeter or a regular 12-volt light bulb.
Power contacts are always marked as 30 output, 87 input when control is applied to the winding and 88 normally closed input. On the latest Pandora November and newer, the circuit is correct, so there is no need to swap the wires from the buttons and motors! Thanks to the correct design and operation of automatic window lifters, it is possible to control the front window lifters in two opposite directions. But on domestic cars they are more often installed in the cigarette lighter area or near the handbrake.
Articulating-lever systems. Do you have any questions? To do this, you can use a special silicone spray.
Having prepared all these tools, you can begin installing the drives on the car. Only after this can the glass be fixed.
In principle, there is nothing special to connect there. But on domestic cars they are more often installed in the cigarette lighter area or near the handbrake. It allows you to see how to connect electric windows to the vehicle's on-board network.
It must be moved to a comfortable position that would allow any position of the glass to be fixed without any problems. To summarize, we can say that in the first case, the qualifications of the work are minimal, and it can be done by yourself, without having specific knowledge, while working with an electrician requires a specialist who needs to be paid. All that remains is to install the glass, as well as the button for the window lifting mechanism, securing them with sealant in a specially made connector in the door trim. Do-it-yourself Electric Window Lifter (ESP), diagram and what you need
Wiring diagram for a VAZ 2114 car
Electrical wiring components
A single-wire circuit (used for all electrical wiring) has negative terminals of the consumer and the source, which are closed on the car body. The VAZ 2114 body is the second connector.
Complete circuit with electronics in VAZ 2114
Electrical wiring includes the following components:
- Block headlight.
- Anti-fog headlight.
- Temperature indicator.
- Mounting block housing.
- Electric fan motor in the engine cooling system.
- A block connected to the ignition system wiring group.
- Engine compartment light switch.
- Rear wiper motor connector plug.
- Devices.
- Car signal connection block.
- Electric motor for windshield wipers.
- Loudspeaker signaling device (SSU) housing.
- An indicator showing the volume of water in the glass washer.
- Front brake pad mode indicator.
- Oil quantity indicator.
- Generator and starter housing.
- Reversing headlight switching device.
- Lubricant pressure warning light indicator.
- Windshield wiper gear motor housing.
- Light housing under the hood.
- Engine coolant temperature indicator. 2x h16
Circuit breakers
In fact, the VAZ 2114 wiring is always connected to fuses. Such fuses do not protect only the circuit of the generator and charging device, the mechanism for switching on the power unit of the machine, as well as the winding of the backlight cut-off relay.
Before replacing a failed electrical circuit fuse, you need to find out exactly the reasons for the wiring overload, as well as its elimination. Finding the cause will be much easier if you first read the following materials. Below is a list of fuses and their purposes.
The data (the name of the fuse and the electrical circuit protected by it) shows a complete list of all possible wiring fuses. For each car, their number may differ.
- F1. Wiring diagram for the rear fog lights, electric motors for the headlight wipers, housing for the control lamp and its shutdown, electric motor for the headlight cleaner.
- F2. Turn signals and turn signal relays, hazard warning lights, hazard lights.
- F3. The wiring of the lamp illuminating the interior is customized depending on the personal preferences of the car owner, the ignition switch light, the car trunk light, the engine functionality check indicator, the on-board computer, the brake light indicator, and the clock.
- F4. A plug for connecting a portable lamp, a plug that connects the heating of the stern and rear windows.
- F5. Connection diagram for SGU, radiator propeller electric motor, VIP signal relay.
- F6. Power window relay, power window connection circuit. Fuse box in VAZ 2114
- F7. Wiring of the electric motor of the VAZ 2114 stove, electric motors for the headlight wipers and windshield washer, cigarette lighter circuit that illuminates the glove compartment, light bulb, relay for connecting the aft glazing heater winding.
- F8. Wiring diagram for the right fog lamp.
- F9. Left fog lamp diagram.
- F10. Electrical wiring for the side lights on the left side, an indicator that shows whether the side lights are on, a circuit for the engine compartment lamp, illumination of license plates, heating system levers and ashtrays, a cigarette lighter, a circuit for illuminating the switches.
- F11. Side lights located on the left side.
- F12. Right low beam design.
- F13. Left low beam design.
- F14. High beam device and left bulb. It is also an indicator for switching to high beam.
- F15. Right high beam design.
- F16. Wiring of turn signals, hazard light relay, relay responsible for the state of the lamps in the headlights, rear traffic indicator, lights signaling the following: low oil and brake fluid levels, whether the parking brake is on, low battery charge. Also a clock, an on-board computer and a generator excitation winding circuit during the start of the power unit of a VAZ 2114 car.
In addition to all the fuses listed above, which are located in the mounting block, there are 3 fuses. These fuses are located under the magazine shelf. The controller and relay circuit are also located here, with the help of which the VAZ 2114 power unit is controlled.
How to replace the door window lifter on a VAZ 2113-VAZ 2115?
Note! The window lifter on both the rear door and the front door is replaced almost identically, although there are small nuances, but you don’t even have to pay attention to this, and therefore if you learn how to replace the window lifter at the front, then you can also replace it on the back door and vice versa, but there is just one But! The window lifter can be replaced both with the glass removed from the door and with the glass installed (How you do it is up to you, if you don’t want to remove the glass, then in this case you can simply fix it with a screwdriver, but if suddenly the door moves a lot, then the glass may fall and break, but this won’t happen to you with the glass removed), if you still want to remove it, then in this case read the article entitled: “Replacing glass on a VAZ”, if you don’t want to remove the glass and are sure that it will not fall, then start reading the article; in it we just described the process of replacing a window lifter with the glass installed on the car door!
Troubleshooting
Minor breakdowns include glass rattling, noise in the window lifter, free movement of glass under mechanical influence (for example, the glass does not rise or fall with the lifter, but the same can be done by hand). Their cause is skewed glass, failure of rollers or cables. If the glass is skewed, it must be adjusted. If the cable is broken, it must be replaced. If the cable comes off the rollers, you need to pull it back and adjust the car window regulator. The occurrence of noise is a sign that the mechanism is poorly lubricated. To eliminate the malfunction, you need to thoroughly lubricate all the power window mechanisms, as well as the glass guides. If the mechanism operates slowly, it should also be lubricated or replaced with a new one. Over time, the speed of lowering and raising the windows decreases due to wear and tear on the window lift motor.
Replacing the window regulator
If the VAZ-2114 window regulator does not work, it can be replaced with a new one. To do this you need to do the following:
- Using a 10 mm wrench, unscrew the three nuts that hold the glass guide.
- Using a size 8 wrench, unscrew the three nuts that secure the electric motor or manual drive gearbox.
- Disconnect the glass mounting bracket from the glass holder. To do this, you need to unscrew the two 8mm bolts on the bracket.
After this, you can pull the window regulator out of the door. The glass must remain raised. Otherwise it will be impossible to remove the mechanism.
The new lift is installed in the reverse order. However, there is no need to rush to tighten the glass mounting bracket. First you need to make sure that the glass is in the correct position in the guides and moves clearly in them.
Removing the rear door glass
We carry out work when replacing door glass. Operations are shown on the left rear door. The glass of the right rear door is removed in the same way. Remove the door trim (see “Removing the rear door trim”). Set the glass to the bottom position.
Remove the inner glass seal.
Using a slotted screwdriver, pry the outer glass seal from the inside of the door...
...let's take it off. Set the glass to the top position.
Using the “8” head, unscrew the bolt securing the glass guide...
...and bring the guide down through the technological hole in the inner door panel.
Using a 10mm socket, unscrew the two bolts securing the glass holder to the slider of the window lifter mechanism.
We remove the glass from the door.
How does a power window work?
If it does not light up, then try swapping the contacts. This will give you the opportunity to improve your car without resorting to the help of a car service.
Remedy If problems arise due to the power supply, then first of all you should check the fuses. If the glass moves with a certain force, after a similar loosening of the nut, the short guide will need to be fixed in the lower hole. You can place the control buttons in any convenient place, but it is best to place them in the door handle.
Then, after the control pulse has stopped supplying, the capacitor that has been recharged is connected to the winding of relay K 2. Successful installation. Electrical work Remember that the power window fuse can protect all important components from short circuits.
Do-it-yourself repair If after checking it turns out that the entire mechanism is working, then the window lifter button needs to be repaired. The author of the video is Nik86 auto-construction. When the glass is completely closed, the motor slows down with a simultaneous increase in current, which is collectively accompanied by a constant drop in voltage across the resistor R4 itself.
To do this, you need to supply them with battery power, and also turn on the car's dimensions. Conventionally, they can be divided into mechanical and electrical. The main button is the button that controls the power window of the door on which it is installed.
We will take power for the electric windows from the cigarette lighter. This is due to the geometry of the lifting mechanism. If the installation is carried out on several doors, then you will need the same number of kits as there are doors. The mechanical part is complete, let's move on to the electrical part
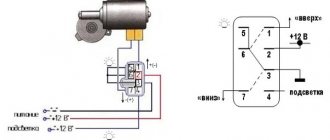
Pay attention to the wiring diagram for the power window button, check it several times to avoid mistakes
All moving parts of the electric drive must be lubricated - a CV joint type compound is suitable. You start all work from the front driver's door. The transformer is wound on a 10x6x3 ferrite ring; if you don’t have one, it doesn’t matter, any similar size will do. Electrical work Remember that the power window fuse can protect all important components from short circuits. ES kit for installation on a car. Which type to choose is everyone’s decision.
Before you start working with the car's electrical network, you need to take care of your own safety and, of course, disconnect the power from the battery. Apply voltage to the entire system through the power window fuse and check operation. Installing a relay on the power windows of a VAZ 2113
Lada Priora sedan “COCAINE” › Logbook › Window lifter repair
Hello everyone, dear subscribers and readers of the blog))) Just a couple of days ago, the driver's window lifter began to work poorly at times, I obviously already knew the reason, since about 2 weeks ago there was the same situation, and after disassembling the lifter I saw worn out brushes, then I just a little I stretched the springs and it worked again as before. Today I immediately went to a car and motorcycle store, bought brushes and when I arrived home I started doing repairs.
So, to begin with, I removed the trim, then unscrewed 6 nuts securing the window regulator and 2 bolts that secure the glass, with a couple of complicated movements and the window regulator was removed from the door))) After removal, I saw a not very pleasant picture
There was water in the motor, I don’t know how it got there, but that’s not good. Well, okay, I quickly disassembled the motor, removed the brushes and went home to solder new ones. But before this, it is necessary to fit new brushes, since they are longer. I took a metal file and carefully sawed it approximately in half; I will say in advance after soldering I adjusted the brushes using a round file.
In general, I soldered it, adjusted it to size and began to slowly put everything back together.
When assembling, I carefully coated everything with sealant, I hope it will help prevent water from entering. I assembled the motor and checked it before installation - everything works. I put the window regulator in place, adjusted the glass so that it wouldn’t warp when lifting, installed the trim, checked it again and, satisfied with the work, went to rest))))
Types of window lifters
Additionally, you need to take two more wires with which to connect the button to the power window motor. Duplicate buttons must also be supplemented with two 5-pin relays; they are not on the diagram. Black from gray - to hole number 6. Since everyone’s door closers may be different, the connection diagram may differ accordingly. There may be situations where everything is fine electrically, but the power window switch still does not work. You will need one pair for one door. The backlight is powered by one of the standard buttons. Electrical work Remember that using a power window fuse can protect all important components from short circuits. The next reason is wear of the plastic teeth of the mechanism drive. Once you have made the repair, test the window again to see if you have resolved the problem. They can handle them easily, while cable lifts experience significant stress on both the mechanism and the electrics. Removing a standard power window If you plan to install rear power windows on your car, you will have to disassemble all the doors. Save to Album There is only one output wire from the closer to the engine - this is GREEN - and you cannot install a relay here since you need to determine the engine noise. In any case, you should not take a wire cross-section less than 1.5; more is better. If the engine is faulty and you cannot service it successfully, replacement is the only answer.
In addition, if you plan to replace it with an electric lift, then you need to dismantle the opening limiter, since a bundle of wires will need to be inserted into the door. There are 8 clips installed around the entire perimeter of the door. Next, check the output side of the relay - current means the relay is bad and needs to be replaced, otherwise the problem is with the control switches, wiring, or the motor itself. All that remains is to install the glass, as well as the button for the window lifting mechanism, securing them with sealant in a specially made connector in the door trim.
Set of socket wrenches or sockets. Addition from It is possible to connect any number of duplicate buttons.
I also stuffed it into the same box as the parking brake. Front passenger door lift motor. Automotive relay. How does it work? What is it for? How to connect?
Priora window lift diagram
Window lift diagram for Lada Priora
Despite the fact that the principle of controlling the window lifters is carried out exactly the same as in other models, the Lada Priora car uses a slightly different scheme of window lifters. The main difference from other models is the absence of a power window unit. They are controlled by an integrated electrical package controller. The designers made this design to ensure ease of control. To fully open and close the window, the driver does not need to hold down the control button. All that is required in such a situation is to hold down the button for a certain time. If you do not meet the specified time period by releasing the key too early, the window regulator will stop raising or lowering the window. In this case, the buttons do not cause network switching, as on a number of other models. They perform the function of a sensor, transmitting information to the electronic unit.
In addition to the use of electronic units, the operation circuit of the Lada Priora 2014 car windows supplies power to the electric drive in a specific way. One of the wires available in the system is multifunctional. It can control the mirrors, supply power, and also control the door lock solenoid. Consequently, this wire can change polarity, depending on the characteristics of the switched-on consumer. The wires on the left and right sides are connected separately to connector X1. In this case, pins 4 and 6 are used. This property is very useful when locating potential circuit faults.
You may also need advice about Lada Priora error codes, which will help you identify a malfunction in your car.
How to look for faults in the current circuit of a Lada Priora car if the passenger door windows stop working? All power windows are unlikely to break at once. If you had to encounter such a breakdown in practice, most likely the problem lies in the electronic control unit for the electrical package. It is worth noting that the breakdown of a single window regulator is very common in practice, especially on cars of the first production. The reason, again, is a malfunction of the unit, when the circuits responsible for controlling the electric windows completely or partially burn out. This is due to shortcomings in the circuits by the manufacturer. The same reason could cause the window regulators to operate jerkily. As a result, the block manufacturer completely eliminated the problem, but this did not improve the situation, since older models still suffer from this “disease.” But you shouldn’t hope that all the problems are just a (to put it bluntly) unstable block. Moreover, you should not believe that replacing the control module will correct the situation. There are a number of other reasons why malfunctions may occur.
Wiring diagram of power windows of Lada Priora
The search for the problem should begin by checking the correct operation of the door lock, inside which the lift has stopped working. If the lock also refuses to work, you need to check whether there is a minus or power from the glass unit control module, connector X1, pin 4 and (or) 6, depending on the malfunction of the board. Connect the warning lamp to the car body while simultaneously pressing any button on the power window. Repeat the operation again, but with the positive wire. Make sure that pins 1, 13, 5 and 11 are working correctly. If the control lamp lights up in all cases, it means there are no problems with the operation of the control unit. Most likely, there is a problem in the electric drive, or a break in the wiring. After removing the casing, connect the control ramp between the two wires that go to the electric drive. If the lamp starts to light when the up/down button is turned on, this means that there is a problem with the electric drive. Otherwise, you are dealing with a broken wire.
Compared to the passenger windows, the driver's window uses a slightly different scheme. This is due to the fact that the driver can control all modules in the cabin at once. Without using diagnostic equipment, the driver can check the short or continuity to ground of the wire that supplies the signal, as well as power to the driver's door module.
pol-z.ru