Signs of a faulty clutch
The clutch on any car wears out over time and begins to perform worse. Thus, the clutch system must be additionally diagnosed when the following signs appear:
- In cars with a manual transmission, the clutch “grabs” when the corresponding pedal is at the top. And the higher it is, the more worn out the clutch is. In particular, this is easy to check when the car is moving from a standstill.
- Reduced dynamic characteristics. When the clutch discs slip between each other, the power from the engine is not fully transmitted to the gearbox and wheels. In this case, you can often hear an unpleasant smell of burnt rubber emanating from the clutch disc.
- Reduced dynamics when towing a trailer. Here the situation is similar to the previous one, when the disk can rotate and not transfer energy to the wheels.
- When moving from a standstill, the car jerks jerkily. This occurs due to the fact that the driven disk has a damaged plane, that is, it is warped. This usually happens due to overheating. And overheating is caused by significant force on the car’s clutch elements.
- The clutch "drives". This situation is the opposite of slippage, that is, when the drive and driven discs do not move completely apart when the clutch pedal is depressed. This is expressed in difficulty when changing gears, to the point that some (and even all) gears are simply impossible to engage. Also, during the switching process, unpleasant sounds usually appear.
The clutch wears out not only for natural reasons, but also due to improper use of the machine. You must not overload the car, tow very heavy trailers, especially when driving uphill, and you must not drive away while slipping. In this mode, the clutch operates in a critical mode, which can lead to its partial or complete failure.
If at least one of the above symptoms is detected, it makes sense to perform a clutch check. Driving with a faulty clutch not only causes discomfort when operating the car, but also aggravates its condition, which results in expensive repairs.
How to determine clutch wear
The clutch system is used in all modern cars paired with a manual transmission. This unit has the main task of transmitting and adjusting torque from the car engine to its chassis. The average lifespan of the main clutch parts is considered to be 120-150 thousand kilometers. When the first symptoms of a malfunction appear, it is recommended to immediately carry out repairs and replace worn parts, otherwise there is a risk of being left on the road with a stationary car. clutch
What parts wear out in the clutch:
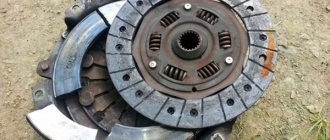
Clutch disc
Under load of high torque, the friction linings wear down and become ineffective. In addition to everything else, severe wear of the linings leads to a high probability of damaging the engine flywheel. The rivets that secure the pads to the disc itself become exposed and begin to scratch the flywheel, resulting in overheating and imbalance.
How to check the clutch on a car
For detailed diagnostics of clutch system elements, additional equipment and often their dismantling are required. However, before moving on to these complex procedures, you can simply and quite effectively check the clutch and make sure that it has failed or not without removing the box. four simple ways to do this .
Check at 4 speed
For cars with a manual transmission, there is one simple method by which you can verify that the manual transmission clutch has partially failed. The readings from the car's standard speedometer and tachometer located on the dashboard are sufficient.
Before checking, you need to find a flat section of the road with a smooth surface about one kilometer long. You will need to drive along it by car. The algorithm for checking clutch slip is as follows:
- accelerate the car to fourth gear and a speed of about 60 km/h;
- then stop accelerating, take your foot off the gas pedal and let the car slow down;
- when the car starts to “choke”, or at a speed of approximately 40 km/h, sharply give the gas;
- During acceleration, you must carefully monitor the speedometer and tachometer readings.
If the clutch is working properly, the arrows of the two indicated instruments will move to the right synchronously. That is, with an increase in engine speed, the speed of the car will also increase, inertia will be minimal and is determined only by the technical characteristics of the engine (its power and the weight of the car).
If the clutch discs are significantly worn , then at the moment you press the gas pedal there will be a sharp increase in engine speed and power, which, however, will not be transmitted to the wheels. This means that the speed will increase very slowly. This will be expressed in the fact that the speedometer and tachometer needles do not move to the right synchronously . In addition, at the moment of a sharp increase in engine speed, a whistle will be heard .
Checking the handbrake
The presented test method can only be performed if the hand (parking) brake is properly adjusted. It should be well adjusted and clearly fix the rear wheels. The algorithm for checking the clutch condition will be as follows:
- set the car to the handbrake;
- start the engine;
- press the clutch pedal and engage third or fourth gear;
- try to start, that is, press the gas pedal and release the clutch pedal.
If at the same time the engine jerks and stalls, then everything is in order with the clutch. If the engine runs, then the clutch discs are worn out. The disks cannot be restored and either adjustment of their position or complete replacement of the entire set is necessary.
External signs
The serviceability of the clutch can also be indirectly judged simply when the car is moving, in particular uphill or under load. If the clutch slips, then there is a high probability of a burning smell in the cabin , which will come from the clutch basket. Another indirect sign is the loss of dynamic characteristics of the car during acceleration and/or when driving uphill.
The clutch "drives"
As stated above, the expression “drives” means that the driving and driven clutch discs do not move completely apart when the pedal is depressed. As a rule, this is accompanied by problems when engaging/shifting gears in a manual transmission. At the same time, unpleasant creaking and grinding sounds are heard from the gearbox. The clutch check in this case will be performed according to the following algorithm:
- start the engine and let it idle;
- fully depress the clutch pedal;
- engage first gear.
If the gear lever is installed in the appropriate seat without any problems, the procedure does not take much effort and is not accompanied by a grinding noise - this means that the clutch does not “drive”. Otherwise, a situation occurs when the disc does not disengage from the flywheel, which leads to the problems described above. Please note that such a breakdown can lead to complete failure of not only the clutch, but also lead to a malfunction of the gearbox. The described breakdown can be eliminated by bleeding the hydraulics or adjusting the clutch pedal.
No switching
When a clutch cable is torn or stretched, it can present itself in the same way as other clutch problems, especially when there is complete clutch failure and the pedal is depressed. The clutch does not engage and this causes the engine to run stationary even though the gear is engaged.
Tip: Lubricate the clutch cable regularly, this will extend its service life.
How to check the clutch disc
Before directly checking the condition of the clutch disc, it is necessary to briefly dwell on its service life. It is important to remember that the clutch wears out the most in urban driving, which is associated with frequent gear changes, stops and starts. The average mileage is about 80 thousand kilometers . At approximately this mileage, it makes sense to check the condition of the clutch disc, even if outwardly it does not cause problems.
Clutch disc wear is determined by the thickness of the friction linings on it. Its value is easy to determine by looking at the clutch pedal. However, before this you need to set the pedal itself correctly. Please note that this value differs for different brands and models of cars, so the exact information can be found in the technical documentation for the car. In most cases, the clutch pedal in the idle (free) position is approximately one to two centimeters higher than the depressed (free) brake pedal.
The algorithm for checking clutch disc wear is as follows:
- place the machine on a level surface;
- remove the handbrake, set the gear to neutral and start the engine;
- press the clutch pedal all the way and engage first gear;
- by releasing the clutch pedal, start driving the car, without allowing the engine to stall (if necessary, you can add a little gas);
- in the process of starting to move, it is necessary to notice in what position of the clutch pedal the car immediately begins to move;
- If vibrations start in the housing, work must be stopped.
Based on the results of the test, the following conclusions can be drawn:
- If the movement began when the clutch pedal was depressed to 30% of its travel from below , then the disc and its friction linings are in excellent condition. Most often this happens after installing a new disc or the entire clutch basket.
- If the car begins to move approximately in the middle of the pedal stroke , this means that the clutch disc is worn by approximately 40...50% . You can still use the clutch, there is no reason to worry. However, after some time it is advisable to repeat the test so as not to cause significant wear of the disk.
- If the clutch “grabs” only at the end of the pedal stroke or does not grab at all, this means significant (or complete) wear of the disc . Accordingly, it needs to be replaced. In particularly “neglected” cases, the smell of burnt clutches may appear.
And of course, critical wear of the disc is indicated by the vibration of the car at the moment of starting from a standstill, as well as clutch slipping when driving the car uphill, at the moment of applying gas, or when towing a trailer.
Replacing the clutch cable, detailed, step-by-step progress of work
- First of all, we remove the windshield wiper in the car.
- Next, you need to loosen the lock nut, as well as the clutch adjusting nut.
- Then remove the cable lead from the clutch release fork.
- Now you need to move the cover in the lower tip of the cable sheath, after which we unscrew the fastening nut on the tip towards the bracket. In this case, using the second key it is necessary to keep the tip from turning.
- We take out the unscrewed tip.
- Then we remove the bracket from the studs by unscrewing the two bolts on its mount, while remembering that the bracket is mounted with an inclined platform towards the front of the car.
- Unscrew the bolt on the protective cover and remove the holder.
- The end of the cable is attached to the clutch pedal. Using a screwdriver, remove the locking bracket from the finger.
- Remove the cable end from the finger.
- On the cable holder to the pedal bracket, you need to unscrew the bolt and remove the cable itself.
- Remove the clutch pedal bushing from the pin and see what condition it is in. Please note that the sleeve must be cut, which is not a defect. If it is worn out, replace it.
- We put the new cable in place, having first lubricated the cable guide and the clutch pedal pin.
- The edge in the cable seal should be pushed towards the engine compartment, after which we tuck it into the hole in the front panel.
- After installing the cable, adjust the clutch pedal.
How to check the clutch basket
The clutch basket includes the following structural parts: pressure plate, diaphragm spring and casing. Signs of failure of the basket are the same as signs of wear on the driven clutch disc. That is, the car loses its dynamics, the clutch begins to slip, the gears shift poorly, the car jerks at the start. Often, if the basket is damaged, the gears stop turning on altogether. It will not be possible to accurately determine that the basket is to blame by simple manipulations with the machine; it is necessary to dismantle it and then carry out diagnostics.
The most common failure of the clutch basket is wear of the so-called petals on it. They lose their springing properties, that is, they sink a little, which is why the entire clutch suffers, since the downforce on the driven disc decreases. During a visual inspection, you need to pay attention to the following things:
- Mechanical condition and color of petals. As mentioned above, they should all be in the same plane, none of them should be bent or turned outward. This is the first sign that the basket is beginning to fail.
- As for the color of the petals, when overheated, dark blue spots may appear on their metal. Often they appear due to a faulty release bearing, so at the same time it makes sense to check its condition.
- Often the petals have grooves from the release bearing. It is believed that if these grooves are evenly spaced and their depth does not exceed one third of the height of the petal, then this is acceptable, although it indicates that the basket will soon need to be replaced. If the corresponding grooves on different petals have different depths, then such a basket clearly needs to be replaced, since it does not provide normal pressure.
- If spots from overheating and so-called tarnish are located haphazardly, then this indicates overheating of the basket. Such a spare part has probably already lost some of its functional properties, so it makes sense to think about replacing it. If the stains are located systematically, then this simply indicates normal wear of the basket.
- In no case should there be cracks or other mechanical damage on the petals. Minor mechanical wear of the petals is allowed, the value of which is no more than 0.3 mm.
- It is necessary to evaluate the condition of the basket pressure plate. If it is significantly worn, then it is better to change the basket. The check is carried out using a ruler (or any similar part with a flat surface) mounted on the edge. This way you can check whether the drive disk is in the same plane and whether it is warped or skewed. If the curvature in the plane of the disk exceeds 0.08 mm, then the disk (basket) must be replaced with a new one.
- If you have a dial indicator for measuring potholes, you can measure the wear of the drive plate. To do this, you need to install the measuring rod on the surface of the disk. When rotating, the deviation should not exceed 0.1 mm. Otherwise, the disk must be replaced.
If there is significant wear on the basket, it makes sense to also check other elements of the clutch system, in particular the release bearing and especially the driven disc. Usually it also wears out a lot, and it is advisable to replace them in pairs. This will cost more, but will ensure normal long-term clutch performance in the future.
When it is necessary to change, or the first signs for replacing the clutch cable
The clutch cable must be replaced if part of the wire in the tip breaks, the cable itself breaks, or its plastic sheath is damaged. The first signs indicating that the clutch cable should be replaced are the appearance of extraneous sounds when the clutch is engaged, its jerking and slipping.
Checking the clutch release bearing
The clutch release bearing only works when the corresponding pedal is depressed (down). In this position, the bearing moves slightly back and pulls the driven clutch disc. This way it transmits torque.
Please note that the bearing in the working position experiences significant loads, so you should not keep the clutch pedal depressed for a long time
. This can lead to premature release bearing failure.
One of the obvious and common signs of a broken release bearing is the appearance of extraneous noise in the area where it is installed when the clutch pedal is depressed . This may indicate its partial failure. An exception may be the first minutes after starting the engine in the cold season. This effect is explained by the different expansion coefficients of the steels from which the bearing itself and the cup in which it is mounted are made. When the engine warms up, the corresponding sound disappears if the bearing is in working condition.
Another indirect sign (the breakdowns listed below can be caused by other reasons) are problems with gear shifting. Moreover, they can have a different character. For example, gears are difficult to engage (a lot of effort is required), the car may twitch during start-up and even driving, and the clutch may not work correctly. In such situations, it is necessary to perform additional diagnostics of the release bearing, but after removing the box.
How to check the serviceability of the release bearing
To begin with, it should be determined that release bearings installed on modern passenger cars come in two types. The first type is a regular release bearing for mechanical action (usually a clutch fork), and the second is hydraulic, using a fluid coupling. In terms of design, the second option is considered more capricious, but its use is being used more and more often today.
Common symptoms of severe release bearing wear:
- A humming noise appears when you press the clutch pedal. This is due to the fact that torque and load begin to flow onto the broken bearing, which in turn makes such sounds.
- The appearance of vibration when the car starts moving is due to the coaxial displacement of the working plane.
Hydraulic bearing release bearings have:
- Airing the hydraulic drive circuit through the hydraulic coupling cylinder. The pedal becomes soft and the clutch stops working.
- Leakage of brake fluid through a violation of the oil seals and seals, as a result of which it is impossible to disengage the clutch.
Checking the pedal free play
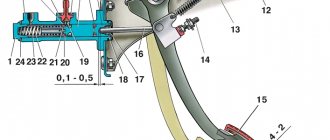
The clutch pedal on any car always has a certain free play value. However, over time or under the influence of external factors, the corresponding value may increase. First, you need to decide what exact free play value the car currently has. And if it goes beyond the permissible limits, it is necessary to carry out appropriate repair measures. For example, in a VAZ “classic” the full travel of the clutch pedal is about 140 mm, of which 30...35 mm is free play.
To measure the free play of the pedal, you must use a ruler or tape measure. In particular, the zero mark is considered to be a fully depressed pedal. Next, to measure the free play, it is necessary to press the pedal until the driver feels a significantly increased resistance to pressing. This will be the end point that needs to be measured.
Please note that free play is measured in the horizontal plane (see picture)!!! This means that it is necessary to measure the distance between the projection of the zero point on the horizontal floor of the machine and the vertical projection of the point where the force resistance begins. The distance between the indicated projected points on the floor will be the value of the free play of the clutch pedal.
The value of free play will be different for different machines, so the exact information must be looked at additionally in the technical documentation. However, in most cases the corresponding value is in the range of 30...42 mm. If the measured value is outside the specified limits, it is necessary to adjust the free play. As a rule, most machines have a special adjustment mechanism for this purpose based on an eccentric or an adjusting nut.
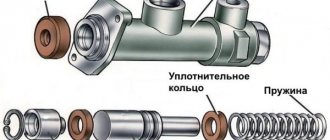
How to check the clutch cylinder
The clutch master and auxiliary cylinders themselves are quite durable and reliable devices, so they rarely fail. Signs of their failure are inadequate clutch behavior. For example, the car may start to move away even with the pedal fully pressed. Or vice versa, do not move when the gear is engaged and the pedal is depressed.
Diagnostics of cylinders comes down to checking for oil leaks from them . This happens, in particular, when depressurization occurs, that is, when rubber seals fail. In this case, you can find oil leaks above the pedal in the cabin and/or in the engine compartment opposite the place where the clutch pedal is located. Accordingly, if there is oil there, then it is necessary to inspect the clutch cylinders.
Priora clutch: price, manufacturers, adjustment, replacement
› Transmission
A caring attitude towards the clutch is instilled in driving school. Gently pressed, switched gears, gently released. The clutch is the unit connecting the gearbox and the motor. Adjustment is needed after replacement. As a rule, clutch replacement can be done in a garage. Lada Priora is generally a repairable car. At a service station, work will cost 1500-2000 rubles.
The price of a set of original clutch costs approximately 2000 rubles. On foreign cars the price of the unit is more expensive even with replacement and adjustment. With the purchase of your first car, your understanding of the full value of the clutch increases significantly.
On the Priora - one of the most popular city cars - many learned to drive (for real, without an instructor!) and perhaps changed the unit in the garage.
The Priora clutch is simple in design, but, nevertheless, it must always be in good working order - the health of the car and traffic safety depend on it. Therefore, you need to know everything about replacing a unit on a Lada Priora - after all, it’s not just a clutch pedal, it’s a whole mechanism. Which is involved in setting the car in motion - the gearbox and the engine are on friendly terms.
Checking the DSG 7 clutch
For DSG robotic gearboxes, the most popular clutch is currently the DSG-7. Signs of its partial failure are usually the following:
- jerking of the car when starting to move;
- vibration, both during start and simply while driving, in particular when the car is moving in second gear;
- loss of dynamic characteristics, namely during acceleration, driving the car uphill, towing a trailer;
- unpleasant crunching sounds when changing gears.
The clutches of robotic gearboxes (DSG) are also subject to wear, so their condition must be checked periodically. However, this is done a little differently than with classical “mechanics”. In particular, checking the DSG clutch must be performed according to the algorithm below:
- Place the machine on a level road or platform.
- Squeeze the brake and alternately move the gear shift knob (modes) to different positions. Ideally, the switching process should occur without significant effort, easily and smoothly, without grinding or extraneous sounds. If during shifting there are extraneous “unhealthy” sounds, vibrations, and gears are switched with considerable effort, it is necessary to perform an additional check of the DSG clutch.
- Set driving mode to D, then release the brake pedal. Ideally, the car should move off even without the driver pressing the accelerator pedal. Otherwise, we can talk about severe wear of the clutch elements. However, in this case, the car may not move due to engine wear. Therefore, additional verification is needed.
- Acceleration should not be accompanied by extraneous rattling sounds, rattling, jerking, or dips (sudden drop in acceleration dynamics). Otherwise, there is a high probability of significant wear of the clutch.
- During sharp acceleration, the speedometer and tachometer readings should increase synchronously. If the tachometer needle rises sharply (engine speed increases), but the speedometer needle does not (speed does not increase), this is a clear sign of wear on the clutch or friction multi-plate clutch.
- When braking, that is, when downshifting, their shifting should also occur smoothly, without clicks, jerks, grinding noises and other “troubles”.
However, the best test of the DSG-7 clutch is performed using electronic auto scanners and special programs. The most common of them is “Vasya the diagnostician”.
Diagnosis of typical main faults
In order to switch gears in the gearbox when accelerating or, conversely, when decreasing it, each time the engine crankshaft is disconnected and again comes into contact with the vehicle’s power transmission. This happens very often, and over time, signs of clutch wear begin to appear in the way the car behaves on the road while driving.
Signs of clutch failure are divided into two main groups. The first is when it does not completely turn off, it “leads”. The second, on the contrary, when it does not turn on completely, or, as they say, “slips.”
The clutch does not disengage (“drive”)
When the discs do not move completely apart when you press the pedal, they say the clutch is “driving.” That is, the disks remain in some contact, and it does not turn off completely. Experienced drivers know how to check the clutch for incomplete disengagement. Diagnosis is simple. If at low speeds with the pedal pressed all the way, first gear is engaged easily and without extraneous noise, the shutdown occurs completely. If switching occurs with difficulty and is accompanied by gear noise, it “drives.”
The reasons for this may be:
- the driven disk linings are broken or the rivets on them are loose;
- decrease in full pedal travel (tight clutch);
- the driven disk is warped and its end runout exceeds 0.5 mm;
- the pressure plate is warped or warped;
- the hub of the driven disk jams on the splines of the input shaft in the gearbox;
- the rivets securing the pressure spring are loose;
- irregularities have formed on the surface of the friction linings of the driven disk.
b) associated with hydraulic drive
- fluid leakage from the hydraulic system;
- air has entered the system.
Elimination of mechanical causes involves adjusting the drive, cleaning and lubricating the splines, straightening or replacing the driven disk and, most often, replacing the friction linings. Every clutch has to be replaced at some point. Problems in the hydraulic system require bleeding to remove trapped air, checking the tightness of connections and the integrity of the pipeline. If necessary, you will have to replace failed parts, such as the main and working cylinders if fluid leaks from them.
Does not turn on (“slips”)
When, while driving, you begin to smell a burning smell, and on a climb your car noticeably slows down and generally begins to accelerate worse, you don’t even need diagnostics: the clutch is slipping. This means that the driven and driven discs do not close tightly enough when the clutch is engaged. There is an easy way to check the clutch. To do this, put the car on the parking brake and start the engine. Squeeze the clutch and engage the gear. Smoothly press the gas pedal and just as smoothly release the clutch. The engine should stall. If it continues to work, it means the clutch is slipping.
Reasons for incomplete inclusion:
- there is no free play of the pedal;
- the friction linings of the driven disk are burnt or worn out;
- oil has got or continues to get on the friction linings, on the surface of the pressure plate and flywheel.
How to check the DSG clutch using software
The best check of the DSG 7 robotic gearbox is performed using the Vasya Diagnostic program. Accordingly, it needs to be installed on a laptop or other gadget. To connect to the car's electronic control unit, you will also need a standard VCDS cable (in common parlance it is called “Vasya”) or VAS5054. Please note that the information below only applies to the DSG-7 0AM DQ-200 with dry clutch! For other gearboxes, the checking procedure is similar, but the operating parameters will be different.
The clutch in this box is double, that is, there are two discs. Before moving on to diagnostics, it makes sense to briefly dwell on the differences between the DSG and the manual transmission clutch; this will help to understand further diagnostics.
Thus, the classic “mechanical” clutch is normally engaged, that is, the driven and driven disks are closed when the pedal is released. In a robotic gearbox, the clutch is normally open. The transmission of torque is ensured by mechatronics by clamping the clutch in accordance with what torque needs to be transmitted to the box. The more the gas pedal is pressed, the stronger the clutch is clamped. Accordingly, to diagnose the condition of a robotic clutch, not only mechanical but also temperature characteristics are important. And it is advisable to shoot them in dynamics, that is, while the car is moving.
Mechanical check
After connecting the laptop to the ECU and launching the “Vasya Diagnostic” program, you need to go to block 2 called “Gearbox Electronics”. Next - “Measurement block”. First you need to diagnose the condition of the first disk, these are groups 95, 96, 97. Using the program, you can build a graph, but you don’t have to do this. In particular, you need to pay attention to the limit value of the rod stroke and the current (diagnosed) limit position of the rod. Subtract them from each other. The resulting difference is the power reserve of the disc in millimeters of thickness. A similar procedure must be performed for the second disk. To do this, you need to go into groups 115, 116, 117. Usually on a new clutch the corresponding margin is in the range from 5 to 6.5 mm. The smaller it is, the greater the wear on the discs.
Please note that the remainder of the first DSG clutch disc should not be less than 2 mm , and the remainder of the second disc should less than 1 mm!!!
It is advisable to perform similar procedures in dynamics, that is, when the car is moving on a smooth, level road with maximum transmission of torque to the gearbox. To do this, you need to go to groups 91 and 111 for the first and second disk, respectively. You can drive for diagnostics in mode D or in fourth, fifth or sixth gears. The dynamics must be measured on even and odd clutches. It is advisable to first click the Graph button so that the program draws the corresponding graphs.
Based on the resulting graphs, one can judge the value of the output of the working clutch rod. It is important to pay attention to the maximum permissible output. And the further the obtained value is from the limit, the better (not worn out) condition the clutch discs are.
Checking temperature readings
Next you need to move on to temperature characteristics. First you need to look at the static indicators. To do this, you need to go to groups 99, 102 for the first disk and 119, 122 for the second. From the readings you can find out whether the clutch worked in critical modes, and if so, then for how many hours. You can also view specific temperature values on the screen. The lower the temperature the clutch operated, the better, the less worn it was.
After this, you need to go to group numbers 98 and 118 for the first and second disks, respectively. Here you can see the value of the clutch coefficient, clutch deformation, as well as the maximum operating temperature. The adhesion coefficient should ideally be in the range of 0.95...1.00 . This means that the clutch practically does not slip. If the corresponding coefficient is lower, and even more significantly, this indicates clutch wear. The lower the value, the worse.
.
Please note that in some cases the device may show a value greater than one! This is due to the peculiarities of indirect measurement and should not cause concern; the value should be taken as one.
The strain factor is also measured indirectly. Ideally it should be zero. The greater the deviation from zero, the worse. The last column on the screen in this mode is the maximum value of the disc temperature for the entire period of operation of this clutch. The lower it is, the better.
Next, you need to collect information about the temperature of the disks over time. To do this, you need to go to group 126 in the program. The program builds a graph with two lines. One (yellow by default) is the first disk, that is, odd gears, the second (blue by default) is the second, even gears. The general conclusion of testing shows that the higher the engine speed and the load on the clutch, the higher the temperature of the discs. Accordingly, it is desirable that the corresponding temperature value be as low as possible.
Please note that some car services offer their clients, using software adaptations, to remove vibration when driving in second gear (a characteristic sign of wear on the DSG-7 clutch). In fact, the reason for these vibrations is different, and adaptation in this case will not help.
Adapting the shift points and clutch free play generally helps the operation of the box and extends the life of the mechatronic. During this procedure, the gear shift points are reset, the mechatronic response pressure is adjusted, and the free and pressed clutch discs are calibrated. It is recommended to perform adaptation every 15 thousand kilometers . Although there are many car enthusiasts who have a negative attitude towards adaptation, so it is up to the car owner to decide whether to adapt or not.
In parallel with clutch diagnostics using software, it makes sense to also check other vehicle systems, in particular, scan for existing errors. In particular, you can check the mechatronics itself. To do this, you need to go to groups 56, 57, 58. If the numbers 65535 , then there are no errors .
Clutch repair
On many cars, the clutch system can be adjusted. You can do this yourself, or by asking a specialist for help. If the car has low mileage on a given clutch basket, then this repair method is quite acceptable. If the mileage is significant, and especially if the clutch has already been adjusted, it is better to replace its discs or the entire basket (depending on the degree and extent of the damage).
It is better to carry out repairs or adjustments as early as possible, when the first signs of a malfunction appear. This will ensure not only a comfortable ride, but will also save money on expensive repairs.