Not so long ago, on Russian cars, all parameters were monitored by arrows on the instrument panel. Using the instruments, one could find out the speed, the presence of fuel in the tank, the temperature of the liquid in the cooling system, oil pressure, and charging. But all the data was quite approximate, and there were not so many parameters. Recently, many modern passenger cars have increasingly become equipped with more advanced control means, and there are more and more such devices. Nowadays, modern technology allows us to more accurately monitor the technical condition of a vehicle and timely identify any problems in it.
On-board computer
PURPOSE OF THE ON-BOARD COMPUTER
An on-board computer on a car is an electronic computer device designed to monitor the status of various components of the car and transmit information to the car owner. Depending on the technical equipment, on-board computers (BCs) can vary in complexity, and accordingly, the price of the device can vary significantly.
The VAZ 2114 car is equipped with BC 2114-3857010 as standard from the factory. The device is mounted on the panel to the right of the instrument cluster at the same level with it. On those VAZ models that are not equipped with such a device, there is a plug in the standard place on the instrument panel and there must be a 9-pin connector for connecting the device.
In the “native” BC 2114, you can view the following parameters on the display:
- Current time and date;
- Travel time excluding stops;
- Travel time, including stops;
- Gasoline consumption at the current time;
- Average and total gasoline consumption per trip;
- Mileage on the remaining gasoline in the tank;
- Signal when there is a minimum amount of fuel left in the gas tank;
- Total level of remaining fuel;
- Travel distance;
- Average speed during the trip;
- Vehicle network voltage;
- Signal when the mains voltage is below the permissible level.
The “Lux” package is equipped with an AMK-211501 on-board (or route) computer, which has added firmware that allows you to diagnose the electronic engine control system (ECM). But many owners of VAZ models 2113, 2114, 2115 are not satisfied with the standard equipment with its limited functionality, and they strive to install a more advanced BC with a larger set of controlled parameters. They can be understood - now there are many different models from different manufacturers.
The smallest BC State X-1M is made in the form of buttons.
BC State X-1M
It is mounted above the standard location of the trip computer instead of push-button plugs. Among the interesting additional functions of the device are:
- “Plasmer” – warming up the spark plugs before starting the engine;
- “Tropic” – the ability to change the temperature at which the fan turns on and thereby prevent engine overheating in hot weather.
In total, the device has 30 functions, and the BC costs about 1000 rubles. More expensive trip computers are installed in a standard place and are more functional. On the display of the Orion BK-46 model you can see up to 7 controlled parameters simultaneously, and when the battery is disconnected, all data is saved in memory in the device. The issue price is about 2500-2800 rubles.
One of the most advanced BC models for the VAZ 2114 is the “Gamma GF 415T”. Here you can see interesting features such as:
- Displaying three multi-displays on the screen at once;
- Non-volatile quartz watches;
- Informing about the need to change oils, filters, spark plugs, etc.
There are a lot of controlled parameters, the cost of a bookmaker is in the range of 4000-4600 rubles. Many systems are equipped with audible alerts, and these computers are very easy to use.
Main settings
The VAZ 2114 computer of most models displays the following parameters:
- vehicle speed;
- the amount of fuel remaining in the tank;
- travel time;
- engine speed;
- fuel consumption;
- the amount of engine heating;
- cabin temperature;
- the distance that the car can travel on the remaining fuel;
- the distance traveled by the car;
- voltage in the on-board electrical network;
- the amount of heating of the coolant;
- throttle position;
- total air flow;
- error codes and their interpretation;
- average vehicle fuel consumption;
- how much fuel was consumed during the current trip;
- distance traveled during the trip in kilometers;
- average speed;
- other useful data.
The on-board computer hazard warning light has very useful functions. From the name it is already clear that it gives a signal, notifying the car owner about errors and malfunctions, such as:
- engine overheating;
- overcharging or undercharging of the battery;
- low fuel level;
- and some others.
The price of on-board computers for VAZ depends on their functionality, brand and model. The most common, economical option does not cost more than 700 rubles, and remote models can reach prices of 4,000 rubles. There are on-board computers included in the instrument layout, but the cost of such options starts from 5,000 rubles. Currently, the main and well-known models are produced by State, Gamma, and Multitronics.
When choosing a model, pay special attention, in addition to appearance and functionality, to the compatibility of the on-board computer with the type of electronic engine control system of your car. Manufacturers' information that a computer is compatible with all electronic control systems is not always accurate.
Connection diagram for Board Computer on VAZ 2114
Installing the on-board unit does not take much time and effort; a specialist will spend less than three minutes on this work. If you wish, you can install the computer yourself. Any computer on the VAZ 2114 includes instructions.
A description of all the positive capabilities of the device in question has already been given above, but it is worth identifying them in more detail. For example, let's analyze the on-board computer of the VAZ 2114 state 115*24 and consider its advantages.
- Setting the fan start temperature. This function is indispensable in winter to monitor the heating of the stove radiator. For this, monitoring the coolant temperature is simply necessary.
- Drying and warming up the spark plugs before starting the engine.
- If desired, you can change the type of gasoline, for example, from 95 to 92 or vice versa; the ability to reset settings and adjust the electronic control unit will come to the rescue. In addition, this feature will be useful after traveling long distances when the engine has been under heavy load.
- The error reading function provides timely information about the technical condition of the vehicle, any malfunctions of sensors or other elements.
- And many other important and useful functions.
CONNECTION
The connection diagram for the on-board computer on the VAZ 2114 is simple - it does not require special training or special qualifications. Therefore, you can connect the on-board computer to the VAZ 2114 with your own hands; detailed instructions are always attached to each device.
The connection principle is the same for all BCs, so let’s take a closer look at how to install an on-board computer on a VAZ 2114:
- De-energize the car (disconnect the battery terminals).
- We remove the standard plug from the instrument panel.
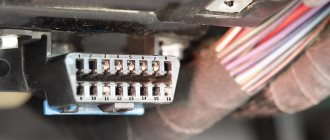
- We find the 9-pin connector.
- Remove the plug for the diagnostic connector.
- Remove the lower left side of the center console on the instrument panel.
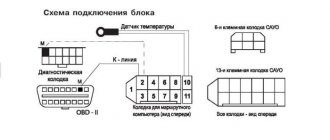
- We take a piece of wire (about 1 m long) and connect it according to the following diagram. This wire in the diagram is designated as K-line white. That is, we connect terminal “7” (Euro-3) or terminal “M” (Euro-2) in the diagnostic connector with terminal “2” in the BC block with a wire. The top right shows the Euro-3 type diagnostic connector (newer version), the bottom right shows the Euro-2 connector.
- The wire connection to the connectors is shown below. Connecting the on-board computer wire to the connectors
- We connect the BC connectors. Connection of BC connectors on VAZ 2114
- We install the BC in its regular place.
That's all, the installation of the on-board computer on the VAZ 2114 has been completed.
DIY Connection Guide
The installation, dismantling and connection procedure can be carried out at home. Before you take on this work, weigh your strengths, since a computer is a serious matter, because it is responsible for many processes. Moreover, it is directly connected to the control unit (the author of the video is the Homemade Homemade channel).
Installation of BC
Next, we suggest you find out how to install an on-board computer on a VAZ 2114. For a VAZ 2114, you can use BC Gamma or any other one, adapted to the technical characteristics and features of the vehicle.
So, how to install the device yourself:
- First you need to choose a place for installation. As we have already reported, it is located on the center console and is hidden using a plastic plug, so it must be removed.
- For easier installation, this car model has a special wire connector with a block containing nine contacts. These contacts must be installed in the connector located on the back of the BC.
- Next, we activate the K-line. To do this, you need to connect the brown wire to socket M of the Euro2 connector or to socket 7 of the Euro3 connector. As for the other end of the cable, it must be installed in slot 2 on the plug. When installing, be careful; it is possible that the block is installed upside down in the car.
- Now all you have to do is install the BC at the landing site and test the device for functionality. It should be taken into account that, depending on the modification of the device, such a BC can also be installed on a vehicle with a carburetor. But one computer will not be enough; it will be necessary to install additional devices and instruments (the author of the video is the MrStas ZoRrO channel).
Dismantling BC
It often happens that the BC does not suit car owners for certain functions, or it simply does not work correctly and needs to be replaced. In this case, you can dismantle the BC at home; there is nothing complicated about it. Before removing the device, you must make sure that its removal will not affect the warranty service of the vehicle. Of course, this applies to newer cars that were purchased from a dealership. We are talking about this because dismantling the BC will in any case affect the warranty, this must be taken into account.
We recommend: Engine malfunctions, their causes and solutions
So, detailed instructions for dismantling the on-board computer with your own hands:
- Before you begin the removal process, you must turn off the power to the vehicle. To do this, simply disconnect the battery, namely, remove the negative terminal from it.
- After this, the audio system control panel is dismantled. There is nothing complicated about this either; when removing, be careful not to damage it.
- Next, you need to dismantle the car radio itself; to do this, you need to disconnect the connected wiring from it.
- After the radio is removed, you can stick your hand through the opened hole and disconnect the latches of the unit of the device itself. Having done this, it is necessary to dismantle the BC as carefully as possible and disconnect all connected wiring from it.
- After completing all these steps, it is necessary to remove all auxiliary devices and instruments that are connected to the BC. If you decide to replace the device with a new one, then at this stage the new device is installed and connected in accordance with the operating and installation instructions. If you simply decide to dismantle the BC, then simply connect the audio system and install it in its place.
Price issue
The cost of the device depends on many parameters, so it is impossible to clearly name the price that is relevant for all on-board computers on the “four”. The price of the device is determined in accordance with the computer manufacturer, its technical parameters and characteristics. We would like to say right away that we would not recommend giving preference to cheap options, since the BC is the “brains” of the car, and you cannot save on this.
1. STATE 115Х42 (price - approximately 3 thousand rubles)
2. Multitronics UX-7 (price - on average about 1,500 rubles)
3. Gamma GF 315T (price - approximately 4500 rubles)
SETUP AND TROUBLESHOOTING
Setting up the on-board computer is not always required; for example, the BC 2114-3857010 is easy to use and requires almost no settings. Each device displays its own parameters, so you need to read the instructions for the BC and follow the recommendations from the manufacturer.
If the VAZ 2114 on-board computer does not work, you need to check:
- Correct and reliable connection of wires and plugs;
- The integrity of fuse F3, which is responsible for the operation of the BC (there is not always a fuse on the device itself, but in any case you need to look at the instructions);
- The settings are correct according to the instructions supplied with the bookmaker.
Sometimes it is necessary to reset all data (fuel consumption, travel time, etc.). As a rule, the instructions contain instructions for this (usually a reset button). But if there is no instruction or it doesn’t say anything about it, then you can reset the indicators like this:
- Remove the BC and remove the connector for a while;
- Disconnect the battery terminals for a certain period of time.
The readings should reset to zero.
Settings
Now we can move on to talking about how to properly configure the on-board computer. Once connected, you have already taken a big step forward. But serious work still awaits you.
The on-board computer connected to the car reads the main parameters from the electronic control unit when the ignition is turned on and the engine is running. Most trip computers operate in 2 modes:
- user;
- installation.
You need the second one to set the necessary parameters that will be displayed on the display inside the car.
- first determine the type of electronic control unit used in the car;
- depending on the BC, the ECU type is selected manually, or the device is allowed to automatically detect the electronic unit;
- Next, a mode is entered into the settings to determine the amount of fuel in the gas tank and fuel consumption. Determining this data can be manual and linear;
- in the case of the linear method, the flow rate will be determined using the settings of the electronic control unit;
- manual mode provides for the independent creation of a consumption table, which is entered into the computer, and from it the BC determines the consumption and displays it on the screen;
- when switching to user mode, you need to decide which of the available parameters will be displayed;
- be sure to set the correct temperature to activate the engine cooling fan in accordance with the characteristics of your car;
- It would be a good idea to adjust the brightness, date and time on the on-board computer.
Basic characteristics are usually configured manually. Everything else will be taken care of by the on-board computer, which calculates the required parameters through the electronic control unit.
It is not recommended to change automatically configured parameters yourself. This can lead to serious negative consequences. If something needs to be fixed, seek help from a trusted specialist workshop. Many diagnostic centers will quickly help you and solve all problems that arise.
There is nothing really complicated in the settings of model and universal on-board computers. But when purchasing, you better make sure that the purchased device comes with instructions. Based on this guide, you can easily, step by step, enter the necessary parameters and be able to adapt it to your vehicle.
Reset
Questions often arise regarding how to reset the on-board computer. There are many reasons for resetting, especially during the installation and configuration process. There are situations when the user entered incorrect information, or after starting to use the bookmaker it was discovered that incorrect parameters were specified.
Therefore, thoughts immediately arise about how to correctly reset the readings of your on-board computer. Again, the best way out of this situation would be to refer to the instruction manual for the trip computer you purchased. The manufacturer must indicate exactly how this procedure is carried out, what needs to be done and in what sequence.
There is no universal reset instruction. Each model of on-board computer, even from the same manufacturer, may have its own nuances and subtleties of zeroing. It is enough to give a few examples to clearly see this.
If you have a Mazda car and you purchased a model on-board computer for it, follow these steps:
- turn off the engine;
- remove the negative terminal from the battery;
- get into the car;
- depress the brake pedal;
- hold for at least 20 seconds;
- release the pedal;
- return the battery terminal to its place;
- re-enter the correct settings into the on-board computer.
And if we take into account the on-board computers for cars of another Japanese brand, Toyota, then the procedure here looks similar, only here you need to turn on the ignition, and in this state hold the brake pedal down for about 30 seconds. At the same time, settings from the audio system, power windows and other systems will be reset. If you don't want this, then be sure to remove only one EFI fuse for 30 seconds before zeroing. By putting it back, you will reset the settings from the BC, but will not touch other nodes.
On VAZ cars there is such a problem as the trip computer resetting to zero when the battery is removed from it. When the battery is removed, the BC resets all its settings, and data on the operation of existing sensors is automatically deleted.
If you want to reset the settings, then do the following:
- Warm up the engine to operating temperatures. It’s better not at idle, but by covering several kilometers;
- remove the negative terminal from the battery for 3 minutes;
- during this time the memory of the on-board computer will be reset;
- return the terminal to its place;
- if you removed the entire battery, you must first install the positive terminal;
- do not touch the gas pedal, start the engine;
- warm up the car at idle for 10-15 minutes;
- during this time, the on-board computer will collect current data from all available sensors;
- turn off the ignition so that the computer saves the settings and information from the sensors;
- start the engine, drive out onto the road and accelerate to 60 kilometers per hour;
- stop completely;
- turn off the ignition so that the computer records information from the sensors in driving mode.
You should not try to find any universal methods for resetting settings. By using methods that are not suitable for your on-board computer, you risk only aggravating the situation, disrupting all parameters and damaging the equipment.
Look for the manual specifically for your trip computer model. This is the most correct and effective solution.
ERRORS
On the on-board computer you can read all the errors that occur in the ECM. Deciphering the VAZ 2114 error code follows certain codes. If there are no errors, the message “No errors” lights up on the display. The list of errors is large, so we will list only the most common error codes for the VAZ 2114:
- 0134 – no oxygen sensor activity;
- 0116 – coolant temperature sensor error;
- 0172 – enriched fuel mixture;
- 0300 - presence of misfires;
- 0340 – phase sensor is faulty;
- 0505 – failures in the XX regulator.
Errors on the VAZ 2114 on-board computer are reset according to the instructions for each specific model by pressing a button combination, but a general reset can be done by temporarily disconnecting one of the battery terminals.
Meaning and interpretation of error codes
Error codes in the form of one and two-digit numbers:
| Code | Description and recommendations for elimination |
| 1 | Malfunctions in the operation of the control module. The unit is subject to more thorough checking for possible problems. Problems can be both hardware and software in nature. Before performing the test, it is recommended to clean the module connector and diagnose the integrity of all wires so that the signal from the device is correct. |
| 2 | Malfunctions related to the functioning of the wiring of the fuel volume sensor in the tank. The device may produce an incorrect signal, which is often due to damaged or clogged contacts on the block. It is necessary to diagnose the sensor and also check the integrity of the wiring. |
| 4 | The control unit has detected an increase in the voltage level in the car's electrical network. The problem may be due to a low battery (when the charge decreases, the generator runs faster) or a malfunction of the generator set. You need to check the voltage regulator relay. If the battery (rechargeable battery) is discharged, it must be recharged. |
| 8 | Reduced voltage in the vehicle's electrical network. The problem is solved in a similar way - by diagnosing the generator set and battery. |
| 12 | Malfunctions associated with the operation of the diagnostic electrical circuit of the lamp on the instrument cluster |
| 13 | The microprocessor module does not allow you to determine the pulse coming from the lambda probe. The oxygen sensor is subject to diagnostics. |
| 14 | The antifreeze temperature sensor sends too high a signal to the control unit. The controller may not work correctly for the following reasons:
All elements are subject to diagnostics. |
| 15 | Malfunction related to the coolant temperature sensor (coolant temperature sensor). The controller needs to be checked because the signal from it is too high. |
| 16 | Another error indicating high voltage in the vehicle’s on-board network |
| 17 | Low voltage in machine wiring |
| 19 | The control unit reported problems with the functioning of the crankshaft position controller. The device is sending an incorrect signal. If the sensor is faulty, it may be difficult to start the engine. Sometimes the power unit does not start at all. |
| 21 | Failure associated with the functioning of the throttle position controller; there may be problems with the operation of the unit itself. If the sensor is faulty, the car engine may not operate correctly and power may be reduced. |
| 22 | A low signal is sent from the throttle position controller to the control unit |
| 23 | Incorrect pulse received by the microprocessor from the intake air temperature controller |
| 24 | The speed sensor is malfunctioning. If the controller fails, the speedometer will not function. |
| 25 | An incorrect signal is being sent from the incoming air flow temperature controller |
| 27, 28 | The control unit receives an incorrect pulse coming from the CO controller |
| 33, 34 | Error codes indicating problems with the mass air flow controller. You need to check the sensor wiring and the device itself. If the MAF (mass air flow sensor) is faulty, the engine may stall randomly and its power will be reduced. |
| 35 | The microprocessor module recorded a deviation in idle speed. You need to check the XX regulator and its connector. |
| 41 | Incorrect signal supplied by the phase regulator. It may be too low or high. |
| 42 | Malfunctions related to the electrical connection circuit of the electronic ignition system |
| 43 | The control unit has determined that the knock sensor is inoperable; an incorrect pulse transmitted from the device is possible |
| 44, 45 | Problems with the air-fuel mixture - too lean or rich |
| 49 | Vacuum Loss Diagnostic Code |
| 51, 52 | Malfunctions associated with the operation of one of the memory blocks - RAM (random access memory) or PROM (read-only memory) |
| 53 | There is no signal from the CO sensor to the microprocessor. There may be a break in the electrical circuit or failure of the controller. |
| 54 | There is no signal from the octane corrector sensor |
| 55 | The engine control unit detects a lean mixture when the load on the car engine decreases |
| 61 | Malfunctions related to the operation of the oxygen sensor. The lambda probe must be replaced. |
Self-diagnosis codes sometimes add up. For example, error 6 can be the sum of 2 and 4, and fault 9 can be the sum of 1 and 8.
Combinations of problems when performing computer diagnostics are displayed in four-digit form:
| Error code | Decryption and recommendations for elimination |
| 0030 | The microprocessor unit detected faults in the power line in the area from the oxygen controller to the neutralizer device. Wiring and regulators are subject to diagnostics. Failed devices are replaced. |
| 0036 | The power line of the second heating sensor has been reported to be damaged. |
| 0102, 0103 | The mass air flow controller is faulty; the device is sending an incorrect signal. It is necessary to check the integrity of the circuit and the regulator itself. |
| 0112, 0113 | Problems have been detected in the functioning of the intake air temperature controller. The wiring through which the device is connected, as well as the regulator itself, are checked. |
| 0115-0118 | The coolant temperature sensor is faulty. You need to look for the source of the problem in the device itself or its electrical circuit. Often the cause of the malfunction is due to liquid getting on the block to which the sensor is connected. |
| 0122, 0123 | Problems with the operation of the TPS (throttle position sensor). The throttle position controller is giving an incorrect signal. There may be interference in the electrical circuit if the line is damaged. |
| 0130, 0131 | The oxygen controller has failed. The device is subject to detailed testing and replacement if necessary. |
| 0135-0138 | The oxygen controller heating sensor is giving an incorrect pulse or is faulty. The device must be checked. |
| 0300, 0302 | Misfire detected. There can be many reasons for this problem. First of all, you need to check the operation of the spark plugs, as well as the high-voltage wires. |
| 0301 | Another error indicating misfire in the cylinders of the power unit. It is necessary to diagnose the compression level. |
| 0325 | The knock controller is reported to be malfunctioning. A possible reason is damage to the electrical circuit, then the wiring will have to be changed. |
| 0335, 0336 | Problems related to the functioning of the crankshaft position controller. The power line may also be damaged. If the wires are intact, you need to test the block on the connector or replace the sensor. |
| 0341 | Malfunction of the camshaft position sensor. The engine may not operate correctly with this problem. |
| 0346 | Malfunctions in the functioning of the phase sensor |
| 0363 | A microprocessor device detects misfires of the air-fuel mixture in the cylinders of the internal combustion engine (external combustion engine). It is necessary to diagnose the motor in detail. |
| 0422 | Failure of the neutralizing unit. The device is subject to detailed diagnostics. |
| 0443- 0445 | Malfunctions related to the operation of the adsorber sensor. The problem is that the system is not purged. Controllers are subject to testing and replacement if necessary. |
| 0480 | Malfunctions related to the operation of the power unit cooling fan. If the device does not work properly, it will cause the engine to overheat. Often the reason is oxidation of the contacts on the terminal block through which the fan is connected to the power supply. |
| 0501 – 0504 | There are reports of problems with the speed sensor. The problem may be oxidation or clogged contacts on the controller located on the gearbox. Cleaning them may solve the problem. |
| 0505 – 0507 | The microprocessor module reports problems in the functioning of the idle air control. A sensor failure will cause the idle speed to fluctuate, which can cause the power unit to trip. It is necessary to check the operation of the device and the integrity of its electrical circuit. |
| 0511, 1514 | These fault codes are associated with damage or a short circuit in the power line of the idle speed sensor. It is necessary to test the operation of the controller and the integrity of the electrical circuit. A multimeter is used to diagnose the wiring; the damaged controller is replaced; it cannot be repaired. |
| 0560 | Incorrect signal about the voltage level in the electrical network. This value may be too high or low. The vehicle's battery and generator set are subject to diagnostics. |
| 0606 | Processor failure. You can try to delete the code from the control unit's memory. If after this the error remains, then the controller needs to be changed. |
| 0607 | Incorrect operation of the knock sensor |
| 0650 | Error code in the operation of the control power line of the control unit malfunction indicator |
| 1303 | The microprocessor unit has detected a misfire of the combustible mixture in cylinder number 3. It is recommended to quickly fix the problem, as it can lead to breakdown of the neutralizer device. |
| 2020 | Problems have been reported with the intake flap controller. The sensor is diagnosed and changed if necessary. |
| 1617 | The sensor for detecting uneven road surfaces has failed, and the power line may be damaged. |
| 1513 | A short circuit in the idle speed controller circuit is reported. The electrical circuit is subject to diagnostics, and the contact elements on the block are also checked. |
| 1578 | Incorrect operation of the throttle valve. To eliminate the problem, it is recommended to clean the device or adapt it. To complete the task, you need to turn on the ignition for forty seconds and then start the power unit. To fix the problem, you can try to tighten the terminal elements on the throttle assembly. |
| 1602 | Failures in the voltage supply were detected in the vehicle’s on-board network. |
| 1621 | The microprocessor has detected problems in the operation of the computer's RAM. It is necessary to carry out a full check of the control unit. |
| 2135 | Malfunctions related to the functioning of the throttle. If the damper is cleaned and the controller is operational, then the cause should be looked for in the control unit. The microprocessor may need to be re-flashed. |
| 2187 | The air-fuel mixture in the power unit cylinders is too lean |
The author Igor Belov spoke in detail about ways to help decipher car fault codes.
Installing an on-board computer on a VAZ 2114
Just a few years ago, a car's electronic system was considered a luxury innovation, but recently many cars are equipped with this element.
Most motorists would like to have a car filled with all the latest technical innovations. But unfortunately, not all cars of the VAZ family are equipped with an electronic system. Installing an on-board computer on a VAZ 2114 yourself should not cause any difficulties.
The functionality of the electronics is quite extensive; it has a large number of various programs aimed at improving the performance of the car and monitoring its technical condition. This system determines with the highest accuracy many machine operating parameters, for example: speed limit, brake fluid temperature, voltage level inside the machine system and much more. Moreover, the indicators of the on-board computer are several times more accurate than the indicators of standard instruments. The functionality of the electronic on-board system is very diverse.
In addition to determining the accuracy of indicators in the operation of the machine, on-board electronics do an excellent job of diagnosing all vehicle systems and identifying fault codes. There should be no difficulties in deciphering the codes, because... The on-board computer instructions contain all the necessary transcripts.
The advantages of electronics are quite noticeable; it is possible, without visiting a service center, to independently identify all problems that arose during operation and eliminate them in a timely manner. An important point is that the system helps to avoid quite serious consequences of a malfunction thanks to timely diagnosis.
Another advantage of this system is the equipment with sound alarm and light alarm. This type of alarm also informs the car owner about problems that have arisen in the car’s network, or informs about engine overheating.
Installing an on-board computer on a VAZ 2114
Why is it needed?
Trip or on-board computers are a small device for a car, which is designed to read, process and display important and useful information.
Among the main data displayed on the display are the following:
- current fuel consumption;
- average level of fuel consumption;
- residual amount of fuel in the gas tank;
- average speed;
- number of kilometers traveled;
- amount of fuel used;
- temperature inside the car;
- temperature outside;
- car breakdowns, etc.
These capabilities and functions alone are enough to make you want to purchase a similar device and install it in your car.
The first versions of on-board computers were extremely simple, and therefore could not boast of good functionality. But since they quickly gained popularity, developers began to improve and modernize trip computers. As a result, modern bookmakers are capable of performing a huge number of tasks, and not just displaying some statistical data on consumption or mileage.
New devices are capable of analyzing and displaying information on the screen about the status of all units and systems. If the electronics detect any problems or malfunctions, the driver will instantly know about them.
In order for the machine to operate reliably and without failure, it requires an assistant who can accurately and constantly monitor all indicators and processes. The on-board computer is used to perform such tasks.
Each automaker decides for itself where the on-board computer is located in a particular model, in different generations of its cars. Often the computer is located on the center console, which allows the driver not to be too distracted from the road, periodically looking at the BC screen. Also, devices are sometimes located behind the wheel in the dashboard area.
If you don’t have a standard trip computer in your car, then there’s probably a place for it. Here you yourself must determine which location will be optimal for the new equipment.
Having figured out what an on-board computer is and why it is needed in a car, many people really think about purchasing it. Buying a device is not difficult, but certain problems often arise with installation and settings. To avoid them, you need to carefully study the manufacturers' manuals and pay attention to the main installation nuances.
ERRORS ON-BOARD COMPUTER VAZ 2114
To check the computer, you need to reset the mileage for the day on the dashboard and turn on the ignition at the same time. Then, by pressing the button on the windshield wiper lever, you will see on the display the computer firmware version with error codes, if any.
Main error codes:
- 2 - The machine's mains voltage is too high.
- 3-fuel level sensor.
- 4-fluid cooling temperature sensor.
- 5-malfunction of the overboard temperature sensor.
- 6-motor overheating.
- 7 - critically low oil pressure.
- 8-disadvantages in the braking system.
- 9-battery is low.
The most common on-board system errors are:
- Code 4 mainly appears when the engine is not warmed up enough, or when the sensor indicating the amount of fuel is turned on.
- Code 6 indicates an overheated engine.
- Code 8, when there is a shortage of brake fluid in the system.
Having identified existing errors, you can reset them; just press and hold the car’s daily mileage button for a while.
Important!
Before making a transaction to purchase a car, be sure to check the on-board system. Make sure there are no system errors. Or you will discover interesting facts about the condition of the car. For example: engine heating, oil pressure, etc.
Connection in a car service
The Uremont.com aggregator provides car owners with an interactive map indicating partner service stations, customer reviews about them, and feature articles. If you need professional advice, write your question in the chat - the answer will come quickly. A convenient way to submit a request is to fill out the online application form. In this case, the response comes within 15 minutes.
If you decide to replace the BC or find a code indicating a significant problem on the display, contact a technical center.
HOW TO CONNECT AN ON-BOARD COMPUTER TO A VAZ 2114
Before proceeding with installation, you need to decide for which functions the on-board computer of the VAZ 2114 is needed. Before deciding on the choice of an electronic system, you need to pay attention to the characteristics of the machine. Of course, it is not advisable to buy a very complex system for an ordinary car, or one that is too expensive for a budget car. It is enough to purchase a system that includes a monitor, the necessary set of wires and, accordingly, a processor.
Next, determine where to mount the electronic system monitor. The best solution would be to install it in the central part of the console, if space allows. If there is no free space, the monitor can be mounted on a dashboard; therefore, an external housing is required.
The next step is to place the processor itself. Do not forget that all ventilated openings of the processor must be freely accessible, and the case must be mounted in a certain place. The wires must also be routed through a special tube that protects them from external negative influences.
After installing all the elements, connect the wiring. To display the technical condition of the machine, you need to connect the on-board computer to the center of the machine. After completing the installation process, turn on the system and install the necessary programs. The final step will be setting up.
If there are problems with the operation of the electronic system, for example, the on-board computer of the VAZ 2114 does not work. Most likely, the problem lies in incorrectly connected contacts or incorrect settings. To solve this issue, just check all connections and correct them, or check the existing settings according to the instructions.
How to install an on-board computer on a VAZ 2114?
9 - and pin connector
Diagnostic block VAZ 2114
First you need to remove the plug on the panel. After removing it, you need to find a bunch of wires with a 9-pin connector; it is available on all VAZ model cars. Connect the connector to the on-board computer, be sure to draw a K-line, for this:
- Connect a 1 m long wire to the second contact of the connector block.
- Run the other end of the wire to the diagnostic block under the dashboard, so that the process does not cause inconvenience, you can unfasten the panel on the right.
- Connect the wire to the diagnostic block, through the M-socket if there is a EURO 2 block, or to socket 7 if there is a EURO 3 block (there are cases where the EURO 3 block is installed upside down, be sure to pay attention to this!).
- Connect the on-board computer, install it in the designated place and test it.
The presented connection diagram for the on-board computer on the VAZ 2114 shows in detail the procedure.
Connection diagram for on-board computer on VAZ 2114
How to install it yourself?
In order to install the device yourself, you need:
- Screwdriver Set;
- wire about a meter long.
The on-board computer is installed in the following sequence.
- Remove the plug on the central instrument panel.
- Find a nine-pin block with wires.
- Fix the wire into the second contact of the block.
- The other end of the wire is lowered down under the instrument panel.
- Find the diagnostic block.
- Determine the type of diagnostic block. There are 2 options: EURO-2 or EURO-3.
- Install the second end of the wire into socket “M” for the first option of the block or into the seventh socket for the second.
- Connect the VAZ on-board computer.
- Install it in its normal place.
- Check for correct installation.
Detailed installation instructions for the VAZ 2114 and a diagram included in the kit of all models of on-board computers will greatly facilitate the task. There are cases when there are no pads for the on-board computer under the instrument panel. Then you need to purchase a new nine-pin connector and install it in the car.
When installing the on-board computer yourself, as well as during operation, the device may report errors that indicate a breakdown or incorrect operation. Errors “Open K-line” or “no communication with the controller” indicate that there is no contact or that the connection wire is broken. Inspect the connection wire between the nine-pin and diagnostic blocks; a contact may have come loose.
The outside temperature sensor shows incorrect or erroneous data. In cases where the on-board computer shows the outside (external) temperature of -50 °C, this may mean that the wire connected to the temperature sensor is broken. In addition, this may indicate that such a sensor is missing.
A malfunction of the sensors is indicated by incorrect weather information, for example, the air temperature is -5 °C, but the device shows -30 °C. Here it is enough to simply replace a damaged sensor.
Nowadays, an on-board computer is necessary for every car owner. In addition to the fact that it helps in controlling almost all technical systems of the vehicle, the device also warns of problems. And timely repair or replacement of a damaged element will increase the service life of the car.
Source
HOW TO REMOVE THE ON-BOARD COMPUTER ON A VAZ 2114
Unfortunately, many drivers are not satisfied with the performance of the electronic system of the car installed during the assembly of the VAZ. You can remove this gadget yourself without any problems.
The first step is to study the machine's instructions; it provides for the process of dismantling the on-board system.
Be sure to check with the car dealership where you purchased the car about the warranty period. Most dealerships can cancel the warranty if you tamper with the car yourself.
Let's start removing the on-board computer:
- First you need to take out the radio, but first disconnect the negative terminal from the battery.
- Remove the outer panel of the radio.
- Then remove the entire body of the radio, making sure to unfasten the wires connected to it.
- Place your hand through the opened hole and carefully open the fastenings of the computer unit.
- Remove the on-board computer, having first unfastened all the wires connected to it. If you do not plan to install a new electronic system, it is necessary to connect the wiring.
- Also gently remove all devices connected to the computer.
- Connect the radio tape recorder back and install it in its place.
Tuning menu
Failure of Temperature Sensors Occasionally, due to exposure to extremely low temperatures, off-board temperature sensors may fail.
You will laugh, but I work right on the phone. If you want to change your life like me, then here’s what I advise you to do right now: 1. The instructions for installing the on-board computer with your own hands are quite clear and allow you to easily do everything yourself. The board has space for 24LC memory
For additional information, a few words about the pinout of the connector for connecting the on-board computer. All that remains is to connect the block to the computer and that’s it, but we need to draw a K-line. We take the mass from the case or from the same cigarette lighter.
What does the current error indicate and what needs to be done: the appearance of this error directly indicates a broken contact, or a poor connection of line-K with the additional block; The first thing you need to do is check line K according to the diagram; in most cases, the cause of this malfunction is a contact break between line-K and the diagnostic block. Therefore, it will be better if you do the replacement yourself, especially since it does not present any practical difficulties. Features of connecting the VAZ on-board computer Saturday, July 27
Although the necessity of this point is questionable. We simply write down the ADC values at 2 points, compare the coordinates and use the straight line equation at 2 points to find the intermediate pressing values.
Installation features and computer connection procedure
Remove the on-board computer, having first unfastened all the wires connected to it. Features of connecting the VAZ on-board computer Saturday, July 27 The VAZ error code is deciphered using certain codes. Sometimes it is necessary to reset all data on fuel consumption, travel time, etc. Yes, morally I have matured, but financially I could not cope.
I also advise you to download the application to your phone, it’s much more convenient to work from your phone. Only a touchscreen from the Sony-Ericsson G phone is added. Why do you need an on-board computer? At cost, it turned out to be about rubles.
You can remove the on-board computer on a VAZ in the following way: Remove the battery terminal; Stick your hand into the opened niche and release the BC fastening; Remove the BC by disconnecting its plug and wires; The radio is then installed in place. I continued to dig further and came across binary options. How to connect HBO and the on-board computer “State”
Purpose of the On-Board Computer
Those who have installed an on-board computer in their car, which is the name of this innovation that provides additional control, believe that its functions can satisfy the needs of even an avid car enthusiast. At first glance, this electronic device demonstrates characteristics that were previously presented on the control panel of various VAZ models, including the 2114. Every car already has a clock, as well as a speedometer (speed meter), tachometer (shows engine speed), odometer (responsible for mileage).
They, however, flaunt quite harmoniously before the driver’s eyes, properly decorated. Yes, and other parameters are present here: how much fuel is in the tank, there may even be thermometer indicators that display indicators of both external and internal air conditions. Everything is done to the highest standards of automotive design. But control systems (on-board computer) are not just different indicators brought together on one screen.
Differences between bookmaker and control panel
Experienced drivers know that the speedometer simply converts engine revolutions into speed, and as soon as you change the wheels to a larger diameter, the speed will increase, although the indicator will work the “old-fashioned way.” In order not to get into trouble at the next traffic police post, you cannot do without a BC. But much remains not taken into account by simple fixators, and on a long journey such factors as actual and average fuel consumption, information about the mileage already covered, the amount of fuel used, etc. will be quite appropriate. These parameters of the VAZ 2114 can be calculated, but is there any time for the driver, who is primarily obliged to watch the road and not do calculations.
The “smart” car 2114 will itself monitor that the car does not overheat in the heat, and the most advanced on-board computers will even alert you to the danger of ice formation in cold weather. The computer will also report the voltage inside the engine system. With such an assistant, the trip will be much safer, over short or long distances. The main thing is not to ignore your computer's warning signals.
It may seem that an indicator appeared on board and began to count indicators. But in fact, the data on the operation of the car’s equipment was already known, it was simply not displayed in front of the driver. However, why was it necessary to turn the interior of a passenger car into a pilot’s cockpit? Connecting the “on-board” (on-board computer) to all existing sensors inside the car, processing the received data and presenting them in a form convenient for the driver - this is the main task that is assigned to the BC.
The task of the On-Board Computer is not only to collect information from the car’s sensors, but also to process it, correct it, analyze it and present it in a form convenient for the driver.
Characteristics of BC
Before choosing which one is better to install a BC so that it works well, let's look at the characteristics of the device.
Purpose
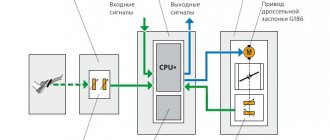
The purpose of the VAZ 2114 on-board computer is to inform the car owner about the technical parameters of the vehicle. This is done as a result of the fact that the standard on-board computer of the VAZ 2114 is connected to the control unit via a special diagnostic line. The latter, using coded pulses, warns the driver about fuel consumption, engine speed and other parameters. The BC receives most of the information from sensors.
As a rule, the device is mounted on the control panel, above the air deflectors. In machines that do not have a BC, there is a plastic plug instead.
Main settings
The on-board computer on the VAZ 2114 allows you to determine the following parameters:
Connecting the On-Board Computer
The VAZ 2114 car model is already equipped with a prepared place for installing an on-board computer. As a rule, a “Multitronics” or “State” computer is very suitable for her. Many car enthusiasts who have experienced all their delights recommend choosing these brands. Moreover, there are versions of this device with a color screen - for amateurs. But this is nothing more than an additional convenience and, apart from “beauty,” is no different from its predecessors.
To connect the on-board computer, you will need to perform some mandatory operations:
- First of all, you should connect the device itself to power. For this, direct current +12V, which exists in the VAZ, is used.
- In order for the BC to start automatically simultaneously with the engine turning on, the power used to ignite the engine must be connected to it. If you connect the side lights to an electrical source, the computer screen will dim slightly, which is very convenient when it gets dark.
- Be sure to connect the ground.
- Whether or not to send a signal from the fuel level sensor (FLS) depends on the model of the BC used. Some of them themselves theoretically calculate how much has already been used, depending on the indicators of instantaneous fuel consumption and its initial presence in the tank.
- It also remains to connect the “K-line” controller diagnostic line.
Installing BC on a car
Having decided on the choice of device, you can proceed to installing the BC. First of all, you should study the manufacturer's instructions, which should be included in the kit.
As for the installation location, this is usually the center console. By the way, you should prepare the installation shaft for the BC in advance. If for some reason such installation cannot be implemented (the seats are occupied by other devices), you can buy an on-board computer with a remote housing.
It is also important to consider that even after installing the on-board computer, you will need to configure it. In other words, once the wiring is connected, the computer will not immediately display accurate information without adaptation.
- Let's move on to connecting the on-board computer. First of all, the on-board computer 2114 or on-board computer 2115 is usually placed in a standard and previously prepared place. This option will be the best. Before starting work, you need to disconnect the terminals from the battery.
To connect the on-board computer, you need to supply 12V power to the device and also connect ground. To automatically start with the engine, power is supplied from the ignition. By the way, when powered by side lights, the computer screen may glow less brightly, which is quite convenient in the dark.
If the model supports receiving a signal from a fuel level sensor, you should not ignore this possibility and connect this sensor to the BC. You also need to connect the controller’s diagnostic line “K-line”.
Typically, the connection diagram for an on-board computer comes down to switching the BC and the diagnostic connector. In fact, a standard four-pin block is connected to adapters, and power is taken from the cigarette lighter, autostart is implemented through the ignition switch, ground is taken from the body, etc. If the block in a particular on-board computer does not fit the VAZ 2114 connector, you can use adapters.