Clutch fork dangles Priora
The clutch pedal is loose.
WHERE TO GO Are you ashamed to write in Russian? Translate.
Is it embarrassing to write in Russian? Translate.
This type is where to go:biggrin:
Tell a beginner whether the lamb should be screwed all the way?
No you shouldn't! I can imagine how much you have the pedal up) are you not scratching your ears with your knees? In general, on Priors, where the clutch pedal is located, there is a self-tensioning clutch cable mechanism, it can sometimes make clicking noises, which can be fixed
I have a clutch pedal on par with the brake, but it’s rare that when you press the clutch, you hear a crunching sound, as if the cable would burst!
The feature is described in the manual. It is useful to read the manual for a technically complex device %)
But my clutch is recessed by 3 centimeters compared to the brake, which is generally significant. Okay, until TO-1 it endures %)
Colleagues, is your clutch pedal recessed compared to the brake pedal or is it flush? Mine is so recessed and it seems to me that this is wrong.
It’s recessed and dangles a bit, I’m already used to such little things, I don’t pay attention to them - why bother yourself.
It’s recessed and dangles a bit, I’m already used to such little things, I don’t pay attention to them - why bother yourself.
Yes, I’m not overthinking it, it’s just quite possible that the clutch is under-depressed (the 1st one doesn’t engage well).
Yes, I’m not overthinking it, it’s just quite possible that the clutch is under-depressed (the 1st one doesn’t engage well).
How are you driving or when you start? I have such a problem from the factory when driving, the first mileage is already under 40 thousand.
How are you driving or when you start? I have such a problem from the factory when driving, the first mileage is already under 40 thousand.
On the go - for sure. But it seems that when I start moving too. Maybe it will work out - mileage 800 km%)
The clutch pedal is loose. WHERE TO GO
I have it too
Mine is also loose, the warranty guy said that this is how it should be, 1.5-2 cm of free play.
I also have it dangling (there is free movement) both down and up and left and right - I don’t even know if this is correct or not.
She's hanging around everyone's prior. maybe only a few don’t have them, but I haven’t seen anything like them yet
and I’m already used to it hanging out
I'm chatting too! I looked at the cable and the lamb is completely twisted :aggressive:
Dimm ka maybe it will work out like hell.
Guys. Do you have a spring or not? I wonder why yours are dangling? Mine isn’t dangling, I didn’t notice. Topic: https://www.priorovod.ru/showthread.php?t=6283
No you shouldn't! I can imagine how much you have the pedal up) are you not scratching your ears with your knees? In general, on Priors, where the clutch pedal is located, there is a self-tensioning clutch cable mechanism, it can sometimes make clicking noises, which can be fixed
It won’t rise above the brake pedal, that’s not 10k for you
Source
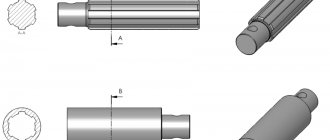
Features of replacing the clutch fork on a VAZ-2110, 2111, 2112
The clutch drive fork is necessary for the proper operation of the entire transmission system. This mechanism is a lever, when pressed, the following occurs: when the pedal is depressed, the clutch and release bearing move, this leads to the inner edge of the spring moving forward, and the clutch is disengaged. When the pedal moves back, the clutch is engaged, so sometimes this spare part is called the release or engagement fork, respectively. Typically, the clutch fork is found in mechanical gearboxes, and is occasionally included in hydraulic ones. The drive fork is a metal rod on which a lever and two legs are attached.
What are the usual malfunctions of the VAZ-2110 clutch fork that require replacement?
The clutch fork is subject to wear and tear, just like other parts. Factory defects are also possible, but due to the simplicity of the design, they are much less common.
- The clutch fork breaks. In this case, the pedal drops sharply, making it almost impossible to continue forward.
- Crack. The clutch grabs lower and lower, adjustment is almost ineffective. As the crack gets larger, the clutch pedal goes down again.
- Curvature.
- Paw wear.
- Defects of the paws at the point of contact of the liner coupling.
You need to change the fork in any case, since this part is necessary for the movement of your car. Without it, gear shifting is impossible.
The cost of spare parts is 300-500 rubles. When choosing, pay attention to the quality of the material and the thickness of the metal. Very often, a fork made of thin iron bends almost immediately.
Although the part is simple in design, it may not be so easy to replace it yourself. When contacting a car service center to replace the clutch drive fork of a VAZ-2110, you will have to pay from 1,500 to 2,500 rubles.
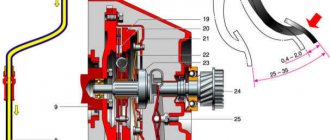
Features of the Lada Priora clutch
Any motorist interested in how to adjust the clutch on a Priora should know about the presence of the drive cable auto-adjustment function. That is, VAZ designers took care of the owner and saved him from the need to constantly adjust the clutch drive mechanism during operation. The same ratchet-type system is installed on Kalina , but both there and on Priora it is impossible to do without periodic adjustments. This factor has been proven by practice and forum discussion pages.
How does an automatic cable tensioner work?
In the release drive on the VAZ 2170, there are no gaps as a concept, hence the name - backlash-free clutch. The ratchet mechanism serves to compensate for the working length of the cable as the driven disk linings wear out. To understand the process, it is important to accept the following data:
- During operation, the driven disk wears out and its linings become thinner - as a result, the release bearing and basket springs shift towards the gearbox.
- Accordingly, the fork at the place where the cable is attached moves towards the radiator.
- The spring located on the bushing of the adjusting mechanism is compressed at this time and tightens the clamps of the cable tip.
- As a result, the tip is pulled out of the driver, due to which the wear of the disc linings is compensated.
Replacement
If you change the fork on a classic without removing the gearbox, you can still do it, but you won’t be able to do the same on a VAZ-2110. The replacement will take 3 to 4 hours depending on experience.
- Remove the gearbox.
- Remove the pressure bearing.
- The next step is to remove the rubber cover by hooking it with a screwdriver. Pull it off the power plug. It also needs to be replaced if it becomes warped, cracked or hard.
- Use pliers to squeeze the locking tabs on one side of the crankcase. Using a screwdriver, pry up the plastic bushing of the fork axle. If there is noticeable damage or signs of wear on the cap, then it also needs to be replaced.
- We unfasten the clutch fork itself: by lifting it, you need to remove its axle from the bushing. First, the axle, then the lever, are removed from the outlets in the crankcase.
- You need to squeeze the ends of the fork spring retainer and remove it. A deformed retainer needs to be replaced.
- We replace the fork that shows signs of wear.
- It is usually recommended to replace the metal bushing as well, especially if it is noticeably worn.
- Before installing a new part, you need to lubricate both the metal and plastic bushings.
- Next, install the shutdown plug. Assembly is carried out in the same order, starting from the end. Carefully secure the plastic sleeve. The protrusion on it should be in the recess on the crankcase. The petals should firmly secure the sleeve, preventing it from falling out.
If you use a spare part of proper quality when replacing, the clutch drive fork will last a long time. Replaced accompanying elements will protect the mechanism and improve its operation.
Video “How to properly remove the cable for replacement”
User Sergei Spiridonov created and posted a video on the Internet that shows the process of removing the cable in a Lada Priora car for its subsequent replacement.
A caring attitude towards the clutch is instilled in driving school. Gently pressed, switched gears, gently released. The clutch is the unit connecting the gearbox and the motor. Adjustment is needed after replacement. As a rule, clutch replacement can be done in a garage. Lada Priora is generally a repairable car. At a service station, work will cost 1500-2000 rubles. The price of a set of original clutch costs approximately 2000 rubles. On foreign cars the price of the unit is more expensive even with replacement and adjustment. With the purchase of your first car, your understanding of the full value of the clutch increases significantly. On the Priora - one of the most popular city cars - many learned to drive (for real, without an instructor!) and perhaps changed the unit in the garage.
The Priora clutch is simple in design, but, nevertheless, it must always be in good working order - the health of the car and traffic safety depend on it. Therefore, you need to know everything about replacing a unit on a Lada Priora - after all, it’s not just a clutch pedal, it’s a whole mechanism. Which is involved in setting the car in motion - the gearbox and the engine are on friendly terms.
As an example, everyone understands that to disengage the clutch the pedal must be depressed. What happens if the machine does not respond to this? Will it bite or stall in the middle of the road? You shouldn’t listen to advice at all, trying to torture the gearbox without a clutch, “catch” the speed. There is only one way out of this situation: learn a good lesson and worry about the “health” of your “friend” in time. Read the article to the end and you will be safe - this unit will definitely not let you down on the road!
Gearbox fork 1st-2nd gear VAZ 2108 - 099, VAZ 2110
Dear customers, in order to avoid errors when sending the 1st and 2nd gear forks of the VAZ 21083 gearbox, please indicate your car model and year of manufacture in the “Comment” line.
Any car of the VAZ family has a gear shift mechanism, which consists of a gear shift lever, a ball joint, a rod, a gear selection rod and a gearbox.
The gearbox is designed to change the torque developed by the engine in order to obtain different traction forces on the drive wheels when starting the car, accelerating, moving and overcoming road obstacles; changes in vehicle speed and direction; the possibility of driving the car at low speeds, which cannot be provided by the engine, and disconnecting the engine from the transmission for a long time when parked or when the car is moving by inertia (coasting).
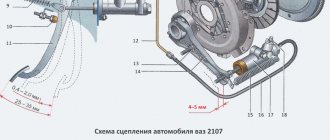
Adjustment instructions
The Lada Priora is equipped with a clutch cable with a ratcheting mechanism. The cable is backlash-free and does not require adjustment, but manufacturers recommend this be done during every maintenance.
Clutch cable
To adjust the cable on the Lada Priora, you need to prepare a screwdriver and a ruler. The procedure then consists of the following steps:
- To perform work, you must open the hood.
Engine compartment of Lada Priora First, you should disconnect the mass air flow sensor and remove the air filter.
Engine compartment without air filter
- After this, a cable will be visible, at the end of which there is a plastic clip.
- Before adjustment, it is necessary to set the cable to its original position: overcoming the resistance of the spring, push the cable clamp forward until it stops in the direction of movement of the car.
- This clamp should be pulled towards you and the distance between it and the plug should be measured, it should be 27 mm.
- The distance is adjusted by turning the tip counterclockwise. In this way, an increase in distance can be achieved.
- Twist the clamp until the distance is 27 mm. Accuracy is very important here.
- Now you can release the cable and place it in the fork.
- After completing the steps, you need to get behind the wheel and press the pedal three times until it stops.
- Then again you need to measure the distance, it must be exactly 27 mm, otherwise we adjust until the desired distance is achieved.
- Next, you should insert the tip into the groove of the mechanism fork and release it. Thanks to the spring, the tip driver clamp is installed without any gap.
- After adjusting the cable, you need to return everything to its place, start the engine and check the operation of the mechanism.
- jerks appear when starting to move;
- noise and shock when shifting gears;
- the pedal gets stuck.
We measure the distance using a ruler
After adjustment, the clicks disappear and the clutch release pedal operates softer.
Clutch pedals
When the clutch pedal travel is large, the clutch is not completely disengaged, so it still comes into contact with the flywheel of the power unit. When the stroke is low, the driven disk does not turn on completely, which leads to slipping and loss of torque.
You should measure your pedal stroke if the following symptoms occur:
The symptoms described indicate that the mechanism requires adjustment. You can diagnose its operation on Priora yourself. To do this, start the engine, slowly release the PS and start moving. If, when the PS is released, the car immediately begins to move, this means that there is no free play. If the car does not budge even with the pedal fully released, then its travel exceeds the norm. The brake pedal should be at the same level as the brake pedal. In this case, its full stroke will be in the range of 125-135 mm. Fluctuations up to 160 mm are possible.
We measure the free play of the pedal
When making adjustments, loosen the first cable adjusting locknut located in the engine compartment on the bracket.
Locknuts for adjusting free play
By tightening the second locknut, the distance and stroke of the PS are adjusted. Thus, the desired result is achieved. After completing the procedure, the first locknut is tightened.
If you adjust so that the brake pedal is located above the brake pedal, then the clutch will barely leave the floor. If it’s lower, it will set almost at the very end. If the PS is located too high, the basket wears out faster. The ideal option is that the brake and clutch pedals should be at the same level.
In order to extend the life of any mechanism, you should use it carefully. You should not constantly keep your foot on the PS; it is better to place it on the left on the floor. During each technical inspection of the Lada Priora, it is recommended to monitor the free movement of the PS and the clarity of gear shifting and, if necessary, make adjustments.
Clutch fork function
The clutch fork (CL) is an important element of the vehicle transmission system. It is a lever with which the pressure plate is retracted, resulting in the clutch being released. The BC is sometimes called the cut-off plug.
BC is mainly part of a mechanical gearbox, less often in hydraulic drives. The design of the VS in the gearbox on a VAZ 2110 is quite simple: a metal rod on which a lever and two legs are attached.
At number 5 VS
When you press the clutch pedal (CS), thanks to the BC, the release bearing clutch moves, thus, the inner edge of the spring moves forward and the device turns off. Naturally, the correct engagement and disengagement of the clutch depends on the serviceability of the aircraft.
Aircraft replacement is required in the following cases:
- Deformation of the part is detected;
- cracks were detected on the body;
- curvature of the aircraft;
- Defects in the tabs were identified at the points of contact with the release bearing coupling;
- paws are worn out.
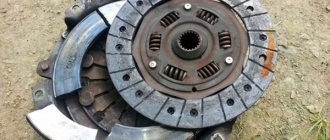
The photo shows a broken down aircraft.
Aircraft with a broken lever
If there are cracks on the aircraft, then this reduces the quality of the PS operation, late setting occurs, the machine may slip, and the pedal may sink when pressed. There is a need to regulate free play. Along the crack, the aircraft deviates from the release bearing. Regulation is enough for only a few days, and in case of a significant defect it is necessary to adjust after a few hours
Damage must be corrected immediately, as this can lead to rapid wear. If the aircraft breaks down completely, the pedal will fail and the vehicle will be unable to move.
Clutch sensor
It happens that when switching gears, the car for some reason begins to jump and twitch. The same signs are observed at low speeds. The whole reason is that the clutch sensor is faulty. It is located in the cabin, at the place where the clutch pedal axis is attached, and only on those cars that use E-gas. They often lack a throttle position and idle speed sensor.
A magnet that rotates with the drive gear and two Hall sensors, which convert changes in the magnetic field into an electrical signal and transmit it to the control unit, these are the components of the clutch sensor. With the help of such a signal, the electronic unit can show a real picture of the magnitude of the clutch stroke. The sensor works on the same principle as the gear shift indicator.
When driving, there is a load on the clutch pedal, a signal about the state of which will be transmitted by the sensor. It will determine the speed of the crankshaft and the engaged gear. If such a signal is not received, then it’s time to change the sensor. An open circuit, a short circuit in the electrical circuit, an abnormal clutch pedal height, a malfunction of the switch - all these indicators can be tracked by the sensor using a signal.
All signs of clutch failure.
Attention, all options are listed in descending order of their likelihood from the most likely to the rarest.
When you press the clutch pedal, it falls through without effort, and with the engine running, it is impossible to engage the gear.
This is the most honest fault. It occurs when the clutch drive is damaged.
— the clutch cable is torn/the hydraulic drive is damaged (repaired by replacement and adjustment).
— the clutch fork has worn out and is put on the hinge (repaired by replacement or welding and adjustment).
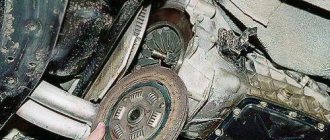
The smell of burnt pads.
This is a very unpleasant and specific smell. It cannot be confused with anything.
It usually occurs when starting from a stop, when trying to accelerate at high speed and when driving uphill. The reason lies in the extreme wear of the clutch driven disc. Those. there was nothing left of its friction linings. It looks something like this:
If your car is very old, or Chinese, the springs in the clutch basket may wear out, but I have never seen this in practice.
Causes of breakdowns and solutions to problems
Domestic automakers are not particularly reliable and durable in their parts and assemblies. It is not surprising that many car components quickly fail and are no longer suitable for further use. All this causes many car owners to have characteristic problems in the operation of the clutch mechanism on their car. However, you should not blame only car manufacturers for all the problems that arise, since many malfunctions are the result of careless operation of the car by the car owner himself.
Solution
| Cause | |
| Insufficient pedal travel causes the clutch itself to “drive” | To eliminate this defect, it is necessary to regulate the mechanism drive itself. Car service station professionals can help solve this problem. |
| Clutch pedal sticking | This problem usually occurs when parts of the drive mechanism are damaged. This can be resolved by replacing the damaged part. |
The cable should be adjusted as often as possible. The fact is that such preventive work helps to avoid a number of problems and, accordingly, allows you to save a considerable share of the financial resources of car owners. Normal operation of the clutch mechanism is the key to safe operation of the vehicle.
Replacement process
The difficulty of replacing an aircraft with a VAZ 2110 is that it is necessary to dismantle the gearbox; the procedure for replacing the part itself is simple.
Required Tools
To carry out the aircraft replacement procedure, it is necessary to install the machine on a lifting device or inspection groove. You can lift the car with a jack and place it on supports.
From tools and materials you need to prepare:
- new aircraft;
- a set of keys;
- pliers
- screwdriver;
- flashlight;
- jack.
How to replace the clutch cable of a Lada Priora
As practice shows, replacing the cable connecting the clutch drive with the gearbox on a Lada Priora is very rarely required. It breaks quite infrequently. The most common problem with it is the threads; its components become frayed. For this reason, the clutch mechanism begins to jam regularly and the pedal eventually does not want to return to its place.
The replacement procedure is not particularly complicated, but it does require time and some effort. For work you will need the following tools and materials:
- a set of keys;
- flat screwdriver;
- cable clamp.
You can get to it in Priora only through the engine compartment. To do this, of course, you will need to open the hood. The cable itself is located next to the gearbox.
In what cases does an element need to be replaced:
- when broken;
- due to jamming;
- due to stretching;
- in case of failure of the mechanism regulating its length.
Removal process
First of all, you will need to dismantle the air filter:
- remove the cable itself, using a leash to remove it from the fork of the drive that disengages the clutch;
- using 17 keys (2 pieces), partially unscrew the two nuts holding its shell on the gearbox crater bracket and pull it out;
- under the dashboard, located directly in the car interior, tighten the nut with an 8mm wrench from the pedal itself.
You just have to remember that getting to the place where the lower part of the cable is attached to the pedal will be quite difficult.
Access is hampered on one side by the engine compartment partition, and on the other by the lower edge of the instrument panel. The work space is significantly limited. But performing the required operation is quite simple - using a flat-head screwdriver that fits the length.
It will be much more difficult to remove the staple. To make it easier to operate, the pedal is raised as high as possible. Ideally, the bracket should appear above the opening. The main thing is to remove the fastening from the cable itself. In the future, it is easy to put on the bracket either using pliers with long lips, or from the side of the power unit with your hands.
Next you will need:
- remove the expansion tank of the engine cooling system;
- dismantle the thermal insulation of the engine on the left side;
- Unscrew the bolts and remove the fastening brackets holding the rubber boot in place (both on the left and on the right) and remove it completely;
- Using a screwdriver, carefully remove the retaining bracket from the fastening axis of the cable guide;
- the latter, in turn, is removed from the foot drive finger.
It is important not to lose the plastic sleeve installed there. Without it, the cable cannot be attached
If it becomes unusable, you need to put a new one on your finger.
Finally, all that remains is to pull out the mat holders (there are 2 of them). This must be done carefully, since they are plastic and break easily.
After this, you need to remove the rubber cover installed in the partition of the engine compartment and finally pull out the damaged cable.
Step-by-step procedure for tensioning the clutch cable on a VAZ-2114
In order to change the length of the clutch cable, we only need a wrench.
1. First of all, open the hood and look for the nuts on the gearbox housing located at the very end of the adjustment unit. Two 17mm bolts.
The clutch cable is marked with a red marker.
2. Next, loosen the locking nut, and then change the position of the adjusting nut, tightening or unscrewing it to the required length.
The nuts will unscrew easily with any pressure.
3. When the nut is screwed on, the clutch pedal will rise, increasing the length of its distance, and if it is unscrewed, the distance to the floor will decrease, pressing the pedal closer to the floor.
The arrow marks the nut for fixing.
There is no doubt that such work is much easier to carry out in the company of an assistant.
4. Upon completion of all adjustment work, the locking nut is tightened as close to the adjusting nut as possible.
When carrying out such procedures, make sure that the clutch cable itself is intact, that there is no damage or scuffing on its body and shell, and that it moves freely inside the elements supporting it. If something like this is discovered, then it is best to replace the cable with a new one, since the wear of the supported one will only increase, and it is impossible to talk about the reliability of the work performed.
Checking work
After you have completed this work, you need to check the correctness of the work performed.
- First, measure the travel of the clutch pedal.
- With the engine turned off, depress the clutch pedal several times and return it to its place.
- Next, we take a new measurement and clarify the received readings.
- If they have not changed compared to the first measurements, then the work has been completed, correctly, and the first stage of verification can be considered completed.
- And if they differ from the first indicators, it means that the locking nut was not tightened tightly, and the adjustment process must be carried out again.
There is one rule among car enthusiasts! A properly adjusted clutch should begin to engage approximately halfway through the pedal stroke.
The following test can definitively indicate the serviceability and correctly adjusted clutch:
- The car must be placed on a flat surface, the handbrake must be turned on, and the engine must be running.
- Next, we turn on the gear and try to start moving.
- If at this moment, when the clutch pedal is not pressed, the car stalls, this means that the adjustment was made correctly.
- And if this does not happen, the car is running in gear with the clutch pedal not pressed, then this will indicate clutch slipping, which will need adjustment.
Removing clutch pedal clicks
How to adjust the clutch? If the clicking becomes constant, then you can get rid of this problem in a simple way, showing a little ingenuity, and you need to use an ordinary ruler. As a rule, clicking sounds come from the clutch control unit. You need to do the following: open the hood of the car and inspect the area to the left of the battery. This is where the clutch cable goes into the fork. To inspect it you will need to pull it out of the plug.
Using a ruler, measure the distance from the base of the cable to the adjusting screw. The distance must be exactly 27 mm. The main factor in adjusting the Priora clutch is accuracy. It should be noted that this indicator should in no way increase or, conversely, decrease with a deviation of even one millimeter.
Otherwise, the pedal will continue its annoying clicking. Now you need to put the cable back. After adjusting the distance, you need to depress the clutch pedal several times. Having eliminated this problem, the softer operation of the clutch release pedal will immediately become noticeable, compared to how it worked before the adjustment.
Clutch fork VAZ 2110 disengagement
The clutch system is designed to smoothly transfer torque from the crankshaft to the gearbox.
The clutch is single-plate, with a central pressure spring. Drive – cable. The housing is attached to the flywheel and pressure plate. There is also a driven disk.
The VAZ 2110 (BC) clutch drive fork is part of the vehicle’s transmission system; without it, the effective operation of all auto mechanics is impossible. The BC has the form of a lever, with the help of which the pressure plate is retracted, as a result of which the clutch is released. Sometimes the term “shift fork” is used to refer to the aircraft, since in the opposite direction, when the pedal is released, it engages the clutch.
When squeezing the pedal, this spare part helps move the clutch and release bearing, which ensures that the inner edge of the spring moves forward and then turns off the device.
Innovations affected the clutch of the VAZ 2110, but the mono-disc housing, dry type transmission and spring diaphragm in the center remained familiar. This unit was considered to be of high quality if it had produced more than 100,000 km.
Characteristic features of the structure of this unit in model 2110 include the following:
The specific structure of the diaphragm spring, which guarantees a reduction in the force to disengage the clutch. This quality creates favorable conditions for driving a car at medium and high speeds, and also affects the conversion of force on the clutch pedal in the area of partial/full starting. This design feature allows an inexperienced motorist to start moving smoothly, reducing the level of fatigue when driving in the city, where frequent engagement of the clutch is the norm.
Rational choice of the shape of the diaphragm spring, the number of blades, the proper structure of the spring supports, which is subject to mandatory control during production.
The nonlinear properties of the spring are carefully calculated taking into account the preservation of car parts: if the clutch begins to slip, it happens shortly before the critically acceptable degree of wear of the friction linings. Thus, the flywheel and clutch disc of the VAZ 2110 are protected from damage from the rivets of the linings and is a distinctive indicator for repairing the VAZ 2110 clutch.
Mechanized finishing of main disk blanks made of cast iron, which is carried out in order to optimize wear-resistant and friction properties. Their processing takes place on semi-automatic lathes with high precision, followed by monitoring the surface quality of the working surface.
Sachs clutch
The production of clutches for various car brands also has its own innovations. The clutch, like all other mechanisms, wears out quickly, and every driver wonders how to choose the right mechanism. Driving style and operating conditions are directly proportional to service life. Therefore, Sachs specialists, taking into account all the wishes of drivers, have released completely new, environmentally tested flywheels, release bearings, clutch discs and slave cylinders, compact clutch units and other equally interesting design solutions. These new products include:
- MZ type clutch basket with pull-out action.
- XTend with automatic wear compensation.
- Dual-mass flywheel ZMS.
- Release bearing type CSC.
- Ultra-compact clutch unit (for sports cars).
Which clutch to install is up to you, but if the driver takes good care of his car, replacement can be done after 100,000 km. The clutch pedal is a kind of indicator of the technical condition of the engine and transmission.
It signals various malfunctions and requires prevention and constant monitoring. Competent and correct replacement of the clutch, using all the capabilities of these designs will extend the life of your car.
Replacing the clutch on a VAZ 2110 with your own hands
The car owner of a "tens" may be taken by surprise by a breakdown of the clutch system. This means that there will be unplanned expenses for spare parts and auto repair shop services. Replacing a VAZ 2110 clutch is not cheap, from 3,500 to 5,000 rubles, not counting the cost of spare parts. However, there is an option to save a significant part of your personal savings and replace worn-out parts with new ones - yourself. Let's face it, this is not an easy procedure. But, following the instructions, it is possible to deftly manage it in one day.
When to replace the cable
The cable is changed only in the following cases:
- when a part broke;
- when tight action occurs in the shell.
To replace the cable, you must have the appropriate tools. A large set of screwdrivers and wrenches will come in handy. If they are not in stock, you can buy them at any spare parts and tools store. The procedure is performed like this:
- First you need to remove the air intake filter located in the engine.
- At the same time, the clutch cable is pulled forward and then the leash is removed from the cell of the lever system.
- Key 17 performs this procedure.
- The tip is removed from the bracket.
- The nut that secures it is carefully unscrewed.
- Then remove the sealing covers.
- After this, the cable is removed.
To install a new cable, you need to check the condition of the plastic sleeve. Only masters can perform this procedure efficiently, so it is better to contact technical service for installation. In general, it is better to carry out diagnostics constantly in order to avoid unpleasant situations. Some inexperienced car owners believe that the parts on new and old VAZ cars are very different.
If the model is new, then it does not need to be diagnosed and checked. This is not true at all. In general, almost all elements are similar. The only thing is that the clutch cable is slightly different. In new cars it is equipped with an automatic tensioning device. Thanks to it, you can adjust the clutch parts with your own hands. However, this does not mean that the car does not need to be looked after and taken to a technical inspection on time. Only with careful and proper use will the car serve for a long time and properly.
| Insufficient pedal travel causes the clutch itself to “drive” | To eliminate this defect, it is necessary to regulate the mechanism drive itself. Car service station professionals can help solve this problem. |
| Clutch pedal sticking | This problem usually occurs when parts of the drive mechanism are damaged. This can be resolved by replacing the damaged part. |
Applicability
| Brand | Model | Name according to auto catalog | Drawing |
| VAZ | VAZ-2108 | Sleeve | Transmission/Clutch |
| VAZ | VAZ-2109 | Sleeve | Transmission/Clutch |
| VAZ | VAZ-21099 | Sleeve | Transmission/Clutch |
| VAZ | VAZ-2110 | Sleeve | Transmission/Clutch |
| VAZ | VAZ-2111 | Sleeve | Transmission/Clutch |
| VAZ | VAZ-2112 | Sleeve | Transmission/Clutch |
| VAZ | VAZ-2115 | Sleeve | Transmission/Clutch |
| VAZ | VAZ-2110 | Sleeve | Transmission/Clutch |
| VAZ | VAZ-1118 "Kalina" | Sleeve | Transmission/Clutch |
| VAZ | VAZ-2170 "Priora" | Sleeve | Transmission/Clutch |
Where else is the spare part used?
The parts data presented on this page is for informational purposes only.
Download price lists
To download price lists, you need to log in. If this is your first time on the site, please fill out the registration form.
Preparatory stage
Before changing the clutch on a VAZ 2110, you need to prepare a place for repairs and tools. For this process, the most suitable solutions are: a car lift or an inspection hole. If there are no such conditions, due to a hopeless situation, it is possible to replace the clutch with a 2110 in “Spartan conditions”. It is enough to find a flat surface area in a garage box, a parking space or in the yard.
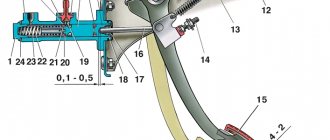
Clutch diagram for VAZ 2110: 1 - release bearing guide sleeve; 2 — gearbox input shaft; 3 — cable lead; 4 — clutch release fork; 5 — fork axle bushing; 6 — pressure disk assembly (basket); 7 — driven disk; 8 - flywheel; 9 — clutch pedal; 10 — mechanism for automatic adjustment of cable length; 13 — clutch release clutch (release bearing); 14 — lower tip of the cable sheath; 15 — bracket installed on the gearbox housing; A - the displacement distance of the leash, checked when installing the cable (27 mm).
How to Identify Incorrect Clutch Adjustment
As drivers say, the clutch can be in two wrong positions.
What does it mean? When the clutch is “weak”, it means that the release bearing is not fully pressing on the “petals” of the drive plate. This means that separating them is difficult. Accordingly, an unpleasant grinding sound of the box will sound. It will become very difficult to shift into gear. There is a risk of the gearbox shaft gears breaking. When the clutch is tightened, the picture is somewhat different, the gear engages perfectly, no difficulties arise. But! Under heavy loads, the disks begin to “slip.” That is, the engine roars with all its might, but the car does not pick up the required speed. There is a smell of burnt friction material. This means that the cable is too tight and the adhesion between the discs is broken.
Clutch fork shaft bushing for VAZ 2108-21099, 2113-2115
CHOOSE SECURE PAYMENTS After payment you will receive an electronic cash receipt
Pay for goods by credit card, using QIWI, Yandex.Money or WebMoney and save on your purchase from 4%, avoiding postal and bank commissions
This product was chosen by 6 customers
The original clutch release fork shaft bushing, which is supplied to the AvtoVAZ conveyor. Designed to replace a failed standard one.
Weight, kg: 0.05 Dimensions, cm: 3 x 3 x 3 Volume, m3: 0.00003
Replacing the clutch of a VAZ 2110
After the conditions and tools are prepared, you can begin to work. First, remove the front left wheel and securely fix the car. Please note that there are two repair options: with complete dismantling of the gearbox and without it. In our case, we will talk about how to replace the clutch on a VAZ 2110 without removing the box.
The process is made easier by the fact that you don’t have to drain the transmission oil, disconnect the drive axles, and remove the heavy unit from under the car. The smallest set of operations saves time. However, to be on the safe side, you need to have a container ready where you can drain the oil from the gearbox in an emergency.
After fixing the car, open the hood, disconnect the battery and remove it completely. For easy understanding, the entire further process of replacing the clutch with your own hands on a VAZ 2110 will be described in the form of step-by-step instructions:
- Unscrew the two ball joint bolts (the wheel has already been removed);
- go to the engine compartment and remove the connector for the mass air flow sensor;
- disconnect the air intake corrugation;
- remove the air filter housing;
- disconnect the clutch cable from the gearbox by unscrewing the two fastening nuts;
- unscrew the starter bolt;
- Unscrew the gearbox bolt, located slightly to the right of the starter;
- we find another upper bolt securing the gearbox to the engine and unscrew it;
- disconnect the speed sensor plug;
- go to the bottom and dismantle the longitudinal rod along with the cup (crab);
- we find the lower starter bolt and 2 gearbox mounting bolts, unscrew them;
- remove the torque mount;
- unscrew the gearbox shift lever;
- place a jack under the engine through a wooden spacer (on the edge of the pallet);
- unscrew the nuts of the rear engine mount;
- lower the engine with a jack (it will fall to one side);
- carefully separate the engine and gearbox;
- We carefully lower the disconnected box down until it hangs on the drive axles.
The first stage of replacing the clutch on a VAZ 2110 without removing the box has been completed. As a result of dismantling, there was access to the clutch basket on the engine and the release bearing on the gearbox. Unscrew the bolts securing the basket to the flywheel and remove it. Carefully remove the release bearing from the input shaft.
After a careful examination of the removed parts, it becomes clear whether it is worth changing the entire clutch pack or whether you can limit yourself to changing the disc and bearing. It is worth noting that the replacement of the VAZ 2110 clutch basket occurs every 80 - 150 thousand km, depending on the operating mode. The disc and bearing wear out more often.
After purchasing new spare parts, we proceed to the second part of the repair and do the following:
- install the basket with the disk in place and tighten the fastening bolts;
- insert the centering shaft (mandrel) into the central hole of the crankshaft;
- then tighten the bolts tightly and remove the mandrel. It should fit freely into the hole, simulating the gearbox input shaft.
- Next, install the release bearing on the box;
- carefully lift the gearbox and connect it to the engine, slightly rotating the drive axis;
- Once the box is in place, you can fasten it with bolts and install the dismantled parts in the reverse order.
On a note! It is advisable not to leave the box hanging for a long time (more than 2 days). The fact is that the drive seals are under heavy load and they can be partially deformed. The formation of damage will lead to oil dripping from the transmission during further operation.
Original clutch
The clutch on Lada Priora cars is usually installed from VIS. For some reason, many car enthusiasts, when they see a foreign abbreviation, think that original parts are supplied from abroad. In practice this is not the case. VIS (VIS) is VAZInterService. This company is the official supplier of AvtoVAZ clutch elements.
Buying a new set will cost you approximately 20 – 25 thousand tenge. Somewhere you can find it cheaper, in other places the price is higher. Typically, stores near the dealer have a higher price. But at car markets and dealerships, the cost is more modest. But it’s also difficult to find new parts there. Most often they sell either used or Chinese counterfeit products.
To check the authenticity of the kit, just find the 12-digit code on the box. It's hidden under a gray layer, like what's on lottery tickets. Enter it on the manufacturer’s official website and get information. But few sellers will allow you to erase the layer and check it before you pay for the goods.
But searching for a new kit is only necessary in those advanced cases when the entire clutch needs to be replaced. In fact, most often, problems with Priora are associated with insufficient adjustment. Inexperienced drivers turn to a car service center. Where, of course, they will be recommended a full-fledged replacement, for serious money. As a result, repairs cost 25–30 thousand tenge, which is quite a lot for the Russian automobile industry.
Let's take action: how to adjust the clutch on a VAZ 2114 car yourself?
The essence of the operation is to force a change in the length of the cable “jacket”, due to which the clutch pedal stroke changes. To complete the process there is no need for high qualifications - a little free time and desire are enough.
Experts have developed a good algorithm for how to adjust the clutch cable on a VAZ 2114; it consists of the following points:
- Open the engine compartment and disconnect the negative battery.
- For ease of operation, disconnect the hose from the air filter and remove it.
- Using two 17" wrenches, rotate the tip nuts and set the desired pedal stroke.
- Press the clutch pedal several times and measure again the distance from the lower to the upper point of the pedal position.
- Tighten the nuts and install the air filter in its original place.
During setup, you should pay attention to the condition of the cable. If there are abrasions on the “shirt” and the steel fibers are partially torn, then you will have to replace the Lada Samara clutch drive cable. Often there is corrosion on the tip, making it difficult for the nuts to rotate. WD-40 will work to solve the problem. It would be a good idea to inspect the pedal bracket bushings and replace them if they are severely worn.
Adjustment
What to do if the pedal travel is too long? You need to tighten the locknuts on the cable. We look into the engine compartment and find the cable. On it we see two rotating elements. These are the necessary locknuts. We will weaken the first one, thereby making it possible to configure the second one. The selection method works here - we adjust the second locknut and at the same time monitor the pedal stroke. We select the required combination until the PS is at the required distance. Then we fix our work and tighten the first lock nut. It won’t be possible to do it right away; it will take time to select the right move.
Again, the PS must be on the same level as the brake. If it is higher, the setting will be too sharp and early. Then you will wear out the basket and soon you will have to buy a new one, remove the old one and replace it. If the level is too low, then setting will be late and inconvenient for work.
Clutch adjustment on a VAZ 2110 after replacement
Setting up the transmission system will help to complete the repair efficiently. To do this, loosen the adjusting nuts on the cable. The clutch pedal will rise. We take a ruler and measure the distance from the front wall to the pedal in the cabin. The working stroke, regulated by the operating instructions, should be 120 mm (±5mm).
Press the pedal several times. Then, tighten the adjusting nut, simultaneously measuring the distance between the pedal and the wall. As soon as the desired value of 12 cm is reached, tighten the nut, holding the lock nut with another wrench. A similar adjustment operation, after replacing the clutch with your own hands, can be performed on a VAZ 2110 with a 16-valve engine.
Source
Self-diagnosis
Most often, problems with clutch operation are associated with the pedal. The pedal is loose, squeaks, or is too tight. A tight clutch can also be mitigated by adjustment.
But the problems that occur during operation of the lever already relate to the mechanism itself: clutch disc, basket, fork. The sensor is in between and rarely shows the real problem. If the problems inside are more serious and the best solution is a trip to the service center, then we can correct the symptoms of the pedal ourselves.
Adjustment begins with inspection. We take a regular ruler and measure:
- Cable clamp and fork. There should be a standard 27 millimeters between them. Plus or minus 2 millimeters. If the distance does not match, then you need to adjust
- Pedal travel. We rest one edge of the ruler against the floor, under the pedal assembly, and with the other we measure the distance to the pedal while parked. Here she should be from 12.5 to 13.5 centimeters. Ideally, it should be flush with the brake assembly. Permissible overshoot - up to 16 centimeters (160 millimeters)
If your pedal assembly or engine compartment elements do not correspond to these numbers, then you need to make adjustments. Let's talk about it further.