A little theory
First, a little theoretical part. In any car engine, even a modern model, each system performs its duties, and there is nothing superfluous. Here we can draw a parallel with a person whose all organs are important and necessary. The main thing is to maintain a healthy lifestyle. Any car in this regard also needs regular maintenance.
The functions of all engine components and assemblies are constantly dependent on each other. And if a part breaks down in any system, the efficiency of the power plant is significantly reduced. The same applies to the crankcase ventilation system, in which a crankcase oil separator is simply necessary.
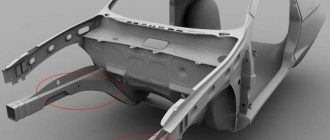
Engine crankcase ventilation system
As a rule, pistons fit tightly to the cylinder walls of the engine due to compression and oil rings. Despite this design of the piston group elements, it is impossible to ensure complete sealing of the combustion chamber. And some of the gases from the burned fuel still break into the crankcase, which is why they are called crankcase gases.
Moreover, depending on the design of the engine, 10-30 liters of gas can flow into the crankcase from just one cylinder in one minute. Due to the fact that the pistons move at high speed, the crankcase gases are constantly enriched with oil particles 0.1-2 microns in size. Oil mist is also formed due to the rotating crankshaft, which is immersed in an oil bath.
The problem itself is that the accumulation of gases in the crankcase leads to an increase in pressure that is exerted on the lubricant consumable. And in the absence of an oil separator for crankcase gases, this leads to an increase in pressure inside the lubrication system, and the oil puts pressure on weak areas, which are oil seals and seals. As a result, oil leakage cannot be avoided, and the engine becomes oil starved.
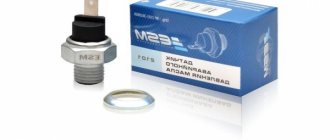
Oil pump VAZ 2115
The oil pump is a device that creates working pressure in the lubrication system, which ensures reliable lubrication of the engine's working mechanisms. In addition, the engine oil pump pumps oil from the crankcase to the reservoir (exclusively in mechanisms with a dry sump).
There are two types of oil pumps:
1) Adjustable - in them the pressure is maintained by changing the volume of the pump.
2) Unregulated - in them the pressure is maintained by a pressure reducing valve.
Pumps are also divided into gear and rotary.
Removing the oil pump
First of all, you need to remove the oil pan, then unscrew the two oil pump bolts. After this, you can remove the oil pump, and then the gasket.
The oil pump is installed on a VAZ in the reverse order of removal.
After installing the pump, you need to fill it with oil. Don't forget to change the gasket before installing the pump.
Symptoms of a problem
The oil pump is the only engine element that can be treated with unfiltered oil. Before you understand why an oil pump wears out, you need to know how it works and what it reacts to. So:
If there are worn mechanisms inside the mechanism or large gaps between the housing and gears, there may be a pressure leak. Thus, the normal operating condition of the engine is not ensured.
The oil composition from the crankcase is absorbed by gears rotating inside the housing, then it passes into the oil receiver, and only then into the pump itself. Through the pump, the oil enters the oil filter under a certain pressure.
If it is cold and the stream is thick, then the bypass valve opens easily and allows the unfiltered mixture to pass through without hitting the filter. Due to this, a cold engine will develop good oil pressure until it warms up and the jet thins out.
Where is
The location of the pump is a mystery to many; it is located in the engine oil sump, and in order to get to it you must drain the engine oil. The oil is drained into a clean canister and after the oil pump is replaced, it is refilled into the engine. Repair work to replace the oil pump is carried out on an inspection pit or lift, using a standard set of tools.
Lubrication system design for VAZ 2114, VAZ 2115, VAZ 2113
Engine lubrication VAZ 2114, VAZ 2115, VAZ 2113
Serious damage to the engine
Burnt gases have a negative impact on the oil and reduce engine efficiency. In fact, crankcase gases are unburnt fuel residues and contain many harmful impurities that have a detrimental effect on the environment. The presence of water evaporation in gases leads to the formation of an emulsion, due to which foam is observed in the oil. Because of it, the rubbing elements do not receive a sufficient amount of lubrication, due to which they wear out faster and fail. And the vapors themselves that fall on the oil dilute it. Various impurities are formed, which have the most destructive effect, reducing the durability of almost all parts with which the oil comes into contact. As a result, the engine life is reduced several times.
Disassembly and assembly of the oil pump VAZ 2114, VAZ 2115, VAZ 2113, Lada Samara 2
Oil pump parts: 1 – pump housing; 2 – driven gear; 3 – drive gear; 4 – pressure reducing valve; 5 – pressure reducing valve spring; 6 – plug; 7 – sealing ring; 8 – front crankshaft oil seal; 9 – pump cover; 10 – rubber sealing ring; 11 – oil receiver
Disassembly and assembly of the oil pump. Carefully secure the oil pump VAZ 2113, VAZ 2114, VAZ 2115 in a vice so as not to damage the cover 9.
Unscrew the screws securing the pump housing 1 and cover 9, remove the housing, driven 2 and driven 3 gears. Unscrew plug 6 of pressure reducing valve 4 and remove spring 5 with valve.
Press out the self-clamping oil seal 8 of the crankshaft from the pump cover 9.
When assembling the pump, lubricate the surface of the outer diameter of the oil seal with engine oil and press it into the cover 9 until it stops.
Carefully secure the cover in a vice, install the gears with chamfers on the tops of the teeth inside housing 1 and tighten the screws securing the housing and cover.
Insert the pressure reducing valve, spring and tighten the valve plug, installing an aluminum O-ring 7 (1.5±0.2) mm thick under the plug.
Before assembling the pump, be sure to lubricate the drive and driven gears, the housing in the gear area, the rubber O-ring of the oil receiver tube and the pressure relief valve with engine oil.
After assembling the pump, when turning the gears by hand, they should rotate smoothly, without jamming or jerking.
A wise decision
The increased pressure that is constantly applied to the oil worsens the properties of the lubricant over time. Without a crankcase gas oil separator on the Polo, for example, the lubricant itself ages faster and its service life is significantly reduced, which entails frequent replacement of consumables. To avoid unnecessary pressure in the engine crankcase, a special exhaust gas ventilation system is provided. However, the standard separator, which is installed by many manufacturers on cars, does not completely clean the crankcase gases from oil particles. Therefore, some car enthusiasts install an additional device.
Most drivers of domestic and foreign cars with impressive mileage have often encountered sticky oil deposits on various parts of the engine. Often this is:
- intake tract;
- throttle valve;
- intake manifold;
- idle control valve;
- air filter - oil can get here through the mass air flow sensor (MAF).
By interacting with the mass air flow sensor, the oil can cause its failure, and replacing it costs 2500-3000 rubles. Isn't this a reason to take care of an additional measure in the form of a crankcase oil separator on a Citroen-Picasso or any other car?
How does an oil separator work?
By cleaning the air returned to the intake system, the separator (installed on the crankcase ventilation pipe) reduces the amount of carbon deposits on the throttle body, spark plugs, valves and intake manifold, so the engine maintains optimal efficiency and does not lose power for a long time.
Among the options for separating crankcase gases from oil suspension, there are two most common ones. These can be like regular filter elements that use a fabric or metal filter.
Likewise, cyclone-type oil traps and centrifugal separators
Thanks to the separator, the engine intake system remains clean, which is especially important in cars with high mileage, as well as cars with a turbocharged engine and in power units that have undergone tuning modifications
For example, in the first case, oil is separated from gases due to the resistance of synthetic fabric or thin metal wire (over time, the internal filter element must be replaced or washed), but a centrifugal oil separator separates lubricant from gases in the following way: when passing through the device, gases and an oil suspension in they seem to “unwind”, exposed to centrifugal force; Thanks to this centrifugal force, the oil settles on the walls and flows back into the engine crankcase.
The cyclonic oil separator is equipped with a special valve that limits the vacuum in the engine crankcase, since strong vacuum can damage the engine boots and its rubber seals.
This is how the built-in filters provided by the internal combustion engine design work.
Relevance
Why do you need to install such a clever device? Due to high crankshaft speeds, oil flies through the crankcase ventilation breather and can end up on the carburetor assembly, and in the case of injection engines, on the throttle unit. And to prevent this from happening, just such a device is installed. Moreover, it is advisable to install it not only for those drivers who do not mind pressing the accelerator pedal to the floor. Those owners who have been using their car for quite a long time should also think about it. After all, during this period, the rings have most likely already worn out and do not provide proper sealing of the combustion chamber.
What might you need?
There is no need to immediately run to the store in search of a miracle device, because you can make it yourself, unless you buy the necessary “ingredients”. So, for home production of a crankcase gas oil separator on a VAZ-2109 (for example), you cannot do without:
- repair coupling;
- plugs for the socket (2 pieces);
- plastic pipes (also 2 pieces);
- metal sponge.
A repair coupling is sold at any hardware store and is used when carrying out sewer work. It is a plastic cylinder, which at both ends has a small thickening on the outside with a rubber seal. The remaining components can also be purchased both at construction sites and in stores selling household goods. As for the cost, it is quite affordable and affordable for any family budget. The metal sponge will serve as the main element of the entire system.
Lada 2114 Battle friend › Logbook › Forced replacement of the oil pump!
Hello everyone! I’ll tell you how I spent the winter holidays! I’ll say right away... it’s a long post. But I recommend you read it! In general, I decided to go to Kazakhstan to visit my grandmother for a few days, 500 km one way! I am confident in the car; nothing has ever stopped me from going on long trips. I got there normally, without incident. Upon arrival in Kazakhstan, I decided to go to my grandfather’s place of work (boxing at the city administration) - all the tools, all the bells and whistles, warmth, light... a fairy tale for repairs! I climbed in and looked at the scale of the work for the spring, the engine was covered in snot running up a little from everywhere, well, I think I’ll do it in the spring, I’ll be patient until spring. As a result, as I wrote earlier, I decided to change the crankshaft gear and the tension roller. Well, I don’t think there’s much work, it’s useful. Of course, I was prepared for the fact that it wouldn’t come off so easily. Well, I suffered this way and that! I tried with a wedge between the block and the gear, and in the end I gouged the mounting clip for the seal on the oil pump, well, damn I think, but the next day for me go home to Omsk. As a result, the trip had to be postponed for one day. The next morning I went to the store, prices in Kazakhstan are not much different from ours, they are a little more expensive (well, like imports))). I also bought some boxing! In fact, there is nothing complicated there, take it off and install a new one. But when we installed a new oil pump, the oil seal was damaged, as it turned out later, the reason for this was a burr in the place where the oil seal sits, and when we put it on, they tore it on this burr. Well, not for long thinking, I took some sandpaper and went to grind the shaft. In the end, everything fell into place with a new oil seal. Along the way, we replaced: the camshaft seal, the pan gasket, the valve cover gasket, the timing belt, the roller, the crankshaft gear, changed the oil, its filter and, in fact, the hero of the occasion, the oil pump
!In general, we did a lot of work, plus we washed everything with gasoline, now the whole engine shines like it came from the factory, everything is dry and beautiful! It’s an indescribable thrill!))) Plus, as a bonus, we washed the injectors using special equipment, since the person who helped me with the repair (my grandfather’s colleague) is engaged in cleaning injectors, diagnostics, etc. Many thanks to him for his help! The car runs smoother, vibrations in the cabin have disappeared, and it runs much quieter and smoother. In a word, everything I wanted to do in the spring was done in 12 hours, but the whole day was wasted, but joy knows no bounds. The issue with the timing belt, previously voiced in the blog, was resolved by replacing the crankshaft gear and installing an old-style, double-row roller. The belt does not eat anymore, it runs smoothly as it should. In general, I'm happy!
Assembly process
There is no particular difficulty in assembly. The first step is to put a plug on one end of the coupling. The result will be something like a glass, but not for tea drinking. During operation of the most effective design of the crankcase gas oil separator, the plug will not have to be removed, and therefore for better reliability it is worth sealing it with a sealant. The next step is to place the metal sponge on the bottom of the cylinder. Just don't fill it out completely. In the upper part of the second plug, you need to drill two holes for the prepared plastic pipes. The edges of the tubes should be treated with silicone grease and installed in the prepared holes.
Looking at the inside of the plug, one of the pipes should be 1 centimeter shorter than the other. The longer one will be the intake one. Now all that remains is to fix the resulting cover in the rubber gasket. That's all - the homemade automotive gadget for catching crankcase gases is ready. If the owner has a delicate taste, then the product can be painted in the desired color and then allowed to dry thoroughly. Only after this can you proceed to further installation.
Lada 2114 0-day › Logbook › DIY oil catcher.
Hi all! There have been no posts for a long time. I will slowly improve. I’ll probably start with a note about “oil in the trash.” At high speeds, a lot of pressure is created in the “head” and it carries oil through the breather into the air filter, which is not good. As a result, the mass air flow sensor begins to suffer and the throttle becomes clogged (the speed fluctuates). Well, as they say, why not make this product for yourself.
— Power steering reservoir from the Volga (metal). — Two “L”-shaped fittings for the level. — Drain tap. — 4 metal sponges. — 2 hoses.
I sanded off the excess solder with a file and then sandpaper.
I made a drain valve in the bottom cover.
Everything was ready with the tank. All that remained was to make the mount. Since I have an adsorber on the right, I had to do it from the opposite side. I cut out two plates from a 2mm piece of iron and welded them to each other.
Then all that was left was to prime and paint the whole thing.
Well, here is the finished version, fully assembled.
Then I filled the tank with sponges, glued bitoplast and splen around the mount and at the points of contact with the body.
Then I took the whole thing to the car and installed it safely. I also installed a fuel filter on the small circle, I will monitor the changes.
UPD.
After a trip to Saratov, 3 days after installation, I had to redo the mount and strengthen it.
UPD2.
I change the small circle filter every 1000 km, during which time several drops of oil accumulate in the filter, and the filter itself begins to deform from the manifold. There is also a little oil on the large circle, but just a little at the bottom. So it’s a completely working thing, because oil doesn’t fly into the intake.
After assembly, I went to the track and turned the engine properly. I arrived home, the tank and fuel filter are dry at the moment. The positive thing I have found so far is that the revs have become more even. Thank you all for your attention and good luck on the road!)
Source
Device installation
The crankcase gas oil separator is installed depending on the engine type:
- carburetor;
- injector.
In carburetor engines, the device is mounted directly in front of the air filter, which regulates crankcase gases. If it is an injector, the device is connected to the inlet pipe located close to the throttle valve and cylinder block cover.
The system is now ready for use. However, for its high-quality and productive functioning, installation alone is not enough; it is necessary to inspect the device from time to time and carry out regular maintenance. To do this, the device must be disconnected from the system and rinsed thoroughly, completely getting rid of any remaining accumulated oil. In this case, treatment with a solvent will not interfere.
After the maintenance procedure, the crankcase gas oil separator device is put into place and can be used for further operation. There is no need for frequent inspection and maintenance; the frequency can be at least once every two months.
As is already known, oil leakage not only has a negative impact on the efficiency of the engine, but also significantly reduces its service life. A homemade device allows you to eliminate this problem to some extent. However, the lubricant itself also plays a key role. Therefore, you should not save on purchases; it is better to purchase only high-quality products. No engine will put up with cheap oils whose quality is questionable.
Why is the PCV valve important?
Faulty PCVs can cause engine oil contamination, sludge buildup, oil leaks, high fuel consumption, and other engine damage problems, depending on the type of fault.
While some of these problems can be caught before they escalate with simple checks, failure of the PCV valve or related components often results in costly repairs. This is because most car owners do not include the PCV system in their maintenance routines. Even though some car manufacturers suggest replacing this part regularly, car owners still forget to replace it. Additionally, not all manufacturers emphasize the importance of regular system checks.
Cheap and cheerful, but functional
Many drivers who have already managed to make a crankcase oil separator on their own are pleasantly surprised by the price. In some cases it is practically zero. Perhaps craftsmen make do with improvised means that they find in their own garage. But even if nothing suitable is available, the price of the crankcase gas oil separator is low, since all the parts from the instructions discussed above are cheap.
On the Internet you can find many ways to make a homemade device, for which different materials are used. However, everything is done according to the scheme described above. Differences may relate to the use of additional elements or the replacement of plastic pipes with metal fittings that are screwed into the oil separator cover.
At the same time, there is a positive trend in engine performance. Oil no longer accumulates, which means you can drive for a long time without problems. However, do not forget to look under the hood of the car and check the condition of the device.
DIY: oil trap for crankcase ventilation
uazvileyka June 4, 2017- Homemade products for cars (cars and motorcycles) Homemade products for the garage
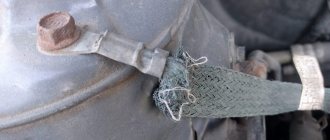
Today we have a new useful homemade product for cars: a do-it-yourself oil trap for crankcase ventilation. I have long wanted to assemble an oil trap for ventilation of crankcase gases, but somehow there was no time. And then I removed the pipe from the breather on the valve roof, and there was an oily coating and quite thick. I freaked out and collected this barbiture during my lunch break.
Metal sponges for washing dishes acted as a “filter”. The design is extremely simple. Everything was done in haste, so the welds are sloppy and a little crooked))
The jaws were not driven tightly so as not to back up the gases.