Create an account
Register a new account in our community. It's very simple!
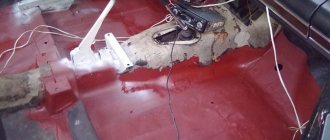
So it’s time for me to look for and weld holes in the body. For almost 30 years, the car went without major body repairs; minor dents and scratches don’t count. I started with what was, in my opinion, the simplest thing - a bathtub under the spare tire. I’ll just say right away that it’s almost impossible to find auto body parts for a penny (only on order and not a fact that they will be delivered). I took the six-wheeler, it’s “almost the same,” but it took half a day to fit it in place. While I took a photo of how I cut out the old one.
cut out with a grinder (welding points are still on the body)
I cleaned up the welding points and found a hole in the wing with a screwdriver...
I had to cut this piece out.
cut it out - made a patch on this piece and already welded it.
We continue the fight against rust and unevenness.
I adjusted and welded the bathtub from 2106 - it’s a little different and doesn’t quite fit, but I inserted it and primed it with filler primer.
Then I took care of the front fender, there was a dent on the edge.
Here is a dent that is slightly disguised with putty.
and two cm of putty at the junction with the door
Such a thick layer, I was too lazy to straighten it, so I just covered it up. The wing tapped from the inside
Somehow it happened and I welded up the holes from the previously installed additional turn signals
the rib is bent, you need to tap.
a little rusty...
Now I tapped and pulled everything out, all with just a hammer and available tools.
The rib is like new, well almost, taking into account the age of 30 years and a couple of accidents. Then I replaced it with a new one anyway, it’s too difficult to weld repair inserts and adjust crooked iron.
Installation of an electric sunroof on a VAZ 2106
The sliding El was taken as a basis. sunroof from Renault Safrane Task: install an electric sunroof in the roof of a VAZ 2106.
Power steering gearbox (column) for VAZ 2101-2107
Razgon front strut extension for VAZ 2105, 2107
In this article we will write about strengthening the body of VAZ 2101, 2102, 2103, 2104, 2105, 2106, 2107 cars, that is, the so-called VAZ “classics”.
During daily use, any car experiences loads while driving, which over time cannot but affect the geometry of the body. And the older the car, the more noticeable this is. And the once cheerful car suddenly turns into a “loose trough.” Such a “tired” body noticeably reduces the precision of control when turning and gets on your nerves when you hit potholes or other road irregularities. Due to constant pressure on the body, its rapid aging may occur, traces of corrosion may appear, and welds may even come apart. So we have a not very rosy picture. How to be? The answer to our question is precisely the strengthening of the body and chassis of the car.
The possibilities for strengthening the body for classic LADA models in comparison with more modern families of VAZ models, unfortunately, are slightly limited. This is due both to the design features of the models and to the range of products manufactured by the enterprises. Despite this, the Motorring.ru online store offers products that will help you take care of strengthening your car:
- reaction rods;
- front suspension arms;
- rear suspension arms;
- engine support cushion;
- propeller shaft support;
- Of course, everyone’s favorite stretching of the front struts.
In addition, strengthening the body has a number of advantages:
- low cost;
- ease of installation and dismantling;
- increase in body life;
- improving car handling.
If you are still wondering whether you need to strengthen the body, then in our opinion the choice is obvious. Of course it's worth it! Moreover, for many people this must be done.
Lada 2106 Shosha rally sprint › Logbook › Body reinforcement and more
The construction process continues) So, first things first, in this blog I’ll tell you about strengthening sore spots and installing hood hinges. I'll start with the hood hinges. I constantly experienced inconvenience when the hood opened in the wrong direction... The Internet helped me and the trunk hinges from the Audi 80. One trump hinge, I got it with the inscription “Valera”, apparently it’s his time))) There is a lot of information on installation, the only thing I’ll focus on is one important moment. We didn’t want to cut the hood drain and moved the hinges forward... it was our miscalculation! The hood is expanding towards the glass, and when we installed the hinges, it began to cling to the wings when trying to open completely (((After we moved the fastenings of the gas stops, the hood began to open a little less, but there is still enough height. So be careful and measure it seven times, before welding)))
Now on to strengthening the body. The first place is the spring cup, mine was, of course, cracked (((They welded a repair insert there.
The spars in the area of the pendulum and steering gear were reinforced from 3mm metal.
The beam was also overgrown with a “saber”.
The shock absorber cups received spacers a couple of years ago; the seams on them were simply lightly welded. In the cabin, all the standard noise and vibration insulation was knocked down, Tseretelli hasn’t felt like himself for a long time))) I’ll find a scale, just for fun, I’ll weigh it, but off the top of my head it’s about 10 kg. A T-shaped gusset was welded on the middle pillar, and the seams on the front pillars were covered with small gussets. All reinforcements are made of 3mm metal. The standard seat brackets went into the trash and their place was taken by profiles. We didn’t bother with the correct plates, so we put them on bolted fasteners and welded them the old fashioned way)))
During the course of the play, they welded a couple of holes in the floor, under the noise they ripened (((Next, the “transverse traction house” came into view. From under the fender liner it was reinforced with a solid sheet,
and a spacer was welded on the back side,
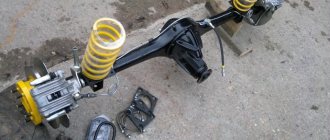
it’s not going anywhere now) One of the most global works fell on the rear axle stocking... All standard welded places were welded and additionally reinforced with overlays made of greasy metal. Plus, we welded and, of course, effortlessly made tall houses under the short bridge rods.
This time I decided to play with the suspensions, to try out the experience of my comrades in action) We also tried on the second rear shock absorbers and cut out places in the floor for them.
And I completely forgot about the beam with through bolts, because this is a classic of tuning classics)))
Well, for one thing they bent the side of the tunnel in the other direction, so that it would be easier to remove the starter))) Well, that’s how the colossal work of welding the body is described in a nutshell)))
Source
We strengthen the car body with the help of special amplifiers
As practice shows, the stiffer and stronger the body, the better the car’s handling characteristics, as well as the characteristics of its chassis. One of the effective ways to make the body of certain VAZ models is to install a spatial racing frame or a special stretching of the rear supports.
There is also another option to make the car body more rigid, for example, using a special body reinforcement. By the way, according to leading experts, this option is considered the most effective, and at the same time has good compatibility with VAZ brand models.
Body structure of the VAZ 2101
Before we begin tuning the body of the VAZ 2101, I consider it necessary to take a detailed look at this most important part of our vehicle.
So, the body of the VAZ 2101 is a rigid spatial truss made of steel, which consists of sequentially assembled, non-separable elements:
| 1 | Base (bottom) assembled with front part and rear panel |
| 2 | "Plumage" of the front part |
| 3 | The left and right sidewalls are in line with the rear “tail” |
| 4 | Roof |
The base is a trough-shaped, all-stamped panel with a tunnel in the center. The tunnel has two functions:
Spar* is a stamped steel beam with a box-shaped section.
Profile view
In the front part they are combined into a single whole:
The rear section also contains mudguards and a luggage compartment panel.
Side view
The left and right sidewalls consist of outer and inner panels connected to each other:
View from above
And finally, the all-stamped structure, reinforced with cross members, is called the roof of the car.
The elements of the body shell are made by stamping from thin sheet steel. The low weight, high strength and durability of such a design fully comply with the basic requirements of the functionality inherent in it.
Next, its removable elements are mounted to this resulting one-piece welded body:
But there is no point in flattery going into extraneous “wilds”; let’s continue the conversation about strengthening the body of classic vases.
How to install a body amplifier with your own hands
After installing a body amplifier, the stability of the car when driving on not entirely smooth roads in our country, as well as at high speeds, increases significantly. You can increase the rigidity of the engine mounting bracket using a set of supports - “Sport”. After installing this kit, the movement of the power unit during operation is significantly reduced, the amplitude of engine vibrations is also reduced, this helps improve gear shifting. This kit is recommended for installation on sports cars, as well as models that are in the process of tuning.
The rigidity of the bracket is increased thanks to the extension bracket - the so-called crab. Installing a crab involves the simultaneous installation of serial silent blocks, as well as silent blocks with increased rigidity made of polyurethane.
In order to increase the rigidity of the front suspension mounting points, as well as the suspension arms, an Autoproduct cross member is usually used. Due to this cross member, you can reduce the load on the car body by 25%. Using the Autoproduct cross member allows you to achieve an almost ideal balance between suspension stiffness and ride comfort. This combination is possible thanks to the original design of the silent blocks themselves.
The next option to strengthen the body structure is to install the front support of the power unit. Such a support will improve the dynamic qualities of the power plant suspension, this applies to a greater extent to maximum load conditions.
The box-section design will add rigidity to the bracket. The design of the support is shaped in such a way that the stronger the vibrations, the stiffer the structure itself will be.
To reduce the displacement of the rear suspension mounting cups, as well as the place where the rear beam is attached to the body, a rear strut is used for this. Thanks to this spacer, movement will be reduced by as much as 20%, while the overall torsional rigidity of the entire car body will increase by 5%. The installation of such stiffening struts will have a positive effect on the overall handling, as well as the stability of the car on bends, and therefore will increase safety. The lower strut allows you to reduce the movement of the front suspension arm bracket by more than three times.
Body reinforcement
Today, many motorists are wondering about strengthening the body. All the advantages of this operation can be explained using the example of a cardboard box from any model of household appliance. It is easy to tear it with your hands, but if you strengthen it at the corners with tape, the box turns into a durable thing that is not so easily dented.
Note. Diagnosing the condition of the “six” body is quite simple. You just need to jack up the car and check how the doors work in this position. If they jam, it's time to start upgrading.
Front and lower struts
Installing front struts is one of the common methods of strengthening. This tuning has a lot of advantages:
Selecting spacers for your “six” will also not present any difficulty. There are various models of these components available on the market. There are so many of them for every taste and color that it’s dizzying. It will be easy for each owner of a VAZ 2106 to choose front struts that are suitable in terms of parameters and price characteristics.
Note. Particular attention should be paid when choosing fastening elements, material and manufacturer.
Even an inexperienced owner can strengthen the “six” with front struts. The geometry of the car is simple, various elements are installed in several ways, without much complexity.
In addition to the usual front struts for reinforcement, there are also lower struts. Their installation will have a positive effect on the body, the handling characteristics of the “six” will increase, and road stability will improve. But the lower struts are quite difficult to install compared to the front ones, and not every car owner is capable of this.
Bottom and its reinforcement
We offer an option for strengthening the bottom of the VAZ 2106. It is suitable for beginners who are not “friendly” with welding. The process can be carried out in normal garage conditions. The method is not only simple, but also cheap. The price of consumables will not take much money out of the family budget.
We prepare the following materials and equipment:
Here's what to do:
Advice. Fixing the galvanizing should begin at one end of the floor to prevent the thin metal from bending.
That's it. The protruding ends of the bolts can also be cut off. The sheet of iron supplied must also be covered with mastic on top, trying to push it into the cracks (if any remain). The cost of this tuning will not exceed 1000 rubles, but the effect will be just right. A floor reinforced in this way will last longer than one that has been overcooked.
Content
VAZ 2107 is a classic of the Soviet automotive industry. The car is really good in many ways. But, unfortunately, it also has a lot of disadvantages, especially for domestic roads. And the main one is the soft suspension. On the one hand, this is good, because it absorbs bumps and the car is comfortable to drive. Plus, you get less stress on your spine. On the other hand, a soft suspension worsens the car's handling during maneuvers. And it is not particularly reliable.
As for the Classic specifically, it has always been and continues to be used as a workhorse. And an additional disadvantage of the soft suspension on this car is that with heavy loads on one of the axles, the car begins to “sag”. It gets to the point where the wheels begin to cling to the arches. When it comes to options for improving the suspension, there are many. If finances allow, you can contact tuning specialists and they will make significant improvements. If your budget is limited, you will have to do everything yourself.
The main points of tuning the VAZ 2107 suspension
The first thing you can do when upgrading the front suspension is to install a spring from a NIVA 2121. The fact is that such a maneuver does not require additional preparation, since the spring fits well into the VAZ 2107 scheme. In addition, this will allow you to obtain greater rigidity. It is worth noting that the same operation can be performed with the rear suspension. Some car enthusiasts cut off one or two turns to reduce ground clearance. Whether to do this or not is up to you. A lower ground clearance has its advantages and we will talk about them in this article. But there are also significant drawbacks.
The next step is to replace the standard shock absorbers. Here everything depends solely on your capabilities. If you want to save money, you can install fairly inexpensive Ikons. Installation of sports type Bilstein will cost more. But the effect will be much greater. The main rule when replacing shock absorbers on a Semerka is that they must be gas-oil. Their advantage is greater elasticity. What is the output? Such modernization will lead to the appearance of large rolls when cornering. To minimize them, they usually install new stabilizers with a higher degree of rigidity (as an option, you can pair a pair of factory ones on both sides).
Tuning and strengthening the body of the VAZ 2101
There is a large amount of body tuning that can be done on the VAZ 2101; the choice is based on only two factors: the further purpose of the car and the thickness of its owner’s wallet.
We will not delve into all the intricacies of the technological process, since when strengthening the body, a classic VAZ requires only imaginative thinking and hands growing from one place, we will discuss only some of the main, so to speak, basic options.
Front suspension strut
The universal front strut brace is designed to maintain the initial positions of the front suspension points during dynamic vehicle movement.
Strengthens the mudguard struts, which deform over time when the front suspension breaks down, thereby preventing and stopping the extrusion of the side members that has already begun, and increases the lateral rigidity of the body.
Installation of the spacer does not require any additional work; it is installed in the standard holes of the horizontal upper suspension mounts. At the same time, you additionally receive from 10 to 25% of the stiffness of the front glasses.
When tuning the body of a VAZ 2101, with the help of struts of this type (including in the rear), your car significantly reduces the risk of lateral skidding, which is very important when sliding sideways.
“Serious” guys have “richer” struts (see photo)
Rear suspension extension
Next we will talk about improving the rear suspension of the car, namely the Parnar rod.
As you remember, the purpose of this element is to prevent the rear axle from moving in a transverse direction to the body, while at the same time, without limiting its vertical movement in any way, it is a transverse rod fixed at one end to the body and the other to the bridge.
It is precisely from these lateral forces that the so-called “house” of the Parnar thrust is gradually deformed, which we will strengthen by welding a patch of 3 mm sheet iron.
Also, when actually performing body tuning on a VAZ 2101, the Watt mechanism can be considered an alternative to Parnar traction.
As can be seen in the photo, regardless of the suspension travel, the suspension with the Watt mechanism installed does not, unlike the Parnar rod, “pull” towards the rear suspension axle.
I would also like to offer another option for tuning the rear suspension of the VAZ 2101, namely installing an anti-roll bar and an A-arm.
This “upgrade” will allow us to reduce the car’s roll when cornering and make the rear suspension more rigid and predictable.
When installing a stabilizer bar, you do not need to have any special skills; the work is carried out in two stages:
It is also advisable to install an additional couple of longitudinal rods, for which we will need to make additional fastenings to the body and axle for each rod.
Now it’s time to replace the Parnar rod with an A-shaped lever, which fixes the rear axle in the center and prevents it from moving in both longitudinal and lateral control.
This element can be purchased, although it is quite simple to manufacture:
All that remains is to weld the pad for the ball onto the rear axle, exactly in the center:
After which the entire structure can be installed on the car.
Overlays. Headscarves
As a rule, rigid struts and tension bars work exclusively for compression, but we can make them work for torsion, for which purpose the cups and load angles are reinforced with special thick plates - gussets or overlays.
These elements can be used to strengthen the wheel arches...
...body stiffening ribs.
Scarves and overlays are very convenient and effective for restoring
sore spots of the VAZ 2101 body:
Places with formed cracks are restored by welding reinforcing linings cut from one-millimeter sheet steel. They are welded with an intermittent seam along the joint, while the reinforcing lining must follow the contour of the panel being restored.
Classic body strengthening
It is also important to strengthen the spar in the area of the pendulum and steering gear using a 10...15 mm plate and weld a reinforcement under the rear seat in the form of a two mm pad.
What else can be replaced in the VAZ 2107 suspension
Tuning the VAZ 2107 suspension should not be limited to work under the car. It is advisable to take care of improving the steering system. As an option - a steering column from Niva. It is possible to install an electric amplifier. But such work is best left to professionals. The point is that the equipment must be connected correctly. Doing this yourself is quite difficult. In addition, experts recommend paying attention to the brake system.
Installing disk drives will significantly improve the car's performance. Finally, all work can be completed by changing the tires and performing a wheel alignment. It is better to choose foreign tires. Both classic and low profile options are available. But it is worth remembering that the latter is good in terms of handling, although it reduces the level of driving comfort.
About the dangers of low clearance
Before you decide to make such drastic changes to your “Seven”, it is impossible not to mention the dangers that may await you on the road. Important information! Before you decide to lower your car's ride height, consider whether it's worth it. There are several points that we recommend paying attention to:
- the possibility of damage to important parts of the car when hitting potholes. At least you will visit the service station much more often;
- If the work is carried out by unqualified specialists, the car will very soon require additional cash injections.
The main options for reducing clearance
The first option, which is considered the most economical, is to shorten the standard springs. You can do this yourself or, if you don’t have the necessary tools and skills, entrust it to a novice specialist. This operation can be performed without removing the spring. It is important to remember that the springs are shortened by a different number of turns (front, for example, by two, and rear by three). This is due to the fact that the weight of the machine must be distributed evenly.
The advantage of this method is low costs. As for the disadvantages, these include the risk of breaking both the spring and the shock absorber. Another option is to purchase and install shortened springs. Such springs are often called sports springs. The main costs here are associated with the purchase of finished parts. The advantages of this method include the fact that you can return everything to its place at any time (after all, the standard springs are not shortened). In addition, you can carry out such an operation yourself. The only thing is, upon completion, you need to contact specialists to perform camber/alignment work.
You can also reduce the ground clearance using a coilover. These are the springs that allow you to adjust the ground clearance. This option is the most convenient, because even if you were not able to achieve the expected result the first time, you can always adjust the desired suspension height without having to buy new parts. The advantages of this method include the versatility of coilovers. They are installed with both sports and conventional shock absorbers. They are adjustable according to your wishes. Finally, they are quite easy to install yourself. As for the minuses, there is only one – the price of the issue.
Air suspension is another option to “pump up” the VAZ 2107. Moreover, this option is only suitable for true fans. The fact is that the cost of the package can reach tens of thousands of rubles. But for this money you will get your hands on a full-fledged tool for working with the suspension. Another disadvantage is the cost of the work. The fact is that such a suspension cannot be made in your garage. And it is also not recommended to entrust the installation of equipment to the first “specialist” you come across. The disadvantages include the fact that such a suspension can quickly fail on domestic roads.
The advantages of this option include the possibility of flexible regulation of ground clearance (in a range of up to five centimeters). If the system is installed correctly, you can adjust the ground clearance at any time at your discretion, depending, for example, on the type of road surface and terrain. Another important advantage is the ability to well support the maximum weight of the car. The machine does not sag even at its maximum load. In general, the ground clearance can be adjusted in the range from two to nine centimeters. You should not do more, as this carries certain risks. During the modification process, it is also recommended to install new boots and rebound buffers. In addition, experts advise changing the support bearings. And one more important point. All work on suspension must be approached responsibly. If you cannot perform some operation yourself, it is better to entrust it to professionals. Saving or doing something carelessly is inappropriate here. Any mistake can significantly affect handling.