A horn that does not function on a vehicle is a very dangerous condition.
It is especially unpleasant when the car owner finds out about this “surprise” at the most inopportune moment, which is an emergency maneuver on the road. For what reasons does the signal fail? Let's consider different options. There are several factors when the signal in the VAZ-2114 ceases to perform its function. Almost all of them relate to electrics and imply the usual lack of contact in the place where it should be.
Fuse blown
The easiest and first-priority check that should be carried out when the horn fails is the integrity of the fuse. So, if the latter actually burned out, therefore, in the 2114th VAZ model there is a short circuit. You need to try to install a complete fuse according to the rating. If it burns out again, it is possible that a short circuit has occurred. In the opposite situation, most likely, the fuse has simply exhausted its resource.
Why the cigarette lighter and radio do not work on the VAZ-2114
Some components that belong to the electrical system are interconnected, so drivers often have complaints that the cigarette lighter and radio in the VAZ-2114 car do not work at the same time ✔. Often the cause of a malfunction is the connection of devices whose power exceeds the permitted value.
The signal button in the VAZ-2114 refuses to work
Mostly in cars, the signal is turned on using a button located in the center of the steering wheel. Sometimes there may be options when the button is located in the steering column switch or in a certain position of the switch itself.
In reality, there are many places in the steering wheel where contact can disappear, as a result of which the signal will no longer work. To figure out where exactly they are located, it is worth understanding how the signal is turned on. All cars have a relay (in a separate category of VAZs there is no relay). In this case, the signal is connected directly via a button on the steering wheel. There are 2 electrical circuits:
- power;
- manager
The power one feeds the horn without coming to the car dealership, while the control one goes to the steering wheel. When the button is pressed, the regulating contacts of the relay begin to close, connecting the power circuit, and accordingly, the signal is triggered.
What to do if the scanner does not see the VAZ 2114 ECU
So, why doesn’t the scanner see the VAZ 2114 ECU? What should I do so that the device can connect and see the block? Today you can find many different adapters for testing a vehicle on sale.
If you buy an ELM327 Bluetooth, most likely you are trying to connect a low-quality device. Or rather, you could have purchased an adapter with an outdated version of the software.
Car diagnostics using a scanner
So, for what reasons does the device refuse to connect to the block:
- The adapter itself is of poor quality. Problems can be with both the device’s firmware and its hardware. If the main microcircuit is inoperative, it will be impossible to diagnose the engine operation, as well as connect to the computer.
- Bad connection cable. The cable may be broken or inoperative itself.
- The wrong version of the software is installed on the device, as a result of which it will not be possible to achieve synchronization (the author of the video about testing the device is Rus Radarov).
In this case, if you are the owner of a device with the correct firmware version 1.5, where all six of the six protocols are present, but the adapter does not connect to the ECU, there is a way out. You can connect to the unit using initialization strings, which allow the device to adapt to the commands of the machine’s motor control unit. In particular, we are talking about initialization lines for diagnostic utilities HobDrive and Torque for vehicles that use non-standard connection protocols.
Worn contacts in the 2114 VAZ model
On the steering column, the clamping contacts come into close contact with the slip ring while driving, so they wear out after a while. One way or another, there comes a period when they cannot reach the slip ring on the steering wheel, and then pressing the horn button does not produce any result. To avoid this situation, when removing the steering wheel for repairs, lubricate the contacts, as well as the steering wheel, with conductive lubricant, for example, graphite. This type of treatment can reduce contact friction and extend service life.
Functionality check
Before blaming the sensor for the malfunction of the reverse signals, make sure that the device has actually lost its functionality. To do this, run the diagnostics:
- Turn the wheels to the left all the way and look at the sensor from the driver’s side - there is a protection on the side of the gearbox, and contacts inside it;
- Remove this protection and inspect the device. There are also two contacts going to the sensor;
- Close the contacts on the frog limit switches (this is the same reverse sensor) and start the engine, engaging reverse gear;
- If everything is fine, the wires and contacts are working properly, then the white headlights will turn on;
- If the headlights do not light, use a tester to check the voltage on the wire (orange) and ground;
- If there is voltage, check the light bulb board and the quality of the contacts.
Causes of the problem and solutions
There are several most common reasons why the DZH fails. But there are countermeasures that can return the sensor to operation.
| Causes of the problem | Actions |
| The contacts on the wiring have oxidized | They just need to be thoroughly cleaned and returned. In this case, the negative terminal of the battery must be disconnected |
| The sensor is loose | As the sensor is used, it may move out of its seat. Screw it in tighter |
| There is no contact with the wiring in the gearbox | Check the condition of contacts and wires. Clean or replace damaged parts |
| There is no contact between the plug and the fuse box | Also check the condition of the contacts, clean them, change the wiring |
| Fuse blown | Here the situation can only be corrected by replacing the fuse |
In some situations, the sensor is working properly, the contacts are intact and the wiring is undamaged. In this case, the light bulbs themselves burned out. They are easy enough to replace.
Signal relay or wiring failure
So, the next category of signal damage factors is a failed relay or broken wiring.
The wires in the signal supply circuit are simply pinched, broken, or disconnected during repairs. Often, during reassembly, the wires are connected incorrectly or forgotten to do so altogether. It is necessary to make sure that the wires responsible for the operation of the sound signal are connected correctly. In some cars the signal is too low, so in the off-season it may end up in water and slush. In addition, the compositions with which the road surface is sprinkled to remove ice do their bad job. Under these conditions, the terminals on the horn itself oxidize and sometimes the wire rots. Therefore, it would not be a bad idea to check this place. If there is a signal activation relay on your VAZ-2114, you should carefully inspect it. You need to find the relay using the complete electrical diagram of your car, and then conduct an experiment. To do this, press the beep button and listen. If there is a click in the relay, it is probably working properly. In the opposite situation, it makes sense to check the voltage at the relay contacts when the signal is pressed.
troubleshooting
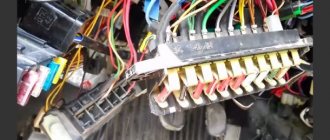
If you notice that the signal on the VAZ 2114 does not work, then the search for a breakdown should begin by checking the fuse. To do this, you will need to find fuse F7 in the common block and replace it with a new one, designed for the same amperage. If after this simple procedure the signal works, then the reason was precisely in the fuse. If not, then you should continue your search.
VAZ 2114 fuses
The next element that needs to be checked will be relay K6. It is located in the same general block. It should also be replaced with a new one (the cost of the relay is low - just over 150 rubles), and then the signal’s functionality should be checked.
It should be noted that trying to repair the relay is a practically useless task, since this element is made beyond repair. It will be cheaper and faster to replace it.
After replacing the relay has not yielded results, you should proceed to checking the sound signal itself.
There may be several reasons for its failure:
- The contact of the wire going from the signal to ground has oxidized.
- The contacts inside the signal have oxidized.
- The membrane is stuck.
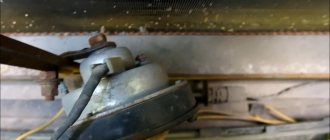
Checking the horn contacts
In the first case, you should check the wire going from the signal to the housing and, if necessary, clean its contact. Very often, such a simple operation helps restore the signal’s functionality without any additional manipulations. If, after cleaning, the signal to the VAZ 2114 still does not work, you will have to look for the reasons inside.
Sometimes it happens that moisture that gets inside the device condenses inside the signal and causes oxidation of its contacts. To eliminate this malfunction, you will need to unscrew the fastening screws, flare the cover and clean the contacts with fine sandpaper or kerosene. If you have no desire to perform such an operation, you will have to buy and install a new signal.
The third reason why the alarm device may not work is souring of the membrane, caused by moisture getting inside the housing. If this happens, then in most cases you will have to acquire a new signal, since it is almost impossible to restore the membrane.
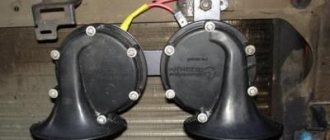
New sound signal
Before you run to buy a new “buzzer,” you should try spraying WD-40 or a similar analogue inside the housing of the soured signal. Sometimes this helps remove oxides from the membrane and restore its mobility, and therefore the sound.
If repair or replacement of the signal is unsuccessful, then all that remains is to check the functionality of its switch. To do this, check the position of the steering column switches. Sometimes it happens that they slide down, resulting in the contacts not touching their tracks.
Ringing signal wires
In addition, if the signal to the VAZ 2114 is lost, you should “ring” all the wires in its circuit, namely:
- from the switch to the common block;
- from a common block to a signal;
- from signal to ground;
- from the switch to ground.
By following all the steps listed above, you can be guaranteed to find and fix the problem with your car's horn. It is also worth noting that if the signal works, but poorly (“wheezes”), then it can be adjusted by smoothly rotating the adjusting screw located on the front side of its housing.
Horn failure
In the case when the relay makes clicks, you need to investigate the presence of current on the signal. You will need to work with a partner: one holds the button, the other measures the voltage at this time. Check with a regular tester or multimeter. The latter may produce low voltage. This will indicate oxidized contacts of the audio signal circuit or a short circuit.
However, when the voltage comes, and there are no oxides in the ground wire and a strong connection to the body, but the signal does not work, therefore, it has burned out. Here the signal must be replaced.
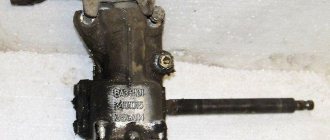
System diagnostics
If signs of damage are detected, there is no need to immediately remove and repair the MH. First, the spark plugs must be checked; to do this, they are removed from their sockets, and the high-voltage wires are first disconnected from the spark plugs. The spark plugs should be carefully inspected, cleaned of carbon and deposits, and then checked again.
Brown color is acceptable on these devices, but soot and carbon deposits are undesirable. If necessary, you also need to adjust the gap between the element itself and the electrodes. More detailed instructions for diagnosing the module yourself are given in the video below (the author of the video is Alexey Romanov).
How to quickly check the performance of the coil at home:
- Of course, the fastest and easiest way would be to install a unit that is known to work, but it is unlikely that anyone will carry a working spare device with them.
- While the engine is running, try tapping the coil. If you notice changes in the operation of the motor, this indicates that there is poor contact inside the device.
- The most accurate results can be obtained from diagnostics with a multimeter. You need to measure the resistance of the paired terminals of the coils, in particular the first and fourth, as well as the second and third. The parameter should be 5.4 kOhm; if the values differ, the device needs to be repaired or replaced.
Maybe it's all about the button?
If you have an "emergency" button on your remote control, you can use it to check if the signal circuit is working. If it causes the horn to sound, but the horn does not sound when you press the button, the problem is with the horn button or the wires from it to the relay. Every modern car has an emergency air bag (AIRBAG), which is located in the middle of the steering wheel. This pillow, if not handled correctly, can expand with deadly force. Even static electricity from clothing rubbing against the seat can cause it to go off. And the horn button (or horns) is usually attached to the top of the airbag housing. This means that you will need an experienced technician to remove the airbag for you and then reinstall it after the horn is repaired. He can test the airbag system to make sure it will work when it needs to and won't explode when no one is waiting. The emergency air bag must be removed to gain access to the current collectors or round spring that carries voltage up the rotating steering column from the relay to the horn button.
The clock spring allows the steering wheel to turn several turns while maintaining an electrical connection to the vehicle's wiring system.
If you need to access it, we recommend that you seek the assistance of a service technician who has practical skills and operating instructions that describe this procedure in detail. By the way, a faulty round spring that accidentally shorts to ground most often causes the sound signal to sound randomly on its own. On older cars, you can do the following: clamp the wire from the horn button near the relay, overlap an additional wire to it (and wrap the splice with electrical tape). Run the additional wire to a separate universal horn button, which you can install on the instrument panel or console. It doesn't look very nice, and you'll have to remember that the button is now in a different place, but it only costs a few tens of rubles.
Published: August 15, 2014
Causes of malfunctions
The fan may not turn on for the following reasons:
- the fan drive (electric motor) is faulty;
- fuse is blown;
- the relay has failed;
- broken electrical wiring;
- lack of contact in the temperature sensor connector;
- The temperature sensor is faulty.
Search for reasons
Diagnosis of a fan malfunction should begin with the fan itself. To do this, disconnect the connector on the fan and connect it, observing the polarity, directly to the battery terminals. If it turns on, it means the drive is working, the reason needs to be looked for further. If the fan does not work, this is the reason. But let's take things in order.
The fan did not turn on. We check the integrity of the wiring and the condition of the contacts on the sensor. If everything is in order, we move on to the fuse and fan relay. They are located under the hood on the left side closer to the driver, in the mounting block.
Fuse F4 is 20A, double, for the sound signal and the cooling fan (it is very easy to check; if there is no sound signal and the fan does not work, then most likely it is the culprit).
You can check the fuse with an ordinary autotester. With relays the situation is more complicated. To make sure that this is not the case, it is better to get a one hundred percent working relay somewhere and temporarily install it in the socket for testing. If the fan does not work even with it, we go to the sensor.
If the sensor is de-energized, the controller must start the fan in emergency mode for constant blowing. Disconnect the connector from it and turn on the ignition. Turning on the fan will indicate that the sensor has failed and requires replacement.
When is it necessary to change a fan?
If the cause is still in the fan itself, you can try to repair it. The problem is usually the brushes or bearings. But it also happens that the electric motor fails due to a short circuit or break in the windings. In such cases, it is better not to experiment and replace the entire drive.
It is strictly forbidden to operate a vehicle with a non-working cooling fan. Overheating of the coolant will inevitably lead to the destruction of rubber pipes and hoses, as well as cylinder head gaskets and valve covers. In addition, high engine temperature can cause destruction of the piston group elements.
Replacing the signal on Kia Rio
In order for the new signal to work well on your Kia Rio, you need to choose the right model that you will install; it must fit exactly in size. Usually, installation instructions are included with the audio equipment kit. As a rule, all signals are installed according to almost the same principle. If you have seen how the horn is replaced, you can probably repeat the process yourself.
The location of the sound device is between the radiator trim and the engine radiator or the air conditioning condenser, if the Kia Rio has one. Mounting to the body is via a bracket.
Procedure (if you have to work in cold weather, it is recommended to pre-warm the engine so as not to damage the lining):
- use a 10mm wrench to unscrew the bolts (4 pcs.) securing the radiator trim;
- lift the radiator trim and, using the same key, unscrew the 2 bolts securing the horn bracket;
- disconnect the wire block from the signal, first pressing the latch;
- remove the sound signal along with the bracket from under the bumper trim;
- unscrew the bolt with a 10mm head and separate the device from the bracket;
- We install a new signal in reverse order.
The device should be connected to a current source (according to the instructions!) and to ground. The weight of the device is at least 30 kg, it is attached to the body of a car, which is 10 times heavier.
Don't forget to make sure that the machine is compatible with a battery before purchasing it. In other words, check to see if the battery can supply power to the horn. Keep in mind that the battery will drain much faster if you decide to combine different beeps - models that provide this consume up to 25 A.
When choosing a more powerful horn for a Kia Rio than one that no longer works, pay attention to the sound insulation of the car; it should be sufficient so that the driver does not experience discomfort, perceiving the sound in the same way as people on the road.
Among other things, the signal that works on Kia Rio cars must comply with medical requirements and GOST standards:
- do not exceed the frequency of 440 Hz, so as not to harm the health of others;
- do not imitate the sound of the horn of special law enforcement vehicles or ambulances, so as not to mislead others and not create confusion on the roads;
- the sound produced must be monotonous and continuous (according to GOST R 41.28-99 (UNECE Rules No. 28)).
Fuse OK
Now you need a 12-volt diagnostic light or voltmeter. You should also find the owner's manual, or at least a graphical representation of the signal's electrical circuit.
Start by checking the 12 volt signal connector.
Using a simple voltmeter, examine the horn connector to see if there is 12 volts when the horn button is pressed and the ignition is on.
One leg of the circuit is supported by a car metal frame, so you need to check between a good ground point and the wiring connector to the signal. If there is no voltage at the connector, check the signal relay.
Check the 12-volt voltage at the signal relay when the ignition is on. 1 – diagnostic lamp. 2 – signal relay connector.
The horn relay switches high voltage current to horns when signaled by a low voltage current button in the steering wheel. This is a simple, single throw, single throw (SPST) relay packaged in a small metal or plastic box with five spade terminal connectors. If you're unlucky, your engine has a relay that's built into a larger fuse box that also controls several other functions on your vehicle, such as the headlights or turn signals. This part is much more expensive. Consult your owner's manual for where the relay is located, as it, like the fuse box, can be located almost anywhere under the hood or under the dash - and not necessarily near the fuse box.
The horn relay increases the low voltage coming from the horn button to the higher voltage needed to operate the horn. 1 – battery. 2 – sound signal. 3 – closed contacts. 4 – signal button. 5 – relay coil. 6 – relay.
A simple SPST relay would have a constant 12 volt supply to it, a lead wire that goes through the wiring harness to the horn, another lead wire that goes to the horn switch in the steering wheel, and a ground. Check that voltage is entering the two terminals of the relay and leaving it through the other two terminals when you press the switch. If not, try grounding the lead wire that goes to the horn button to force the relay to pull in. If the horn buzzes, the relay is good, but the horn button or wiring is faulty. You can simply replace the relay if it is the problem. Otherwise, you will have to do some serious diagnostic work to find the open circuit.
How to connect via relay. Scheme
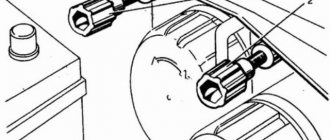
At home, we will first prepare the mounting of signals from the Volga based on a steel angle purchased at any building materials store. For example, I recently gave a car I had made to a man, and over time his signal stopped working.
I connected the power to the standard signal circuit, there is a 16A fuse there, in addition to the signal from this fuse, the rear brake lights and interior lamps are powered, all of which are LEDs. Well, somehow it’s not solid.
Take it and connect!!! Everything turned out perfect.
In this case, the contacts close, which again leads to the passage of current through the winding. The wires to the fog lights come from the fuse box, but they go through a relay along the way. The signal worked in such a way that my ears remembered this sound for a long time... That's all.
All powerful consumers of electricity in the car, such as headlights, starter, fuel pump, heated rear window, electric power steering, are connected through a relay. With this anchor, the rod that bends the membrane begins to move, and thanks to the nut, the contacts open, which helps interrupt the electrical circuit.
The horn winding is burnt out. Let's look at installing a relay using the example of a gas pump. I connected the power to the standard signal circuit, there is a 16A fuse there, in addition to the signal from this fuse, the rear brake lights and interior lamps are powered, all of which are LEDs. I used the plates that held the old stock signal in place.
We recommend: How and which one is better to install a hood lock?
Using this circuit, you can connect almost any powerful device and control it with a small, beautiful key. You can adjust the sound of signals from the Volga by rotating the special. Additional signal switching relay We fix the ground wire of the relay, contact 86, under the flange of the relay mounting to the car body through a castle washer to ensure electrical contact, having previously installed a tip with a fastening eye on the wire. For everyone else, the diagram is below.
As a result, numerical values should appear on the display. In order for the signals to fit, you need to file the “pipes” a little on the sandpaper. In some cases, a relay can be a salvation from factory defects. The upper trim on the radiator grille can be installed without any problems. How to install a horn on a VAZ 21102 via a relay
Signal diagram
Before you start talking about finding and fixing this malfunction, you should first talk about the electrical circuit of the signal (after all, without knowing it, it will be difficult to carry out repair work).
It is immediately worth noting that the electrical circuit of the sound signal is quite simple and includes:
You can study the circuit diagram of the device in more detail using the following drawing: